SAML Integration
Introduction
nevisAdmin 4 supports secure authentication with SAML. This is the recommended setup for enterprises that want to control access to nevisAdmin 4 in a centralized way, or enable second factor authentication.
When SAML is configured, nevisAdmin 4 creates users in its database as soon as they log in. During the login process, nevisAdmin 4 also updates the user's group memberships and attributes within the database.
The main steps to integrate SAML are as follows:
- Prepare the Identity Provider to integrate with nevisAdmin 4. See the Microsoft Entra ID setup as an example.
- Follow the steps below.
Change the Configuration
The settings below are configured in /var/opt/nevisadmin4/conf/nevisadmin4.yml.
Restart nevisAdmin 4 after making changes to the nevisadmin4.yml file:
nevisadmin4 stopService
nevisadmin4 startService
Enable SAML Authentication
Enable the saml profile in /var/opt/nevisadmin4/conf/env.conf by extending the JAVA_OPTS.
-Dnevisadmin.profiles=jpa,mariadb,saml,health
Apply the below settings to enable authentication against an Identity Provider. These properties can be found in the default configuration file /var/opt/nevisadmin4/conf/nevisadmin4.yml.
nevisadmin:
  saml:
    idp:
      metadata-uri: https://login.microsoftonline.com/...
    sp:
      private-key: file:/var/opt/nevisadmin4/keys/saml.key
      certificate: file:/var/opt/nevisadmin4/keys/saml.crt
Create service provider key material
openssl req -nodes -x509 -newkey rsa:4096 -keyout saml.key -out saml.crt -sha256 -days 3650
Default admin group
In SAML authentication the login with local users are not allowed, therefore the local admin user neither can login.
Enabling the saml profile automatically creates a group named __admin on start-up. This group has the same permissions as the local admin user.
The __admin group can be assigned to users via assertion attributes. See it in the next chapters.
Synchronization During Login
nevisAdmin 4 creates users in its database as soon as they log in. Based on the provided attribute mappings, nevisAdmin 4 then extracts the following user attributes:
- userKey
- groupKeys
- first name
- last name
The default attribute names correspond to the SAML attribute names used by Microsoft Entra ID (formerly Azure AD), but they can be overwritten with nevisadmin.saml.attribute.* properties:
nevisadmin:
  saml:
    attribute:
      user-key: http://schemas.xmlsoap.org/ws/2005/05/identity/claims/emailaddress
      group-keys: http://schemas.microsoft.com/ws/2008/06/identity/claims/role
      email: http://schemas.xmlsoap.org/ws/2005/05/identity/claims/emailaddress
      first-name: http://schemas.xmlsoap.org/ws/2005/05/identity/claims/givenname
      last-name: http://schemas.xmlsoap.org/ws/2005/05/identity/claims/surname
group-keys names the single assertion attribute whose values are used directly as nevisAdmin 4 group names. This works when your IdP is configured to include the exact nevisAdmin 4 group name (for example __admin) as a role or group value in the assertion.
If the assertion values do not match nevisAdmin 4 group names — for example because your IdP sends generic application roles like nevisAdmin.integrator — use the role-to-group mapping feature described below instead.
IdP Metadata Truststore
Available in rolling release 9.2605.2 and later, and in LTS26.
By default, nevisAdmin 4 uses the JVM default CA bundle to verify the TLS connection when fetching the IdP metadata. If your Identity Provider uses a certificate issued by a private or internal CA, configure a custom truststore.
nevisadmin:
  saml:
    idp:
      trust-store: file:/var/opt/nevisadmin4/keys/idp-truststore.p12
      trust-store-password: changeit
      trust-store-type: PKCS12
The trust-store property accepts Spring resource paths (for example, file: or classpath:).
To avoid a plaintext password in nevisadmin4.yml, set the environment variable NEVIS_SAML_IDP_TRUSTSTORE_PASSPHRASE instead of trust-store-password.
The custom truststore is merged with the JVM default CA bundle, so publicly trusted certificates continue to work alongside the custom CA.
nevisAdmin 4 refreshes the IdP metadata periodically in the background (default: every hour). If a refresh attempt fails, a warning is logged and nevisAdmin 4 continues using the previous metadata — running sessions are not interrupted. To change the interval (only takes effect when trust-store is configured), set nevisadmin.saml.idp.metadata-refresh-interval (in milliseconds, default 3600000).
To disable hostname verification — for example in a non-production environment — set:
nevisadmin:
  saml:
    idp:
      hostname-verification:
        enabled: false
This setting only takes effect when trust-store is also configured.
For Kubernetes deployments, see nevisAdmin4.saml.idp.trustStoreSecret.
Role-to-Group Mapping
Available in rolling release 9.2605.2 and later, and in LTS26.
Use this feature when the values in the SAML assertion do not directly match nevisAdmin 4 group names. Instead of expecting the assertion to carry exact group names, you name the assertion attribute that holds roles (roles-key) and define an explicit map from nevisAdmin 4 group keys to the role values that grant membership (role-mappings).
Configure the assertion attribute and the mapping:
nevisadmin:
  saml:
    attribute:
      roles-key: http://schemas.microsoft.com/ws/2008/06/identity/claims/role
      role-mappings:
        __admin:
          - nevisAdmin.admin
          - nevisAdmin.integrator
        operators:
          - nevisAdmin.operations
In this example, any user whose SAML assertion contains the role value nevisAdmin.admin or nevisAdmin.integrator is added to the __admin group. The role value nevisAdmin.operations grants membership in operators.
The __admin group is created automatically on startup. Any other group referenced in role-mappings (such as operators above) must be created beforehand, for example through the nevisAdmin 4 UI or REST API.
Groups resolved from role-mappings are merged (union) with groups resolved from group-keys. Roles that have no matching entry in role-mappings are silently ignored.
For Kubernetes deployments, add roles-key and role-mappings as sub-keys under nevisAdmin4.saml.attribute in values.yaml. See nevisAdmin4.saml.attribute.
Supported SAML Properties
See nevisadmin.saml.* properties in Configuration Properties in the nevisadmin4.yml File.
Troubleshooting
Logging
To debug your SAML setup, perform the following steps:
-
Add the lines from the next code block to the
logback.xmlfile. You find this file at/var/opt/nevisadmin4/conf/logback.xml.<logger name="ch.nevis.admin.v4.infra.spring.rest.util.SAMLAuthenticationSuccessHandler" level="debug" additivity="false"><appender-ref ref="STDOUT" /><appender-ref ref="FILE" /></logger><logger name="ch.nevis.admin.v4.infra.spring.rest.util.SAMLUserInfoFilter" level="debug" additivity="false"><appender-ref ref="STDOUT" /><appender-ref ref="FILE" /></logger><logger name="ch.nevis.admin.v4.infra.spring.rest.util.SAMLAssertionValidator" level="debug" additivity="false"><appender-ref ref="STDOUT" /><appender-ref ref="FILE" /></logger><logger name="org.springframework.security" level="debug" additivity="false" ><appender-ref ref="STDOUT" /><appender-ref ref="FILE" /></logger>Configuration is automatically synchronized every 5 seconds.
-
Try to log in with a SAML account.
-
Check the nevisAdmin 4 log file, which you find at
/var/opt/nevisadmin4/logs/nevisadmin4.log.
Identity Provider metadata change
If the Identity provider's metadata value is changed then nevisAdmin 4 has to be restarted to pick up the new configuration on startup.
For example: when the Identity Provider's certificate expires and needs be renewed.
Microsoft Entra ID setup
Note: this is only an example configuration, you may use any identity provider.
Prerequisites
- Sign in to your Azure Account through the Azure portal.
- Select Azure Active Directory.
Create an application with Microsoft Entra ID
-
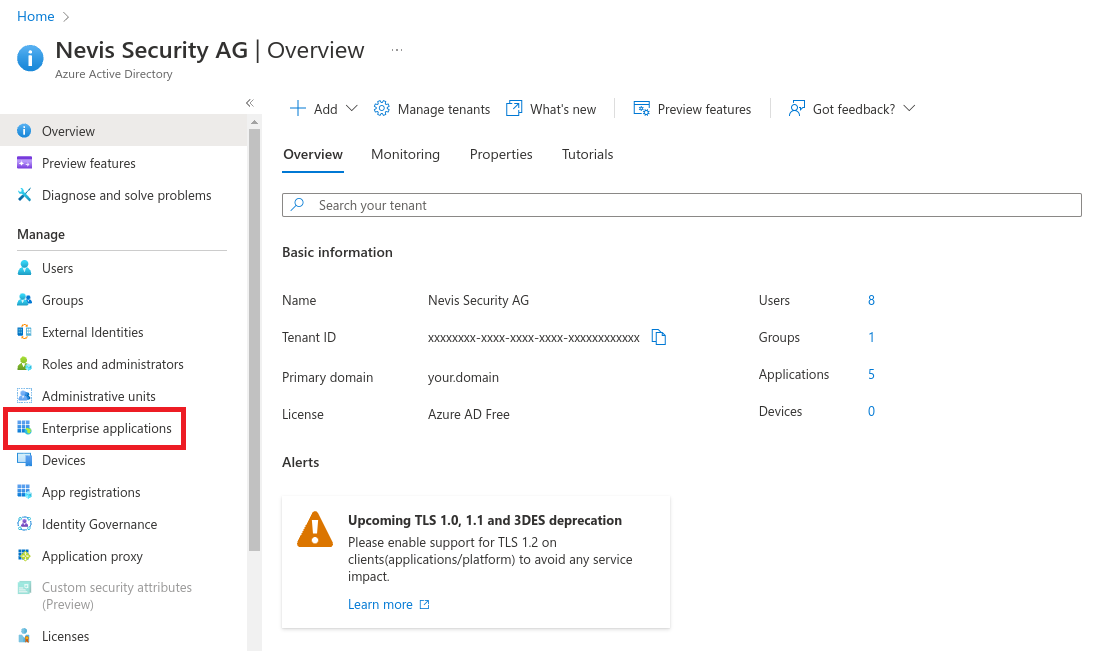
Select Enterprise applications.
-
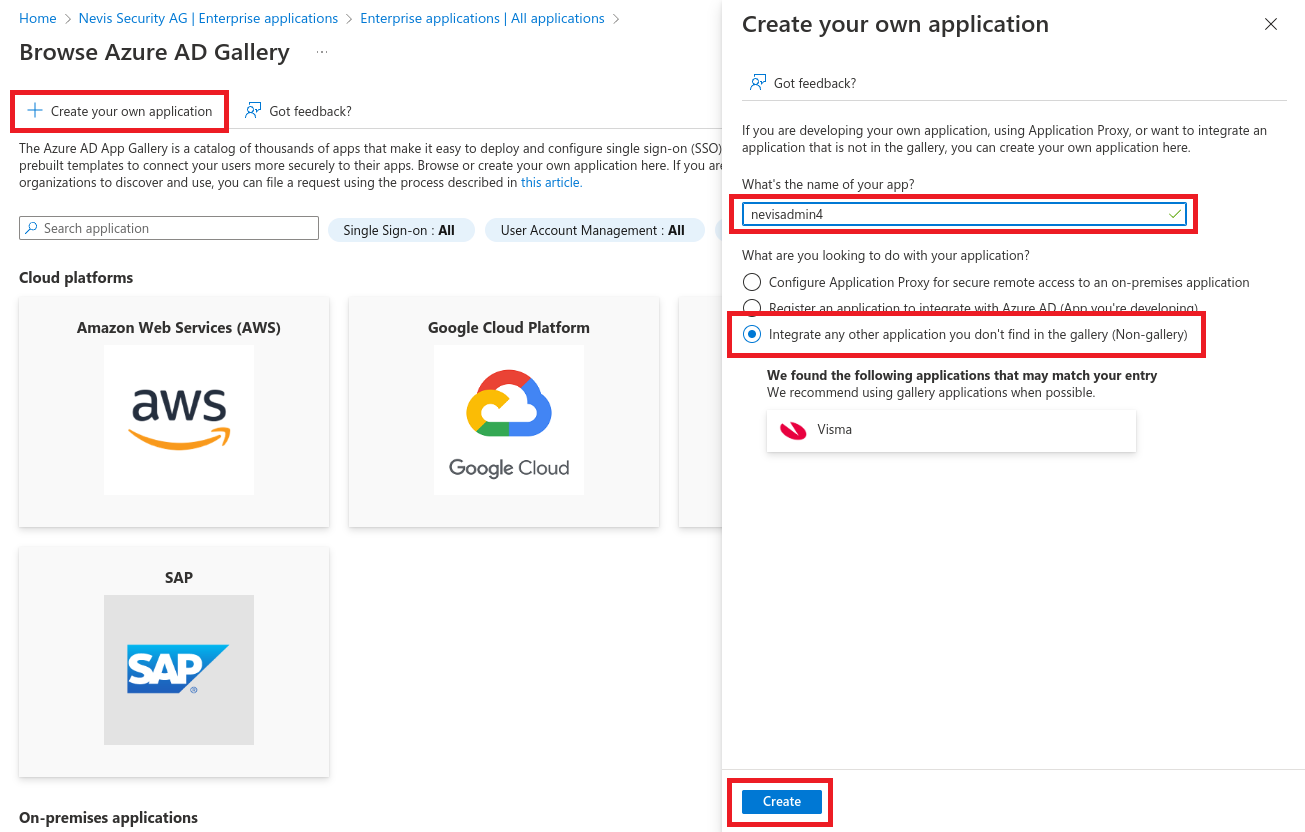
Select New application.
-
Select Create your own application.
Create Application Roles
-
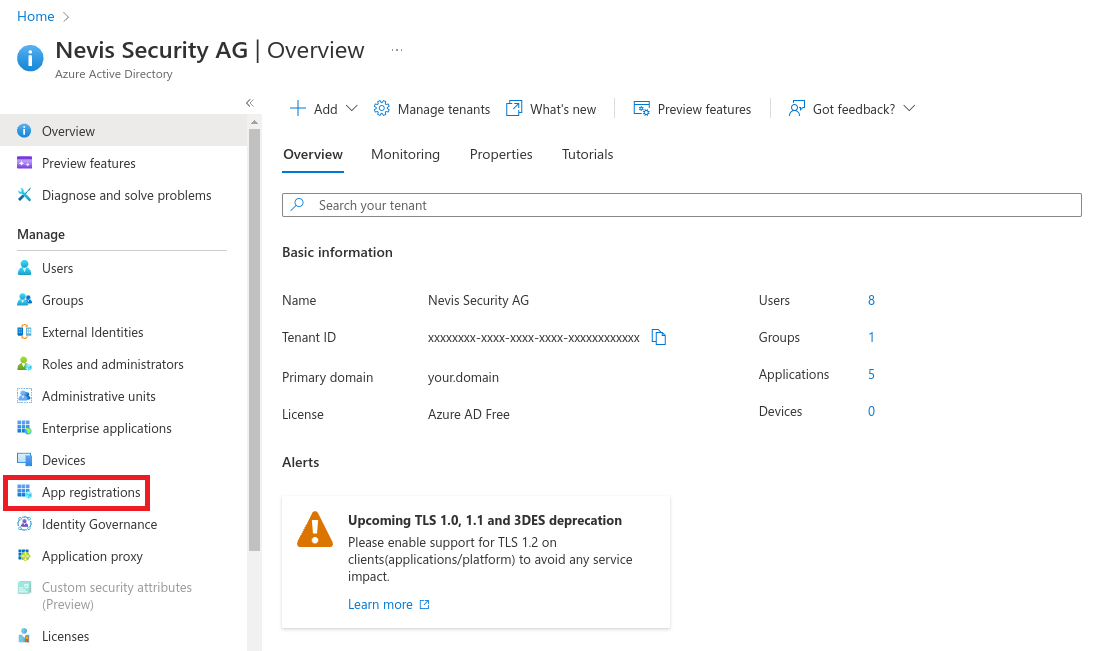
Select App registrations.
-
Navigate to All applications > nevisadmin4 > App roles.
-
Select Create app role.
-
Create Admin role with value
__admin(double-underscore). The__admingroup is available by default in nevisAdmin 4 and must be used for initial setup.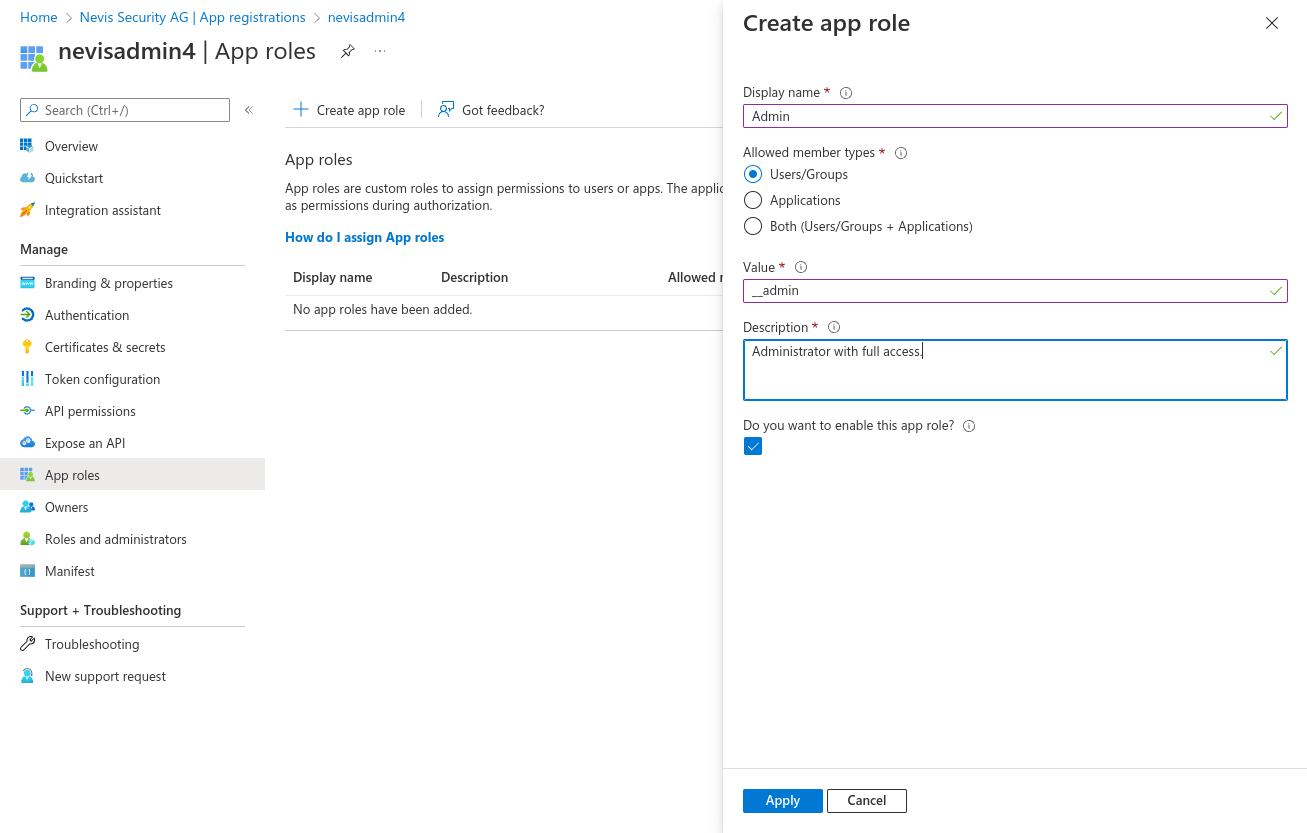
Assign Users and Roles
-
Navigate to Enterprise applications > nevisadmin4 > Users and groups.
-
Select Add user/group.
-
Choose users then click Select.
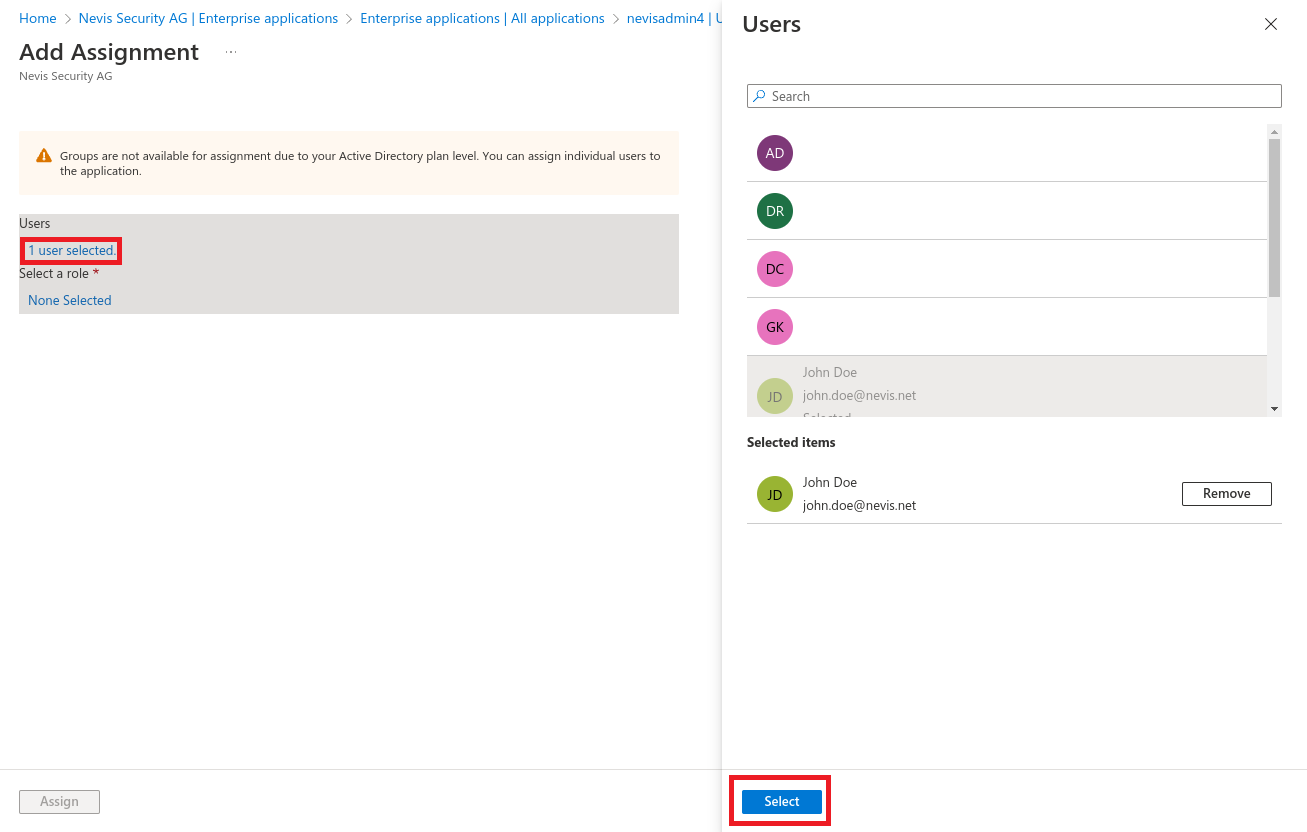
-
Select Roles
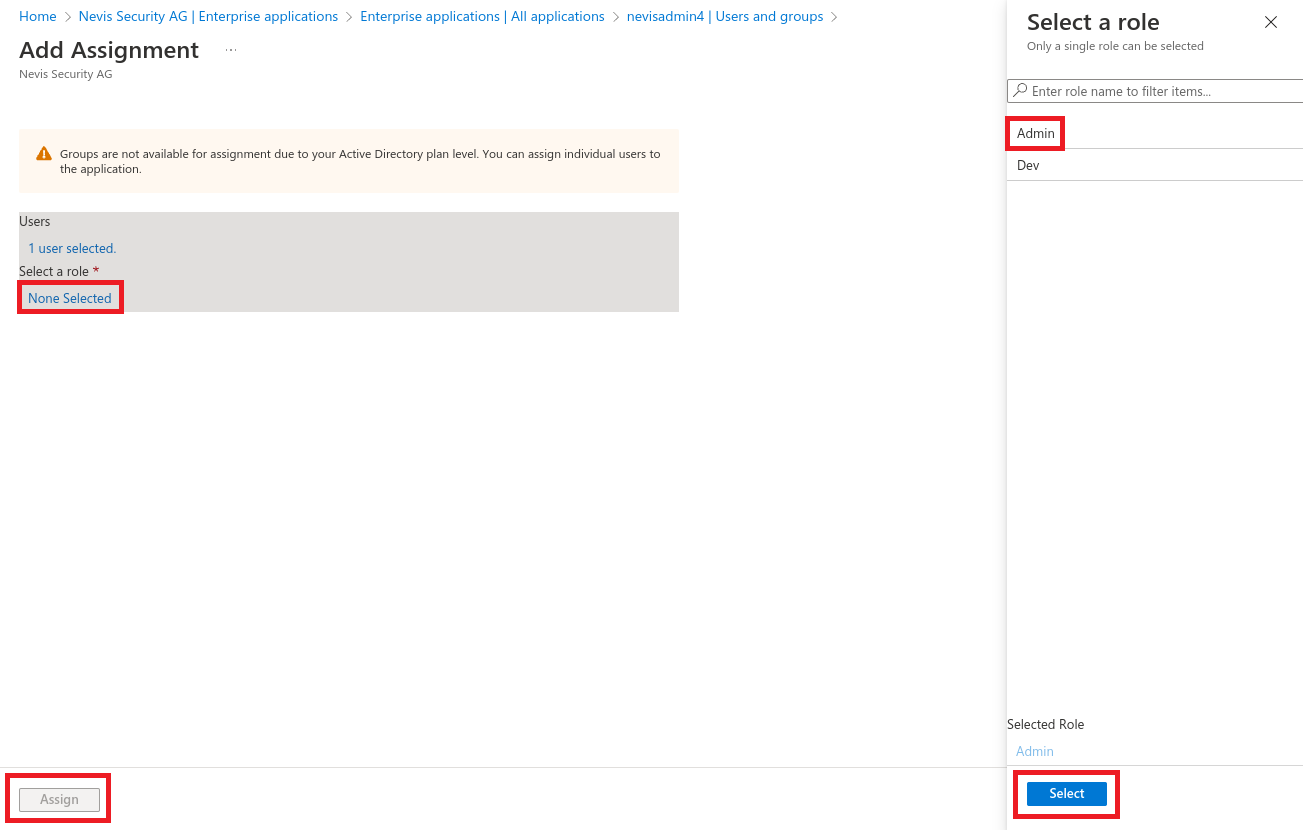
Enable Single sign-on
-
Navigate to Enterprise applications > nevisadmin4 > Single sign-on > SAML.
-
Edit the Basic SAML Configuration.
Url templates:
https://{your.domain}/nevisadmin/saml2/service-provider-metadata/nevisadminhttps://{your.domain}/nevisadmin/login/saml2/sso/nevisadmin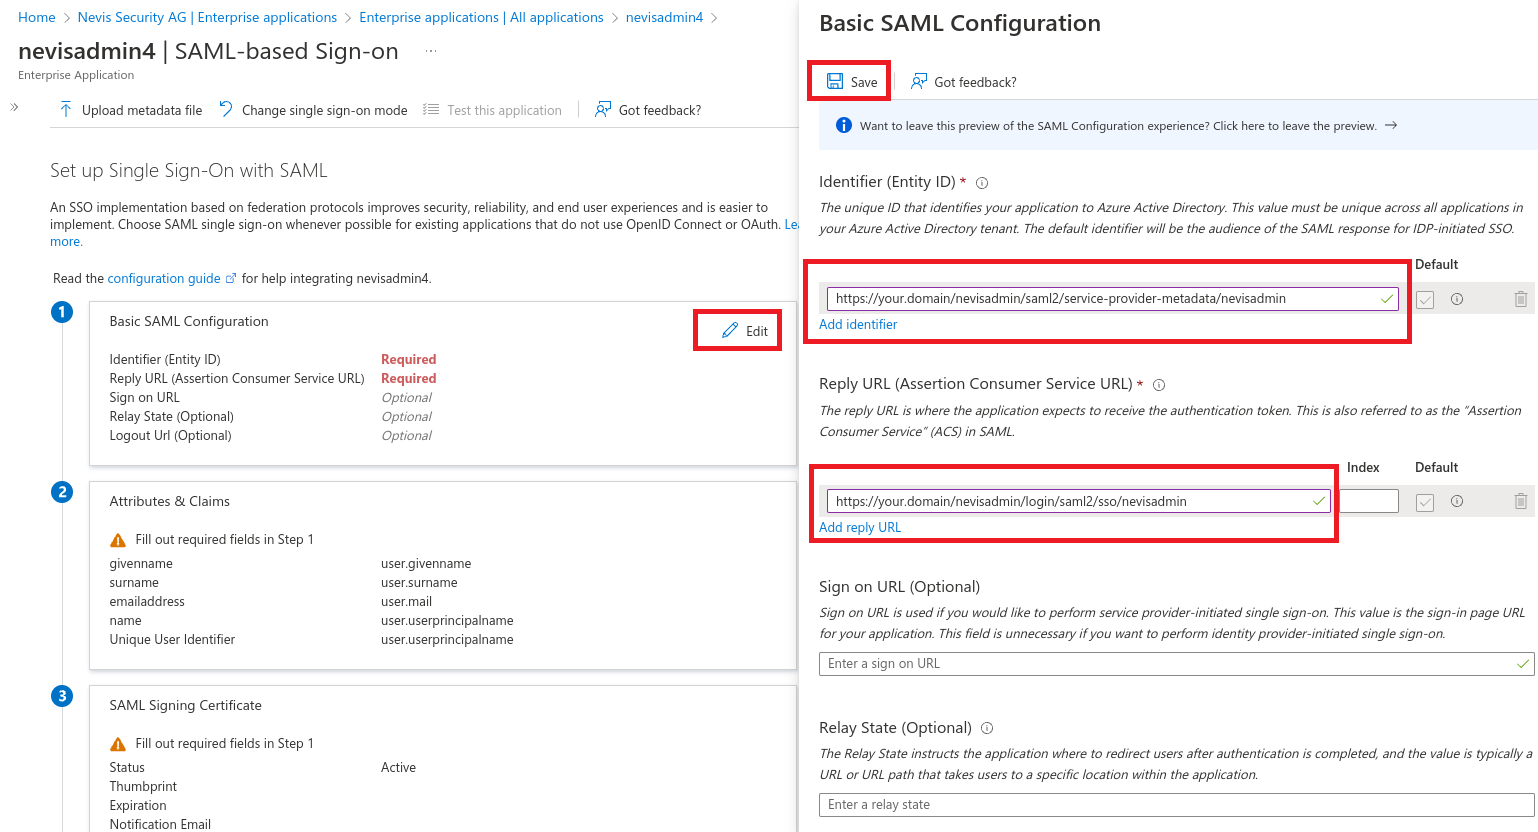
-
Copy the App Federation Metadata Url and set it as
nevisadmin.saml.idp.metadata-uriin thenevisadmin4.ymlfile.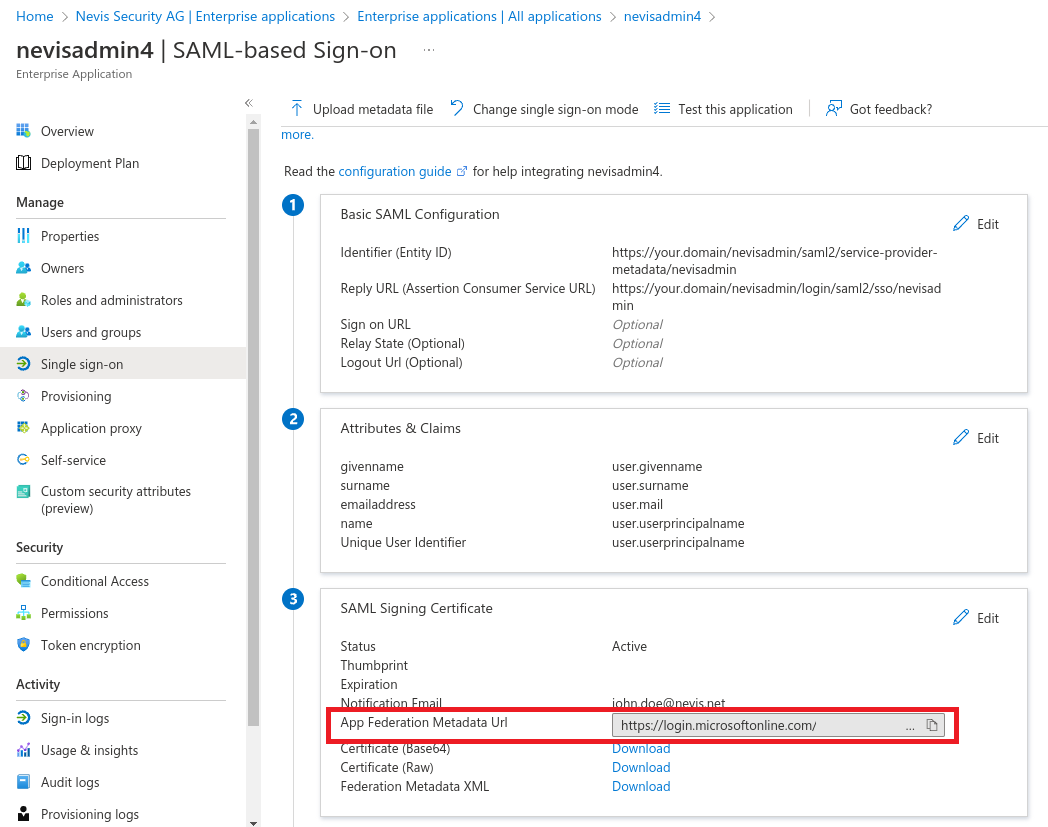
Custom userKey attribute (optional)
By default the email address is used as userKey in nevisAdmin 4.
There are multiple ways to customize it.
- See the official Azure documentation about how to customize claims issued in the SAML token for enterprise applications.
- Use your own attribute extension. See below.
Create Attribute extension
Run Windows PowerShell as administrator
#Install AzureAD module if not available yet
Install-Module AzureAD
Import-Module AzureAD

#Set TenantId
$TenantId = "xxxxxxxx-xxxx-xxxx-xxxx-xxxxxxxxxxxxx"

#Connect to your Microsoft Entra ID tenant
Connect-AzureAD -TenantId $TenantId

#Search for the nevisadmin4 application to determine the ObjectId
Get-AzureADApplication -SearchString "nevisadmin4"

#Set Application ObjectId
$AppObjectId = "xxxxxxxx-xxxx-xxxx-xxxx-xxxxxxxxxxxxx"

#Create "userKey" extension property
New-AzureADApplicationExtensionProperty -ObjectId $AppObjectId -Name "userKey" -DataType "String" -TargetObjects "User"

#Set ExtensionName
$ExtensionName = "extension_xxxxxxxxxxxxxxxxxxxxxxxxxxxxxxxx_userKey"

#List users in your tenant to determine the ObjectId for your user
Get-AzureADUser

#Set User ObjectId
$UserObjectId = "xxxxxxxx-xxxx-xxxx-xxxx-xxxxxxxxxxxxx"

#Set a value for the extension property on the user.
Set-AzureADUserExtension -ObjectId $UserObjectId -ExtensionName $ExtensionName -ExtensionValue "your-custom-user-key"

#Verify that the attribute was added correctly.
Get-AzureADUser -ObjectId $UserObjectId | Select -ExpandProperty ExtensionProperty
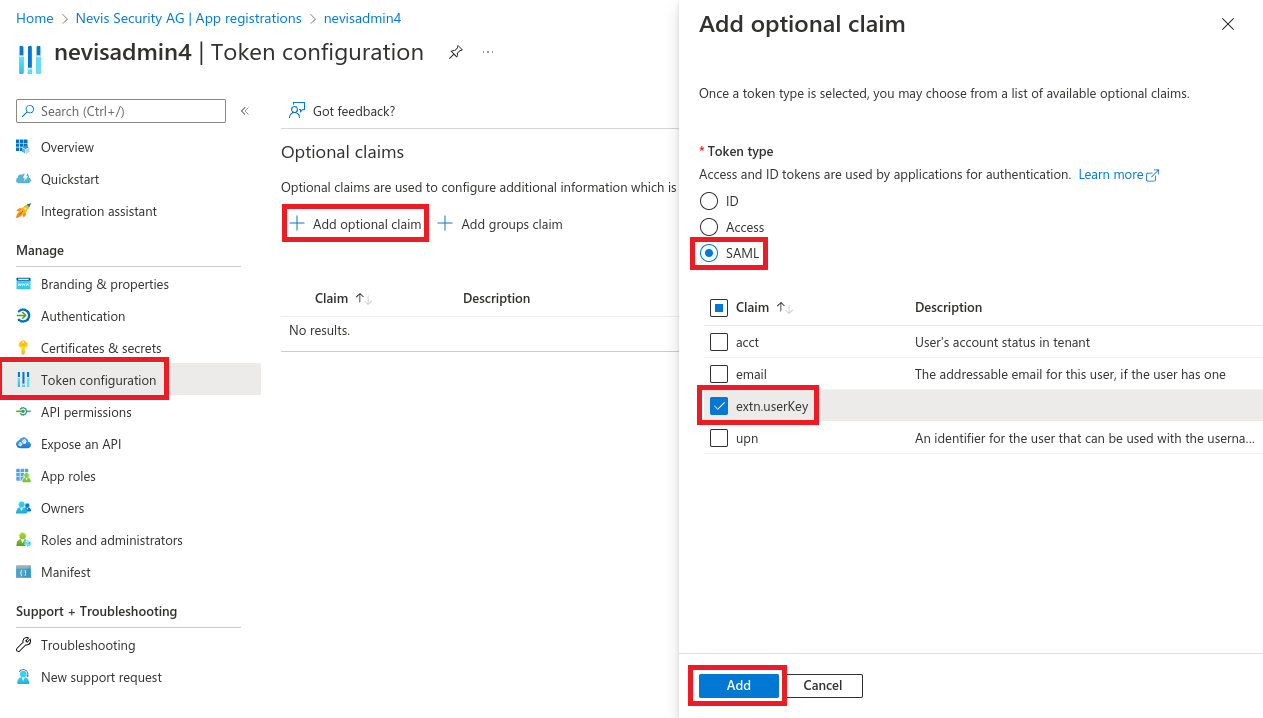
Configure optional claims
-
Navigate to App registrations > All applications > nevisadmin4 > Token configuration.
-
Select Add optional claim.
Define attribute mapping
nevisadmin4.yml snippet:
nevisadmin:
  saml:
    attribute:
      user-key: http://schemas.microsoft.com/identity/claims/extn.userKey