Installation and Authentication Setup
This page explains how to obtain the migration tool, configure its connection to NevisID, and verify the setup before running a migration.
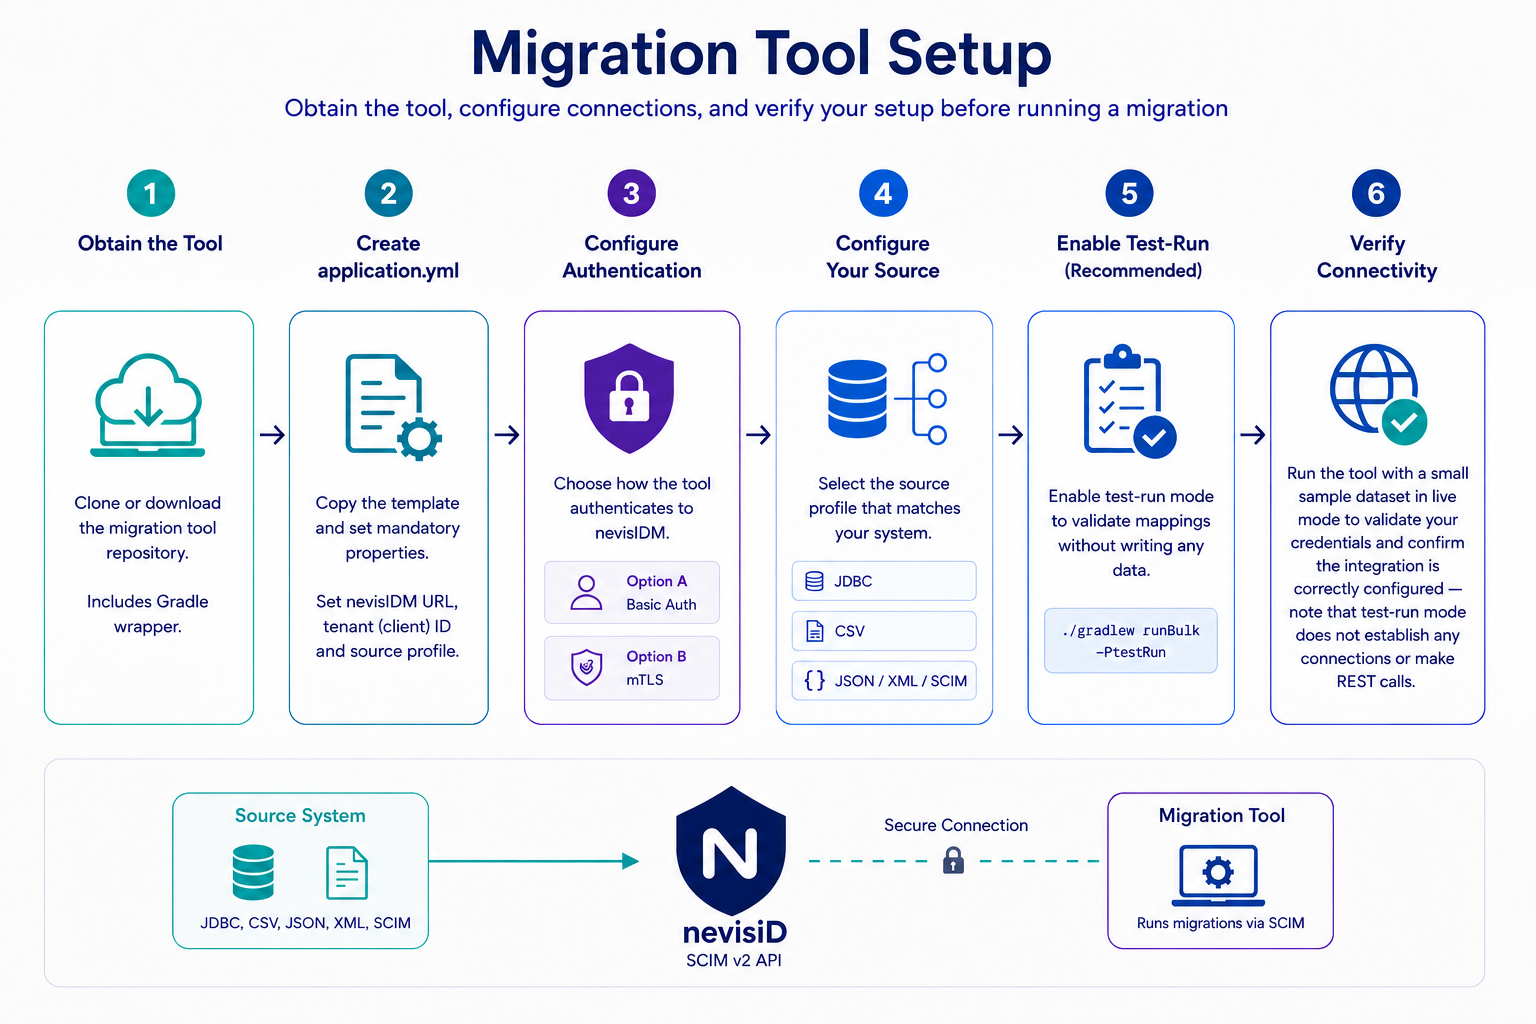
Step 1 - Obtain the tool
Clone or download the migration tool repository to a directory on the machine that will run the migrations. The repository includes a Gradle wrapper (gradlew / gradlew.bat), so no separate Gradle installation is needed.
git clone <repository-url> nevisidm-migration
cd nevisidm-migration
Step 2 - Create your application.yml
Update the values in the provided application.yml file to match your environment.
cp config/application.yml.template config/application.yml
Set the following mandatory properties:
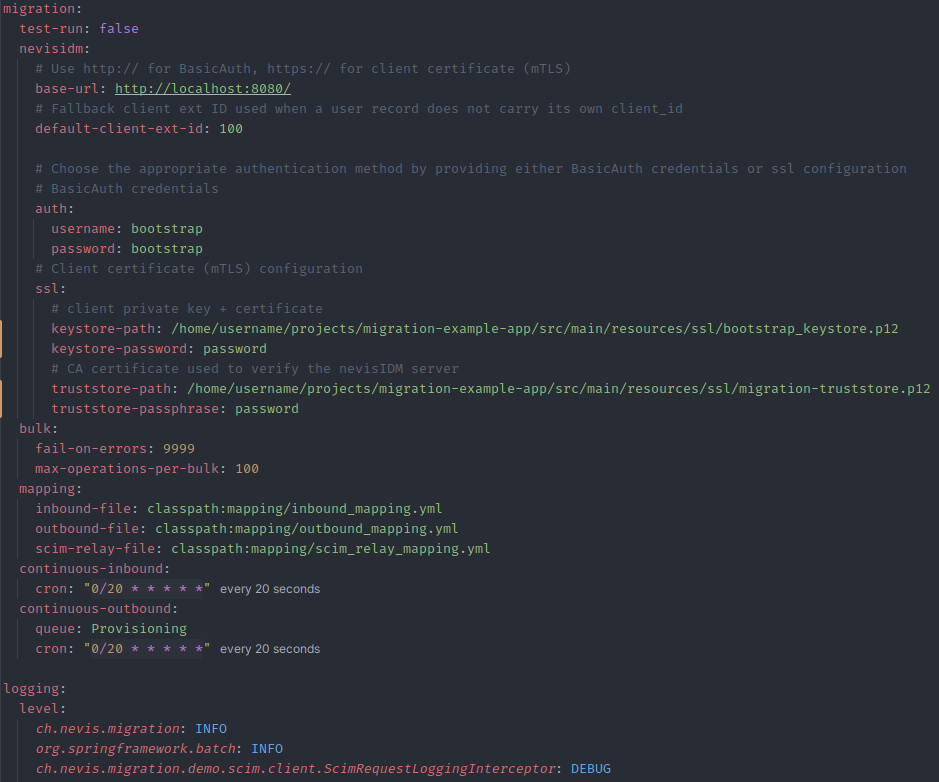
migration:
  nevisidm:
    base-url: https://idm.example.com/
    default-client-ext-id: my-client-ext-id   # nevisIDM tenant identifier
Step 3 - Configure authentication
Option A - Basic Auth (recommended for most setups)
migration:
  nevisidm:
    auth:
      username: scim-service-account
      password: changeme
ℹ️ NOTE : Basic Auth takes precedence over mTLS when both are configured. Remove or leave blank the auth block if you want mTLS to be used.
Option B - Mutual TLS (mTLS)
migration:
  nevisidm:
    ssl:
      keystore-path: /etc/migration/client.p12
      keystore-password: keystore-secret
      truststore-path: /etc/migration/truststore.p12
      truststore-password: trust-secret
Step 4 - Configure your source
The active Spring profile determines where users are read from. Select the profile that matches your source and add the relevant properties.
JDBC / H2 source
spring:
  profiles:
    active: jdbc
  datasource:
    url: jdbc:mysql://legacy-db:3306/users
    username: reader
    password: secret
    driver-class-name: com.mysql.cj.jdbc.Driver
CSV source
migration:
  source:
    type: csv
    file: classpath:sample-data/csv/users.csv
    credentials-file: classpath:sample-data/csv/credentials.csv
    profiles-file: classpath:sample-data/csv/profiles.csv
    delimiter: ","
Step 5 - Enable test-run mode (strongly recommended)
Before writing any data, run a test to verify your mappings are correct. Add the following property:
migration:
  test-run: true
Alternatively, pass it on the command line:
./gradlew runBulk -PtestRun
The tool logs every planned operation with a [TEST-RUN] prefix and writes nothing to nevisIDM.
Step 6 - Verify connectivity
Run the tool with a small sample dataset in live mode to validate your credentials and confirm the integration is correctly configured — note that test-run mode does not establish any connections or make REST calls.
./gradlew runBulk
Check the console output for:
- No connection refused or SSL handshake errors — confirms network and auth are working.
⚠️ WARNING : If you see 401 Unauthorized, double-check the username / password values and confirm the account has SCIM write permissions in nevisIDM. If auth and mtls are both present, Basic Auth is used — remove the auth block to switch to mTLS.
Next steps
With connectivity confirmed, proceed to Field mapping and Running Your First Migration to execute a full bulk import.