nevisAdmin software installation
Package
nevisAdmin is installed on a central management server that is able to control the remote servers via nevisAgent.
The package is available as RPM for the Linux platform. The Java runtime environment should be either adnjdk18 or OpenJDK. nevisAdmin is deployed in the adnglassfish container (you have to install Java and adnglassfish before installing the nevisAdmin package). Solaris SPARC and Solaris ix86 platforms are not supported.
On Linux systems, nevisAdmin requires a CVS binary in /usr/bin/cvs. This program is used by the Java application and from the command line to manage the nevisAdmin data repository.
The package creates a user "nvbuser" and a group "nvbgroup".
nvbgroup
# groupadd nvbgroup -g 30000
nvbuser
The container runs as user nvbuser. On Linux platforms, the Java process is started by using the su(1) command. Make sure that the nvbuser has a valid shell set within the /etc/passwd file:
# usermod -s /bin/sh nvbuser
The initial installation of nevisAdmin requires three steps:
- Installation of the software package.
- Creation of the nevisAdmin instance by using the nevisadmin handover command.
- Setting of an administration password to secure the access to the console of your adnglassfish domain (an empty password is set by default).
# rpm -i nevisadmin-3.2.8.x-1.i486.rpm
# nevisadmin handover
# nevisadmin changepassword
Password protection makes sure that nobody can access the console anonymously and requires that you enter the administration password when updating (re-deploying) nevisAdmin.You may store your password within the /var/opt/nevisadmin/default/nevisadmin/config/passphrase file to allow the nevisAdmin package scripts to redeploy new versions of nevisAdmin without user interaction (no password prompt). The password within the file must be prefixed by the string "AS_ADMIN_PASSWORD=" (see also the description of the "--passwordfile" parameter of the glassfish asadmin command).
Only one instance (called "default") can be created per server.
Configuration
domain.xml
nevisAdmin requires a few environment properties which are configured within the /var/opt/nevisadmin/default/nevisadmin/config/domain.xml file.
| Variable name | Description |
|---|---|
| ch.nevis.nevisadmin.ssl.keyStore | The key store used by nevisAdmin for communication with the nevisAgent. The certificate used within the key store must match the nevisAgent settings (see ch.nevis.nevisadmin.agent.ssl.trustStore in Table 4). |
| ch.nevis.nevisadmin.ssl.keyStorePassword | The passphrase used to open the key store. |
| ch.nevis.nevisadmin.ssl.trustStore | The trust store containing the CA certificates which are used to verify the certificates used by the nevisAgent. |
| ch.nevis.nevisadmin.ssl.trustStorePassword | The passphrase used to open the trust store. |
| javax.net.ssl.keyStore | The key store used by the GlassFish container (HTTPS to the web front-end). |
| javax.net.ssl.trustStore | The trust store used by the GlassFish container (HTTPS to the web front-end). |
Grant nevisAdmin (nvbuser) write access to these key files and directory.
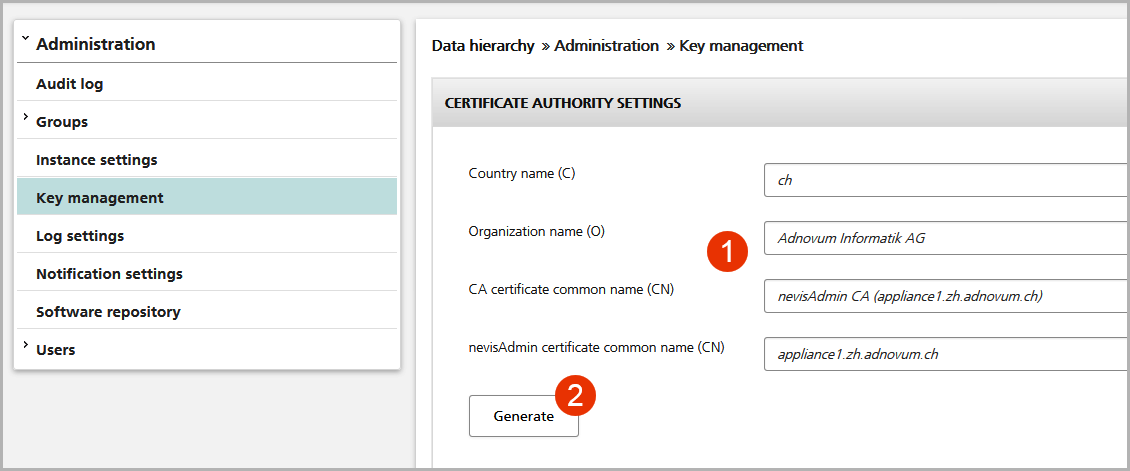
nevisAdmin is able to create the necessary key material itself. You do this in the Key management view of the Administration tab, see the figure below. Before you generate the certificate authority (CA), you might want to adapt its settings, such as the organization name (O), the CA certificate common name (CN) or the nevisAdmin certificate common name (CN) – see no.1 in the figure. Click Generate to initialize the CA and to create the certificate for nevisAdmin (no.2).
HTTPS settings
nevisAdmin starts with its HTTPS listener using some default settings including a self-signed certificate. You may replace this certificate with your own key using the Java keytool.
Example
The keystore uses the passphrase "changeit" by default. The chosen path names of the new key material are for illustration purposes only, and may be different in your environment.
# cp /var/opt/nevisadmin/default/nevisadmin/config/keystore.jks \
 /var/opt/nevisadmin/default/nevisadmin/config/keystore.jks.bak
# cp /var/opt/nevisadmin/default/nevisadmin/config/cacerts.jks \
 /var/opt/nevisadmin/default/nevisadmin/config/cacerts.jks.bak
# /opt/adnjdk18/bin/keytool -delete \
 -keystore /var/opt/nevisadmin/default/nevisadmin/config/keystore.jks -alias s1as
# /opt/adnjdk18/bin/keytool -importkeystore \
 -srckeystore /var/opt/neviskeybox/default/default/node_keystore.p12 \
 -srcstoretype PKCS12 -srcalias node \
 -destkeystore /var/opt/nevisadmin/default/nevisadmin/config/keystore.jks \
 -destalias s1as -destkeypass changeit
# /opt/adnjdk18/bin/keytool -delete \
 -keystore /var/opt/nevisadmin/default/nevisadmin/config/cacerts.jks -alias s1as
# /opt/adnjdk18/bin/keytool -import -trustcacerts -alias s1as \
 -file /var/opt/neviskeybox/default/default/node_certificate.pem \
 -keystore /var/opt/nevisadmin/default/nevisadmin/config/cacerts.jks
# /opt/adnjdk18/bin/keytool -importkeystore \
 -srckeystore /var/opt/neviskeybox/default/default/truststore.jks \
 -destkeystore /var/opt/nevisadmin/default/nevisadmin/config/cacerts.jks
# nevisadmin restart
Define the enabled cipher suites
You may configure the cipher suites using the asadmin command.
/opt/adnglassfish/glassfish3/bin/asadmin --port 8034 --user admin \
set "server.network-config.protocols.protocol.http-listener-2.ssl.ssl3-tls-
ciphers=TLS_ECDHE_RSA_WITH_AES_256_CBC_SHA384,TLS_ECDH_RSA_WITH_AES_256_CBC_SHA384,TLS_D
HE_RSA_WITH_AES_256_CBC_SHA256,TLS_DHE_DSS_WITH_AES_256_CBC_SHA256,TLS_ECDHE_RSA_WITH_AE
S_256_CBC_SHA,TLS_ECDH_RSA_WITH_AES_256_CBC_SHA,TLS_DHE_RSA_WITH_AES_256_CBC_SHA"
Controlling nevisAdmin
Use the nevisAdmin command line tool to stop or start nevisAdmin.
# nevisadmin restart
Troubleshooting
The log files of nevisAdmin are stored in the following directory:
/var/opt/nevisadmin/default/nevisadmin/logs/
- nevisadmin.log: Contains all messages written by nevisAdmin. This is the file you should monitor.
- audit.log: Audit log which shows major configuration changes/operational tasks and service status.
- server.log: Contains all messages from the GlassFish container as well as the nevisAdmin application.
The nevisadmin.log and audit.log files are configured (size, severity, etc.) by the log4j.xml file within the /var/opt/nevisadmin/default/conf/ directory.
Since nevisAdmin version 3.4.5.1, custom process logging for the categories Import, Deploy, Commit, and Load can be enabled in the log4j configuration. If enabled, nevisAdmin will write any actions taken during environment or application import, config generation, deployment, or rollback, to a separate file called <category name>-<timestamp>.log (for example, "Commit-2015-09-02-09-09-56.157.log").
This feature is disabled by default, because the generated files can grow quite large. For the same reason only logs of the last ten runs of each category are kept. Older ones are deleted automatically when a new one is generated.
To enable this feature,
- Set the property
ch.nevis.nevisadmin.log.processlogin the nevisadmin.properties file to "true". - In the log4j.xml file, uncomment the category definition you want to use and set the priority (log) level accordingly, for example for the Deploy category:
<!-- separate log file per deployment -->
<category name="Deploy"><priority value="DEBUG"/></category>

<!-- separate log file per commit -->
<!-- <category name="Commit"><priority value="DEBUG"/></category> -->

<!-- separate log file for load revision -->
<!-- <category name="Load"><priority value="DEBUG"/></category> -->

<!-- separate log file for environment or application import -->
<!-- <category name="Import"><priority value="DEBUG"/></category> -->
If the current log4j.xml file in the /var/opt/nevisadmin/default/conf/ directory does not contain these entries, you can replace this file by the one provided in the /opt/nevisadmin/template/ directory. The same applies to the nevisadmin.properties file, which can be found in the same directory.
Forward nevisAdmin log data to a syslog host
If you like to forward the log data written to your syslog host, you need to edit the /var/opt/nevisadmin/default/conf/log4j.xml file. Enable the two *ADN_SYSLOGS**_ appenders and configure the host name of your syslog server. A restart of nevisAdmin is required to apply the changes.
Access the web front-end
The web front-end is available on port 8037 by default. You can access it by your web browser by using the HTTPS protocol.
The password of the default administration user "admin" is set to "admin".
The hash value of the password is stored in the keyfile: /var/opt/nevisadmin/default/nevisadmin/config/keyfile.
See the chapter User management for additional information on how to manage the users accessing nevisAdmin.
Port forwarding
You may want to configure port forwarding to use the standard HTTPS port 443 instead of 8037. This can be done using iptables.
# iptables -t nat -A PREROUTING -p tcp -m tcp --dport 443 -j REDIRECT --to-ports 8037
# iptables-save > /etc/sysconfig/iptables
Backup
nevisAdmin stores all configuration data in the following directory on the file system:
- /var/opt/nevisadmin/default/nevisadmin/repository/
There are other files you might want to store for disaster recovery purposes:
- /var/opt/nevisadmin/default/nevisadmin/config/domain.xml
- /var/opt/nevisadmin/default/nevisadmin/config/keyfile
Restore
When restoring a nevisAdmin instance, you should go through the following steps:
- Create a nevisAdmin instance on the new server as described in the chapter Package.
- Stop the new instance, delete the default repository and clear the cache.
# nevisadmin stop
# rm -rf /var/opt/nevisadmin/default/nevisadmin/repository
# rm -rf /var/opt/nevisadmin/default/nevisadmin/osgi-cache/felix/
# touch /var/opt/nevisadmin/default/.redeploy
- Install the files you had saved.
- Start nevisAdmin:
# nevisadmin start
Redundant setup
nevisAdmin keeps the whole configuration repository within its memory at runtime (but periodically writes it back to the file system). Therefore, no active/active setups are possible, but you may wish to set up an active/standby setup to meet your availability requirements.
- Install nevisAdmin instances on two different servers.
- Define which is the active instance to use and shut down ("nevisadmin stop" command) the standby instance.
- On the standby instance, delete the default repository and clear the cache.
- Synchronize the repository files/directories (see the chapter Backup between the two hosts by using either a shared file system or a periodical synchronization process
#!/bin/sh
PATH=/sbin:/bin:/usr/sbin:/usr/bin; export PATH
# define the host name of the standby server:
SERVER=standbyserver.adnovum.ch
# synchronize the repository:
rsync -rlptgoD /var/opt/nevisadmin/default/nevisadmin/repository/ \
 root@${SERVER}:/var/opt/nevisadmin/default/nevisadmin/repository/
rsync -rlptgoD /var/opt/nevisadmin/default/nevisadmin/config/keyfile \
 root@${SERVER}:/var/opt/nevisadmin/default/nevisadmin/config/keyfile
Make sure that you always synchronize the repository from the active to the standby server and not contrariwise.
Updates
Software updates are performed by removing the old and installing the new nevisAdmin package. You have to restart the nevisAdmin application manually after the package installation.
# rpm -e nevisadmin
# rpm -i nevisadmin-3.2.8.x-1.i486.rpm
# nevisadmin start
Sizing
- We recommend installing nevisAdmin on a server featuring at least two CPUs (e.g., an Intel dual core Xeon processor), 2GBytes of memory, and 30GBytes disk space.
- A single nevisAdmin instance is usually qualified to manage up to 10 environments (see the chapter Environment), each using up to 20 Nevis instances and 20 Nevis services.
The memory consumption of nevisAdmin depends on the size of your configuration as well as on the number of concurrent users working with nevisAdmin. Consider to increase the available heap size of the JVM (Xmx parameter within the domain.xml) if necessary.