Side-by-side Deployment
Overview
The Kubernetes side-by-side deployment helps to mitigate the risk in application deployment. With this deployment strategy, you can make frequent deliveries and deployments, and release a better quality application to production.
The side-by-side deployment strategy reduces risks in the application release as it allows you to release to a smaller subset of users first. You deploy new features and configuration into the active production as a secondary release that is running side by side to the previous release, which is the primary version. Additionally, you can manage and control the traffic between these two versions. Traffic that meets certain parameter sets, such as header and cookie settings, is directed to the new version, whereas the rest of the users still access the previous version. This ensures zero downtime to the users during a deployment. It also gives the QA team enough time and flexibility to test and monitor the deployment. Once the quality is approved, you can fully roll out the new version to production.
For more advice regarding the side-by-side deployment, read the chapter Recommendations and Limitations.
How it Works
The primary and secondary deployments are defined as follows:
- The primary deployment is your productive deployment available for all users.
- The secondary deployment is a deployment added next to the primary one and accessible only to a limited number of users. It is created for testing purposes. Based on the test results, this deployment can be promoted or rolled back. The traffic routing to this deployment is based on the routing parameters.
Both primary and secondary deployments are deployed in the same inventory and run inside the same namespace. The [Kubernetes-Based Installation] is enough, no additional installation or setup is needed.
The figure below shows how the traffic is split among the installed versions. The numbers in the figure correspond to the numbers in the following list:
- Your current setup, where 100% traffic is going to your primary version.
- You deploy a secondary version and set up at least one of the required routing parameters, such as a Header name, Cookie name and/or User base split. The traffic will be directed to the secondary version based on a routing parameter. You will be able to test and monitor your deployment, and afterwards to decide to roll back or promote this deployment to production.
- You will either promote or roll back the secondary deployment:
- In case of promotion, the secondary deployment becomes your primary deployment. The previous primary version will be removed. 100% of your traffic will go to your newly promoted primary version.
- In case of a rollback, the secondary deployment is removed. 100% of your traffic keeps going to your primary version.

Secondary (Side-by-Side) Deployment
To make a secondary deployment, there must already be a primary version deployed to the selected Kubernetes inventory.
When you create a secondary deployment, make sure that you deploy all your projects as secondary. This is necessary, because the moment you promote the secondary deployment, you replace the entire primary deployment with the secondary one. The components between the primary and secondary versions cannot connect to each other.
Perform the following steps to create a secondary deployment:
- Open the Deployment Wizard by clicking on the Deploy button, or on the Deploy as Secondary button in Kubernetes Status screen.
- Select your project.
- Select a Kubernetes inventory.
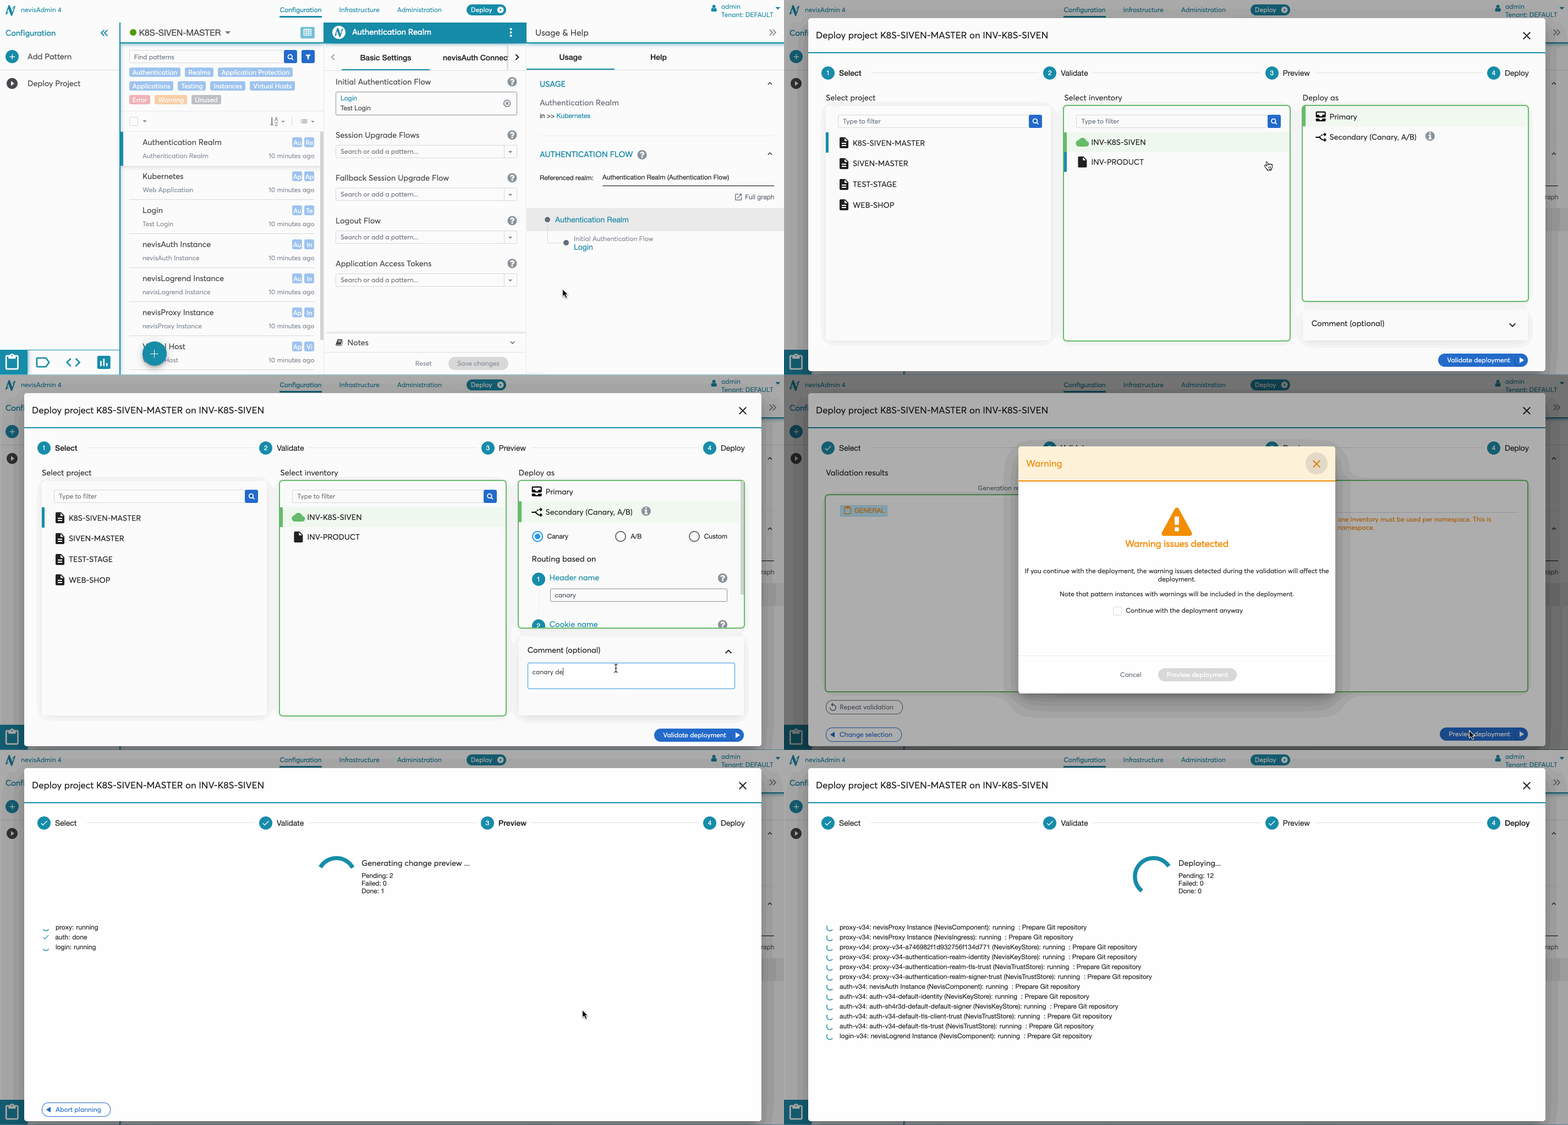
- Select the Secondary (Canary, A/B) option.
- Choose one of the three deployment options (Canary, A/B or Custom) and define the routing parameters:
Canary: Define routing parameters such as the Header name and/or Cookie name (or leave the default values as is). The routing to the secondary deployment will be based on these parameters. At least one of the parameters must be set. Tick the Auto-set cookie checkbox to set the routing based on a URL including a query parameter (see further details below).
Note that the sequence of the fields matter: The system first checks for the Header name and then in the Cookie header.If the Header name is found, the Cookie name is skipped.
Header name: The system checks if the request header contains the defined header name. If yes, it checks for the value of the header:
- If the value is "always", all the traffic goes to the secondary version.
- If the value is "never", the traffic never goes to the secondary version.
- In case of all other values, the traffic goes to the primary version.
Note that the key-value pair and regex are not supported in this release. However, this is planned for the future
Cookie name: The system checks if the request header contains the defined cookie name. If yes, it checks for the value of the cookie:
- If the value is "always", the traffic goes to the secondary version.
- If the value is "never", the traffic never goes to the secondary version.
- In case of all other values, the traffic goes to primary version.
Auto-set cookie on query parameter: Enable this checkbox to set up the routing to the secondary deployment with a URL. For this, first define the Header nameand Cookie name. After the first request, the cookie will be added automatically based on the given query parameter. Here are sample URLs including a query parameter:
- URL to enable routing to the secondary deployment:
<yourURL>/?canary=always, where "canary" is the cookie name. - URL to disable routing to the secondary deployment:
<yourURL>/?canary=never, where "canary" is the cookie name.
The header is used internally to direct the first request with the query parameter to the correct version, as the cookie doesn't exist yet at this point.
- URL to enable routing to the secondary deployment:
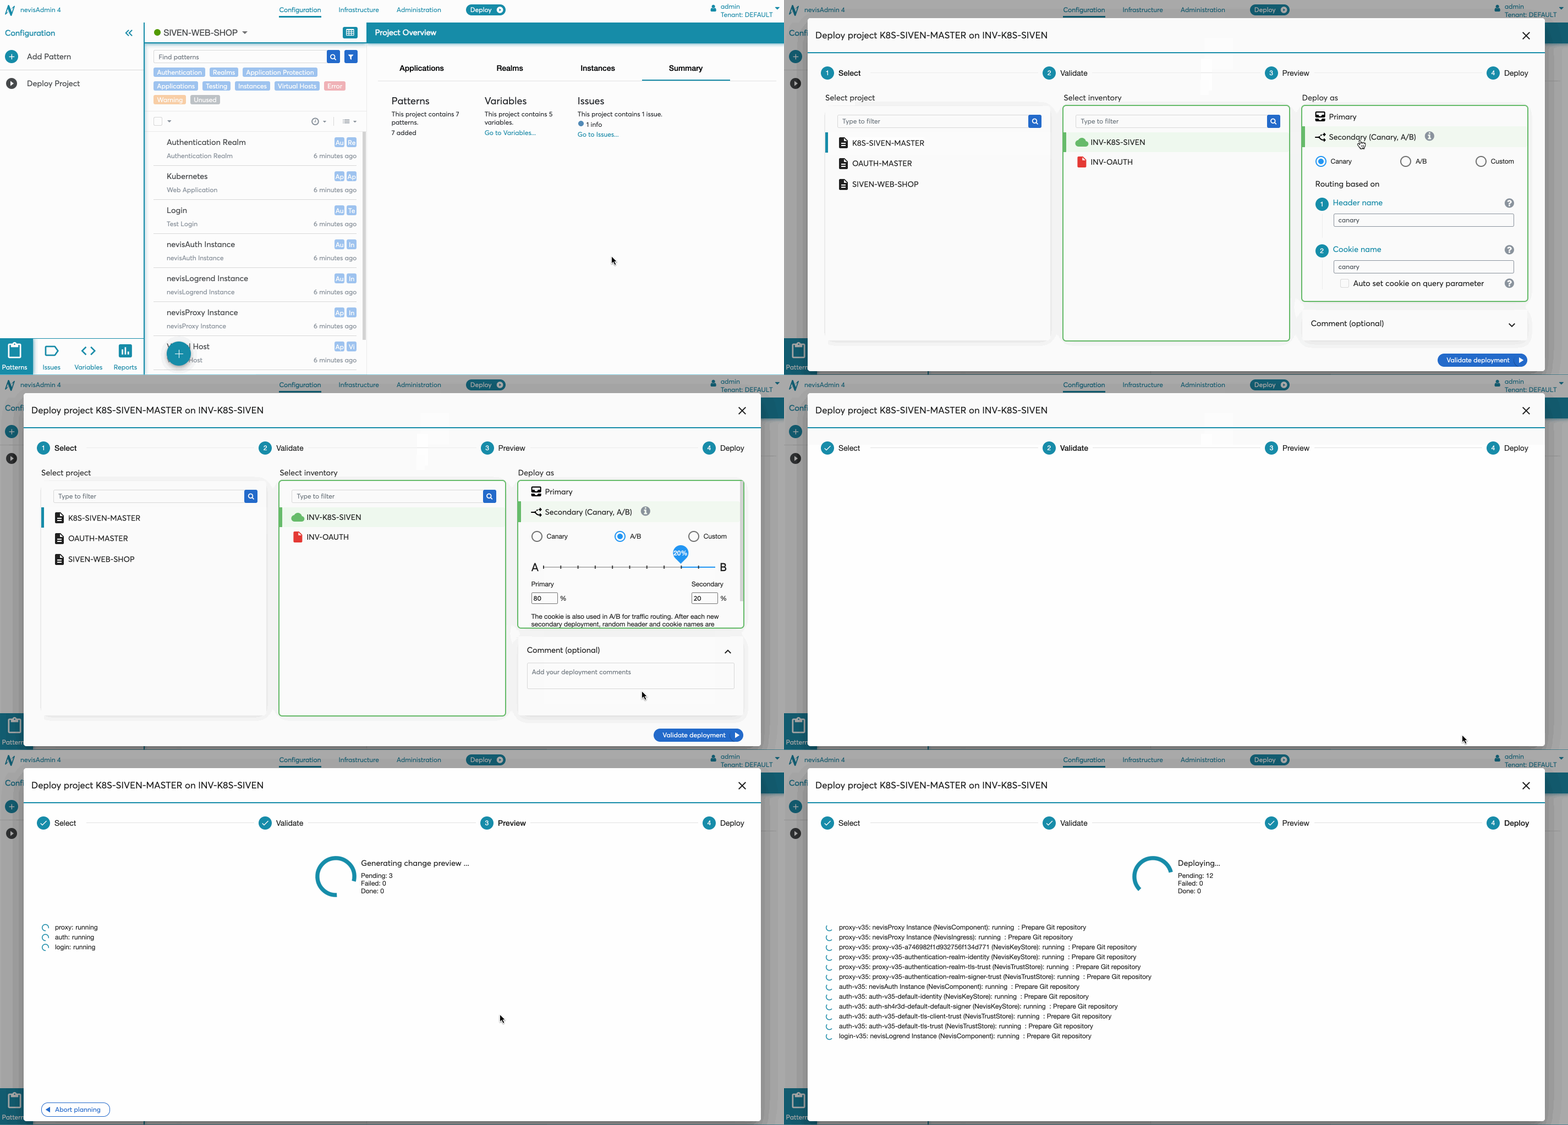
A/B: Allocate the traffic to the primary (A) and secondary (B) by splitting the user base between each side. Set up how much traffic you would like to have routed to the secondary (B) while the rest will remain to the primary (A). For instance, if you set 30% to the secondary, 30% of the users will be navigated to the secondary while 70% will still go to the primary.
Note that the cookie is also used in A/B secondary deployment for routing the traffic. After each new secondary deployment a random header and a cookie name are generated and used for routing the traffic to the secondary. The header is used internally to direct the first request to the correct version, as the cookie does not yet exist at this point.
In case of the deployment over the existing one, if you change the percentage allocation, a new random header and a cookie name are generated and the traffic is newly redistributed affecting all users. If the percentage is not changed, the header and cookie names stay the same, as a result, the traffic allocation remains as it was in the previous deployment.
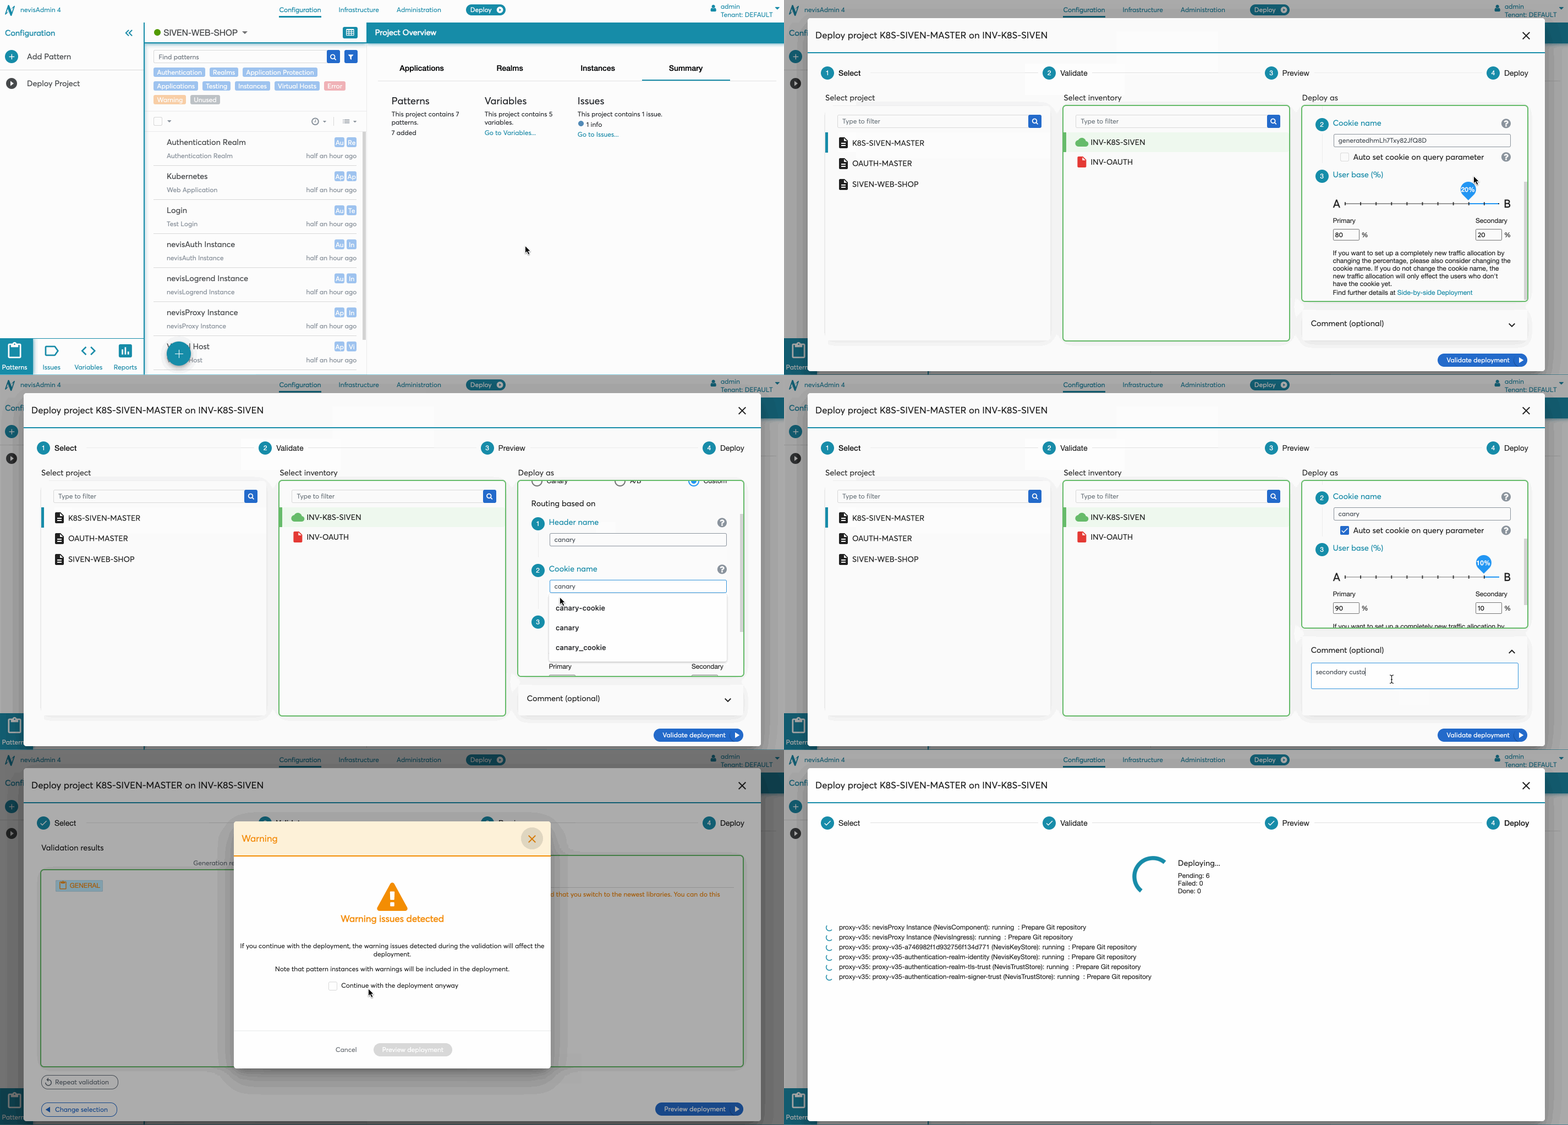
Custom: Custom option contains both settings from Canary and A/B. Use this option if both the general traffic distribution and manual overriding with Header/Cookie is required. Using the Custom option you can also change the existing traffic percentage without redistributing the users.
If you want to set up a completely new traffic allocation by changing the percentage, also consider changing the cookie name. If you do not change the cookie name, the new traffic allocation will only effect the users who do not have the cookie yet.
- You may add a comment to the deployment.
- Click on Validate deployment.
- From this step on, the flow is the same as for the normal deployment (see the chapter Kubernetes Deployment).
Note that the routing information you provide during the deployment creation is applied by the NevisIngressresources, which are generated by the nevisProxy instances. Therefore, if you wish to change the Header name and Cookie namefields set for the environment, you have to redeploy the projects containing these instances.
This release does not support traffic allocation based on a user percentage. However, this feature is planned for the future.
The following movie shows how to create a secondary deployment:
Viewing Active Deployments
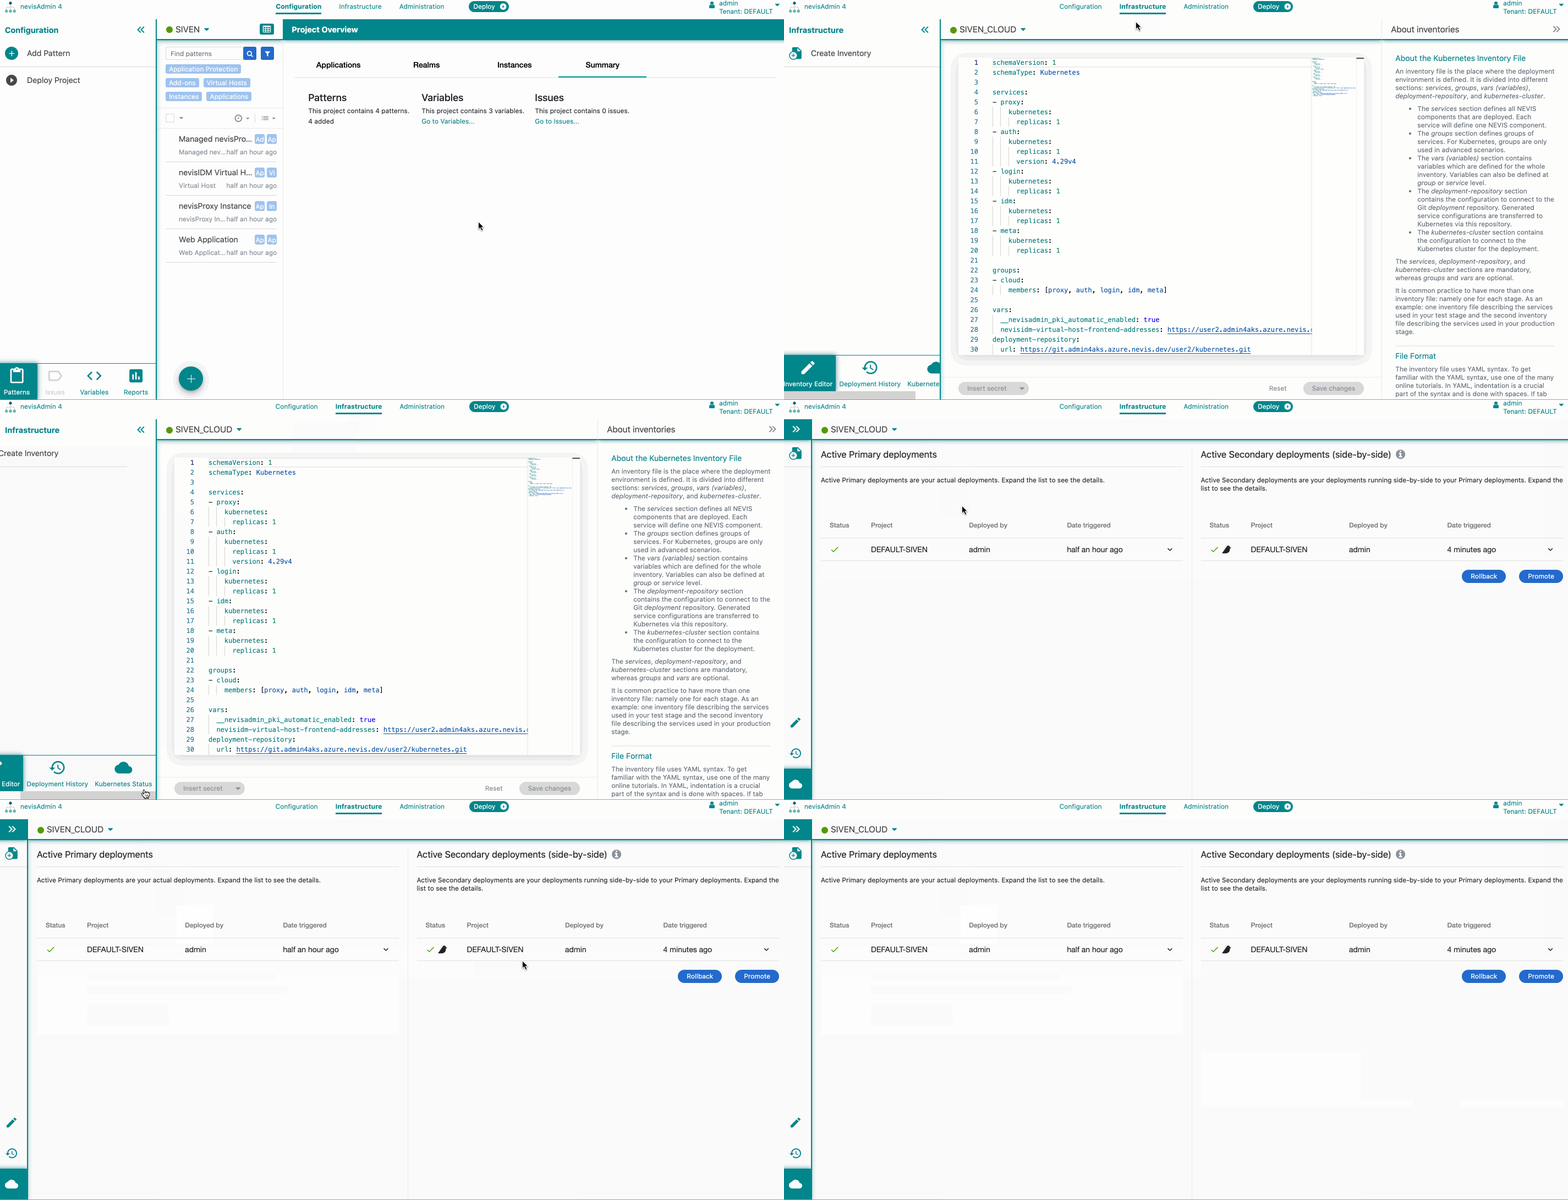
- Select the Infrastructuretab.
- Select a Kubernetes inventory from the dropdown.
- Click on the Kubernetes Status item in the Navigation menu on the bottom of the sidebar.
The Kubernetes Status item is available only for Kubernetes inventories.
The Kubernetes Statusscreen opens. It consists of two sections:
- Active Primary deployments
- Active Secondary (side-by-side)
To view further details about a deployment, click its entry in the list. The following sections are shown per deployment entry:
Deployed services The list of deployed services, with the version number (e.g., proxy-v2). The version number is incremental.
Note that the version number does not indicate the version of the component. It is rather a technical indicator to differentiate between secondary and primary deployments. The field is available for deployments done in nevisAdmin 4 version 4.9.
Deployment repository git tagGit tag of the generated configuration. To copy the tag, click on the copy icon.
The field is available for deployments done in nevisAdmin 4 version 4.9.
CommentShows the comment that you entered during the deployment and/or promotion or rollback.
Secondary (side-by-side) deploymentShows the routing information for the secondary deployments.
- Header name
- Cookie name
- Enabled checkbox for the cookie set with the URL
The following movie shows how to view active deployments:
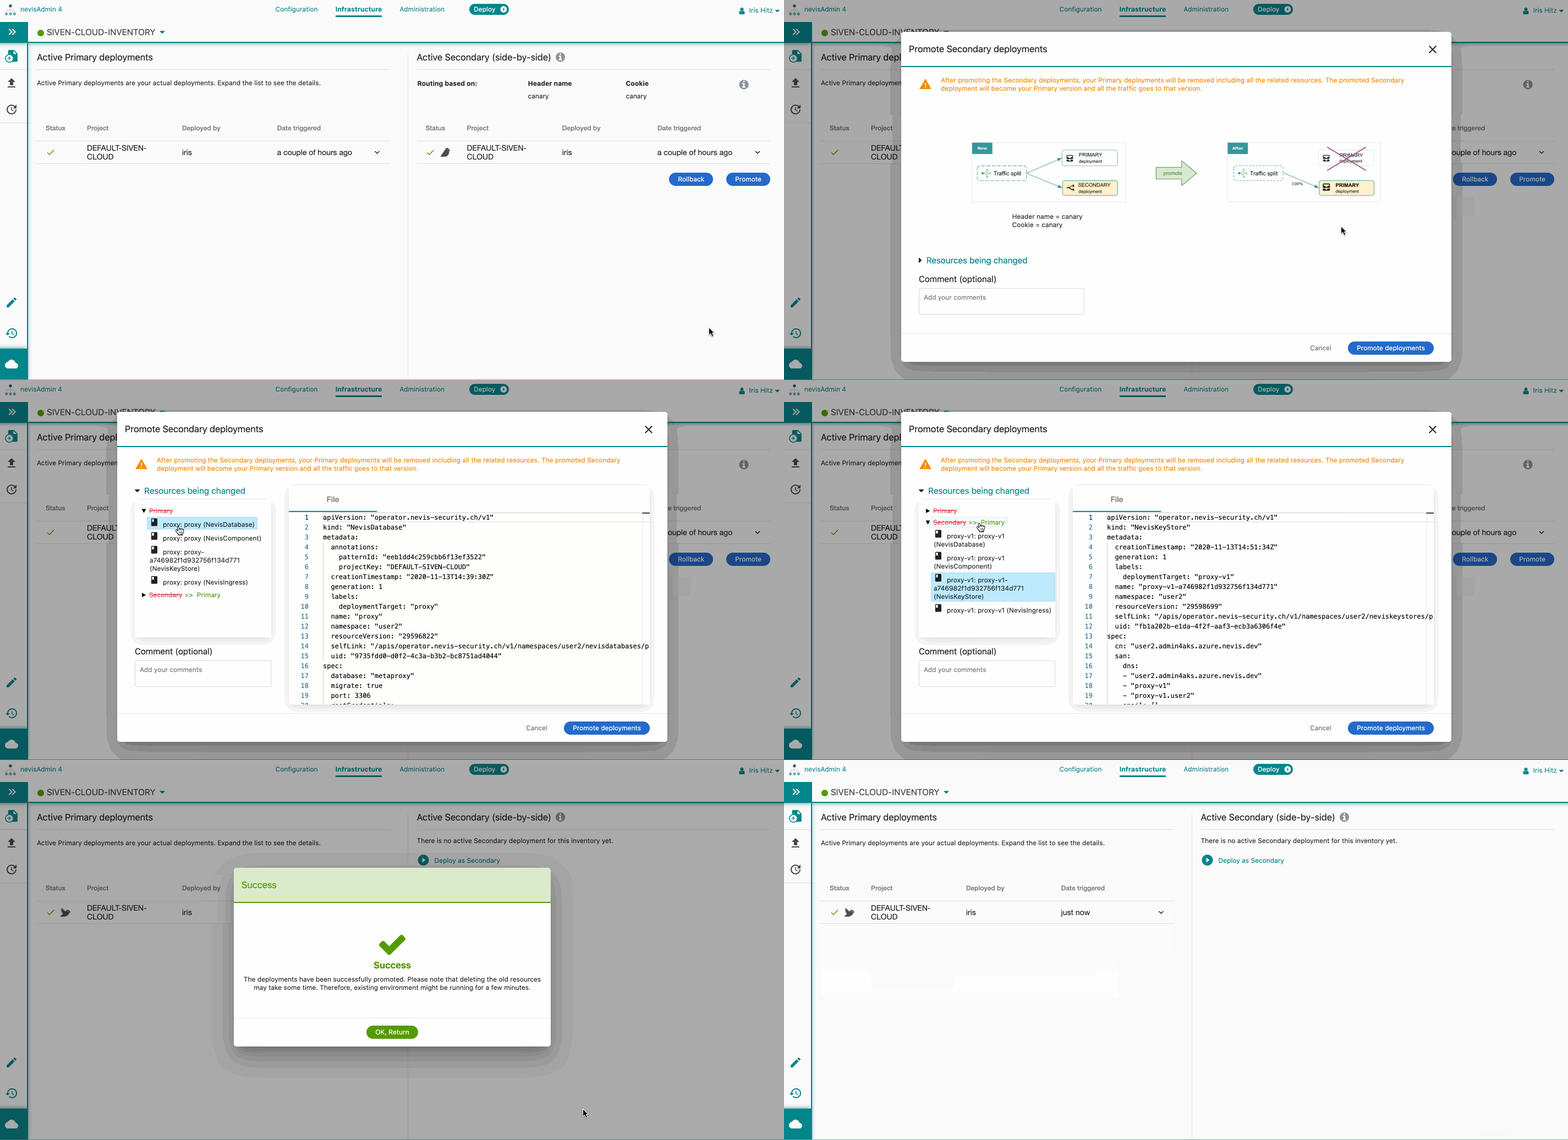
Promoting Secondary Deployments
When promoting your secondary deployments, the following happens:
- The secondary deployments become your primary deployments, and all traffic will go to these new primary deployments.
- The previous primary deployments are deleted.
Take the following steps to promote the secondary deployments:
- Open the Kubernetes Statusscreen.
- Click on Promotebutton under the Active**Secondary deployments (side-by-side) list.
- The Promote Secondary deployments dialog screen opens.
- You can check the resources that will be changed due to the promotion. Expand the resources list to see the details. Note that
- The primary version and related resources will be deleted.
- The secondary version and related resources will become the primary after the promotion.
- You can add a comment or reason for your promotion for record-keeping purposes.
- You can check the resources that will be changed due to the promotion. Expand the resources list to see the details. Note that
- Click on Promote deployments.
- All the secondary deployments in the Active**Secondary deployments (side-by-side) list are promoted to be the primary version and visible in the Active Primary deployments list.
If promoting the secondary deployment fails, just retry. Do not roll back the primary deployment. This is because the primary deployment might have been affected due to the promotion, so that it is damaged or removed. If the promotion of the secondary deployment fails again, deploy everything from the beginning.
The following movie shows how to promote secondary deployments:
Rolling Back Secondary Deployments
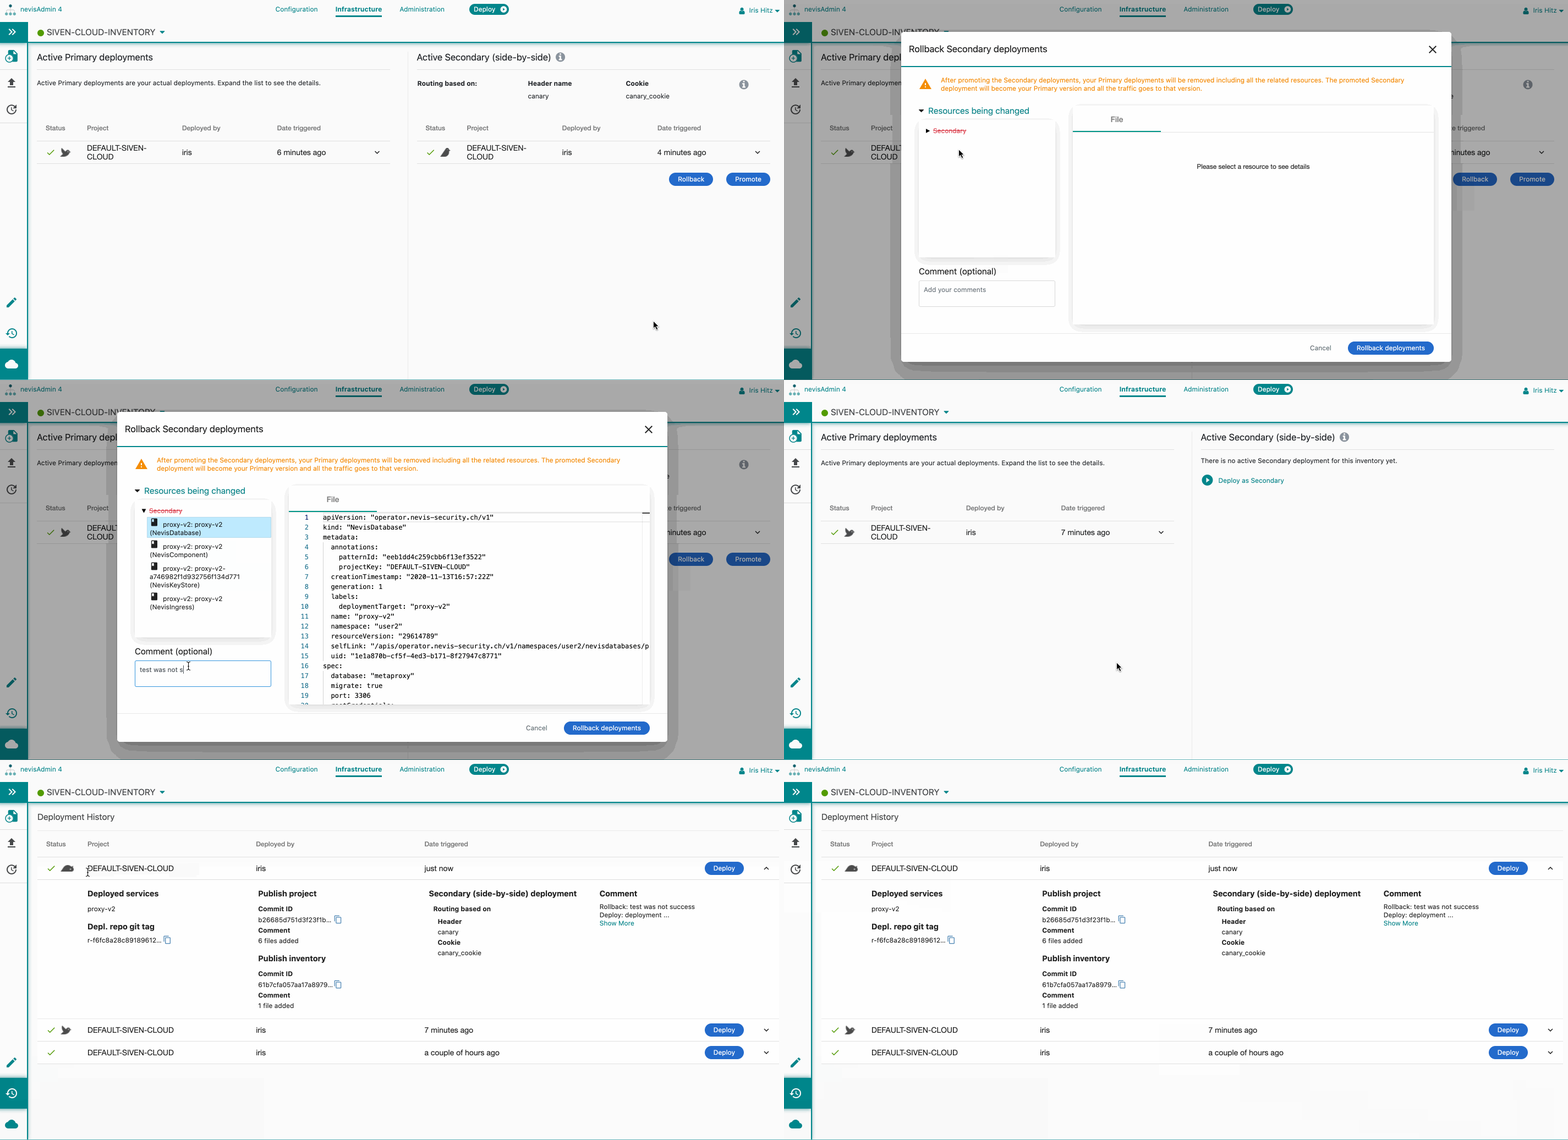
You can rollback your secondary deployments. This will,
- Remove the secondary deployments and all the related resources.
- Not affect the primary deployments. The traffic will continue to go to them.
Take the following steps to rollback the secondary deployments:
- Open the Kubernetes Statusscreen.
- Click on Rollbackunder the Active**Secondary deployments (side-by-side) list.
- The Rollback Secondary deployments dialog opens.
- You can check the resources that will be changed due to the promotion. Expand the resources list to see the details. Note that
- The secondary version and related resources will be deleted.
- You can add a comment or reason for your roll-back for record-keeping purposes.
- You can check the resources that will be changed due to the promotion. Expand the resources list to see the details. Note that
- Click on Rollback deployments.
- All the secondary deployments in the Active**Secondary deployments (side-by-side) list are removed, but can be found in the Deployment History screen.
To access the Deployment History screen, click on Deployment History in the Navigation menu in the sidebar of the Infrastructure tab.
If rolling back the secondary deployment fails, retry. If the rolling back fails again, re-deploy all secondary deployments from the beginning.
The following movie shows how to rollback secondary deployments:
Deployment History
You can view the secondary deployment history in the Deployment History screen. See further details in the chapter Deployment History and Rollback.