Overview and Main Concepts
This user guide explains how to work with nevisDetect. The goal of nevisDetect is to detect malicious and untrustworthy user interactions and to mitigate their consequences. To be able to detect malicious user requests, nevisDetect makes use of multiple anomaly detection technologies. By correlating multiple attributes like behavioral biometrics, geolocation or device information it is possible to create very unique user profiles. If the attributes of a request coming from a certain user differ substantially from his profile, nevisDetect will react.
Additionally, there is a possibility to integrate a custom risk detection technology, through the Proxy plug-in.
This chapter shortly discusses the main concepts of nevisDetect, which you need to know to be able to work with the nevisDetect web application.
For detailed information, see the chapter Conceptional Overview and its subchapters in the nevisDetect reference guide.
Plug-ins
One of the main concepts of nevisDetect is the use of plug-ins. A plug-in connects nevisDetect with a particular anomaly detection technology. A plug-in itself contains no detection functionality. It calls a remote anomaly detection service as well as extracts and converts data.
An example of such a plug-in is the BehavioSec plug-in. This plug-in links nevisDetect with the BehavioSec detection service, whose decisions about the trustworthiness of a user interaction are based on how the user moves the computer mouse (biometrical data). The BehavioSec plug-in delivers two risk scores:
- The BehavioSecTransaction risk score is based on the behavioral data of the actual HTTP request.
- The BehavioSecSession risk score is based on the behavioral data of all HTTP requests in the current session.
Another example of a plug-in is the nevisAdapt plug-in. This plug-in/detection service analyzes HTTP requests based on the physical context of the user login attempt, e.g., the login location and time.
The nevisDetect web application gives an overview of all connected plug-ins. If you do not want to include a certain plug-in in the risk calculation, you can disable this plug-in in the web application.
For more information about how to configure the plug-ins, see the chapter nevisDetect plug-ins in the nevisDetect reference guide.
Risk scores
The risk score of a user interaction/HTTP request is an indication about the trustworthiness of the request. nevisDetect uses risk scores to decide if it is necessary to take action (such as asking the user to re-authenticate or blocking the user).
In the context of nevisDetect, the term risk always refers to the risk that someone other than the legitimate user has executed the HTTP request.
For every user request, each plug-in determines a plug-in risk score, a numerical value between 0.0 and 1.0. For this, the plug-in compares the request data with the relevant user profile. The more the request data matches the profile, the lower the risk (score).
In the nevisDetect web application, you can define how nevisDetect deals with the plug-in risk scores (e.g., ignore a plug-in risk score if it is below a certain threshold, or assign different weights to the risk scores of the different plug-ins, to express their importance in the overall risk calculation).
To determine the overall risk of a specific HTTP request from a specific user, nevisDetect aggregates the risk scores of all plug-ins into a normalized risk score, a single numerical value between 0.0 and 1.0. The normalized risk score indicates the overall risk of the HTTP request.
- A normalized risk score of 0.0 signals no risk at all: the legitimate user has executed the request.
- A normalized risk score of 1.0 signals a maximum risk: It is for sure that the request has not been executed by the legitimate user.
There are several methods or algorithms to compute the normalized risk score. You define the method to use in the nevisDetect web application.
For more information about risk scores, see the chapter Normalization in the nevisDetect reference guide.
Policies, actions and rules
nevisDetect uses policies, actions and rules to determine how to react to a specific normalized risk score.
The policy connects a specific normalized risk score with an action. A rule connects the action with the user who has sent the request.
For more information about policies, actions and rules, see the chapters Policy in the nevisDetect reference guide.
Policies
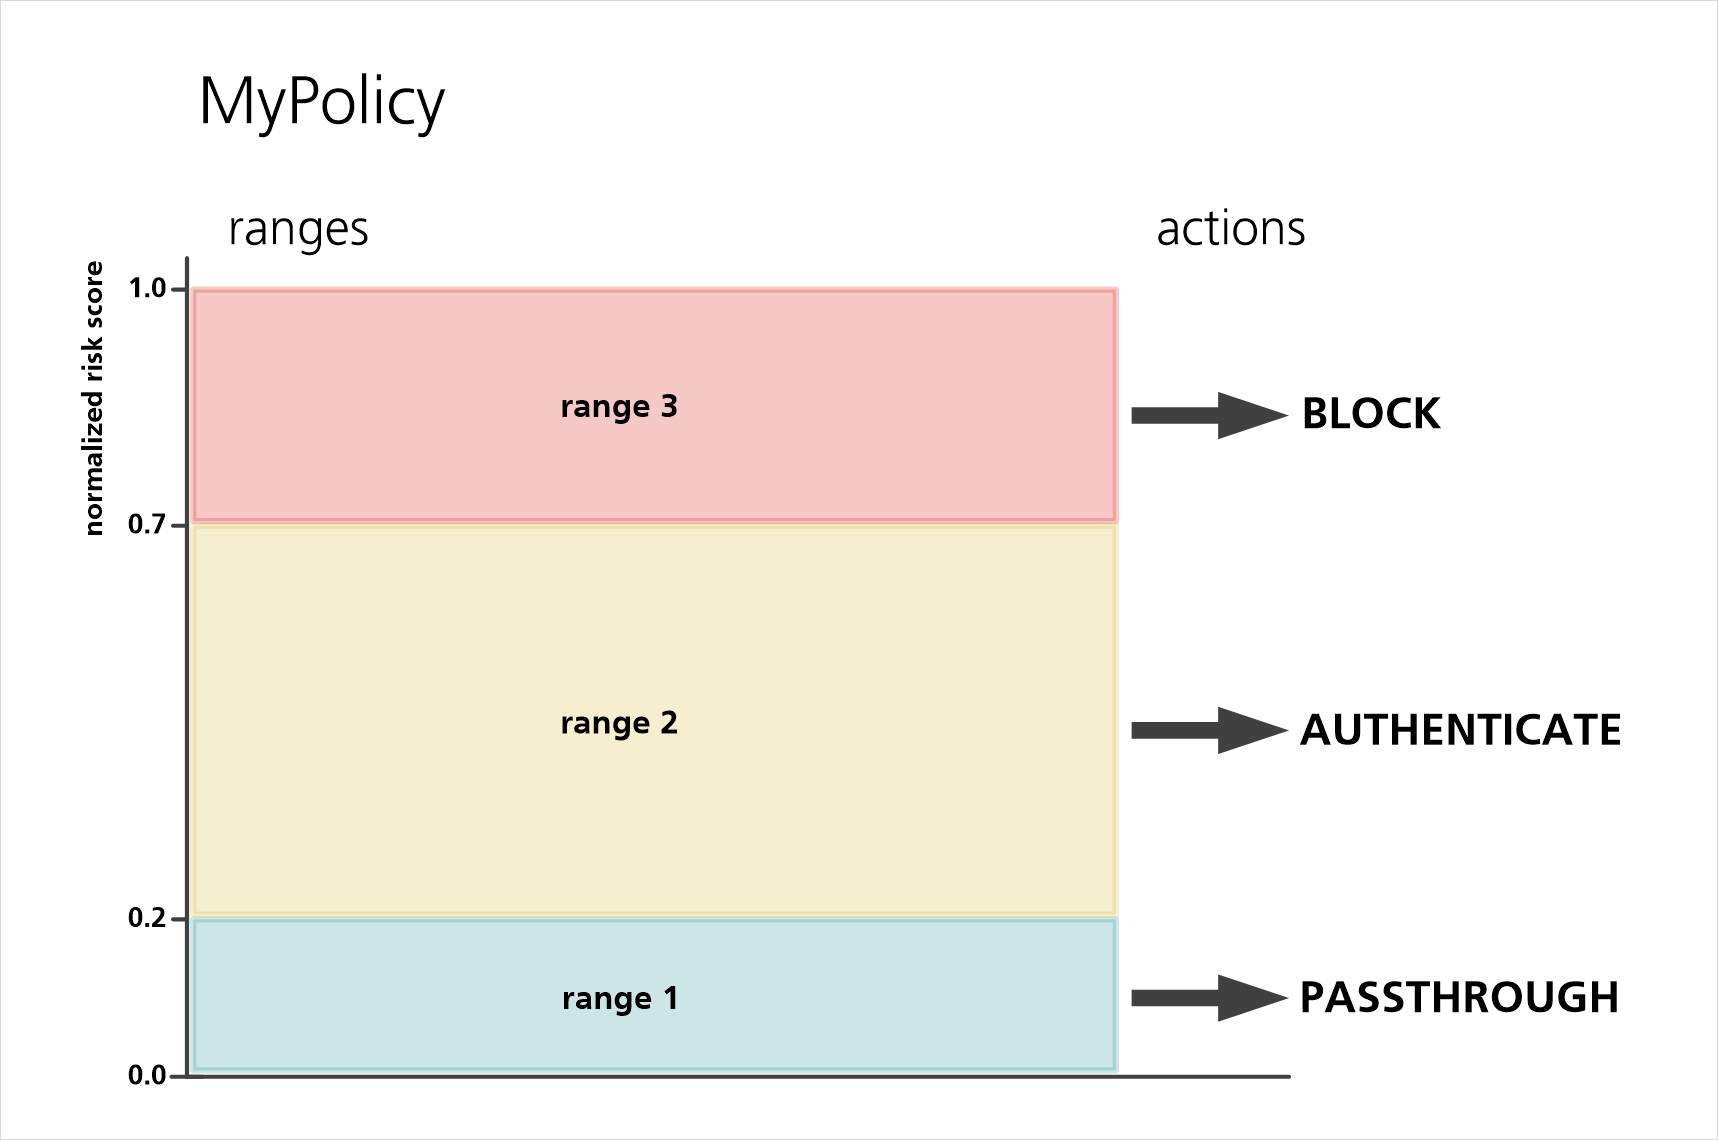
A policy consists of several ranges and associated actions. The ranges represent the possible values of the normalized risk score.
Usually, there are three ranges. Each range corresponds with a certain risk level and is connected with a certain action (e.g., asking the user to re-authenticate or block the user entirely) - see Figure Policy - normalized risk score and actions.
In the nevisDetect web application, you can create policies according to your needs. For each policy, define the ranges and connect them with suitable actions.
Actions
nevisDetect supports the following actions:
- PASSTHROUGH: Forwards the request to the application and notifies the application. This happens in the background, the user does not notice anything.
- AUTHENTICATE: Terminates the authenticated session. The user has to log in and authenticate again.
- BLOCK: blocks all requests of this specific user.
In the nevisDetect web application, you can link these actions with (the risk score ranges of) a policy.
Rules
A rule connects an action with the user that has sent the HTTP request.
Suppose user X sends an HTTP request to an application in the backend. nevisDetect assigns a normalized risk score of "0.5" to this request. This score matches with the second risk score range of the valid policy and correlates with the action "AUTHENTICATE".
nevisDetect reacts accordingly, that is, it creates a rule. This rule contains, among others, the user ID of the corresponding user as well as the relevant action. The rule is a sort of instruction for nevisProxy to execute the action (here, to make the user re-authenticate himself).
nevisDetect creates rules automatically, you do not have to do anything. However, you can deactivate a rule. This may be necessary, for example, if the system falsely blocks a user (a so-called "false-negative"), and the user cannot do anything anymore.
nevisDetect only creates rules if an action is required (that is, in case of AUTHENTICATE or BLOCK).
Cases
Each time nevisDetect creates a rule, it also creates a case.
The rule is necessary to trigger the action (AUTHENTICATE or BLOCK). The corresponding case is a kind of report that shows all the details regarding the rule/case (time of detection, action taken, request ID, risk score), the request itself (HTTP session ID, request URL) and the user (user ID, actual risk score, status).
Modes
nevisDetect can operate in several operation and communication modes. You set these modes in the nevisDetect web application.
Operation mode
Before nevisDetect can start detecting malicious HTTP requests, it must pass a training phase. During this phase, nevisDetect is just collecting data, so that the detection technologies can train their models. In the nevisDetect web application, this phase corresponds with the operation mode "Training".
A specific plug-in/detection technology has collected enough data of a specific user, if for this user the average plug-in risk score (the mean) and the variance do no longer change from day to day. From that point on, you can switch the plug-in into the detection phase.
In the nevisDetect web application, you can select between two different operation modes for the detection phase: "Detection" or "Mixed". The difference between these two options is how an untrained user is treated: In the "Mixed" mode, the application will not create any rule for untrained users.
Communication mode
If nevisDetect detects a fraudulent request, it creates a rule and notifies nevisProxy. The communication mode specifies how to propagate the created rule to nevisProxy.
There are two modes available: the synchronous and asynchronous communication mode. They differ in when the rule is propagated to nevisProxy. You can set your preferred communication mode in the nevisDetect web application.
Failopen feature: Through this feature, you can determine how the application should behave if any of the plug-ins failed to process a request. Enable this feature to ensure that no user will be blocked if any of the plug-ins could not process his request.
Request filter management
The Request Filter Management functionality allows you to ignore requests in certain cases, for example if the request does not contain specific data fields. This functionality also makes it possible to override the default communication mode for specific URLs.
Personas
If you read this user manual, you probably have to work with the nevisDetect web application. This means that you have one of the following roles:
- Forensic expert
- Security expert
- Support desk user
- Operator
In nevisDetect, these roles are called personas. Each persona has specific rights that correspond to the tasks he/she has to perform. Also, it depends on the persona what you get to see of and what you can do in the nevisDetect web application.
The four personas "forensic expert", "security expert", "support desk user" and "operator" are part of the standard permission concept of nevisDetect. However, it is possible to create different personas with different permissions, according to the needs of your company. For more information, see the chapter Security in the nevisDetect reference guide.
Forensic expert
The forensic expert analyzes and verifies the origination of a case.
The Case overview view in the nevisDetect web application is therefore an important view for the forensic expert. But to be able to perform his job well, the forensic expert needs access to all views of the nevisDetect web application.
- For more information about the forensic expert and his most important use cases, go to the chapter Forensic expert.
Security expert
The security expert configures the detection and mitigation process. He or she can for example add new policies and modify existing policies, define how to calculate the normalized risk score or set the operation and communication mode.
The security expert has access to all views necessary to perform his tasks, such as the Policy creationand the Application management views and the entire Normalization section.
- For more information about the security expert and his most important use cases, go to the chapter Security expert.
Support desk user
The task of the support desk user is to help end users of a nevisDetect-protected application who are stuck, for example because nevisDetect (falsely) blocked the user after a specific user interaction, and the user cannot do anything anymore. The support desk user will first try to find out which rule is responsible for the situation. If he assesses the situation as risk-free and safe, he can deactivate the rule and thus unblock the user.
The support desk user has access to all views necessary to perform his tasks, such as the Generated rules and the Case overview views.
- For more information about the support desk user and his most important use cases, go to the chapter Support desk user.
Operator
The operator operates the nevisDetect overall system. For this, he or she needs to monitor the nevisDetect web application and check that everything works fine. However, he is not allowed to modify nevisDetect's configuration and settings.
The operator has access to all views necessary to perform his tasks*.* These are the Plug-in overview and the Application monitoring views.
- For more information about the operator and his most important use cases, go to the chapter Operator.