Persistence backend
nevisMeta supports MariaDB (relational database) and PostgreSQL (relational database) as persistence backend.
| Deployment type | Supported persistence backend |
|---|---|
| Standalone (recommended) | MariaDB (recommended), PostgreSQL |
Database configuration properties
Configuring nevisMeta to use persistence backend
You configure the use persistence backend in the file nevismeta.properties:
database.connection.url
Example:
jdbc:mariadb:sequential//host-db1:3306,host-db2:3306/nevismetajdbc:mariadb://host-db1:3306/nevismetajdbc:postgresql://host-db1:5432/nevismeta
Define the connection string with fully support database syntax, because this value is handed over to the MariaDB or PostgreSQL JDBC driver as connection string without any changes. You can find more information about the syntax in MariaDB JDBC or PostgreSQL JDBC
database.connection.username
Example: umet02
The name of the application user who has access to the schema set in the property database.connection.url. For details, see Overview of database users.
database.connection.password
Example: umet02
The password of the user set in the property database.connection.username.
database.connection.schema.owner.username
Example: umet01
The name of the user who is the owner of the schema specified in database.connection.url. For details, see Overview of database users.
database.connection.schema.owner.password
Example: umet01
The password of the user set in the property database.connection.schema.owner.username.
Default data
During the database initialization, new Setup will be created with id 00000000000000000000000000000000 named Default if the schema does not contain any tables.
MariaDB persistence backend
Stable. Recommended for production systems.
Relational databases have a proven track record as a reliable choice to persist structured data. To be in line with the software stack of Nevis components, MariaDB Server is supported as a persistence backend starting with nevisMeta 1.5.0.0.
Setup of MariaDB for nevisMeta
This chapter does not guide you through the setup of a MariaDB server. If step-by-step instructions to install a new MariaDB server are required, refer to the official MariaDB Server documentation.
It is strongly recommended that you back up your current nevisMeta MariaDB database (if any) before you create a new one.
Creating a new database for nevisMeta
The user in the following command must have the right to create a new database.
Run the following command:
nevismeta <instance name> init-mariadb <options>
The following options are available:
| Option | Default | Description | Example |
|---|---|---|---|
| -h | database.connection.url from the file nevismeta.properties | Defines the database host. You can have a single host or multiple hosts (separate by ","). | -h localhost |
| -P | 3306 | Defines the database port. | -P 1234 |
| -u | root | Defines the database root user to create the nevismeta DB and user. | -u customUser |
| -p | false | Flag to enable/disable a password-protected connection to the DB. The value must be "true" or "false". | -p true |
The command will create an empty MariaDB database with the following users:
| User | Local host | Current machine hostname |
|---|---|---|
<schema owner> | <schema owner>@localhost | <schema owner>@<current machine name> |
<schema user> | <schema user>@localhost | <schema user>@<current machine name> |
For example, the schema owner is umet01, the schema user is umet02 , and current the machine hostname is iam , so the following users will be create:
- umet01@localhost
- umet02@localhost
- umet01@iam
- umet02@iam
The setup information is taken from the nevismeta.properties file here:
Tables and other constraints are configured later via Flyway when starting a nevisMeta instance (see also Database migration with MariaDB).
Overview of database users
To separate concerns, the database is managed by several database users. The creation of the users is explained below.
| Username | Purpose | Required permissions | Created when |
|---|---|---|---|
| umet01 | A schema owner- has full control over the schema objects (tables, views, etc.),- can execute DDL,- is used for database migration only (see also Database migration with MariaDB] | ||
| umet02 | An application user- has read and write access to all objects in the schema,- cannot execute DDL,- is used for daily operations. | SELECT, INSERT, DELETE, UPDATE, EXECUTE | During |
| replication_user | Account used by the slave node to log into the master node | REPLICATION SLAVE to be able to replicate data | During |
| binarylog_user | Account used for binary log management | SUPER permission to be able to purge the binary logs | During |
Configuring outage resilience on MariaDB
This chapter is about resilience towards outages of database nodes, which differs from resilience towards failures of nevisMeta instances. To achieve resilience towards failures of nevisMeta instances, two nevisMeta instance addresses must be configured in nevisProxy. Such a configuration enables failover to the second nevisMeta instance if nevisProxy cannot connect to the first nevisMeta instance. For more information, see the nevisProxy reference guide (InetAddress parameter of the HttpConnectorServlet).
Resilience to database instance outage
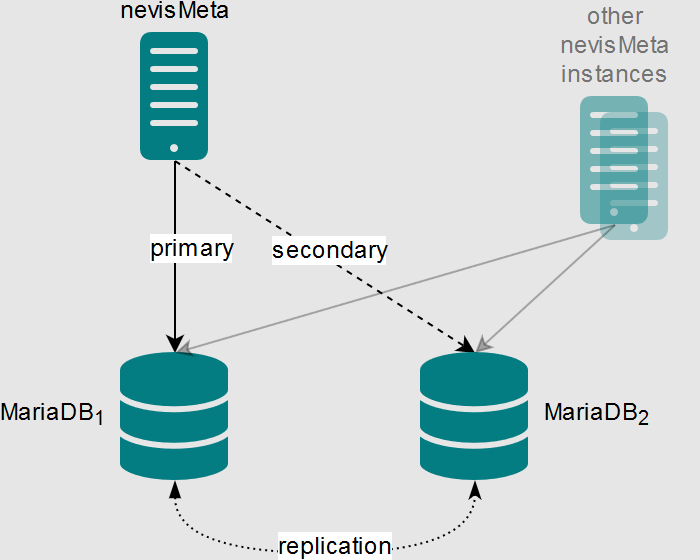
This chapter explains how to set up data replication with two MariaDB instances. The advantages of this solution are:
- Resilience towards outage of one of the MariaDB instances or its host (e.g., in case of a power outage).
- Resilience towards a failure of the network infrastructure between nevisMeta and one of the MariaDB instances (e.g., in case of a data center outage).
The above statements hold only as long as at least one of the two MariaDB instances is running and reachable. Simultaneous outage of both database instances hinders nevisMeta from running properly.
Components involved
This section describes the setup of a fail-safe persistence layer for nevisMeta using two MariaDB database hosts with data replication. This setup is tested with MariaDB version 10.3.7. For a discussion of the nevisProxy connection to the nevisMeta configuration, see the nevisProxy reference guide (the HttpConnectorServlet).
The database hosts are called host-db1 and host-db2 in this guide. The replication is enabled in both directions (master/master setup), so that each host is a replication master and a replication slave at the same time. The replication is enabled for a single database specified in the property database.connection.url (see nevisMeta configuration properties for MariaDB). It is called nevismeta for the sake of simplicity in this guide. Unless otherwise stated, the instructions have to be performed on both hosts.
Hint
The installation of MariaDB is not discussed here. For instructions, refer to the online documentation of MariaDB. Note that Nevis offers a database appliance that comes bundled with a pre-installed MariaDB package.### Implementation overview
Implementation Overview
Regular clustering solutions provide all fault-tolerant features themselves. Therefore, the connecting application has no clue about the resilient setup. The suggested solution takes a different approach. In this setup, the connecting application becomes part of the resilient setup in terms of configuration.
Two key features to achieve resilience
Connectivity (MariaDB JDBC driver)
jdbc:mariadb:sequential//host-db1:3306,host-db2:3306/nevismetaData consistency (MariaDB replication)
Replication is done by the database. The application and the JDBC driver are not aware of it at all.
Step-by-step setup of database replication
Prepare schema, user, tables, and constraints on both database servers:
Create the schema, user as described in Creating a new database for nevisMeta on one server.
Synchronize data for both database servers
In case of setup replication for a fresh nevisMeta, tables, constraints and data will be replicated by MariaDB, so we do not need to do anything.
In case of setup replication for running nevisMeta, all the data that exists before replication will not be replicated by MariaDB, so you need to manually copy it over by following the steps below:
- Make a copy of the newly created database. For details, see Backup persisted data on a MariaDB server.
- Apply the database copy to the other database server:
mysql -u umet01 -p nevismeta < <path to the database copy file>
Ensure that you can remotely access the database specified in the property database.connection.url with the user specified in the property database.connection.username (in the nevismeta.properties file):
mysql -h <hostname of the remote database server> -P 3306 -u umet02 -p nevismeta
If the previous command does not work, follow this guide for configuring remote client access on MariaDB.
- Grant permission to the nevisMeta user to check the replication status on each database server:
GRANT REPLICATION CLIENT ON *.* TO 'umet01'@'localhost';
- Create the replication user on each database server:
CREATE USER IF NOT EXISTS 'replication_user'@'<hostname of the other database server>' IDENTIFIED BY 'replicationpassword';
GRANT REPLICATION SLAVE ON *.* TO 'replication_user'@'<hostname of the other database server>';
FLUSH PRIVILEGES;
- Create the user for binary log monitoring on each database server:
CREATE USER IF NOT EXISTS binarylog_user IDENTIFIED BY 'binarylogspassword';
GRANT SUPER ON *.* TO binarylog_user;
Configure the MariaDB service. Add the following entries to the file /etc/my.cnf as super user on each database servers. The two configuration files (host-db1 and host-db2) differ at some points. The different lines are marked with (*).
Configure the MariaDB service on host-db1:
[mariadb]
# Enabling binary log
log-bin
# The ID of this master (*)
server_id=1
# The ID of the replication stream created by this master (*)
gtid-domain-id=1
# The basename and format of the binary log (*)
log-basename=nevismeta-primary-master
binlog-format=MIXED
# Setting for which database is replicated
replicate_wild_do_table="nevismeta.%"
# Avoiding collisions of primary IDs for tables where the primary ID is auto-incremented
# Auto-increment value
auto_increment_increment=2
# Auto-increment offset (*)
auto_increment_offset=1
# Suppressing duplicated keys errors for multi-master setup
slave_exec_mode=IDEMPOTENT
# Ignoring some data definition language errors
slave-skip-errors=1452,1062
# Suppressing binary logs after a delay regardless of the replication status
expire_logs_days=1
# Maximum number of connections
max_connections=1000
# Size of each of the binary log files (default: 1GB)
max_binlog_size=500M
# Enabling writing to the DB in parallel threads for the replication
slave-parallel-threads=10
# enabling semi-synchronous replication
rpl_semi_sync_master_enabled=ON
rpl_semi_sync_slave_enabled=ON
# change to READ COMMITTED
transaction-isolation=READ-COMMITTED
Configure the MariaDB service on host-db2:
[mariadb]
# Enabling binary log
log-bin
# The ID of this master (*)
server_id=2
# The ID of the replication stream created by this master (*)
gtid-domain-id=2
# The basename and format of the binary log (*)
log-basename=nevismeta-secondary-master
binlog-format=MIXED
# Setting for which database is replicated
replicate_wild_do_table="nevismeta.%"
# Avoiding collisions of primary IDs for tables where the primary ID is auto-incremented
# Auto-increment value
auto_increment_increment=2
# Auto-increment offset (*)
auto_increment_offset=2
# Suppressing duplicated keys errors for multi-master setup
slave_exec_mode=IDEMPOTENT
# Ignoring some data definition language errors
slave-skip-errors=1452,1062
# Suppressing binary logs after a delay regardless of the replication status
expire_logs_days=1
# Maximum number of connections
max_connections=1000
# Size of each of the binary log files (default: 1GB)
max_binlog_size=500M
# Enabling writing to the DB in parallel threads for the replication
slave-parallel-threads=10
# enabling semi-synchronous replication
rpl_semi_sync_master_enabled=ON
rpl_semi_sync_slave_enabled=ON
# change to READ COMMITTED
transaction-isolation=READ-COMMITTED
Restart the mariadb servers on both hosts:
sudo systemctl restart mariadb
Semi-synchronous replication
By default, MariaDB uses asynchronous replication. To reach more consistency, it is recommended using semi-synchronous replication.
The database configurations previously shown enable semi-synchronous replication with the following lines:
rpl_semi_sync_master_enabled=ON
rpl_semi_sync_slave_enabled=ON
MariaDB versions before 10.3.3 require the installation of plug-ins for semi-synchronous replication and are not supported.
Start-up of replication
To start the replication, log in as root into your MariaDB client and run the following commands.
- On host-db1 (points to the master on host-db2):
Setting master on host-db1
CHANGE MASTER TO
  MASTER_HOST='host-db2',
  MASTER_USER='replication_user',
  MASTER_PASSWORD='replicationpassword',
  MASTER_PORT=3306,
  MASTER_USE_GTID=current_pos,
  MASTER_CONNECT_RETRY=10;
- On host-db2 (points to the master on host-db1):
Setting master on host-db2
CHANGE MASTER TO
  MASTER_HOST='host-db1',
  MASTER_USER='replication_user',
  MASTER_PASSWORD='replicationpassword',
  MASTER_PORT=3306,
  MASTER_USE_GTID=current_pos,
  MASTER_CONNECT_RETRY=10;
- On host-db1:
Starting replication on host-db1
START SLAVE;
- On host-db2:
Starting replication on host-db2
START SLAVE;
Verify on both hosts that the data replication runs properly:
SHOW SLAVE STATUS\G;
# then look for these both values
# Slave_IO_Running: Yes
# Slave_SQL_Running: Yes
Once both MariaDB servers start replication successfully, configure two database hosts in the property database.connection.url and restart nevisMeta. See also nevisMeta configuration properties for MariaDB further above.
database.connection.url=jdbc:mariadb:sequential//host-db1:3306,host-db2:3306/nevismeta
We recommend using sequential fail-over mode, which will sequentially use the database nodes in the provided order, one at the time.
The connection handling to a database in nevisMeta is lazy. If one of the database nodes fails, the system continuously moves each connection to the other node. The same happens if the failing database node recovers. That is, the connections are continuously re-initiated to the recovered node as they age out.
Additional setup
Purging the binary logs
With the provided configuration (expire_logs_days=1 in the MariaDB settings), the system will automatically remove binary logs that are older than one day, even if the logs were not copied by the slave. This prevents the disk of the master node from being filled up in case the slave is down for a long time. The automatic binary log removal takes place when
- the master DB node starts,
- the logs are flushed (nevisMeta does not use this feature),
- the binary log rotates, or
- the binary logs are purged manually (see below).
So binary logs older than one day can exist, if none of the listed actions occurred recently.
Complementary to this expiration feature, MariaDB provides the possibility to manually purge the binary logs. The purge action removes all binary logs that were already copied by the slave. This allows a safe removal of the binary logs on a regular basis. The nevisProxy package is delivered with an adaptable purging script, which is located at: /opt/nevisproxy/sql/mariadb/purgebinarylogs.sh
To use this script,
- copy the script to a location of your choice, and
- adapt it to your configuration.
The script takes care of both DB nodes, so that it only needs to be configured once.
Note that if different database server nodes are used for nevisProxy and nevisMeta, you have to set them up separately.
You can schedule the script to run for example once per hour, with a cron job:
/etc/crontab
0 * * * * /var/opt/nevisproxy/instance/conf/purgebinarylogs.sh # Absolute path of your adapted script
Size the binary logs
The provided configuration (max_binlog_size=500M in the MariaDB settings) allows you to configure the maximal size of the binary log files before rotating. The smaller the size, the more often rotations will occur, which will slow down replication. The advantage is a more efficient purge process. The bigger the size, the less often rotations will occur, but the disk may be filled with old logs.
According to our experiences, a size less than 8K does stop replication completely under heavy load, because the slave keeps rotating the logs.
Troubleshooting
There is a common issue with configuring MariaDB to allow remote client access. If you encounter this problem, have a look at this useful article from MariaDB: Configuring MariaDB for Remote Client Access.
Usually the slave stops replication if an error occurs. You can check the state of the slave with the following sql command:
show slave status\G
Note that showing the slave status requires the REPLICATION CLIENT grant.
If replication has stopped, usually the error that caused it will be displayed. First you should try to fix the error. If this is not possible, you can do a "forced" restart of the slave like this:
On the master call (to display the current state of the master):
MariaDB [replicated_session_store]> show master status\G
*************************** 1. row ***************************
            File: nevismeta-primary-master-bin.000131
            Position: 194630804
            Binlog_Do_DB:
            Binlog_Ignore_DB:
1 row in set (0.00 sec)
On the slave (using the values returned by the above call "show master status\G" on the master):
STOP SLAVE;
CHANGE MASTER TO
  MASTER_LOG_FILE='nevismeta-primary-master-bin.000131',
  MASTER_LOG_POS=194630804;
START SLAVE;
In this way, the system will restart the slave, without replicating to the slave all data manipulation that occurred from the moment replication has stopped until now.
Database migration with MariaDB
The database schema may evolve over time. Migration of the database schema is automatically done when a new version of nevisMeta connects for the first time to a database with an old database schema.
It is strongly recommended that you back up the database before you upgrade nevisMeta. This is because earlier versions of nevisMeta may not be able to connect to the database anymore after the completion of the automated migration.
PostgreSQL
This chapter does not guide you through the setup of a PostgreSQL server. If you need step-by-step instructions to install a new PostgreSQL server, refer to the PostgreSQL Server documentation.
To run nevisMeta with PostgreSQL, you need a local or remote PostgreSQL server installation. In addition, a PostgreSQL client is required for the initial database setup.
Creating a new database for nevisMeta
Creating the database users
To separate concerns, the database is managed by several database users. The creation of the users is explained below.
| Username | Purpose | Required permissions | Created when |
|---|---|---|---|
| umet01 | A schema owner- has full control over the schema objects (tables, views, etc.),- can execute DDL,- is used for database migration only (see also Database migration with MariaDB] | ||
| umet02 | An application user- has read and write access to all objects in the schema,- cannot execute DDL,- is used for daily operations. | SELECT, INSERT, DELETE, UPDATE, EXECUTE | During |
- Log in to the PostgreSQL as the system user.
- Execute the steps described in the following code block to create the required users:
CREATE USER "umet01" WITH encrypted password 'REPLACE_WITH_PASSWORD';
CREATE USER "umet02" WITH encrypted password 'REPLACE_WITH_PASSWORD';
The CREATE USER is an alias for CREATE ROLE, with the sole difference of a single option.
When we have created the required users, we have defined ROLES in the PostgreSQL.
Creating the database
We have created the two required users in advance, as the database will be assigned to the owner.
The following command creates the database. If no custom table space was created, use the default 'pg_default':
CREATE DATABASE nevismeta
    WITH
OWNER =  "umet01"
tablespace = REPLACE_WITH_TS_NAME
ENCODING = 'UTF8'
LC_COLLATE = 'C'
TEMPLATE template0
;
Set search_path for users
Setting up search_path simplifies the connection URL used for the database users.
ALTER ROLE "umet01" IN DATABASE nevismeta SET search_path TO "umet01";
ALTER ROLE "umet02" IN DATABASE nevismeta SET search_path TO "umet01";
Creating schema and setting up default privileges
A database contains one or more schemas, which then contains the tables. It can represent logical group of tables, and can reduce naming issues. It is also used to allow multiple users to use the database, without them interfering with each other.
To create the schema:
CREATE SCHEMA "umet01" AUTHORIZATION "umet01";
Providing access to the schema and database to the "umet02" database user:
GRANT USAGE ON SCHEMA "umet02" to "umet02";
GRANT CONNECT ON DATABASE nevismeta TO "umet02";
Setting up privileges for all future created tables, sequences and functions for "umet02" database user:
ALTER DEFAULT PRIVILEGES FOR USER "umet01" IN SCHEMA "umet01" GRANT SELECT, INSERT, UPDATE, DELETE, TRIGGER ON TABLES TO "umet02";
ALTER DEFAULT PRIVILEGES FOR USER "umet01" IN SCHEMA "umet01" GRANT USAGE, SELECT ON SEQUENCES TO "umet02";
ALTER DEFAULT PRIVILEGES FOR USER "umet01" IN SCHEMA "umet01" GRANT EXECUTE ON FUNCTIONS TO "umet02";