 Ninwin
Ninwin implements authorization based on Nevis SecTokens as a .NET HttpModule. It provides a convenient interface to ASP.NET-based IIS web applications to authorize access and consume claims contained in Nevis SecTokens. The Ninwin technical documentation provides all the information required for the installation, configuration, administration and operation of Ninwin.
The official component name is "NINWIN – Nevis Integration with Windows" (short "Ninwin"). Sometimes, the component is also referred to by its technical name "NinNetHttpModule", short "NinNet". NINWIN and NinNetHttpModule are identical.
Concept Description and Technical Architecture
Ninwin implements authorization based on Nevis SecTokens as a .NET HttpModule. It provides a convenient interface to ASP.NET-based IIS web applications to authorize access and consume claims contained in Nevis SecTokens. Ninwin is sometimes referred to by its technical module name "NinNet".
This chapter provides a technical view on the NinNet HttpModule. The usage context, implemented features and restrictions as well as the chosen implementation will be explained.
Scope of the NinNet HttpModule
Perimeter Authentication
In a single sign-on environment, user authentication is typically managed by a central reverse proxy (or entry server). Often, the entry server delegates the actual authentication process to a separate authentication service. Regardless of this delegation, all application servers that can be reached through the reverse proxy have to trust the reverse proxy to forward only authenticated requests. Because an application server no longer authenticates the user directly, it must at least be able to extract the user's identity from a request. Most modern application servers offer this feature, and some vendors use the term perimeter authentication for this setup.
Secure Token Delegation
To prove that a user has been authenticated, the entry server adds a so-called secure token (SecToken) to every request – either as a basic authentication header or as a custom HTTP header. Among other things, the secure token contains authentication data about the user; it is digitally signed by the authentication service. In such an environment, the application server must only accept requests containing a valid secure token. Because the information contained in the secure token is digitally signed, any manipulation of this data is detected. After the NinNet component has verified the token's integrity, we know for sure that the token has been issued by a trusted authentication service.
To achieve end-to-end security, the secure token should be propagated along the call chain. Each node or service in this chain is responsible for verifying the token.
Context of Usage: The Nevis Web Framework
To better understand the functionality of the NinNet HttpModule, it is important to understand the context in which it is used. Basically, the component has to perform its task in the context of a Nevis Web structured environment. This means that there is an entry point reverse proxy which uses an authentication service to authenticate users.
To explain the basic principle, the interactions between these components may be simplified as follows:
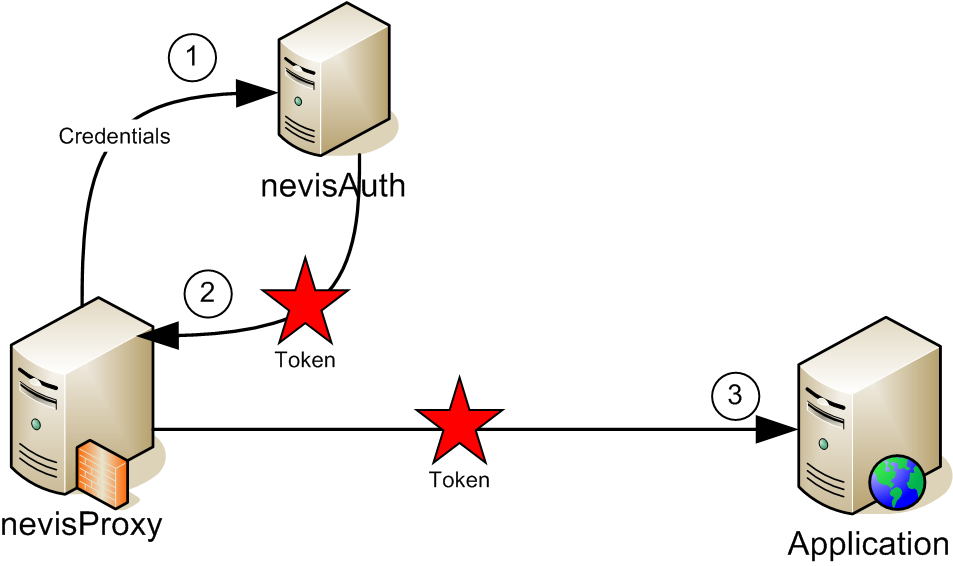
- The user's browser sends an HTTP request to the reverse proxy. If the user has not yet logged on, the reverse proxy redirects the browser to a login page.
- The actual authentication is delegated to the authentication service. Although the authentication process may consist of multiple (interactive) steps, it is simplified as a single arrow in the drawing as we are only interested in the result of the authentication. The authentication server returns a secure token to the reverse proxy, and this token is stored in the user's single sign-on session.
- After successful authentication, subsequent requests of the same user are passed directly to the IIS application server, with one important addition: Each request contains the secure token as an additional HTTP header entry. It is now the task of the NinNet HttpModule to verify this token and to reject any invalid request.
Features
The NinNet HttpModule provides the following features:
- Secure token verification: Only requests containing a correct token are accepted and passed to the web application. A token is considered correct if it has been issued by a trusted authenticator and if the contained data has not been tampered with, i.e. the token is authentic. Often, the token is verified on the first request only. For subsequent requests, the application server identifies the original caller with the aid of a tracking mechanism (like a HTTP cookie).
- Secure token lifetime check: The lifetime of the token must regularly be checked by comparing the actual clock time with the signature time and the token lifetime. The clocks of the token-issuer machine and the verifying machine may vary: The maximum tolerated clock variance should be configurable.
- .NET authentication: The authentication providers plug into the application servers authentication framework to support declarative and programmatic security according to .NET specification. The authentication typically results in an object implementing IPrincipal that represents the users identity and roles. All further security checks are based on this object. The container propagates this object by adding it to the HttpContext.
- Identity propagation to the application: The identity and roles contained in the secure token must be made available to the application. This may be achieved by the means of the .NET authentication and authorization framework.
Restrictions
- The NinNet HttpModule has been designed for the purpose to provide integration with Nevis and Nevis SecTokens to ASP.NET applications. It should not be used in any other context. (The NinNet HttpModule requires the .NET 4.0 runtime system and has been tested with Microsoft IIS 7.5 running on Windows Server 2008 R2.)
- The secure token is propagated to the HttpModule in a custom HTTP header entry.
- If you are looking for authentication and authorization in ASP.NET Core, we refer to authorization via JWTs as described here and here. In such a setup, Nevis issues JWTs in addition (or instead of) to the Nevis SecToken.
Implementation
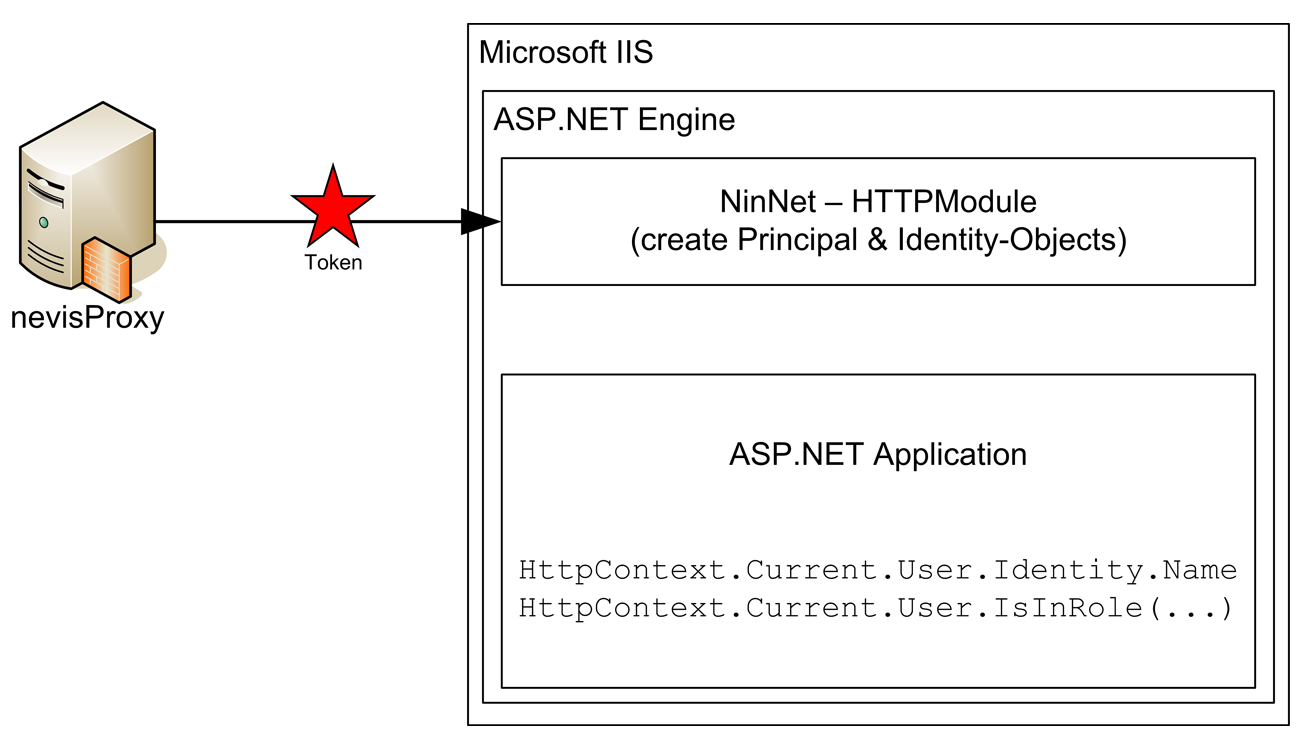
The Ninwin secure token validation component for .NET is implemented as a .NET HttpModule (NinNet). The NinNet HttpModule implements the interface IHttpModule and registers a callback for AuthenticateRequest. This callback is invoked whenever a user should be authenticated.
The module can be seen as a filter which is located in the ASP.NET engine itself. This allows the HttpModule to log in the user to the container. The user and its roles can then be retrieved or checked by standard conforming .NET calls.
Authentication based on the caller's secure token is carried out when the NinNet HttpModule, SecTokenAuthenticationModule, is activated in the Web.config file. This HttpModule registers a callback for the OnAuthenticateRequest and, when invoked by the ASP.NET subsystem, performs the following steps:
- Reads the secure token from the custom HTTP header entry or uses the password of a basic authentication „Authorization" header. The header name is configurable and defaults to "isiwebsectoken" if no configuration property in the Web.config file is found.
- Verifies the signature and validates the secure token. Verification of a secure token entails verifying the signature on the secure token. Validation means that the lifetime of the secure token is checked.
- Upon successful verification and validation, creates an AuthTokenPrincipal based on the contents of the secure token.
- Invokes either the configured IRoleGetter class or the default TokenRoleGetter class to obtain the list of roles for the user based on the secure token. As its name implies, the default class will read the list of roles straight from the secure token. However, applications are free to implement their own strategies by implementing their own IRoleGetter type and configuring this type in the Web.config file.
- Populates the AuthTokenPrincipal with the role list obtained from the IRoleGetter implementation.
- Stores the AuthTokenPrincipal object in the HttpContext.Current.User property to be used by any downstream authorization modules.
ASP.NET also wires up Thread.CurrentPrincipal based on HttpContext.User after the AuthenticateRequest event, so the newly created AuthTokenPrincipal object is available via the current Thread and the current HttpContext.
If no secure token is found or verification or validation of the secure token fails for any reason, the SecTokenAuthenticationModule will block the request by redirecting the caller to configured error pages.
The following picture gives a general overview of the entire process.
Propagation of the User Identity and Roles
As mentioned above, the SecTokenAuthenticationModule will create an AuthTokenPrincipal based on the secure token and store this object in the HttpContext.User. The AuthTokenPrincipal implements the System.Security.Principal.IPrincipal interface. The System.Security.Principal.GenericIdentity class is used to store the identity information of the user. The following figure illustrates how these objects are linked.

However, applications should never have to cast to the underlying types and should always manipulate the objects through their interfaces. This ensures that future changes to the particular implementations will not adversely affect any existing applications.
Once the HttpContext.User value is set, downstream modules can simply retrieve the IPrincipal and IIdentity information using standard conforming .NET calls as follows:
HttpContext.Current.User.Identity.Name
HttpContext.Current.User.IsInRole(...)
Similarly to J2EE applications, declarative authorization is possible by defining which roles a user needs to have when accessing a specific function. When declarative authorization is declared, the ASP.NET system effectively marches down the list of configured roles and invokes code similar to the following pseudocode:
if (HttpContext.Current.User.IsInRole("ConfiguredRole")) {
ApplyRule();
}
Additional Token Information (Claims)
The System.Security.Principal.IPrincipal interface is limited to a small set of standard parameters such as the user identity and roles. The Nevis SecToken can contain more information and this information is accessible by the application. The IPrinciple is implemented by Nevis.NinNet.Auth.AuthTokenPrinciple which offers the AuthToken property that can be used to access the token information through the Nevis.NetCan.SecToken.IAuthToken interface that is found in the Nevis.NinNet.Interfaces assembly.
var principle = HttpContext.Current.User as IAuthTokenPrinciple;
var claimValue = principle.AuthToken.Get("claim");
var roles = principle.AuthToken.UserRoles;
NinNet HttpModule - Installation
The NinNet module is delivered as a Microsoft Windows Installer package containing the required assemblies. This package can be installed in an arbitrary directory (chosen at installation time). The assemblies are privately deployed assemblies. That is, applications need to copy the assemblies to their own package or installation directory for them to be found.
Installation
This chapter describes the steps that have to be executed when installing the NinNet HttpModule onto a Windows Server 2008 R2 with IIS 7.5. The following steps describe the installation of the package:
- Execute the installer "ninnet.msi". Follow the steps to install the niniis to an arbitrary
<install_dir>.
Integration of the NinNet HttpModule in a .NET Application
The installed DLL has to be included in the .NET web application. Basically the HttpModule has to be configured in the web.config file of the .NET web application. To which section of the configuration this goes depends on the application and the kind of application pool that is used. For the default (integrated pipeline) application pool, the module has to be registered in the system.webServer section as shown below:
<configuration>
  <system.webServer>
    <modules>
      <add type="Nevis.NinNet.Auth.SecTokenAuthenticationModule, Nevis.NinNet"
           name="Nevis.NinNet"/>
    </modules>
  </system.webServer>
</configuration>
For classic application pools, the module has to be registered in the system.web section as shown below:
<configuration>
  <system.web>
    <httpModules>
      <add type="Nevis.NinNet.Auth.SecTokenAuthenticationModule, Nevis.NinNet"
           name="Nevis.NinNet"/>
    </httpModules>
</system.web>
</configuration>
Also the default authentication module of ASP.NET has to be disabled (only one authentication module is loaded):
<authentication mode="None"/>
For a secure environment, only authenticated users should be allowed (e.g. no anonymous access):
<authorization>
 <deny users="?"/>
</authorization>
A detailed example config can be found as an appendix to this document.
Development Mode
NinNet also supports the development mode feature. When enabled it will allow developers to use basic authentication to access the web application. The developer has to provide a username and the developer password. If no token is configured for this user NinNet will create a default properties file for that user in the specified location. This file can be modified to incorporate additional claims into the security token.
Example:
<add key="devMode" value="true" /><add key="devPassword" value="test" /><add key="devTokenSignerCert" value="csp://CurrentUser/My?friendlyName=signer" />
In the example above, development mode was enabled. We use the password "test" to login. As soon a protected resource is accessed basic authentication is triggered. We can then log in using an arbitrary username and the password "test". NinNet will create a properties file in the temporary directory (%TEMP%).
devmode_user.properties
The file can be modified. NinNet then creates a sectoken with the claims specified in the properties file.
Configuration of the NinNet HttpModule
The NinNet HttpModule is configured using the Web.config file of the .NET application. The configuration uses its own section, therefore, it is necessary that the following is defined in the <sectionGroups> tag:
<sectionGroup name="system.web">
   <section name="nevis.ninnet"
      type="System.Configuration.NameValueSectionHandler,System,
      Version=1.0.5000.0,Culture=neutral,PublicKeyToken=b77a5c561934e089"/>
</sectionGroup>
This defines a handler for the NinNet HttpModule section. As seen from the configuration tag above, the NinNet HttpModule configuration tag is called <nevis.ninnet> and is a sub-section of the <system.web> tag.
The following section shows the configurable parameters for the NinNet HttpModule (the parameters are kept similar to the ones of the J2EE Ninja login module).
Configuration parameters
verifierCert
- Type: string array
- A comma (or semi-colon) delimited list of verifier certificates used for SecToken verification. The list of certificates are URIs pointing to certificate stores from where certificates should be read. Currently there are three "types" of stores supported:
file://<path-to-ceritificate>base64://<base64-encoded-certificate>csp://<storeLocation>/<storeName>[?query]
For the file:// store, the path can be either absolute or relative to the web application. This attribute defines the certificates used to verify the SecToken. The certificates can either be in DER or PEM format.
For the csp:// store, the Microsoft Windows Certificate Store is used and can be managed through the management console. The URI is defined by a store location and a name. The values for location, the name and the optional query parameters are described below.
noSecTokenRedirectURL
- Type: string
- Redirect page to use when no SecToken is found in the configured header.
tokenValidationErrorRedirectURL
- Type: string
- Redirect page to use when an error occurs verifying or validating the SecToken.
secTokenHeaderName
- Type: string
- Name of the HTTP header containing the SecToken. If not defined, defaults to "isiwebsectoken".
staticRoles
- Type: string array
- A comma (or semi-colon) delimited list of roles which every authenticated user gets automatically.
roleGetter
- Type: string
- Class which is used to retrieve the Role values based on a SecToken. By default, the TokenRoleGetter class is used if nothing is defined. This class retrieves the roles directly from the SecToken. Users can, however, override this functionality by directly specifying their own implementation here. All subclasses must implement Nevis.NinNet.Role.IRoleGetter.
To specify the type, the name plus the additional Assembly must be specified.
tokenTolerance
- Type: integer
- Defines the TokenTolerance (in seconds) used when validating a SecToken. Defaults to 600s (10min).
enforcedTokenPaths
- Type: string array
- A semi-colon (or comma) delimited list of protected locations. SecToken verification will only occur if the incoming URL starts with one of the defined protected locations. Conversely, if an incoming request matches one of the paths configured here, then a SecToken must be present as part of the request, otherwise the authentication module will block the request. If no protected locations are configured, then SecToken verification will always occur. This keeps the behavior backward-compatible.
The configured paths are relative to the web application location (e.g. /bar if the web application is deployed under /foo and we want to protect /foo/bar) and are matched case insensitively.
This value was previously configured with the key „protectedPaths”, which is still supported but considered deprecated. Newer applications should configure „enforcedTokenPaths”.
relaxedTokenPaths
- Type: string array
- A semi-colon (or comma) delimited list of optionally protected paths where SecToken verification will occur if the incoming URL matches one of the defined paths and a SecToken is available.
The „relaxed” in the name refers to the relaxation of SecToken verification and validation on the configured path. If a request arrives on a relaxed protected path and no SecToken is available (not sent by client), then SecToken verification is skipped and the call is passed through unauthenticatedly.
The configured paths are relative to the web application location (e.g. /bar if the web application is deployed under /foo and we want to protect /foo/bar) and are matched case insensitively.
If a path is configured in both „enforcedTokenPaths” and „relaxedTokenPaths”, then the semantics of „enforcedTokenPaths” take precedence. In other words, a SecToken must be present in this case, otherwise the request will be blocked by the authentication module.
enabledWindowsImpersonation
- Type: boolean
- Indicates whether the NinNet authentication module should perform user impersonation after successful verification of the SecToken.
Default is false.
impersonationDomainName
- Type: string
- The domain name to use when constructing the service principal name (SPN) for authenticating against an Active Directory server using the Kerberos protocol.
The SPN is created as follows: <user-id-from-sectoken>@<impersonationDomainName>
This value is only used if enabledWindowsImpersonation is set to true.
basicAuth
- Type: boolean
- Indicates whether the NinNet authentication module should search for a section in the password of an „Authorization” header used in HTTP basic authentication.
Default is false.
basicAuthDataEncoding
- Type: string
- Indicates the encoding type used to decode the content of the „Authorization” header used in HTTP basic authentication.
Default is UTF-8.
devMode
- Type: Boolean
- Indicates whether the development mode is enabled or not. If it is enabled several other parameters have to be provided. This feature will automatically enable basic authentication.
devDir
- Type: string
- Optional path to the directory that the NinNet developer mode uses to store temporary files. It defaults to the Windows default temporary files directory which depends on the user running the web application.
devPassword
- Type: string
- The developer password the user has to type to obtain access as developer.
devTokenSignerCert
- Type: string
- A certificate URI similar to the one used in “verifierCert” with the difference that the certificate has to provide a private key for token signing.
The certificate is automatically added to the token verification certificates if development mode is enabled. So there is no need to put this certificate into the “verifierCert” configuration.
devTokenSignerKeyPassphrase
- Type: string
- An optional password to access the private key of “devTokenSignerCert”.
Explanation of the store location in csp:// URIs
| Store Location | Explanation |
|---|---|
CurrentUser | The X.509 certificate store used by the current user. |
LocalMachine | The X.509 certificate store assigned to the local machine. |
Explanation of the store name in csp:// URIs
| Store Name | Explanation |
|---|---|
AddressBook | The X.509 certificate store for other users. |
AuthRoot | The X.509 certificate store for third-party certificate authorities (CAs). |
CertificateAuthority | The X.509 certificate store for intermediate certificate authorities (CAs). |
My | The X.509 certificate store for personal certificates. |
Root | The X.509 certificate store for trusted root certificate authorities (CAs). |
TrustedPeople | The X.509 certificate store for directly trusted people and resources. |
TrustedPublisher | The X.509 certificate store for directly trusted publishers. |
Explanation of the query parameters in csp:// URIs
| Query Parameter | Explanation |
|---|---|
fingerprint | Search by the fingerprint of the X509 ceritficate as shown in the properties of the certificate in the store. All non-hexadecimal characters are ignored. Example: csp://CurrentUser/My?fingerprint=53e0eebde05ad61bfbfddf308ebc709ca8db721c |
friendlyName | Search by the friendly name of the X509 certificate. Example: csp://CurrentUser/My?friendlyName=signer |
subjectDn | Search by the subject distinguished name (DN) of the X509 certificate. Note that the = signs in the DN are URL encoded to %3D in the example below. Example: csp://CurrentUser/My?subjectDn=CN %3D Signer, O %3D Org, C %3D ch |
The sample directory contains a Web.config file showing a sample configuration for a test application. All configuration parameters listed in the table above are also found in the sample Web.config along with a short description, describing how the parameter is configured.
Caching Configuration
The NinNet HttpModule makes use of a memory cache for validated tokens. The size and runtime characteristics of this cache can be controlled in the web.config by adding the following section to the configuration:
<!-- control the cache behavior of NinNet -->
<system.runtime.caching>
  <memoryCache>
    <namedCaches>
      <add name="Nevis.NinNet.NetCan.SecToken.MemoryTokenCache"
        cacheMemoryLimitMegabytes="10"
        physicalMemoryLimitPercentage="0"
        pollingInterval="00:05:00" />
    </namedCaches>
  </memoryCache>
</system.runtime.caching>
For a detailed description of the caching parameters, refer to Microsoft's documentation.
It is recommended to not use this section which enables auto-sizing defaults which are optimal for most cases.
Impersonation
Impersonation enables ASP.NET to execute code and access resources in the context of an authenticated user. The NinNet module supports impersonation by creating a service principal name (SPN) and authenticating the user against an Active Directory using the Kerberos protocol. The exact steps used are described below.
- The secure token is read from the header and validated.
- The principal name is extracted from the verified secure token and, together with a configured domain name, a service principal name (SPN) is created.
- A new WindowsPrincipal is then created using this service principal name and this WindowsPrincipal is then used to do the impersonation.
Configuration Parameters
To configure impersonation using the NinNet authentication module, the following two configuration parameters must be configured.
- enableWindowsImpersonation
- impersonationDomainName
The enableWindowsImpersonation parameter is a boolean flag indicating whether impersonation should take place. The impersonationDomainName is used to create the service principal name for authentication against the Active Directory server. The SPN is constructed using the user-id found in the verified SecToken and the configured domain name specified by the impersonationDomainName.
The <identity impersonate="true"/> property cannot be used to enabled impersonation with the NinNet authentication module. This property can only be used in conjunction with the WindowsAuthentication module.
Tracing
Tracing in the NinNet HttpModule is carried out using the log4net framework. Tracing is configured in the web.config configuration file.
In the sample directory, which is installed as part of the NinNet package, there is a sample log4netsection in the web.config file which can be used by an application. The default template uses a RollingAppender, rolling the log files based on their size.
It is important that the user under which the IIS server process is running has write privileges on the specified logfile location.
Appendix - NinNet Example Configuration Files
<?xml version="1.0"?>

<configuration>
  <configSections>
    <sectionGroup name="system.web">
      <section name="nevis.ninnet"

type="System.Configuration.NameValueSectionHandler,System,Version=1.0.5000.0,Culture=neutral,PublicKeyToken=b77a5c561934e089" />
    </sectionGroup>
    <section name="log4net" type="log4net.Config.Log4NetConfigurationSectionHandler, log4net" />
  </configSections>

  <system.web>
    <compilation targetFramework="4.0" />
    <globalization requestEncoding="UTF-8" responseEncoding="UTF-8" />

    <nevis.ninnet>
      <!-- =========================== MANDATORY OPTIONS =========================== -->
      <!--
        A comma (or semi-colon) delimited list of verifier certificates.
        The list of certificates are URIs pointing to certificate stores from where
        certificates should be read. Currently there are two types of stores supported:

          o file://<path-to-ceritificate>
          o base64://<base64-encoded-certificate>
          o csp://<storeLocation>/<storeName><?query>

        For the file:// store, the path can be either absolute or relative to the
        Web application base directory. Supported formats are PEM and DER.

        The Windows Certificate Store can be accessed through csp:// URIs.
      -->
      <add key="verifierCert" value="csp://LocalMachine/My;csp://LocalMachine/Root"/>

      <!-- Redirect page to use when no SecToken is found in the configured header -->
      <add key="noSecTokenRedirectURL" value="/missing.html" />

      <!-- Redirect page to use when an error occurs verifying or validating the
      SecToken
      -->
      <add key="tokenValidationErrorRedirectURL" value="/invalid.html" />

      <!-- ============================ OPTIONAL OPTIONS =========================== -->

      <!-- Name of the HTTP header containing the SecToken. Defaults to "isiwebsectoken"
      -->
      <!-- <add key="secTokenHeaderName" value="isiwebsectoken"/> -->
      <!--
        Use the HTTP basic authentication password from the Authorization header as the
        SecToken. Defaults to "false" -->
      <!-- <add key="basicAuth" value="true"/> -->

      <!--
        A semi-colon (or comma) delimited list of roles which every authenticated user
        gets automatically
      -->
      <add key="staticRoles" value="engineer;tester" />

      <!--
        Class which is used to retrieve the Role values based on a SecToken. By default,
        the TokeRoleGetter class is used if nothing is defined. This class retrieves the
        roles directly from the SecToken. Users, however, can override this
        functionality by directly specifying their own implementation here. All
        subclasses must implement the Nevis.NinNet.Role.IRoleGetter interface.

        To specify the type, the name plus the additional Assembly must be specified.
      -->
      <!-- <add key="roleGetter" value="MyNameSpace.MyRoleGetter, MyAssembly"/> -->

      <!--
        Defines the TokenTolerance (in seconds) used when validating a SecToken.
        Defaults to 600s (10min)
      -->
      <!-- <add key="tokenTolerance" value="600"/> -->

      <!--
        A semi-colon (or comma) delimited list of protected paths where SecToken
        verification is enforced if the incoming URL matches one of the defined
        protected paths. If no paths are configured, then SecToken verification
        will always occur (default: '/'). This keeps the behavior backward-compatible.

        The list of paths is taken relative to the Web application path. That is,
        if your Web application is located at /portalapp, then all configured path
        values are taken relative to this path.

        NOTE: This value was previously configured with the key 'protectedPaths' which
        is still supported but considered deprecated. Newer applications should
        configure 'enforcedTokenPaths'.
      -->
      <add key="enforcedTokenPaths" value="/secured" />

      <!--
        A semi-colon (or comma) delimited list of optionally protected paths where
        SecToken verification will occur if the incoming URL matches one of the defined
        paths and a SecToken is available. The "relaxed" in the name refers to the
        relaxation of SecToken verification and validation on the configured path. If no
        paths are configured or no SecToken is available (not set by client), then
        SecToken verification is skipped and the call is passed through unauthenticated.

        The list of paths is taken relative to the Web application path. That is, if
        your Web application is located at /portalapp, then all configured path values
        are taken relative to this path.
      -->
      <add key="relaxedTokenPaths" value="/"/>
    </nevis.ninnet>

    <!--
      Configures the Nevis SecTokenAuthenticationModule for Token-based authentication
      Uncomment for classic application pool.

    <httpModules>
      <add type="Nevis.NinNet.Auth.SecTokenAuthenticationModule, Nevis.NinNet" name="Nevis.NinNet" />
    </httpModules>
    -->

    <!-- Disable default authentication: Authentication done by Nevis.NinNet -->
    <authentication mode="None" />

    <!-- Only allow authenticated users -->
    <authorization>
      <deny users="?" />
    </authorization>

    <!-- APPLICATION-LEVEL TRACE LOGGING
      Application-level tracing enables trace log output for every page within an
      application. Set trace enabled="true" to enable application trace logging.
      If pageOutput="true", the trace information will be displayed at the bottom
      of each page. Otherwise, you can view the application trace log by browsing
      the "trace.axd" page from your web application root.
    -->
    <trace enabled="false" requestLimit="10" pageOutput="false" traceMode="SortByTime" localOnly="true" />
  </system.web>
  <system.webServer>
  <modules>
    <!--
    Configures the Nevis SecTokenAuthenticationModule for Token-based authentication
    -->
    <add type="Nevis.NinNet.Auth.SecTokenAuthenticationModule, Nevis.NinNet" name="Nevis.NinNet" />
  </modules>
</system.webServer>
<log4net>

  <!-- ================================= -->
  <!-- Preserve messages in a local file -->
  <!-- ================================= -->

  <!-- Nevis.NinNet logging -->
  <appender name="FILE" type="log4net.Appender.RollingFileAppender">

    <param name="File" value="C:\inetpub\logs\ninnet.log"/>
    <param name="Append" value="false"/>
    <param name="MaximumFileSize" value="500KB"/>
    <param name="MaxSizeRollBackups" value="1"/>
    <param name="RollingStyle" value="Size"/>

    <layout type="log4net.Layout.PatternLayout">
      <param name="ConversionPattern" value="%d{ISO8601} %-15.15t %-28.28c %-5.5p %x%m%n"/>
    </layout>
  </appender>

  <appender name="ASP_TRACE" type="log4net.Appender.AspNetTraceAppender" >
    <layout type="log4net.Layout.PatternLayout">
      <param name="ConversionPattern" value="%d{ISO8601} %-15.15t %-28.28c %-5.5p %x%m%n"/>
    </layout>
  </appender>

  <!-- ============================ -->
  <!-- Limit application categories -->
  <!-- ============================ -->

  <logger name="Nevis">
    <level value="DEBUG"/>
  </logger>

  <!-- ======================= -->
  <!-- Setup the Root category -->
  <!-- ======================= -->

  <root>
    <level value="INFO"/>
    <appender-ref ref="FILE"/>

    <!-- appender-ref ref="ASP_TRACE"/ -->
  </root>
 </log4net>
</configuration>