Encryption and Storage of Secrets
This section explains how secrets are stored and protected by nevisAdmin 4. The information below can be useful for system administrators or security auditors who want to understand the inner workings of nevisAdmin 4.
nevisAdmin 4 protects the secrets, such as passwords, that are needed to configure certain components. The secrets are encrypted and stored in the database at the inventory level, and are referenced from the inventory YAML files. The secrets are decrypted during deployment of the configuration.
This documentation explains the security concepts used in the implementation.
Secrets are not supported when you deploy with the Generation Engine. If you want to automate deployment while using secrets, use the REST API.
Attack scenarios
Secrets are designed to protect against the following two attack scenarios:
- A malicious user has access to the database, but not to the filesystem.
- A malicious user has access to the filesystem, but not to the database.
Definitions and assumptions:
- Database access includes access to the live database, to the database files or to an unencrypted database backup.
- Filesystem access includes access to the storage server or to an unencrypted filesystem backup.
- The malicious user does not have access to the system where the nevisAdmin 4 application runs.
- The malicious user does not have credentials to access the nevisAdmin 4 GUI or REST API.
Behind the Scenes
The following documentation about the secrets implementation is provided for reference only.
To work with secrets, you have two supported options:
- Use the GUI. For more information, see Working with Secrets.
- Use the REST API.
Encryption algorithms, storage methods and other details may change in future releases. For this reason, Nevis does not support direct database access (via SQL) to secrets or any other information stored in the database.
All secrets are stored in the database, encrypted (and salted) with a strong algorithm. We use 256-bit AES in Galois/Counter Mode (GCM).
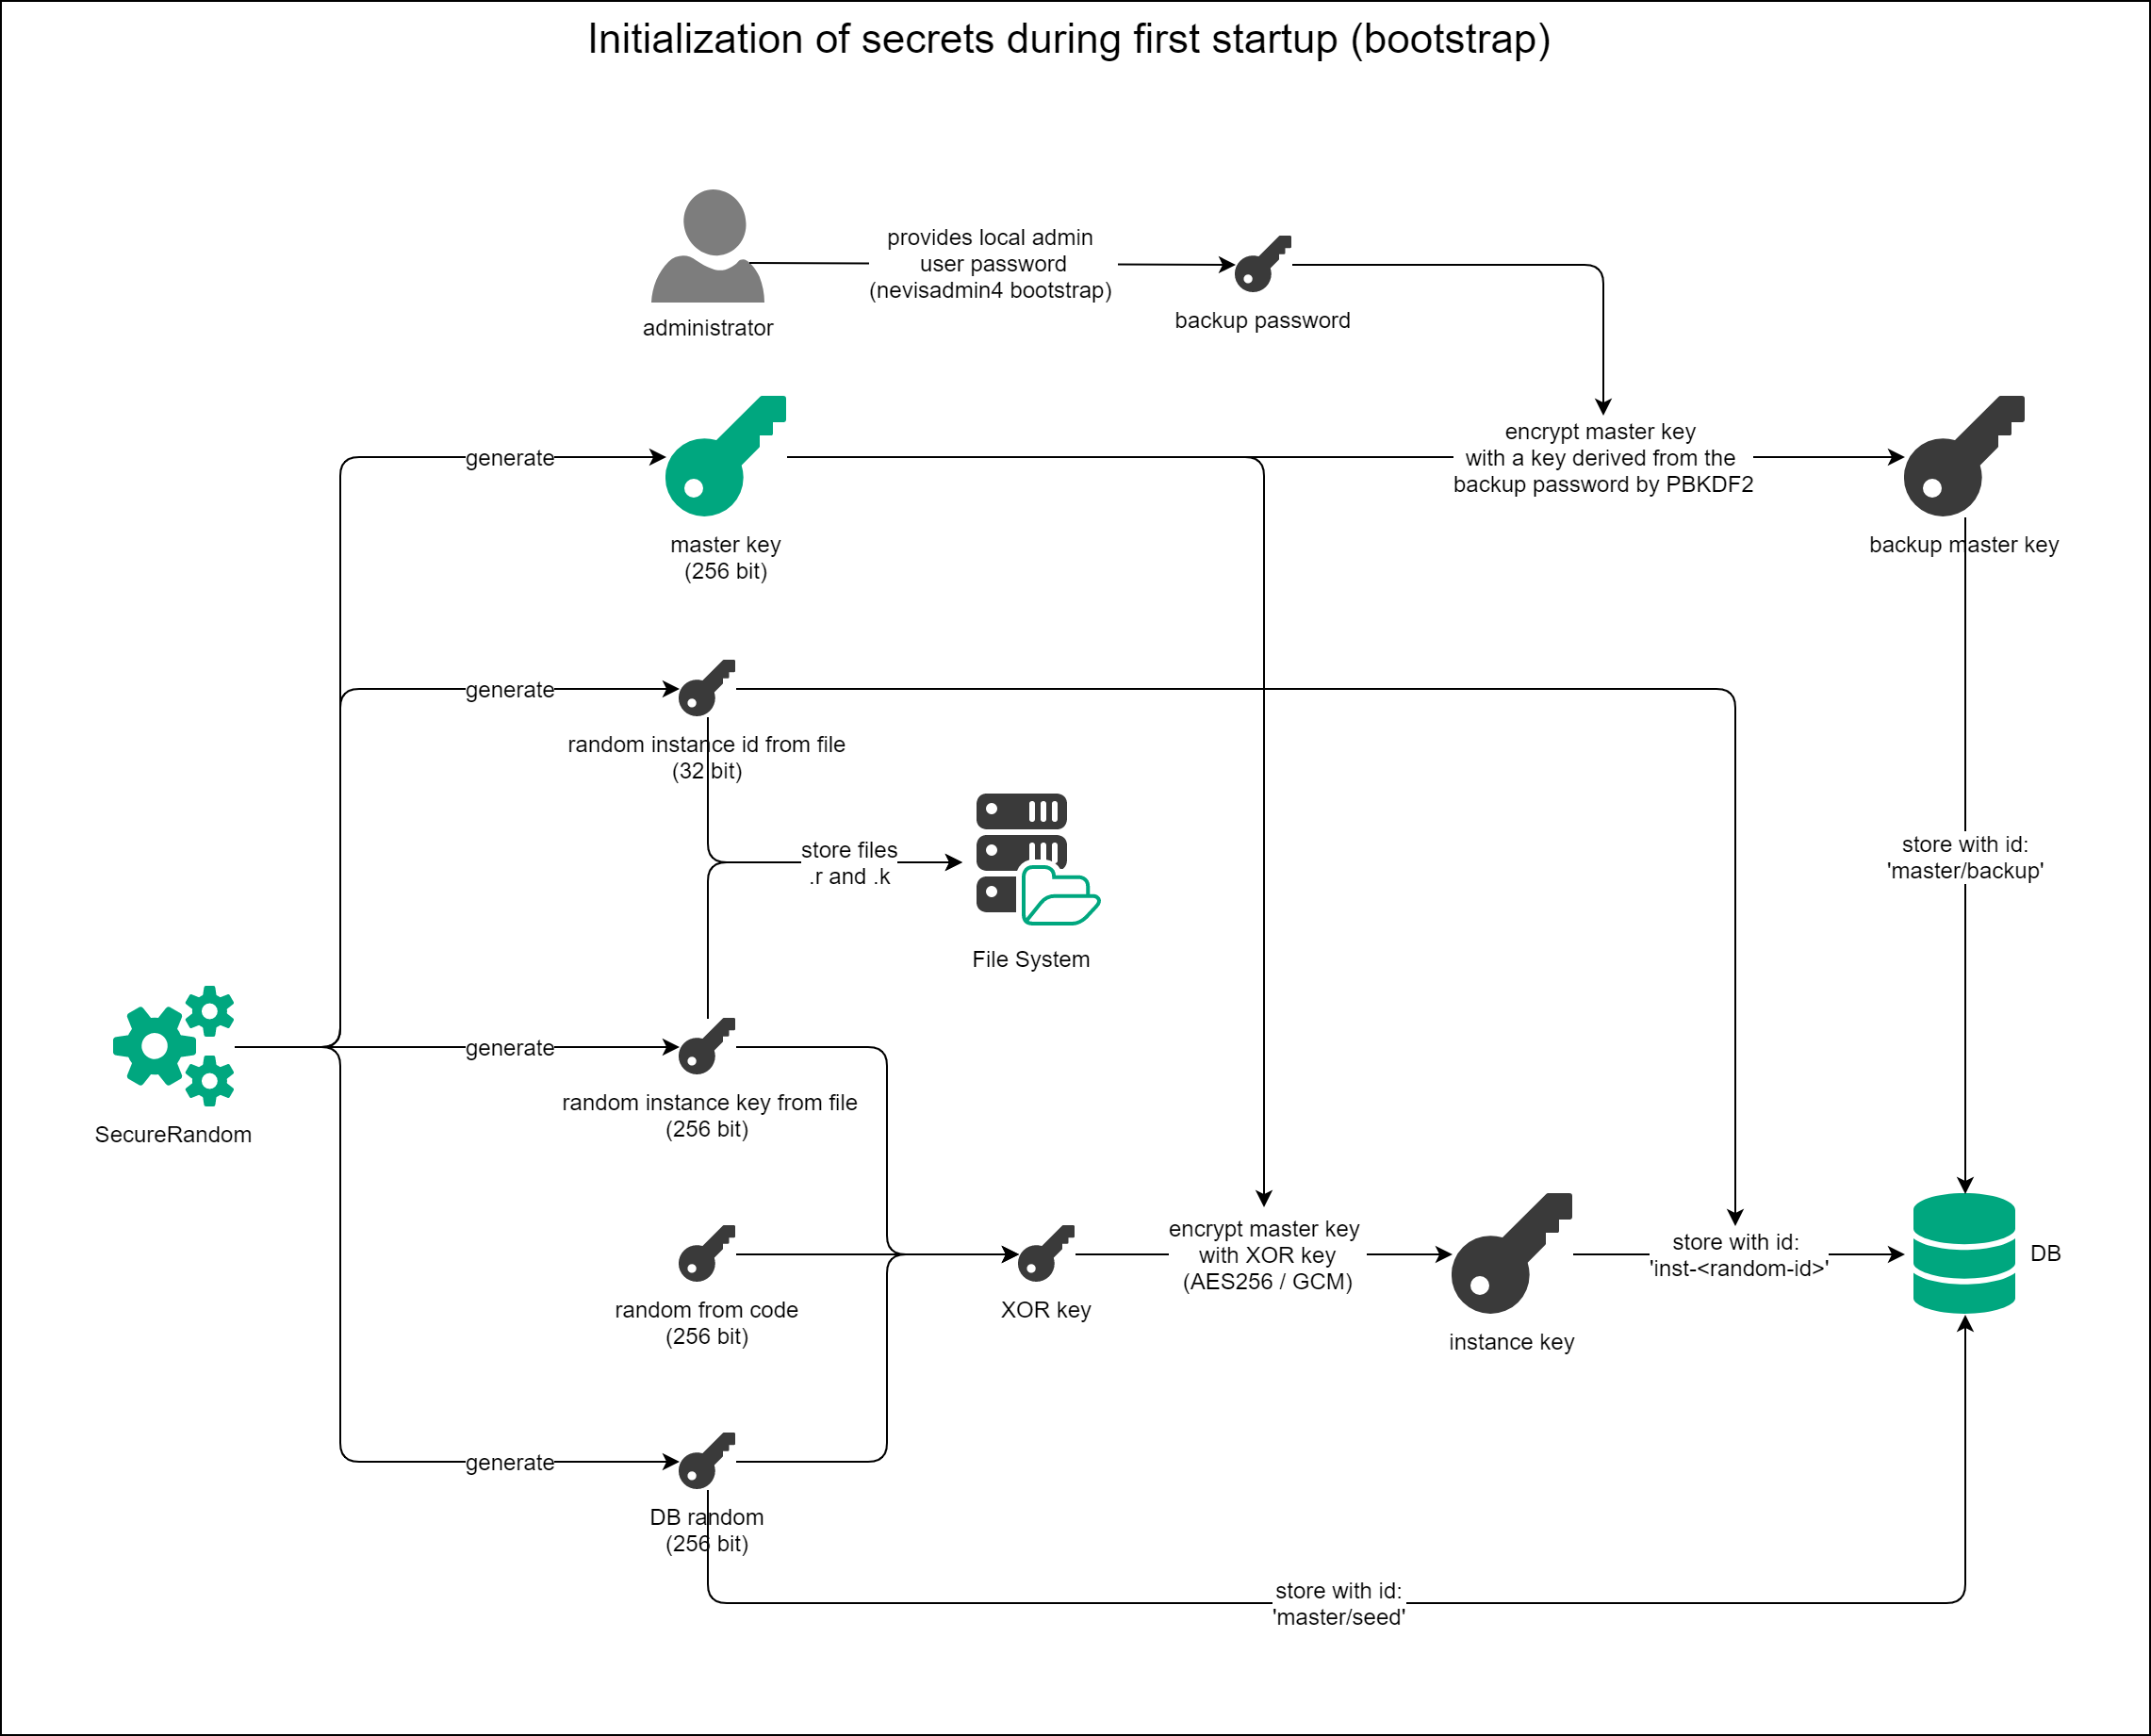
The key that encrypts the secrets is the master key. This key is stored in the database twice, in encrypted form:
-
As an
instance key- The instance key is used by the running application to obtain the
master key. - The key is stored with ID
inst-<random-id>, encrypted with anXOR keyresulting from XOR-ing three values (see the Initialization diagram below). - The
<random-id>is a random instance ID stored in a file (file name:.r).
- The instance key is used by the running application to obtain the
-
backup master key- The backup master key is used to recover access to secrets when the instance key is unavailable. This is the case, for example, when the file containing the random instance ID is lost.
- The password for this key (the backup password) is the same as the password of the local admin user.
- If the local admin user logs in, and the instance key is unavailable, the backup master key will be used to recover.
- The key is stored with ID "/master/backup", encrypted with a key derived from the backup password by PBKDF2.
The following sections describe the storing and encryption of secrets in more detail:
Initialization Procedure
The local admin user password is used as the backup password to encrypt the backup master key. The local admin user is created during the execution of the nevisadmin4 bootstrap command (for more information, see the Initial Setup guide.
After the local admin user creation, each nevisAdmin 4 instance goes through the following steps:
-
Performance of the first check Has a backup master key been created and has a random value been stored in the database? The answer is "yes" only when a secret with ID "/master/backup" and a secret with ID "/master/seed" exist on the database.
- If yes:
- We perform a second check: Go to (2).
- If no:
- The master key is generated and the backup encryption stored in the database with ID "/master/backup".
- The random value on the database is generated and stored with ID "/master/seed".
- Then the instance initialization takes place: Go to (3).
- If yes:
-
Performance of the second check Has the instance been initialized? For example, do the instance files exist and is there a value with ID
inst-<random>on the database?- If yes:
- Done.
- If no:
- The master key is retrieved by decrypting the value at "/master/backup" with the key derived from the backup password.
- After decrypting the master key, the instance initialization takes place: Go to (3).
- If yes:
-
Instance initialization
The instance initialization consists of the following steps:
- Generating a 32-bit random instance ID and storing it in a file (.r).
- Generating a 256-bit random instance key value IS and storing it in a file (.k).
- Creating an XOR key from XOR-ing these three values:
- Random value constant from code.
- Random value stored in the database (with ID "/master/seed").
- Random value from file (.k).
- Encrypting the master key with the XOR key and 256-bit AES-GCM and storing it in the database with ID
inst-<random-id>.<random-id>is the 32-bit instance random ID stored in a file (.r). - Done.
Loading of the Master Key after Initialization
The loading of the master key after initialization consists of the following steps:
- Performance of the following checks:
- Is the backup master key with ID "*master/backup"*available in the database?
- Is the database random with ID "master/seed" available in the database?
- Is the .r instance random ID file available on the file system?
- Is the .k instance random key file is available on the file system?
- Is the instance key with ID
inst-<random-id>available in the database?
- Getting the master key:
- The instance key with ID
inst-<random-id>is loaded from the database. - The XOR key is created from
- the random value constant from code,
- the random value (with ID "/master/seed") stored in the database, and
- the random value from file (.k).
- The instance key is decrypted with the XOR key.
- The master key is ready to be used for the encryption and decryption of secrets.

Encryption and Decryption of Secrets
Inventory secrets are stored in the database in encrypted form.
Encryption is done as follows:
- Before the secret creation nevisAdmin 4 ensures that the master key is available (see the previous sections).
- The secret provided by the user is encrypted with the master key using the 256-bit AES in Galois/Counter Mode (GCM).
- The encrypted value is stored in a database record, keyed by the secret's random ID.

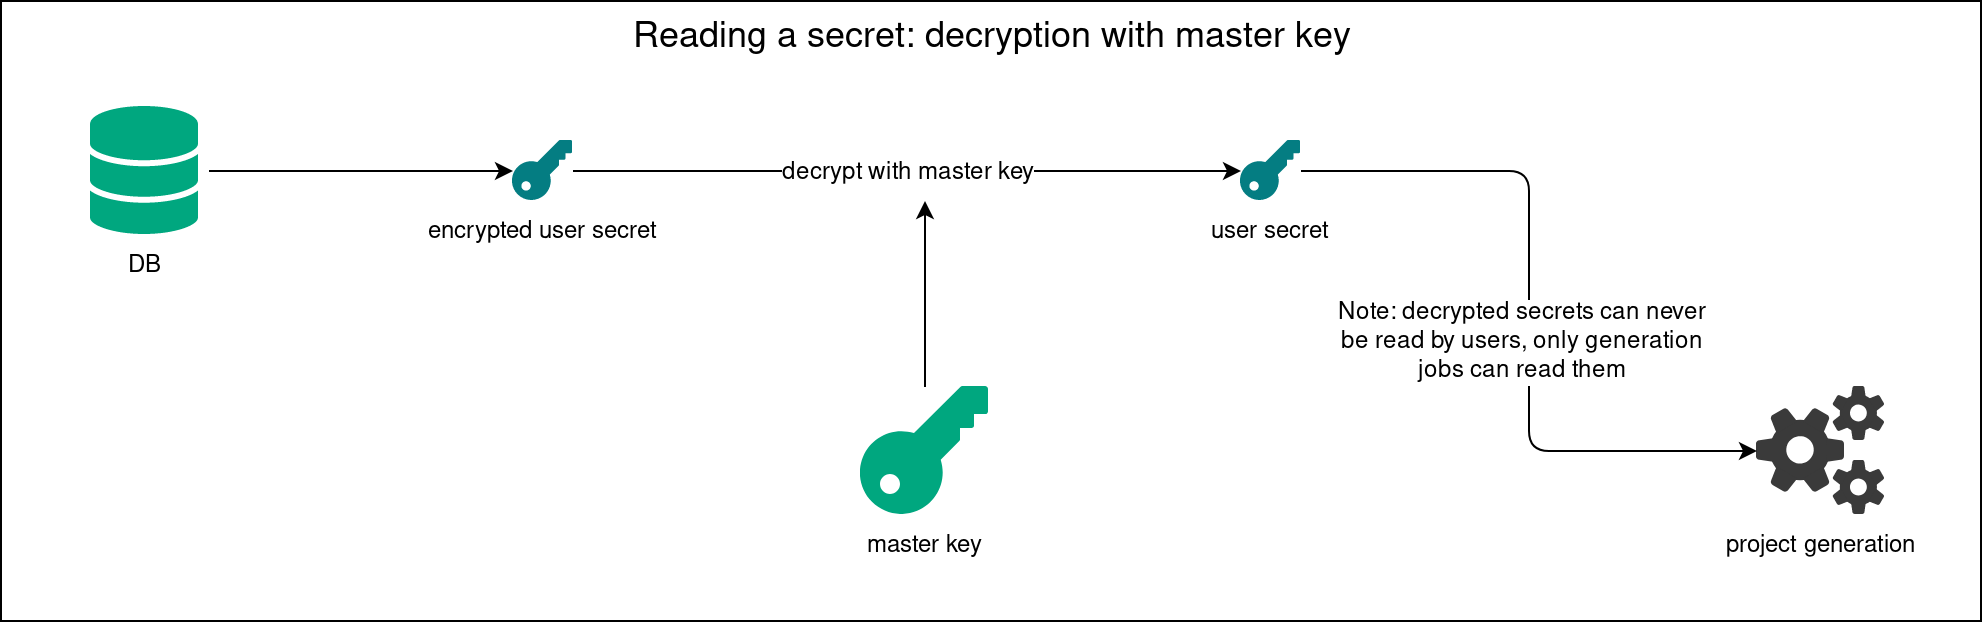
Decryption is done as follows:
- When the inventory YAML file is processed, all
secret://<randomId>references are resolved one by one. - nevisAdmin 4 ensures that the master key is available (see the previous sections).
- The secret is looked up in the database by the
<randomId>. - nevisAdmin 4 checks if the user has permission to decrypt the secret. Only the special InternalUser has the rights to do that. Deployment generation runs with that user in the context.
- The secret is decrypted with the master key.
Changing the Local admin User Password
The local admin password must be stored in a safe place to allow recovery with the backup master key!
The backup master key is encrypted with the password of the local admin user. You can change the local admin user password via the GUI. For more information, see Protecting the Default admin Account.
This is what happens on password change:
- The backup master key with ID "master/backup" is loaded from the database.
- The backup master key is decrypted with the old password of the local admin user. This can fail if the secrets were initialized before version 4.7.0, when the backup master key was encrypted with an old, hardcoded default backup password. If this happens, nevisAdmin 4 tries to decrypt the backup master key with the default backup password. To improve security, there is no hardcoded default backup password anymore from nevisAdmin 4 version 4.7.0 onward.
- The master key is encrypted with new password of the local admin user to obtain the new backup master key.
- The new backup master key with ID "master/backup" is stored in the database.
Kubernetes / Docker
nevisAdmin 4's storage of secrets has no relation to Kubernetes secrets. These are separate systems.
Follow the installation guide Example Installation on Azure. In this guide, nevisAdmin 4 is configured to use a volume mount for the var/opt/nevisadmin4/data directory. Therefore, the .r and .k files are kept on pod restart or on update of the nevisAdmin 4. This makes it possible for the secrets storage to work as described on this page.
In Kubernetes deployments, the secrets used in the inventory are mapped to corresponding Kubernetes secrets, to not expose the secrets in the generated files. For more information about Kubernetes secrets, check out the relevant section of their official documentation.
Special Cases
Lost admin User Password
The local admin password must be stored in a safe place to allow recovery via the backup master key!
The local admin user password can be reset to admin/admin following this guide: Reset the Password of the Local admin User.
Losing the password of the local admin user means you can no longer decrypt the backup master key. This state can be recovered on login of the local admin user.
Prerequiste: The instance key is available
This is how you recover the backup master key:
- Log in with the local admin user after resetting the password.
- nevisAdmin 4 verifies if the backup master key can be decrypted. This fails because of the direct password change on the database. An error will be written to the log, but the login process continues.
- nevisAdmin 4 loads the master key from the instance key.
- nevisAdmin 4 encrypts the master key with the password provided on local admin user login.
- nevisAdmin 4 storer the new backup master key with ID "master/backup" in the database.
After the password reset, the local admin user must set their own password. See the section Changing the Local admin User Password above.
Lost Instance Files
Back up your file system regularly. For more information, see the chapter Database and File System Backup > File System.
The instance files are crucial to load the instance key from the database and to create the XOR key to decrypt it. Losing these files means that it is no longer possible to load and decrypt the instance key to get the master key. In such a case, you can recover the instance files with the backup master key.
After performing the recovery, nevisAdmin 4 re-runs the initialization procedure with the provided password. In step 3 of that procedure, nevisAdmin 4 creates the new instance files and instance key.
For non-SAML users
Simply log in with the local admin user.
For SAML users
Use the recover-master-key REST endpoint at POST /api/v1/recover-master-key. The request body has one property, password, which must be the local admin user's password.
{
  "password": "***"
}
The user sending the request must have SUPER_ADMIN permission.
Alternatively, use this curl command:
secret recovery curl command
export NEVISADMIN_URL=http://localhost:9080
export TOKEN=***
export PASSWORD=***
curl -X POST \
  "$NEVISADMIN_URL/nevisadmin/api/v1/recover-master-key" \
  -H 'accept: */*' \
  -H "Content-Type: application/json" \
  -H "X-XSRF-TOKEN: $TOKEN" \
  -d "{\"password\": \"$PASSWORD\"}"