Developer guide
This guide is aimed at developers and integrators who want to modify the sample reports delivered with nevisReports, or create entirely new reports on Nevis data. In this guide developers and integrators will learn about:
- Elasticsearch basics,
- the document types used by nevisReports in Elasticsearch,
- logging custom properties to Elasticsearch,
- using and setting up Jaspersoft Studio for developing reports,
- and using JasperReports to create reports with Elasticsearch as datasource.
For information about the nevisReports architecture and initial installation, refer to the nevisReports Reference Guide.
nevisReports comes with an embedded JasperReports Server license that allows creating reports only on data provided by Nevis components such as nevisProxy, nevisAuth and nevisIDM.
Additional reading
nevisReports is built on top of several well-known third-party components like Elasticsearch or JasperReports Server. All these third-party components come with a wide range of documentation, guides and tutorials. In case of doubt or problems we suggest you see the following documentation:
(https://www.elastic.co/guide/en/elasticsearch/reference/6.2/_basic_concepts.html),(https://www.elastic.co/guide/en/elasticsearch/reference/6.2/index.html),(https://www.elastic.co/learn) - including videos and books,(http://community.jaspersoft.com/wiki/jaspersoft-community-wiki-0),(https://www.youtube.com/playlist?list=PL5NudtWaQ9l4LEzDAU-DdBQAp21lLH00r)(https://community.jaspersoft.com/documentation/tibco-jaspersoft-studio-user-guide/v643/getting-started-jaspersoft-studio)
We also consider Google/Bing or Stackoverflow as valuable sources of information on specific JasperReports and Elasticsearch topics.
Elasticsearch Introduction
nevisReports relies on Elasticsearch for storing and querying the large amounts of log data that accumulate in typical Nevis installations. Elasticsearch is a NoSQL database with an architecture that makes it suitable for handling large volumes of log data.
Elasticsearch is used as the primary database for the following reasons:
- Schema-free data modeling: Depending on the target environment, different kinds of fields or event types may be required. Elasticsearch allows defining these field and event types on-the-fly and gracefully handles any missing data.
- Powerful indexing and queries: Elasticsearch automatically indexes data, which facilitates fast data aggregation and quick execution of free text queries.
- Designed for scale and resiliency: Elasticsearch allows the addition of nodes, i.e., (virtual) machines, as needed. It automatically synchronizes data with those nodes and distributes the query load across the nodes. These scalability features have a proven track record with big cloud service providers.
- Built-in support for log file management and analysis: Elasticsearch is part of the Elastic Stack, which is optimized to process and visualize any amount and kind of log data.
- Easy data maintenance: To free up space, Elasticsearch can easily partition and remove log data that is no longer needed.
- Straightforward installation: The initial Elasticsearch configuration is a good starting point for many environments.
- Open source license: The open source version of Elasticsearch is included with nevisReports without incurring additional license costs.
How Elasticsearch differs from SQL databases
Elasticsearch has some properties that make it fundamentally different from the various well-known SQL databases.
- Eventual consistency: When data is submitted to Elasticsearch, it is not immediately available for querying. Instead, there is a delay of typically five to ten seconds until the data is indexed and can be returned by queries.
- No "random" joins: To be able to efficiently query relations, you have to denormalize data or organize it in parent-child relationships before you store the data in the database.
- No elaborate constraints system: Elasticsearch is configured very permissively for nevisReports in regard to the storage of data types and properties. Its referential integrity and data constraint system is limited. For this reason, we recommend adding a data integrity test to your test suite that checks if data in the index adheres to certain rules.
- Java-based: It may be necessary to tune the Elasticsearch database in demanding setups to optimize its performance. Since Elasticsearch is based on Java, know-how of Java profiling tools and tuning options will be helpful when tuning is required.
When developing your own reporting use cases on top of Elasticsearch, design your solutions with the above properties in mind. Also, get familiar with Elasticsearch before starting development (see the next section).
Read the manuals
For more detailed information on Elasticsearch, read the excellent Elasticsearch manuals online. Below are some pointers to get you started on the query topic:
- Basic concepts - focus on the chapters "Index", "Type", and "Document"
- Exploring your data
- Search in Depth
- Search APIs/Search
The Elasticsearch schema for nevisReports is documented in the section: Elasticsearch Document Types, of this developer guide.
Example queries on nevisReports data
The examples below describe some typical use cases with index data provided by nevisReports.
The examples use many different features of Elasticsearch, so it is worth skimming through all of them.
This applies even if you already know SQL since Elasticsearch is quite different.
In a real-world reporting scenario you may have to combine approaches from several examples into one big query.
We recommend using the SoapUI tool to try out queries.
Breaking changes
The following breaking changes apply to existing nevisReports queries.
- The terms "filtered", "and", "or", "not" and "missing" have been deprecated and removed.
- Deprecation of file-based templates. You need to migrate to a new format for pre-registered templates.
- The "type" concept has been deprecated and removed.
The sample queries have been refactored to make them compatible with the latest Elasticsearch 6.2.x version. The removal of the "type" concept has been mitigated by the introduction of an additional custom field type in each document (see here).
There are many other breaking changes between the Elasticsearch versions 2.4.x to 6.2.x. If you want to find out more, refer to 5.x breaking changes and 6.x breaking changes.
Aggregate nevisProxy requests by host name and application
Use case
Create a report that shows the number of requests and total number of bytes received or sent for each external (virtual) host name / application pair.
Solution
Perform a query on the "ProxyRequest" type of document.
- Filter by time range.
Perform a nested bucket aggregation.
- First level bucket = serviceName.raw (represents host names).
- Second level bucket = reqPathComp1.raw (represents applications). Note that the applications must have unique context roots.
Do a metric aggregation at the required levels to get the number of request and bytes.For example:
_sumInBytes at serviceName level= total bytes received for this serviceName (see #1 in the sample output)_sumInBytes at reqPathComp1 level= total bytes received for this serviceName & reqPathComp1 (see #2 in the sample output).
Use **serviceName.raw in the query, because it contains the untokenized service name (e.g., "abc.com"). If instead you use serviceName, tokenized results will be returned, which is usually not desired (e.g., one for the token "abc" and one for "com"). The same applies to reqPathComp1.raw.
From Elasticsearch version 6.x onwards, the type concept is not supported anymore. To guarantee that the data model remains compatible with the model of nevisReports, we have added a custom field type in the data model. The samples below show how to solve the use case for both scenarios (before and after version 6.x of Elasticsearch).
POST /events-*/ProxyRequest/_search
{
 "query": {
 "filtered": {
 "filter": {
 "range": {
 "@timestamp": {
 "gte": "2015-07-31T14:40||/m",
 "lte": "2015-07-31T14:40||/m"
 }
 }
 }
 }
 },
 "size": 0,
 "aggs": {
 "_serviceName": {
 "terms": {
 "field": "serviceName.raw"
 },
 "aggs": {
 "_reqPathComp1": {
 "terms": {
 "field": "reqPathComp1.raw"
 },
 "aggs": {
 "_sumInBytes": {
 "sum": {
 "field": "inBytes"
 }
 },
 "_sumOutBytes": {
 "sum": {
 "field": "outBytes"
 }
 }
 }
 }
 }
 },
 "_sumInBytes": {
 "sum": {
 "field": "inBytes"
 }
 },
 "_sumOutBytes": {
 "sum": {
 "field": "outBytes"
 }
 }
 }
}
POST /events-*/_search
{
 "query": {
 "bool": {
 "must": [
 {
 "term": {
 "type": {
 "value": "ProxyRequest"
 }
 }
 },
 {
 "range": {
 "@timestamp": {
  "gte": "2015-07-31T14:40||/m",
 "lte": "2015-07-31T14:40||/m"
 }
 }
 }
 ]
 }
 },
 "size": 0,
 "aggs": {
 "_serviceName": {
 "terms": {
 "field": "serviceName.raw"
 },
 "aggs": {
 "_reqPathComp1": {
 "terms": {
 "field": "reqPathComp1.raw"
 },
 "aggs": {
 "_sumInBytes": {
 "sum": {
 "field": "inBytes"
 }
 },
 "_sumOutBytes": {
 "sum": {
 "field": "outBytes"
 }
 }
 }
 }
 }
 },
 "_sumInBytes": {
 "sum": {
 "field": "inBytes"
 }
 },
 "_sumOutBytes": {
 "sum": {
 "field": "outBytes"
 }
 }
 }
}
{
 "took": 5,
 "timed_out": false,
 "_shards": {
 "total": 2,
 "successful": 2,
 "failed": 0
 },
 "hits": {
 "total": 37,
 "max_score": 0,
 "hits": []
 },
 "aggregations": {
 "_sumInBytes": { #1
 "value": 37000,
 "value_as_string": "37000.0"
 },
 "_sumOutBytes": {
 "value": 370000,
 "value_as_string": "370000.0"
 },
 "_serviceName": {
 "doc_count_error_upper_bound": 0,
 "sum_other_doc_count": 0,
 "buckets": [
 {
 "key": "adnlt115.zh.adnovum.ch",
 "doc_count": 37,
 "_reqPathComp1": {
 "doc_count_error_upper_bound": 0,
 "sum_other_doc_count": 0,
 "buckets": [
 {
 "key": "nevislogrend",
 "doc_count": 12,
 "_sumInBytes": { #2
 "value": 12000,
 "value_as_string": "12000.0"
 },
 "_sumOutBytes": {
 "value": 120000,
 "value_as_string": "120000.0"
 }
 },
 {
 "key": "nevis",
 "doc_count": 11,
 "_sumInBytes": {
 "value": 11000,
 "value_as_string": "11000.0"
 },
 "_sumOutBytes": {
 "value": 110000,
 "value_as_string": "110000.0"
 }
 },
 {
 "key": "loginpages",
 "doc_count": 8,
 "_sumInBytes": {
 "value": 8000,
 "value_as_string": "8000.0"
 },
 "_sumOutBytes": {
 "value": 80000,
 "value_as_string": "80000.0"
 }
 },
 {
 "key": "/",
 "doc_count": 6,
 "_sumInBytes": {
 "value": 6000,
 "value_as_string": "6000.0"
 },
 "_sumOutBytes": {
 "value": 60000,
 "value_as_string": "60000.0"
 }
 }
 ]
 }
 }
 ]
 }
 }
}
Aggregate nevisProxy requests by nevisAuth sessions - join
Use case
Create a report that lists the start date, end date and duration of every session as well as request-based statistics per session, such as total requests and total bytes received/sent.
Solution
Perform a nested aggregation on AuthSession objects. Use the following criteria:
Unique session, via the built-in field "_uid".
This creates one bucket for every session.
The children of type ProxyRequest.
So for every session we look at the session's children.
The sum of ProxyRequest.inBytes and ProxyRequest.outBytes
Thus, we aggregate the inBytes and outBytes for the session's children.
Use top_hits to return the data (document) of each session. By using top_hits it is guaranteed that the system returns data for exactly one session.
- You can retrieve the total request count per session via the JSON path
*/_childrenProxyRequest/doc_count. - In SQL parlance, the following is done: the AuthSession "table" drives the query and joins in "rows" from the ProxyRequest table. In the query result some "columns" are aggregated, "grouped by" the AuthSession's _uid "column".
From Elasticsearch version 6.x onwards, the type concept is not supported anymore (see <http://www.elastic.co/guide/en/elasticsearch/reference/6.2/removal-of-types.html/>). To guarantee that the data model remains compatible with the model of nevisReports, we have added a custom field type in the data model.
The samples below show how to solve the use case for both scenarios (before and after version 6.x of Elasticsearch).
POST /events-*/AuthSession/_search
{
 "size": 0,
 "aggs": {
 "_termsUid": {
 "terms": {
 "field": "_uid"
 },
 "aggs": {
 "_childrenProxyRequest": {
 "children": {
 "type": "ProxyRequest"
 },
 "aggs": {
 "_sumInBytes": {
 "sum": {
 "field": "ProxyRequest.inBytes"
 }
 },
 "_sumOutBytes": {
 "sum": {
 "field": "ProxyRequest.outBytes"
 }
 }
 }
 },
 "_topHits": {
 "top_hits": {}
 }
 }
 }
 }
}
POST /events-*/_search
{
 "query": {
 "bool": {
 "must": [
 {
 "term": {
 "type": {
 "value": "AuthSession"
 }
 }
 }
 ]
 }
 }
 ,
 "size": 0,
 "aggs": {
 "_termsUid": {
 "terms": {
 "field": "_id"
 },
 "aggs": {
 "_childrenProxyRequest": {
 "children": {
 "type": "ProxyRequest"
 },
 "aggs": {
 "_sumInBytes": {
 "sum": {
 "field": "ProxyRequest.inBytes"
 }
 },
 "_sumOutBytes": {
 "sum": {
 "field": "ProxyRequest.outBytes"
 }
 }
 }
 },
 "_topHits": {
 "top_hits": {}
 }
 }
 }
 }
}
{
 "took": 1,
 "timed_out": false,
 "_shards": {
 "total": 2,
 "successful": 2,
 "failed": 0
 },
 "hits": {
 "total": 2,
 "max_score": 0,
 "hits": []
 },
 "aggregations": {"_termsUid": {
 "doc_count_error_upper_bound": 0,
 "sum_other_doc_count": 0,
 "buckets": [
 {
 "key": "AuthSession#1b3da8c0ff0ds1X3y7we3+ceoo6TQuewApwhOPngFE2OdLwkcVKZLm4=",
 "doc_count": 1,
 "_childrenProxyRequest": {
 "doc_count": 3,
 "_sumOutBytes": {"value": 30000},
 "_sumInBytes": {"value": 3000}
 },
 "_topHits": {"hits": {
 "total": 1,
 "max_score": 1,
 "hits": [ {
 "_index": "events-2015.07",
 "_type": "AuthSession",
 "_id": "1b3da8c0ff0ds1X3y7we3+ceoo6TQuewApwhOPngFE2OdLwkcVKZLm4=",
 "_score": 1,
 "_source": {
 "@version": "1",
 "@timestamp": "2015-07-17T08:45:37.000Z",
 "host": "adnlt275-vm",
 "logVersion": "1",
 "eventType": "authentication-completed",
 "trID": "c0a80dff-6c6c-a8c0ff0d-14e9b30b648-00000000",
 "sessionID": "YATMLfpS_IymQ7KptF3SIPA0nWSmlFuBaWpYKrXvtNg",
 "client": {
 "sessionID": "1b3da8c0ff0ds1X3y7we3+ceoo6TQuewApwhOPngFE2OdLwkcVKZLm4=",
 "clientID": "adnlt115.zh.adnovum.ch",
 "sslProtocol": "TLSv1.2",
 "sslCipher": "DHE-RSA-AES128-SHA",
 "sslClientDN": "cn=Lior,ou=MyNevisSetup,o=Adnvum Informatik AG",
 "hostName": "adnlt115.zh.adnovum.ch",
 "port": 443,
 "clientIP": "192.168.13.255"
 },
 "agent": {
 "userAgent": "Mozilla/5.0 (X11; Linux x86_64; rv:31.0) Gecko/20100101 Firefox/31.0",
 "agentIP": "192.168.13.255",
 "sslProtocol": "TLSv1.2",
 "sslCipher": "DHE-RSA-AES128-SHA",
 "resPath": "/nevis/test/logrend/",
 "resQuery": null,
 "reqPath": "/nevis/test/logrend/",
 "reqQuery": "?login"
 },
 "sessionStartTimestamp": "2015-07-17T10:45:37.000+0200",
 "loginID": "blabla",
 "realm": "SSO_TEST",
 "conversationId": "367751585188",
 "userID": "foobar",
 "roles": [
 "auth.whatever",
 "foo",
 "bar"
 ],
 "authLevel": "auth.whatever",
 "eventTrail": [
 {
 "state": "TestUseridPassword",
 "timestamp": "2015-07-17T10:44:52.000+0200",
 "tech": "dummy",
 "type": "username/password",
 "detail": "lior"
 },
 {
 "state": "IdmPasswordChange",
 "timestamp": "2015-07-17T10:44:57.000+0200",
 "tech": "nevisIDM",
 "type": "mutation",
 "detail": ""
 }
 ],
 "custom": {}
 }
 }]
 }}
 },
 {
 "key": "AuthSession#6c2da8c0ff0d6jANsKFcYgmn6m7w8hx/IfarPSkKO9Wd/+qUfAAJ+vc=",
 "doc_count": 1,
 "_childrenProxyRequest": {
 "doc_count": 78,
 "_sumOutBytes": {"value": 780000},
 "_sumInBytes": {"value": 78000}
 },
 "_topHits": {"hits": {
 "total": 1,
 "max_score": 1,
 "hits": [ {
 "_index": "events-2015.07",
 "_type": "AuthSession",
 "_id": "6c2da8c0ff0d6jANsKFcYgmn6m7w8hx/IfarPSkKO9Wd/+qUfAAJ+vc=",
 "_score": 1,
 "_source": {
 "@version": "1",
 "@timestamp": "2015-07-17T08:45:37.000Z",
 "host": "adnlt275-vm",
 "logVersion": "1",
 "eventType": "authentication-completed",
 "trID": "c0a80dff-6c6c-a8c0ff0d-14e9b30b648-00000000",
 "sessionID": "YATMLfpS_IymQ7KptF3SIPA0nWSmlFuBaWpYKrXvtNg",
 "client": {
 "sessionID": "6c2da8c0ff0d6jANsKFcYgmn6m7w8hx/IfarPSkKO9Wd/+qUfAAJ+vc=",
 "clientID": "adnlt115.zh.adnovum.ch",
 "sslProtocol": "TLSv1.2",
 "sslCipher": "DHE-RSA-AES128-SHA",
 "sslClientDN": "cn=Lior,ou=MyNevisSetup,o=Adnvum Informatik AG",
 "hostName": "adnlt115.zh.adnovum.ch",
 "port": 443,
 "clientIP": "192.168.13.255"
 },
 "agent": {
 "userAgent": "Mozilla/5.0 (X11; Linux x86_64; rv:31.0) Gecko/20100101 Firefox/31.0",
 "agentIP": "192.168.13.255",
 "sslProtocol": "TLSv1.2",
 "sslCipher": "DHE-RSA-AES128-SHA",
 "resPath": "/nevis/test/logrend/",
 "resQuery": null,
 "reqPath": "/nevis/test/logrend/",
 "reqQuery": "?login"
 },
 "sessionStartTimestamp": "2015-07-17T10:45:37.000+0200",
 "sessionEndTimestamp": "2015-07-17T10:55:37.000+0200",
 "sessionEndReason": "session-expired",
 "loginID": "albalb",
 "realm": "SSO_TEST",
 "conversationId": "367751585188",
 "userID": "foobar",
 "roles": [
 "auth.whatever",
 "foo",
 "bar"
 ],
 "authLevel": "auth.whatever",
 "eventTrail": [
 {
 "state": "TestUseridPassword",
 "timestamp": "2015-07-17T10:44:52.000+0200",
 "tech": "dummy",
 "type": "username/password",
 "detail": "lior"
 },
 {
 "state": "IdmPasswordChange",
 "timestamp": "2015-07-17T10:44:57.000+0200",
 "tech": "nevisIDM",
 "type": "mutation",
 "detail": ""
 }
 ],
 "custom": {}
 }
 }]
 }}
 }
 ]
 }}
}
Alternative solutions
The following alternative solutions can be useful if you have other use cases, e.g., if you want to combine queries and aggregations, perform multiple unrelated aggregations, or return multiple document types.
POST /events*/_search
{
 "query": {
 "filtered": {
 "filter": {
 "type": {
 "value": "AuthSession"
 }
 }
 }
 },
 "size": 0,
 "aggs": {
 "_termsUid": {
 "terms": {
 "field": "_uid"
 },
 "aggs": {
 "_childrenProxyRequest": {
 "children": {
 "type": "ProxyRequest"
 },
 "aggs": {
 "_sumInBytes": {
 "sum": {
 "field": "ProxyRequest.inBytes"
 }
 }
 }
 },
 "_topHits": {
 "top_hits": {}
 }
 }
 }
 }
}
POST /events*/_search
{
 "query": {
  "bool": {
   "filter": {
    "bool": {
     "must": [{
      "type": {
       "value": "AuthSession"
      }
     }]
    }
   }
 }
 },
 "size": 0,
 "aggs": {
 "_termsUid": {
 "terms": {
 "field": "_id"
 },
 "aggs": {
 "_childrenProxyRequest": {
 "children": {
 "type": "ProxyRequest"
 },
 "aggs": {
 "_sumInBytes": {
 "sum": {
 "field": "ProxyRequest.inBytes"
 }
 }
 }
 },
 "_topHits": {
 "top_hits": {}
 }
 }
 }
 }
}
POST /events*/_search
{
 "size": 0,
 "aggs": {
 "sessionType": {
 "filter": {
 "type": {
 "value": "AuthSession"
 }
 },
 "aggs": {
 "_termsUid": {
 "terms": {
 "field": "_uid"
 },
 "aggs": {
 "_childrenProxyRequest": {
 "children": {
 "type": "ProxyRequest"
 },
 "aggs": {
 "_sumInBytes": {
 "sum": {
 "field": "ProxyRequest.inBytes"
 }
 }
 }
 },
 "_topHits": {
 "top_hits": {}
 }
 }
 }
 }
 }
 }
}
POST /events*/_search
{
 "size": 0,
 "aggs": {
 "sessionType": {
 "filter": {
 "bool": {
 "must": [{
 "type": {
 "value": "AuthSession"
 }
 }]
 }
 },
 "aggs": {
 "_termsUid": {
 "terms": {
 "field": "_id"
 },
 "aggs": {
 "_childrenProxyRequest": {
 "children": {
 "type": "ProxyRequest"
 },
 "aggs": {
 "_sumInBytes": {
 "sum": {
 "field": "ProxyRequest.inBytes"
 }
 }
 }
 },
 "_topHits": {
 "top_hits": {}
 }
 }
 }
 }
 }
 }
}
List individual nevisProxy requests including nevisAuth session fields (join)
Use case
Create a report that lists executed HTTP requests, e.g., timestamps, IP addresses of the end user's client, requested hosts and URLs. For every request, include the user's unit name from the session.
In this use case, we expect the number of returned requests to be quite large (e.g., 10'000).
It is assumed that the unitDisplayName has been added to the session as a custom log property.
Solution
- Filter ProxyRequest objects as follows:
- Match the first or the second criterion below:
- Return results having a parent of type AuthSession:
- Match all such parents (i.e., do not filter on attributes of the parents).
- Return the parent as inner hit, but only include the field custom.unitDisplayName of the parent.
- Return results for which the parentfield does not exist.
- Sort by event @timestamp.
- Return the ProxyRequest fields @timestamp etc.
- Make sure that a maximum of 10'000 requests are returned (size).
- Use "_source" to specify which fields to include in the result. This will reduce the size of the response. Note that it is also possible to use "f**ields" instead. However, in that case you will get arrays. Moreover, it only works for non-nested fields.
- Replace the
notfilter by"query": { "match_all" : { } }. This will improve the performance. However, note that in this case an optimized query execution engine could decide to skip thehas_parentfilter. If that happens, the query will never return any session data.
From Elasticsearch version 6.x onwards, the type concept is not supported anymore (see <http://www.elastic.co/guide/en/elasticsearch/reference/6.2/removal-of-types.html/>). To guarantee that the data model remains compatible with the model of nevisReports, we have added a custom field type in the data model.
The samples below show how to solve the use case for both scenarios (before and after version 6.x of Elasticsearch).
POST /events-*/ProxyRequest/_search
{
 "query": {
  "filtered": {
   "filter": {
    "or": [
     {
      "has_parent" : {
       "query": { "match_all" : { } },
       "parent_type" : "AuthSession",
       "inner_hits" : {
        "_source": "custom.unitDisplayName"
       }
      }
     },
     {
      "not": {
       "filter": {
        "exists": {
         "field": "_parent"
        }
       }
      }
     }
    ]
   }
  }
 },
 "sort": { "@timestamp": { "order": "desc", "unmapped_type" : "date" } },
 "_source": [ "@timestamp", "agentIP", "host", "reqPath", "reqQuery" ],
 "size": 10000
}
POST /events-*/_search
{
 "query":
 {
 "bool": {
 "must": [
 {
 "term": {
 "type": {
 "value": "ProxyRequest"
 }
 }
 }
 ],
 "filter": [{
 "bool": {
 "should":[{
 "has_parent" : {
 "query": { "match_all" : { } },
 "parent_type" : "AuthSession",
 "inner_hits" : {
 "_source": "custom.unitDisplayName"
 }
 }
 }]
 }
 }],
 "must_not": [
 {
 "bool": {
 "filter": {
 "exists": {
 "field": "_parent"
 }
 }
 }
 }
 ]
 }
 },
 "sort": { "@timestamp": { "order": "desc", "unmapped_type" : "date" }},
 "_source": [ "@timestamp", "agentIP", "host", "reqPath", "reqQuery" ],
 "size": 10000
}
Example results
Below you see the output of the first two hits. Note that the first hit has no parent session.
{
 "took": 143,
 "timed_out": false,
 "_shards": {
 "total": 2,
 "successful": 2,
 "failed": 0
 },
 "hits": {
 "total": 256,
 "max_score": null,
 "hits": [
 {
 "_index": "events-2015.07",
 "_type": "ProxyRequest",
 "_id": "AU7fnsezDNO81WoMP6en",
 "_score": null,
 "_source": {
 "@timestamp": "2015-07-30T14:08:14.000Z",
 "host": "adnlt275-vm",
 "agentIP": "192.168.13.255",
 "reqQuery": "?login",
 "reqPath": "/nevisidm/admin/"
 },
 "sort": [
 1438265294000
 ],
 "inner_hits": {
 "AuthSession": {
 "hits": {
 "total": 1,
 "max_score": 1,
 "hits": [
 {
 "_index": "events-2015.07",
 "_type": "AuthSession",
 "_id": "484ba8c0ff0d0wmrjaPpkKWbjHiK5hs6BiQ7mn1+Nd/brTKVXTUerRY=",
 "_score": 1,
 "_source": {
 "custom": {
 "unitDisplayName": "foobar fighters (EN)"
 }
 }
 }
 ]
 }
 }
 }
 },
 {
 "_index": "events-2015.07",
 "_type": "ProxyRequest",
 "_id": "AU7eTRFNXepvcNf9nPS-",
 "_score": null,
 "fields": {
 "reqPath": [
 "/nevisidm/admin/UserImport.do"
 ],
 "clientIP": [
 "192.168.15.123"
 ],
 "@timestamp": [
 "2015-07-17T09:54:08.000Z"
 ],
 "host": [
 "adnlt275-vm"
 ]
 },
 "sort": [
 1437126848000
 ],
 "inner_hits": {
 "AuthSession": {
 "hits": {
 "total": 0,
 "max_score": null,
 "hits": []
 }
 }
 }
 }
...
 ]
 }
}
Alternative solutions
The above query is fairly complex. If you only want requests that are part of a session, try the following approach:
POST /events*/ProxyRequest/_search
{
 "query": {
 "has_parent" : {
 "query": { "match_all" : { } },
 "parent_type" : "AuthSession",
 "inner_hits" : {
 "_source": "custom.userFullName"
 }
 }
 },
 "sort": { "@timestamp": { "order": "asc" }},
 "size": 10000,
 "fields": [ "@timestamp", "clientIP", "host", "reqPath", "reqQuery" ]
}
POST /events*/ProxyRequest/_search
{
 "query": {
 "has_parent" : {
 "query": { "match_all" : { } },
 "parent_type" : "AuthSession",
 "inner_hits" : {
 "_source": "custom.userFullName"
 }
 }
 },
 "sort": { "@timestamp": { "order": "asc" }},
 "size": 10000,
 "stored_fields": [ "@timestamp", "clientIP", "host", "reqPath", "reqQuery" ]
}
Show nevisProxy requests in a given time frame
Use case
Create a report that shows the number of logins per month during the last three months, for each user.
Solution
- Perform a filtered query:
- Term: type= ProxyRequest
- Filter on time range (for the sake of performance, we exclude aggregates outside the range).
- Do a bucket aggregation on userID.
- Perform a nested "date_histogram" aggregation in each bucket.
- Add
| |/Mto the range filter to round timestamps automatically, either to the start of the month (for "gte") or to the end of the month (for "lte"). This is helpful if the caller does not want to do any date math but just wants to transfer the from/to selection from the GUI to the filter. - To ensure that empty buckets in-between are returned, the "date_histogram" aggregation uses the "min_doc_count" option. "extended_bounds" guarantees that buckets start/end at the given months, even if the starting/ending bucket(s) is/are empty.
From Elasticsearch version 6.x onwards, the type concept is not supported anymore. To guarantee that the data model remains compatible with the model of nevisReports, we have added a custom field type in the data model. The samples below show how to solve the use case for both scenarios (before and after version 6.x of Elasticsearch).
POST /events-*/_search
{
 "query": {
 "filtered": {
 "query": {
 "term": {
 "_type": "ProxyRequest"
 }
 },
 "filter": {
 "range": {
 "@timestamp": {
 "gte": "2015-05||/M",
 "lte": "2015-07||/M"
 }
 }
 }
 }
 },
 "size": 0,
 "aggs": {
 "logins": {
 "terms": {
 "field": "userID"
 },
 "aggs": {
 "_logins_over_time": {
 "date_histogram": {
 "field": "@timestamp",
 "interval": "month",
 "format": "yyyy-MM",
 "min_doc_count": 0,
 "extended_bounds": {
 "min": "2015-05",
 "max": "2015-07"
 }
 }
 }
 }
 }
 }
}
POST /events-*/_search
{
 "query": {
 "bool": {
 "must": [
 {
 "term": {
 "type": {
 "value": "ProxyRequest"
 }
 }
 }
 ],
 "filter": {
 "range": {
 "@timestamp": {
 "gte": "2015-05||/M",
 "lte": "2015-07||/M"
 }
 }
 }
 }
 },
 "size": 0,
 "aggs": {
 "logins": {
 "terms": {
 "field": "userID.raw"
 },
 "aggs": {
 "_logins_over_time": {
 "date_histogram": {
 "field": "@timestamp",
 "interval": "month",
 "format": "yyyy-MM",
 "min_doc_count": 0,
 "extended_bounds": {
 "min": "2015-05",
 "max": "2015-07"
 }
 }
 }
 }
 }
 }
}
{
 ...
 "aggregations": {
 "logins": {
 "doc_count_error_upper_bound": 0,
 "sum_other_doc_count": 0,
 "buckets": [
 {
 "key": "foobar",
 "doc_count": 1,
 "_logins_over_time": {
 "buckets": [
 {
 "key_as_string": "2015-05",
 "key": 1430438400000,
 "doc_count": 0
 },
 {
 "key_as_string": "2015-06",
 "key": 1433116800000,
 "doc_count": 0
 },
 {
 "key_as_string": "2015-07",
 "key": 1435708800000,
 "doc_count": 1
 }
 ]
 }
 },
 {
 "key": "ich",
 "doc_count": 1,
 "_logins_over_time": {
 "buckets": [
 {
 "key_as_string": "2015-05",
 "key": 1430438400000,
 "doc_count": 0
 },
 {
 "key_as_string": "2015-06",
 "key": 1433116800000,
 "doc_count": 0
 },
 {
 "key_as_string": "2015-07",
 "key": 1435708800000,
 "doc_count": 1
 }
 ]
 }
 }
 ]
 }
 }
}
Elasticsearch tips and tricks
The following tips and tricks may help you improve your Elasticsearch queries:
Filter your document type inside the URL for shorter queries. For example, instead of simply posting your query to
/events-*/_search, add the more verbose"type": "ProxyRequest"filter.When sorting, specify unmapped_type. Thus, you can avoid errors in case an index does not (yet) contain any document of the given type (see this example)
If you have a "children" aggregation, and "filters" as a sub-aggregation, prefix the field names with a document type. For other sub-aggregations such as "terms", the document type prefix seems to be optional.
Document type prefix"aggs": {
"_childrenProxyRequest": {
"children": { <===== children aggregation
"type": "ProxyRequest"
},
"aggs": {
"_http": {
"filters": { <======== filters sub-aggregation
"filters": {
"_2xx": {
"range": {
"ProxyRequest.status": { <======== must have "ProxyRequest" document type prefix. If the sub-aggregation were to be "terms" instead of "filters", prefix is optional
"gte": 200,
"lte": 299
}
}
},From Elasticsearch 2.x, use the "bool" query as root query. The "bool" query supports filters.
Elasticsearch Document Types
Inside Elasticsearch, each log event is stored as a separate document. In some cases, there is the need for querying documents based on a relation, for example if you want to count all proxy requests per session. For these cases, Elasticsearch provides the parent-child relationship to relate documents.
Relations between document types
ProxyRequest and AuthEvent are children of their corresponding AuthSession. If an event does not belong to a session, the parent is not set.
ProxyRequest
The table below lists the Elasticsearch fields that are available for ProxyRequest documents. The following conventions are used:
- When a field name is in bold, then the field is generated from other fields to allow easier querying.
- Fields are of type string, unless stated otherwise in the description.
| Elasticsearch field | Example values | Optional | Description |
|---|---|---|---|
| type | "ProxyRequest" | This field holds the document type (mapping type).This field is available when running nevisReports with Elasticsearch 6.x and higher, to differentiate between the various document types used for nevisReports. Previously, Elasticsearch Mapping Types served the same purpose. | |
| _type | "doc" | This field always has "doc" as value. It is the default mapping type set by the Logstash. | |
| host | "nevapl13" | The log sending host as defined in the logstash-forwarder configuration. | |
| comp | "nevisproxy" | This field's value is always "nevisproxy". | |
| instance | "proxynb" | nevisProxy instance name. | |
| logVersion | "2" | The log version value is increased when the log format is changed in a way that must be detectable. | |
| @timestamp | 2015-06-30T15:30:29.000Z 2015-06-30T15:30:29.000+0100 | The value is of type date and includes time zone information. | |
| clientIP | "192.168.13.255" | The IP of the client host directly connecting to the nevisProxy server. In most setups this is the end user's IP. In some setups however, this can be the IP of another proxy or a load balancer instead of the end user's IP. | |
| xForwardedFor | ["192.168.13.252"] ["192.168.13.252", "2.3.4.5"] | optional | Refers to the HTTP header "X-Forwarded-For".Can contain multiple comma-separated IP addresses (more info). |
| agentIP | "192.168.13.255" | The value of the first IP inside the xFowardedFor field, or, if the field is empty, the clientIP. | |
| trID | "c0a80dff-2adc-a8c0ff0d-14e44a96556-00000006" | nevisProxy transaction ID: unique ID assigned to the current request. | |
| sessionID | "2600a8c0ff0d8zs FqXl1VfV0XQv7u73d WbvoDXVCw5kwZH11//jthf8=" | optional | nevisProxy session ID (also known as clID in other places). Groups multiple requests by the same agent. Note that there are spaces inserted in the example value for readability. In default nevisProxy installations this field may be empty for some requests (see section Reliable session ID logging in the nevisReports reference guide). |
| join_field | AuthSession (parent) "join_field": "AuthSession" ProxyRequest (child) "join_field": { "parent": "2600a8c0ff0d8zs FqXl1VfV0XQv7u73d WbvoDXVCw5kwZH11//jthf8=", "name": "ProxyRequest" } | The link to the AuthSession parent document of this ProxyRequest document.For more information on join_field, see join field. | |
| sslProtocol | "TLSv1.2" | optional | The SSL protocol. |
| sslCipher | "DHE-RSA-AES256-SHA" | optional | The SSL connection cipher. |
| sslClientDN | "CN=Nevis Demo Client/O=AdNovum Informatik AG/C=ch" | optional | The client's distinguished name (DN) in case of two-way SSL. |
| serviceName | "www-test.siven.ch" | The name of the proxy "service" (ServerName) that handled the HTTP request.(warning) The serviceName field is the same as the URL's host name as seen in the web browser only if a service exactly matching the URL's host name exists. When such a service does not exist, the serviceName will contain the name of a wildcard or default service and thus differ from the host name in the browser. | |
| port | 443 | The TCP port used to connect to the nevisProxy server. | |
| reqMethod | "GET" | The HTTP verb used in the request. | |
| reqPath | "/confluence/favicon.ico" | optional | The URL path without query string. |
| reqQuery | "details=none" | optional | The query string from the URL (without "?"). |
| reqPathComp1 | "confluence" | The first component of the URL path. This component usually corresponds to the application.The field is empty if the URL contains a slash only at the start. | |
| userAgent | "Mozilla/5.0 (X11; Linux x86_64; rv:31.0) Gecko/20100101 Firefox/31.0" | optional | The userAgent string in the HTTP header. |
| userAgentParsed | { nested object } | optional | A nested object of fields parsed from userAgent string using logstash useragent filter. See: Fields parsed from userAgent string |
| referer | "/index.html" | optional | The referer string in the HTTP header. |
| inContentType | "text/html" | optional | The content-type string in the HTTP header of the request. Refers to the content (MIME) type of the request body. |
| outContentType | "text/html" | optional | The content-type string in the HTTP header of the response. Refers to the content (MIME) type of the response body. |
| status | 200 | The response HTTP status code that is sent to the client. | |
| originalStatus | 404 | The original response HTTP status code before being altered by ErrorFilters. By default, this field is the same as the status field. If your nevisProxy setup contains ErrorFilters to change status code sent to the client, you should configure to log the original unaltered HTTP status in this field (see chapter: Logging originalHttpStatus in the nevisReports reference guide). Regardless of configuration this field always falls back to status if the original status is not available. | |
| dT | 258516 | The time to serve the response in µs (microseconds). | |
| dTF | [ 256 ] | Same as dT but excludes Apache processing time.; Expressed in ms (milliseconds).; dTF = dT - Apache time; Note, that dT and dTF include time taken to make back-end calls. | |
| dTProxy | 5 | The total time taken in nevisProxy without time taken by back ends. Expressed in ms (milliseconds). dTProxy = dT - sum of (dTB) | |
| dTB | [ 251 ][ 100, 151 ] | optional | Total time taken to make back-end call(s) in ms (milliseconds). Note: This field is an array. If there are multiple back-end calls, time taken for each call is represented as one entry. Entries are in the same order as the calls, i.e., if the first call took 100 ms and the second call took 151 ms, the value of this field is [ 100, 151 ]. |
| sCB | [ 200 ][ 200, 404 ] | optional | Response HTTP status codes received from each back-end call. Entries are in the same order as the calls. Example: The value [ 200 , 404 ] means that two back-end calls were made, with the first call resulting in 200 and the second call resulting in 404. |
| invS | ["ServletNevisWorkflow100"] ["NevisAuthConnectorLDAP"] ["NevisLogrendConnectoridm"] | optional | The name(s) of the servlet(s) being invoked. Entries are in the same order as the servlets' invocation. |
| application | "Zimbra" "Nevis (authentication)" "Nevis (others)" | The name of back-end content-provider application associated with this request. (See chapter Custom Logstash mapping configuration in the nevisReports reference guide.) If the call is routed to nevisAuth/nevisLogrend, the name "Nevis (authentication)" is assigned. If the call has no back-end requests and is handled entirely within nevisProxy, the name "Nevis (others)" is assigned. | |
| adrB | ["nevisreports-test-sg:8777"]["nevisreports-iam-sg:8991", "localhost:8988"] | optional | Address of the back end(s) composed of host name and port number. Entries are in the same order as the calls. |
| hostB | ["nevisreports-test-sg"]["nevisreports-iam-sg", "localhost"] | optional | Same as adrB but only the host name. |
| portB | ["8777"]["8991", "8988"] | optional | Same as adrB but only the port number. |
| ipB | ["10.21.208.86"]["10.21.208.86","127.0.0.1"] | optional | IP address of the back end(s). Entries are in the same order as the calls. |
| events | ["AU01"]["AU01", "P02"] | optional | nevisProxy events (see Appendix C in the nevisProxy reference guide). |
| userID | "00233453" | The user ID retrieved from the authentication back end, passed on from nevisAuth to nevisProxy inside the SecToken. Only available after successful authentication. | |
| loginID | "lior" | The login ID as entered by the user. After a successful authentication it is possible that the user login ID in the loginID field is overwritten by the nevisIDM login ID for the same session. Only available after a successful authentication. Can be empty in some setups. | |
| inBytes | 566 | The number of total bytes coming in (HTTP headers + body). Long type data, always >0. | |
| outBytes | 100 | The number of total bytes going out (HTTP headers + body). Long type data, always >0. | |
custom.<x> | any valid JSON value | optional | <x> can be any valid JSON attribute name (see also the special case for time stamps below).Elasticsearch derives the data type from the value (click here for more information). |
custom.<y>Timestamp | 2015-06-30T15:30:29.009+0100 | optional | Custom attribute name ending with Timestamp (date type, including time zone information). |
Fields parsed from userAgent string
The examples given are observed known values over a wide range of user agent strings. However, there is no guarantee that the underlying parser or the browser's userAgent strings will stay exactly the same.
For more examples: see a sample list of user agent strings and the parsed values here: userAgent-samples.json.
| Elasticsearch field | Example values | Optional | Description |
|---|---|---|---|
| userAgentParsed.name | - Chrome, Firefox, Safari, IE - Chrome Mobile, Mobile Safari, Firefox iOS - AppleMail, Thunderbird, Outlook - Apache-HttpClient, Java, CFNetwork - Python Requests, Other | Name of the user agent, e.g., the browser software. | |
| userAgentParsed.major | 47, 48, 49, 50 | optional | Major version of the user agent |
| userAgentParsed.minor | 0, 7, 9, 11, 12 | optional | Minor version of the user agent |
| userAgentParsed.patch | 1, 1599, 2228 | optional | Patch version of the user agent |
| userAgentParsed.os | Mac OS X 10.6, Windows 10, Red Hat, iOS 8.0, Android 6.0, Other | The operating system string (name with version string) | |
| userAgentParsed.os_name | Mac OS X, Windows 10, Red Hat, iOS, Android, Other | Name of the operating system (name without version string) | |
| userAgentParsed.os_major | 10 | optional | Major version of the operating system |
| userAgentParsed.os_minor | 6, 7, 8 | optional | Minor version of the operating system |
| userAgentParsed.device | - iPad, iPhone, iOS-Device, Samsung SM-G920F, Nexus 5X, Generic Feature Phone - Spider, Other | Type of device Note: Laptops and desktops are usually recognized as "Others" |
Adding custom fields
For information on adding custom fields, see section: Custom Log Properties.
When custom properties are added inside the log files, these properties will be indexed automatically as Elasticsearch fields, because nevisReports uses schema-less indexing.
AuthEvent
The following table lists fields that occur in AuthEvent documents. In some descriptions we refer to technical terms that are defined in the nevisAuth reference guide (for example, AuthState).
Some fields occur only when the log type is sessionEvent or acaaEvent (see the logType column in the table below).
Events of log type acaaEvent are only available starting from nevisReports 1.2.1.7 and with the nevisAdapt 1.0 release.
| Elasticsearch field | Example values | logType | Optional | Description |
|---|---|---|---|---|
| type | "AuthEvent" | This field holds the document type (mapping type).This field is available when running nevisReports with Elasticsearch 6.x and higher, to differentiate between the various document types used for nevisReports. Previously, Elasticsearch Mapping Types served the same purpose. | ||
| _type | "doc" | This field always has "doc" as value. It is the default mapping type set by the Logstash. | ||
| host | "nevapl13" | <any> | The log-sending host as defined in the Filebeat configuration. | |
| comp | "nevisauth" | <any> | This field's value is always "nevisauth". | |
| instance | "authnb" | <any> | The nevisAuth instance name. | |
| logVersion | "1" | <any> | The log version value is increased when the log format is changed in a way that must be detectable. | |
| @timestamp | 2015-06-30T15:30:29.000Z 2015-06-30T15:30:29.000+0100 | <any> | The value is of date type and includes time zone information. | |
| logType | "event" "sessionEvent" "acaaEvent" | <any> | The log type. The following log types are available: event: Stored as an AuthEvent document type. sessionEvent: Stored as AuthEvent and AuthSession document type. acaaEvent: Stored as an AuthEvent document type. | |
| eventType | "session-terminated" | <any> | The type of event. For all possible values, see the [List of event types] below. | |
| trID | "c0a80dff-6c6c-a8c0ff0d-14e9b30b648-00000000" | <any> | optional | The transaction ID (usually the same as the ProxyRequest.trID). |
| sessionID | "GdLf3s6nQjbfRFY-yi8mYOPGW25aJ9_kJujbypoDhCs" | <any> | optional | The nevisAuth session ID. This ID can change when a session becomes authenticated. |
| conversationID | "680026204835" | <any> | optional | The nevisAuth conversation ID. The conversation in this case is a sequence of requests and responses that forms one operation, e.g., an authentication or a step-up operation that renders forms. |
| client | { nested object } | sessionEvent acaaEvent | The client that talks to the nevisAuth server (usually nevisProxy). | |
| client.sessionID | "2fb3000ae5cdRHQtAH 3VObujYtYiUnfn0tul BVEZGYyv6hrD1hz1YGE=" | <any> | optional | The nevisProxy session ID (also known as clID in other places).Note that there are spaces inserted in the example value for readability. |
| client.clientID | "12441" | sessionEvent acaaEvent | The identification ID of the client (also known as actorId in other places). | |
| client.entryPoint | "nbnevap07.zh.adnovum.ch" | sessionEvent acaaEvent | The client entry point is the human-readable name provided by the client to identify itself. In nevisProxy configurations that are generated by nevisAdmin, the entryPoint value refers to the nevisProxy instance's host name. | |
| client.sslCipher | "TLS_DHE_RSA_WITH_AES_256_CBC_SHA" | sessionEvent | optional | The SSL connection cipher. |
| client.sslClientDN | "CN=nbcert,O=Adnovum Informatik AG,C=ch" | sessionEvent | optional | The distinguished name (DN), as presented in the client certificate. |
| client.clientIP | "10.0.205.229" | sessionEvent acaaEvent | The IP of the client host. | |
| agent | { nested object } | sessionEvent acaaEvent | The end user's client. The data is provided by the intermediate client above (usually nevisProxy). | |
| agent.userAgent | "Mozilla/5.0 (X11; U; Linux i686; en-US; rv:1.9.1.7) Gecko/20091221 Firefox/3.5.7" | sessionEvent acaaEvent | optional | The userAgent string in the HTTP header (same as ProxyRequest.userAgent). |
| agent.userAgentParsed | { nested object } | sessionEvent acaaEvent | optional | A nested object of fields parsed from userAgent string using logstash useragent filter. |
| agent.agentIP | "10.0.204.245" | sessionEvent acaaEvent | The IP of the end user's client if available (should be the same as the ProxyRequest.agentIP). | |
| agent.sslProtocol | "TLSv1" | sessionEvent | optional | The SSL protocol (same as ProxyRequest.sslProtocol). |
| agent.sslCipher | "DHE-RSA-AES256-SHA" | sessionEvent | optional | The SSL connection cipher (same as ProxyRequest.sslCipher). |
| agent.resPath | https://nbnevap07.zh.adnovum.ch/monitoringCertLogin/ | sessionEvent | The original URL (resource) that the agent (end user) wanted to access. | |
| agent.resQuery | "a=b" | sessionEvent | optional | |
| agent.resPathComp1 | "monitoringCertLogin""/" | sessionEvent | ||
| agent.reqPath | https://nbnevap07.zh.adnovum.ch/monitoringCertLogin/ | sessionEvent | The URL of the current agent request that caused the nevisAuth back end to be invoked (same as ProxyRequest.reqPath). | |
| agent.reqQuery | "login" | sessionEvent | optional | The query string part of the request (without "?", same as ProxyRequest.reqQuery). |
| hostName | "nbnevap07.zh.adnovum.ch" | sessionEventacaaEvent | The host name of the internet protocol (IP) interface that received the request. | |
| port | 8991 | sessionEventacaaEvent | The port number (long type) of the internet protocol (IP) interface that received the request. | |
| sessionStartTimestamp | 2015-10-08T17:40:26.044+0200 | sessionEvent | The start time (date type) of the current session. | |
| sessionEndTimestamp | 2015-10-08T17:45:43.127+0200 | sessionEvent | optional | The end time (date type) of the current session. |
| sessionEndReason | "terminated-by-client" | sessionEvent | optional | The reason why the session was finished. For all possible values, see the List of session end reasons, below. |
| loginID | "user1" "CN=nbcert,O=Adnovum Informatik AG,C=ch" | sessionEvent acaaEvent | This field contains the intended (but unverified) user identity (name) which is usually visible to the end user. It is set by an AuthState before successful authentication. - In the case of a classic client certificate login, this is the same value as ProxyRequest.sslClientDN. - In the case of a form-based login, this is the value that the user entered into the User Name field. In many setups, this user identity name differs from the login ID defined in nevisIDM and the user ID in the userID field (see below). | |
| userID | "user1" "1260" | sessionEvent acaaEvent | optional | The principal name as provided by the authentication back end. It is set by an AuthState during the authentication process. This user ID is used to pass on the identity, e.g., via a SecToken. This ID cannot be used to check whether a session is authenticated or not since it is also set on failed authentication attempts (e.g., by the nevisIDM IdmPasswordVerifyState). |
| authLevel | "auth.weak" "auth.strong" "STRONG" | sessionEvent acaaEvent | optional | The authentication strength of the session after a successful login or step-up (e.g., if the user was authenticated by a simple password only, the authentication strength is set to weak). For possible values, see the authLevel attribute of the AuthState and ResultCond elements in your nevisAuth configuration. |
| roles | ["nevisIdm", "nevisIdm.SelfAdmin", "auth.strong"] | sessionEvent | optional | The roles received by the user (based on role information from the authentication back end).The field usually contains the current authLevel name as well. |
| realm | "SSO" | sessionEvent acaaEvent | The name of the SSO authentication domain.For possible names, see the Domain element in your nevisAuth configuration. | |
| language | "en" | sessionEvent | The natural language (as ISO code) in which nevisAuth GUIs are rendered. The value is selected from configured languages based on the user agent's language header or, in rare cases, based on the nevisIDM-defined language. | |
| eventTrail | [ nested array ] | sessionEvent acaaEvent | The audit events that can be generated by AuthStates and are collected during the session. | |
| eventTrail[].stateName | "SSOIdmCertificate" | sessionEvent acaaEvent | The name of the AuthState in the configuration. | |
| eventTrail[].stateClass | "ch.nevis.esauth.auth.states.x509.X509Login" | sessionEvent acaaEvent | The class of the AuthState. | |
| eventTrail[].timestamp | 2015-10-08T17:40:25.939+0200 | sessionEvent acaaEvent | The event timestamp (date type). It includes time zone information. | |
| eventTrail[].tech | "X509" "Kerberos" "LDAP" | sessionEvent acaaEvent | A short text that indicates the technology used in the operation. | |
| eventTrail[].type | "token" | sessionEvent acaaEvent | The authentication type of the event (trail). For all possible authentication types, see the: List of event trail authentication types, below. | |
| eventTrail[].detail | "CN=nbcert, O=Adnovum Informatik AG, C=ch" | sessionEvent acaaEvent | optional | AuthState-dependent information. |
| acaa | { nested object } | acaaEvent | The detailed information from the ACAA AuthState. Only available in pre-releases of nevisReports and nevisAuth. | |
| acaa.devicerecognition | { nested object } | acaaEvent | The detailed information from the devicerecognition module. | |
| acaa.geolocation | { nested object } | acaaEvent | The detailed information from the geolocation module. | |
| acaa.timeofday | { nested object } | acaaEvent | The detailed information from the timeofday module. | |
| acaa.... | TODO | |||
custom.<x> | <any> | optional | <x> can be any valid JSON attribute name (see also the special case for timestamps below).Elasticsearch derives the data type from the value. | |
custom.<y>Timestamp | 2015-06-30T15:30:29.009+0100 | <any> | optional | Custom attribute name ending with Timestamp (date type, including time zone information). |
customEvent.<x> | <any> | optional | <x> can be any valid JSON attribute name (see also the special case for timestamps below)Elasticsearch derives the data type from the value. | |
customEvent.<y>Timestamp | 2015-06-30T15:30:29.009+0100 | <any> | optional | Custom attribute name ending with Timestamp (date type, including time zone information). |
List of event types
The event type describes why/when an event was logged.
The table below lists all possible event types.
| Event type | Reason for logging the event |
|---|---|
| authenticate-completed | A completed authentication operation (the AUTH_DONE status has been reached). |
| stepup-completed | A completed step-up operation (the AUTH_DONE status has been reached). Traditionally, a successfully completed step-up operation leads to an increased authentication level (authLevel). Note that a step-up may also be used for re-authentication, e.g., to trigger a password change operation. In this case, the authentication level is not increased. |
| logout-completed | A completed logout operation requested by the user (usually via logout URL). |
| session-terminated | A session that is killed out of the context of a user request. This can happen for various reasons (see the List of session end reasons). |
<operation>-completed | A completed operation (leading to the AUTH_DONE status). |
<operation>-aborted | An aborted operation (which caused an AUTH_ERROR status). |
| acaaRiskScore | A risk scoring event within the ACAA AuthState. Usually happens before AUTH_DONE or AUTH_ERROR. |
| acaaPersist | A risk persist event when the user successfully completed a login (AUTH_DONE) and risk scores are persisted. |
List of session end reasons
The following values can occur in the sessionEndReason field when a session finishes:
| Session end reason | Description |
|---|---|
| expired | The SessionReaper has removed a timed-out session. |
| terminated-by-client | A kill call was made from an external client (such as nevisProxy reaching a session time-out). |
| terminated-by-flow | The session was killed by AuthState logic (e.g., through response.setInvalidateSession()). |
| aborted | The authentication operation failed (that is, the AUTH_ERROR status was triggered by the configuration or a Java exception). |
| redirected | A user request resulted in an AUTH_REDIRECT status. |
| logout | A user-triggered logout has been completed. |
| stateless-domain | The domain configuration signals stateless authentication support. |
| stateless-request | The client signals stateless authentication support. |
List of event trail authentication types
The table below lists the event trail authentication types.
This documentation is based on the nevisAuth Java class ch.nevis.esauth.auth.engine.AuthMarker. For further information, see the nevisAuth reference guide, chapter "Auth Markers", and the Marker row in the summary table included for each AuthState.
| Event trail type | Description |
|---|---|
| username/password | Classic user name/password authentication. |
| token | Authentication based on a verifiable (signed, encrypted, etc.) unique token held by the user. For example: x509, kerberos tokens |
| challenge/response | The authentication is based on a challenge/response procedure. In this case, the user is presented with a challenge to which he must respond correctly. For example: vasco, rastercards, CAPTCHA |
| extern | Federated authentication where an external, foreign service must be trusted, without being able to verify the correctness of the service. For example: SOAP- and HTTP-based integration of external authentication services. |
| federation | Federated authentication by a well-known external service and the usage of secure message transfers. For example: SAML, WS-Fed |
| one-time-password | Authentication by transmitting a one-time secret via a different communication channel. For example: TAN |
| selection | This is not an authentication step/type but refers to the selection of authentication-relevant options. For example: user profiles |
| mutation | This is not an authentication step/type but refers to a change of permanent authentication data. For example: password change |
| none | This is not an authentication step/type but a significant event in the session. |
AuthSession
Elasticsearch creates an AuthSession document for every user session. The document is updated when there is an update of the session information or when the session is over.
Behind the scenes, the following happens: Whenever Elasticsearch receives a nevisAuth JSON event with the sessionEvent log type, it creates/updates an AuthSession document. It then adds the same event as an AuthEvent document to keep a full history of such events. See the AuthEvent field table for information about available fields.
From nevisReports 4.0 onwards, document and mapping types are set in different fields. The document type is set in the type field, whereas the _type field is always set to the "doc" mapping type. In case of an AuthSession document, the document type set in the type field must be "AuthSession".
Joins
In Elasticsearch, the AuthSession document is the parent of one or more ProxyRequest or AuthEvent documents. This can be used, for example, to include session information when reporting on proxy requests or to aggregate proxy requests by session. For examples, see section: Elasticsearch Introduction.
In the standard configuration, nevisReports switches the index files every month (for performance and maintenance reasons). Thus, if a user session starts in month 1 and ends in month 2, there will be two AuthSession documents, one in each month's index. Because in this case the session ends in month 2, the AuthSession document of the first month's index will not yet have the sessionEndTimestamp set. In reports you can handle this special case as follows:
- Especially when displaying sessions across month boundaries, you may want to include the actual session only once. To accomplish this, require a non-null sessionEndTimestamp value in the query. The matching AuthSession objects will contain the final session information.
- If you are joining AuthSession documents to other documents via the parent-child relationship, the joins will only include documents inside the index (month) where the AuthSession document resides. In such cases, it may be preferable to report on both sessions so that all available information can be included in the report.
AuditEvent
The table below lists the Elasticsearch fields that are available for AuditEvent documents. They are created by nevisIDM only at the moment.
From an audit relevant event there are three main blocks at work:
- The actor, the system or user that executed the operation.
- The subject, in case of events defined under the "Audit events when subject user must be added" section.
- The subject should show the user's LATEST state. (for e.g. when the subject user's name is changed, the new name shall be logged).
- If the subject is being deleted in the event, the "old" state must be logged.
- The eventData, which contains:
- newValues, which lists all changed fields with their new values if there's any.
- oldValues, which lists all changed fields with theis old values if there's any.
- updatedState, which lists all fields with their actual values.
| Elasticsearch Field Name | Nested fields | Nested fields | Type | Importance* | Example Value | Description |
|---|---|---|---|---|---|---|
| logVersion | number | mandatory | 1 | The log version value is increased when the log format is changed in a way that must be detectable. | ||
| timestamp | string | mandatory | 2015-06-30T15:30:29.000Z or 2015-06-30T15:30:29.000+0100 | The value is of date type and includes time zone information - ISO-8601 format (used by most JSON parsers). | ||
| source | string | mandatory | [email protected] | The source of the audit entry in the form [machine]@[hostname] The machine is always "nevisidm", collected from log file path by Filebeat and Logstash. The hostname is the log sending host as defined in the Filebeat configuration. | ||
| eventType | string | mandatory | USER_CREATE | The nevisIDM audit log event type, also simply called Event in the text-based nevisIDM audit logs. Event type: (see AuditEventTypes and Fields) | ||
| trID | string | optional | 7f000001.3e07.0a14d672.00000024 | General transaction ID: unique ID assigned to the current request. For events triggered by the system, this value is empty. | ||
| sessionID | string | optional | 24ab80993abefbTKRgWyC5ZkUk3tNpHwwIXJ2Lj+CKPXg/mL/zB7tfk\= | nevisIDM clID (also known as session ID in other places). For events generated by the system these values are empty. | ||
| client: optional | sessionId | string | optional | G2YfYeyQv_x3L0lwW9u8bV5Z | The nevisIDM session ID, also called sessID in the text-based nevisIDM audit logs. SSO session ID of the caller (comes from sectoken). | |
| entryPoint | string | optional | nevisidm-test.zh.adnovum.ch | The entry point for audit events directly hitting the nevisIDM web application, this is also called EntryID. SSO entry ID (the nevisProxy instance) of the caller (comes from sectoken). | ||
| actor: mandatory | firstName | string | optional | Bruce | The first name of the actor as it is stored in nevisIDM. User.firstName | |
| lastName | string | optional | Lee | The last name of the actor as it is stored in nevisIDM. User.name | ||
| string | optional | [email protected] | The email address of the actor as it is stored in nevisIDM. User.email | |||
| loginId | string | mandatory | theonlybrucelee | The login ID of the actor, as identified by nevisIDM. User.loginId | ||
| extId | string | mandatory | 100 | The user ID (also know as ext ID in other places) of the actor, as identified by nevisIDM. User.extid | ||
| isTechnicalUser | boolean | mandatory | true or false (boolean) | Indicates whether the actor is a technical user according to nevisIDM or not. User.isTechnicalUser | ||
| client: mandatory | extId | string | mandatory | apClient1 | The client ID of the actor, as identified by nevisIDM.Client.extId | |
| name | string | mandatory | Default | The client name of the actor, as identified by nevisIDM. Client.clientName | ||
| unit: this is the unit of the profile which the actor have selected at login If no unit is assigned to the user, it is optional. | profileExtId | string | mandatory | prof1234 | The external ID of the user's profile which is assigned to this unit, as identified by nevisIDM. | |
| extId | string | mandatory | authtestunit002 | The unit id of the unit, as identified by nevisIDM. Unit.extId | ||
| name | string | mandatory | UnitForAuthTest2 | The unit name of the unit, as identified by nevisIDM. Unit.name | ||
| hierarchyName | string | optional | /authtestunit001/authtestunit002 | The hierarchical unit name of the unit, as identified by nevisIDM. Unit.hName | ||
| subject: optional, check the table below for exact cases | firstName | string | optional | Alan | The first name of the subject user as it is stored in nevisIDM. User.firstName | |
| lastName | string | optional | Rickman | The last name of the subject user as it is stored in nevisIDM. User.name | ||
| string | optional | [email protected] | The email address of the subject user as it is stored in nevisIDM. User.email | |||
| loginId | string | mandatory | alarick | The login ID of the subject user , as identified by nevisIDM.User.loginId | ||
| extId | string | mandatory | 1201y | The user ID (also know as ext ID in other places) of the subject user , as identified by nevisIDM. User.extid | ||
| isTechnicalUser | boolean | mandatory | false | Indicates whether the subject user is a technical user according to nevisIDM or not. User.isTechnicalUser | ||
| client: mandatory | extId | string | mandatory | apClient1 | The client ID of the subject user , as identified by nevisIDM.Client.extId | |
| name | string | mandatory | Default | The client name of the subject user, as identified by nevisIDM. Client.clientName | ||
| units [ARRAY]: lists all units of the subject user - If no unit is assigned to the user, return an empty array. - The array must be sorted by hName in an ascending order (if it's set) | profileExtId | string | mandatory | prof1234 | The external ID of the subject user's profile which is assigned to this unit, as identified by nevisIDM. | |
| extId | string | mandatory | authtestunit002 | The unit id of the unit, as identified by nevisIDM. Unit.extId | ||
| name | string | mandatory | UnitForAuthTest2 | The unit name of the unit, as identified by nevisIDM. Unit.name | ||
| hierarchyName | string | optional | /authtestunit001/authtestunit002 | The hierarchical unit name of the unit, as identified by nevisIDM. Unit.hName | ||
| eventData: Theoretically optional, but makes no sense in practice to log an empty event. | newValues | object | optional | "number": 1000002267,"boolean": true,"string":"blablabla1234" | Only fields with updated values are listed here. (Note: If it's a DELETE event, there are no new values.) Zero or more fields of the affected entity depending on the EventType (see AuditEventTypes and Fields). If a field is a Date, it should have the same format as the "timestamp" field has. | |
| oldValues | object | optional | "number": 1000002267,"boolean": true,"string":"blablabla1234" | The updated fields are listed here with their values before the update. (Note: If it's a CREATE event, there are no old values.) Zero or more fields of the affected entity depending on the EventType (see AuditEventTypes and Fields). If a field is a Date, it should have the same format as the "timestamp" field has. | ||
| updatedState | object | optional | "number": 1000002267,"boolean": true,"string":"blablabla1234" | All fields are listed here with the values after the update. (Note: If it's a DELETE event, there is no updated state.) Zero or more fields of the affected entity depending on the EventType (see AuditEventTypes and Fields). If a field is a Date, it should have the same format as the "timestamp" field has. |
Importance was set based on what is set as nullable in the database and what is not, and also based on the remarks of Lukas Westermann.
Audit events when subject user must be added
Subject users are for example the owner of a credential, an owner of a profile, authorization etc.
| Audit event type | Remark |
|---|---|
| USER_CREATE, USER_MODIFY, USER_DELETE | - |
| PROFILE_CREATE, PROFILE_MODIFY, PROFILE_DELETE | - |
| CREDENTIAL_CREATE, CREDENTIAL_MODIFY, CREDENTIAL_DELETE | - |
| CREDENTIAL_LOGIN_INFO_CREATE, CREDENTIAL_LOGIN_INFO_MODIFY, CREDENTIAL_LOGIN_INFO_DELETE | - |
| PROPERTY_VALUE_CREATE, PROPERTY_VALUE_MODIFY, PROPERTY_VALUE_DELETE | only for credential, user, profile and authorization |
| CERTIFICATE_INFO_CREATE, CERTIFICATE_INFO_MODIFY, CERTIFICATE_INFO_DELETE | - |
| MOBILE_SIGNATURE_CREATE, MOBILE_SIGNATURE_MODIFY, MOBILE_SIGNATURE_DELETE | - |
| SAML_FEDERATION_CREATE, SAML_FEDERATION_MODIFY, SAML_FEDERATION_DELETE | - |
| OATH_CREATE, OATH_MODIFY, OATH_DELETE | - |
| PERSONAL_ANSWER_CREATE, PERSONAL_ANSWER_MODIFY, PERSONAL_ANSWER_DELETE | - |
| GET_PDF_FOR_CREDENTIAL | - |
| AUTHORIZATION_CREATE, AUTHORIZATION_DELETE, AUTHORIZATION_MODIFY | - |
| AUTHORIZATION_UNIT_CREATE, AUTHORIZATION_UNIT_DELETE | - |
| AUTHORIZATION_APPL_CREATE, AUTHORIZATION_APPL_DELETE | - |
| AUTHORIZATION_CLIENT_CREATE, AUTHORIZATION_CLIENT_DELETE | - |
| SELFADMIN_MOBILE_CHANGE | - |
| ENTERPRISE_AUTHORIZATION_CREATE, ENTERPRISE_AUTHORIZATION_DELETE | - |
| AUTHORIZATION_ENTERPRISE_ROLE_CREATE, AUTHORIZATION_ENTERPRISE_ROLE_DELETE | - |
Custom Log Properties
By defining custom log properties, integrators can add environment-specific information to the nevisProxy and nevisAuth event logs.
Property naming rules
Before defining new properties, consider that Elasticsearch works reliably only if properties have unique (path) names across the nevisReports "events" indexes. The reason is two-fold:
- Within the same [document type], a field with the same name must always have the same value type.
- Some functionality requires consistent field names/types across all document types (more information).
To avoid such issues:
- Add properties only within the
custom { }orcustomEvent { }blocks.- This ensures that there is no conflict with any standard properties, since Elasticsearch internally stores properties under the full path name.
- The properties within each block MUST have different names if they have different value types (even if they appear in different document types).
- For example, in nevisProxy, you add a custom property for the login's ID (numeric), and in nevisAuth for the login's name (string). Name these properties
custom.loginIDandcustom.loginName, respectively, instead of using custom.login for both.
- For example, in nevisProxy, you add a custom property for the login's ID (numeric), and in nevisAuth for the login's name (string). Name these properties
nevisProxy custom properties
Standard nevisProxy events can be enriched with environment-specific information. This information will appear inside the custom { } block of the log events. The following can be configured:
- Property name: a valid JSON property name not containing dots.
- Property value: a supported Apache mod_log_config directive (starting with the %-sign). Some useful examples:
%{<X>}e: <X>is an environment variable supported by Apache, its modules or nevisProxy extensions.- See section DelegationFilter in the nevisProxy Reference Guide for background information about the "ENV source". Note that listed variable names may not always match those that can be used inside a mod_log_config directive.
- For additional variables, see the column "Apache Environment Variable" in the table following NProxyOp, in the section Debugging of the nevisProxy Reference Guide.
%{<IN-H>}i: <IN-H>is an HTTP request header.%{<OUT-H>}o: <OUT-H>is an HTTP response header.
- JSON formatted: whether or not the value is valid JSON by itself.
- When not ticked: the value is not (always) valid JSON, so it will be quoted when logged. Use this for:
- Any request or response header, since any header can be missing causing Apache to log the string - (minus sign, must be quoted in JSON).
- Environment variables that contain strings.
- A directive such as %b that can evaluate to - (minus sign, must be quoted in JSON).
- When ticked: the value itself is valid JSON and must be logged unquoted. Used for advanced use cases only. Use this for:
- A (custom) environment variable that always contains valid JSON and is never missing.
- A directive such as %B that is guaranteed to evaluate to a number.
- When not ticked: the value is not (always) valid JSON, so it will be quoted when logged. Use this for:
nevisAdmin configuration
To configure custom properties, do the following inside the Events log section (its location inside the nevisAdmin GUI is explained in the section Hosts running nevisProxy):
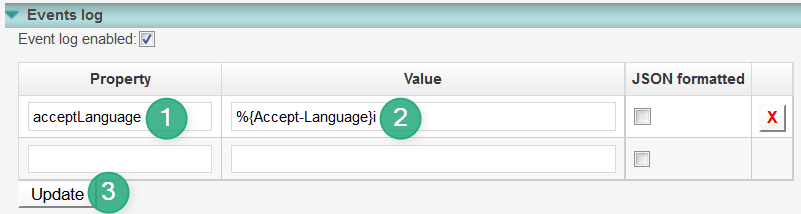
- Enter the property in the Property field.
- Enter the value in the Value field (usually the value starts with %).
- Click Update, then commit and deploy (not shown).
After deploying the configuration, the file navajo.xml will be updated. See the section Manual configuration below if you want to have a look at the generated logging directive.
Manual configuration
- Open the file /var/opt/nevisproxy/$PROXY_INSTANCE_NAME/conf/navajo.xml.
- Look up the CustomLogs element.
- Between the curly brackets following \"custom\": add your properties in valid JSON syntax, for example:
\"acceptLanguage\":\"%{Accept-Language}i\", \"responseSize\":\"%B\"
- Restart the nevisProxy instance.
Never add properties at the root level (i.e., outside of the custom map) since this may cause trouble with the Elasticsearch field mapping, or with future nevisReports releases.nevisAuth custom properties
If you use a version of nevisAuth > 4.21.10.0, then check chapter "Customize event content" in the nevisAuth Reference Guide on how to write custom properties. For all versions of nevisAuth <= 4.21.10.0, follow the next steps to set custom properties.
Standard nevisAuth events can be enriched with environment-specific information. This information will appear inside the custom { } block of the log events.
To add custom properties:
- Edit the vmargs.conf file.
- In nevisAdmin, go to the File Manager of the nevisAuth instance and edit the file there.
- When using manual configuration, you can find the file here: /var/opt/nevisauth/$AUTH_INSTANCE_NAME/conf/vmargs.conf.
- Add the desired property, usually at the end of the file:
- Add a line in this form: -Devent.log.custom.field.CUSTOM_PROPERTY_NAME=VALUE
- Replace CUSTOM_PROPERTY_NAME with the name of your property following the naming rules defined at the beginning of this section.
- Replace VALUE with a variable or EL expression that evaluates to the needed value. See the tip below for syntax requirements. By default, the value will be quoted and JSON-escaped.
- If the value must appear without quoting, for example because it always evaluates to a number or because it is a JSON array or map, add the following additional line for the property: -Devent.log.custom.field.CUSTOM_PROPERTY_NAME.format=JSON
How to define expressions inside vmargs.conf
- Refer to the nevisAuth reference guide, chapters "Variable Expressions" and "Java EL Expressions", for more information on the language.
- The dollar ($) character starting the expression must be escaped to prevent interpretation by the shell.
- The hash character can not be used for starting the EL expression because it is interpreted as the start of a comment.
- After the open curly bracket
{character, add a space to force expressions to be evaluated as EL expressions. The space prevents evaluation as a variable expression. The following table lists some example property definitions.
| Example property definition in vmargs.conf | Example value | Description |
|---|---|---|
-Devent.log.custom.field.userExtId= "\${sess:ch.nevis.idm.User.extId}" | 1002 | The nevisIDM external ID of the logged-in user |
-Devent.log.custom.field.userEmail= "\${sess:ch.nevis.idm.User.email}" | "[email protected]" | The e-mail address of the logged-in user. |
-Devent.log.custom.field.userLastName= "\${sess:ch.nevis.idm.User.name}" | "Doe" | The last name of the logged-in user. |
-Devent.log.custom.field.userGivenName= "\${sess:ch.nevis.idm.User.firstName}" | "John" | The first name of the logged-in user. |
-Devent.log.custom.field.unitExtId= "\${sess:ch.nevis.idm.User.unit.extId}" | 1000 | The nevisIDM external ID of the unit the logged-in user belongs to. |
-Devent.log.custom.field.unitDisplayName= "\${sess:ch.nevis.idm.User.unit.displayName}" | "Finance" | The nevisIDM display name of the unit the logged-in user belongs to. |
-Devent.log.custom.field.unitLocalizedHierarchicalName= "\${sess:ch.nevis.idm.User.unit.localizedHname}" | "Default unit >> Finance" | The hierarchical nevisIDM display name of the units the logged-in user belongs to, in the language of the user. |
-Devent.log.custom.field.unitExtIdHierarchy= "['\${ sess['ch.nevis.idm.User.unit.hname'].contains('/') ? sess['ch.nevis.idm.User.unit.hname'].substring(1).replace ('/', '\\',\\'') : sess['ch.nevis.idm.User.unit.hname']}']" - Devent.log.custom.field.unitExtIdHierarchy.format=JSON | [100,1000] | The full unit hierarchy of the user (as external unit IDs), in the form of a JSON array to allow precise querying. |
Observe the following when trying out the examples above:
The examples may wrap across multiple lines. When adding them into vmargs.conf, make sure each line starts with -D
For the unitExtIdHierarchy property, make sure there is a space after the first open curly bracket
{character.The values contain expressions that refer to user information from nevisIDM, so your nevisAuth realm must contain the various nevisIDM AuthStates. Its IdmGetPropertiesState must retrieve the referenced attributes as specified below:
<property name="user.attributes" value="extId, firstName, name, email" />
<property name="unit.attributes" value="extId, name, displayName, hname, localizedHname" />
nevisAuth custom events
This is an advanced topic that does not apply to standard "out-of-the-box" installations of nevisReports.
Sometimes, there is a need for capturing (user) actions that are not logged as standard events. For example, you may need to track failure or completion of specific AuthStates related to a two-factor authentication process.
nevisAuth can be extended, e.g., by writing a custom AuthState, to log additional custom events. These can contain the same information as standard events plus event-specific properties inside a customEvent { ... } map. The whole event is automatically indexed in Elasticsearch.
JasperReports Development
Target audience
This section is for AdNovum developers, integrators or partners that want to create or modify reports for use with nevisReports.
Licensing note
nevisReports is built on the professional edition of JasperReports Server and assumes that customization developers use the same edition of these tools in the development environment. Developers or integrators external to AdNovum should contact AdNovum regarding Jasper licensing before starting development.
Overview
How to use this guide
In this section we introduce you to the vendor documentation by Jasper. We also describe common problems and their solutions, useful patterns, tips and tricks. Check out these topics here or see the vendor documentation directly. The following section is an introduction to help you get started.
Introduction to JasperReports
TIBCO Jaspersoft is a suite of business intelligence (BI) software consisting of but not limited to reporting functionality. It pays to understand various Jasper components used in the nevisReports context - so that you can look up relevant documentation when required.
- Jasper BI Suite: refers to all components. The nevisReports license covers some of them.
- JasperReports Library: This is a Java library that can generate documents if it is given a template (in JasperReports XML - JRXML) and a model. JasperReports Library is not a standalone application. It must be embedded in a Java application.
- Jaspersoft Studio (JSS): Eclipse-based IDE to develop JasperReports XML files (JRXMLs). It is a successor of iReport, which was a legacy JRXML editor.
- JasperReports Server (JRS): JRS is a kind of Java server application developed by Jaspersoft that can be deployed out-of-the-box to a Java container. It builds on top of the JasperReports Library and, among others, offers the following functionalities:
- A repository to store and manage report templates, meta data, images and other artifacts necessary to generate finished report documents.
- A web-based UI to let end users log in, generate and view reports.
- A job scheduler to generate and distribute reports.
In nevisReports, only the above Jaspersoft components are used. Examples of components that we do not use are the OLAP server and Jaspersoft ETL. Additionally, some components may not be part of the nevisReports license. Contact AdNovum in case you have licensing-related questions.
Understanding what each component does will help you navigate through the Jaspersoft guides more quickly. For example, if you have a question about an element in JRXML, see the library guide(s). Or if your question is about the job scheduler, take a look at the server guide(s).
Jaspersoft guides
Jaspersoft documentation is available online here. In general, the following guides are relevant to a customization developer/designer:
- TIBCO JasperReports Server User Guide: Describes what the end user will see or use in the report server.
- TIBCO JasperReports Server Administrator Guide: For developers to configure and customize the JRS server.
- TIBCO JasperReports Server Ultimate Guide: Includes detailed aspects of the JRS server.
- JasperReports Ultimate Guide: Contains detailed documentation about the JasperReports Library.
- TIBCO Jaspersoft Studio User Guide: Deals with questions specific to the IDE.
Other guides, such as the TIBCO JasperReports Server REST API Reference, address more specific areas.
Types of reports
Reports can be:
- Standard reports, included with every nevisReports installation.
- Customer or project reports, such as the following:
- Additional report topics not covered by the standard reports.
- Variants on standard reports tailored to a specific customer, e.g., a standard report with an additional filter or a tabular report from scratch.
The instructions on this page and on child pages apply only to column-based reports, not to dashboards and charts.
The developer guide does not cover how to create a custom dashboard. For custom dashboards, contact AdNovum.
Test drive: Create your first report (time estimate: 1.5–2.5 hrs)
The following tutorials give you a quick overview of reporting tool concepts and what JasperReports is. The tutorials require a minimal setup, come with sample data and are independent of the nevisReports context. They are especially helpful if you have never used any reporting tools.
Step 1: Install Jaspersoft Studio
Install the Windows version of Jaspersoft Studio. For the tutorials, either the community or professional edition is suitable. However, use the professional edition for the actual nevisReports report development.
Step 2: Do the following basic tutorials from the Jaspersoft community wiki archive
Your Jaspersoft Studio comes with sample databases and sample report templates. Based on those, you can do the following tutorials to get started:
- Visit this page: http://community.jaspersoft.com/wiki/jaspersoft-studio-tutorials-archive
- Do the following tutorials:
[What is Jaspersoft Studio?](https://community.jaspersoft.com/wiki/introduction-jaspersoft-studio): An introduction to Jaspersoft Studio, the new report designer for JasperReports based on Eclipse.[Getting started with Jaspersoft Studio](https://community.jaspersoft.com/wiki/getting-started-jaspersoft-studio): Contains minimum requirements, installation and compilation information.[Designing a Report](https://community.jaspersoft.com/wiki/designing-report-jaspersoft-studio): Create your first report in a few seconds.[Report Structure](https://community.jaspersoft.com/wiki/report-structure-jaspersoft-studio): Description of the basic structure of a report: bands, columns and properties.
Jaspersoft offers structured training modules on the active site. However, the tutorials in the community archive are just as useful for beginners.
More Jaspersoft tutorials
The Jaspersoft community archive site contains more useful tutorials in addition to the four basic ones mentioned in the previous section. We recommend going through them to understand more about JasperReports development.
Development environment setup
We recommend the following setup for development:
- For each developer: Install Jaspersoft Studio IDE on Windows.
- For the entire project team: Use one shared JasperReports Server. Each development server requires a license (see below).
Jaspersoft Studio
There are also Linux and Mac versions available for Jaspersoft Studio. In our experience, though, these are more buggy than the Windows version.
Software packages
Use the version that matches your nevisReports version. Contact AdNovum for required software packages.
Setting up Jaspersoft Studio (JSS) with a development license
Run the Windows installer version of TIBCOJaspersoftStudioPro.
Select Help > License manager and install the development license. Contact AdNovum for the license.
Install the WS adapter plug-in (for Elasticsearch):
- Contact AdNovum for this plug-in.
- Copy the plug-in to:
<JSS-install-dir>/plugins/. - Restart JSS.
Connect to the JasperReports Server. Go to the Repository Explorer and select Servers > Create new connection. Enter the following data:
- URL:
http://example.ch:8773/nevisreports - Organization:
<empty>. - User name and password: jasperadmin/jasperadmin by default.
Jasper Studio refuses to connect to SSL endpoints with self-signed certificates. For development, enable non-SSL http port 8773 in your nevisReports server.
- URL:
Enable the JavaScript function as expression for highchart:
- Go to *Preferences > Jaspersoft Studio Properties > Add new property >
com.jaspersoft.jasperreports.highcharts.function.properties.allowed=true.
- Go to *Preferences > Jaspersoft Studio Properties > Add new property >
JasperReports Server
Setting up the JasperReports Server (JRS) with development license
Use a standard nevisReports installation as JRS back end for report development.
To set up the nevisReports instance, follow the standard installation instructions (see the chapter: Installation).
This setup requires an external Oracle RDBMS schema. See the installation instructions for more details.
The standard installation instructions include setting up Elasticsearch and Logstash. You may skip these if you do not require an Elasticsearch back end.
Override the production license with the development license. Contact AdNovum for the license.
By default, only the HTTPS port 8777 is enabled. For development, enable the HTTP port 8773 by editing the following configuration and restarting the container.
> vim /var/opt/adnwildfly/instances/jrs/standalone/configuration/standalone.xml
## look for undertow subsystem tag and add http-listener as below

...
<subsystem xmlns="urn:jboss:domain:undertow:1.1">
 <buffer-cache name="default"/>
 <server name="default-server">
 <http-listener name="default" socket-binding="http" redirect-socket="http" />
 `<http-listener name="https" socket-binding="https" security-realm="HttpsRealm"/>
 <host name="default-host" alias="localhost">
- Use the following URL to access the server via a web browser:
http://example.com:8773/nevisreports/login.html - Use the following URL to connect to the server via JSS Repository Explorer:
http://example.com:8773/nevisreports
Preparing the repository of a custom JRS installation
This step is not required if you use a nevisReports appliance as your JRS development server. In such a setup, the default repository is already prepared.
If you use a custom JRS installation as your development server, we recommend using the nevisReports catalog(s) as your base. It has:
- a standardized repository structure,
- sensible defaults for directory permissions,
- the nevisReports theme, and
- templates, samples and other artifacts (you can delete unnecessary items later).
First, contact AdNovum to obtain the nevisReports catalog(s) suitable for your appliance version.
Assuming you have a functioning JRS installation, do the following:
##drop database schema
cd <jrs-install>/buildomatic
./js-ant drop-js-db-pro
##import all catalogs according to number sequence:
./js-ant import -DimportFile=****.zip -DimportArgs=\"--update\";
Verifying the JRS repository
When you have a functioning JRS installation, verify that your JRS repository is prepared according to the nevisReports convention. There are two views to check.
Administrator view
- Log in to your server using the jasperadmin account (default password: jasperadmin).
- Navigate to View > Repository.
- Verify that at least the following directories exist (there may be other directories such as Templates or Themes; ignore them):
- Organization
- Datasources
- Standard
- Dashboards
- Standard
- Dashlets
- Standard
- Reports
- Standard
- Shared Resources
- Standard
- (more sub-directories)
- Standard
- User Data
- output
- temp
- Datasources
User view
- Log in to your server using the testuser account (default password: testuser).
- Navigate to View > Repository.
- Verify that the following directories exist (ignore other directories):
- Organization
- Dashboards
- Standard
- Dashlets
- Standard
- Reports
- Standard
- User Data
- output
- temp
- Dashboards
Repository directories overview (administrator view)
The following figure gives an overview of the default repository directories (administrator view):

JasperReports Server repository administration
When you have a functioning JRS and JSS, you are ready to begin the report development. During the development phase, you will be developing reports in your JSS studio, publishing them to your development JRS server and testing them on the server. At the end of the development, you will export a snapshot of your JRS server as a set of catalog file(s). These catalog files can then be delivered to your customer and deployed onto their production server. Later sections describe this process in more detail. However, to avoid conflicts between your reports and nevisReports standard reports, it is necessary that you respect the rules listed below.
Do not delete default directories
When you log in to your development JRS server as administrator, you will see many default directories in the Repository View. Some are part of the JasperServer product and are required for the regular operation of the application. The rest are created by nevisReports and are required for the correct functioning of the standard reports. These directories may also be manipulated in future versions of the product.
Do not delete these default directories. You can hide them from end user view by not granting permission. For information about repository permissions see TIBCO JasperReports Server Administrator Guide.
Do not write to Standard directories
nevisReports artifacts are deployed into various Standard directories, e.g., /Organization/Datasources/Standard, /Organization/Reports/Standard, etc. These directories are reserved by nevisReports. We may add, update or remove objects in them in future releases.
To avoid conflicts, do not publish your reports into these directories or add/remove any items from these directories.
Publish your reports and other artifacts into your own project directories
By creating dedicated directories for your own project (preferably using your project name), it will later be possible to export a snapshot of only your project directories. This has the advantage of being able to update your reports or nevisReports standard reports independently.
Create your own directories in the repository and publish your reports and other artifacts into them.
Two approaches are possible:
Mirror Standard directories
- Organization
- Datasources
- Standard
- My-Project
- (sub-directories if needed)
- Reports
- Standard
- My-Project
- (sub-directories if needed)
- Datasources
Create a project root directory
- Organization
- My-Project
- (sub-directories)
- My-Project
The first approach follows the organization of the Standard directories. The second approach is more advanced. We recommend the first approach if you wish to create reports that are not too different from the standard reports.
How to organize the directories below your project root directory is entirely up to you. If you choose the second option, consider which directory permissions to set, how to support future updates, where to store generated report documents, etc.
Do not reference anything from the Standard directories
Your reports may have to reference objects that are outside the report but inside the repository. You may sometimes find that nevisReports Standard directories contain artifacts that you need. However...
Not directly reference anything in the Standard directories. If you want to use objects in the Standard directories, create a duplicate copy in your own project directories.
Finalize your repository organization before the first production release
Regardless of which approach you choose above, it is important to finalize the directory structure before the first production release.
Although not critical during development phase, it is important to finalize your repository directory structure before your first production go-live.
The reason: Once in production, users will start adding data (e.g., report jobs) into the repository. It takes significantly more effort to re-organize the repository without losing this data. In contrast, for pre go-live releases you can always drop and recreate the repository from scratch.
Deployment packaging
Jasper buildomatic export/import tool
JasperReports Server ships with a set of ant scripts called buildomatic to support various server setup, configuration and administration tasks. One of the tools that comes with buildomatic is a database import/export utility (we call it buildomatic export/import tool). It can export contents of a JRS repository database into a zip file called catalog. This catalog file can be delivered to your customer and imported into the production server using the same buildomatic importer tool.
Almost everything from your JRS repository can be exported into catalog files. For example, the tool can export not only report definitions but also resources and configuration artifacts such as images, bundles, data source definitions, etc.
Since nevisReports deployment packaging relies on this mechanism, make sure to read through the relevant section Import and Export in the JasperReports Server Administrator Guide.
Catalog files as deployment artifacts
In nevisReports, we make use of the buildomatic export/import mechanism as a way to deliver and deploy report definitions. It applies to the following scenarios:
- nevisReports ships with catalog files that contain standard report sets.
- You will package and deliver your own project-specific reports as buildomatic catalog files.
To create buildomatic catalog files, set up a JRS server in your development environment, develop and test your reports in there and finally export server repository contents as catalog files.
Example development and deployment life cycle
The following steps describe a very high-level overview of what a typical development and deployment life cycle will look like:
- Set up your JSS (professional edition).
- Set up a development JRS server (professional edition).
- Export your project directories as a "catalog" and commit to a version control system of your choice (e.g., svn).
- Create (or edit) a new report unit, upload it to the JRS. This is done as follows:
- Connect your JSS IDE to the JRS server.
- Create a new report unit and upload it to the JRS server.
- To modify the report, use the JSS repository explorer and download a cache copy of the report from JRS into your JSS.
- Edit, save and publish it back to JRS.
- Export the "catalog" again (now with +1 report) and commit to svn.
- Repeat step 4 and 5 until all reports are completed.
- Zip the "catalog" directory.
- Deliver the catalog zip with your software package and deploy it into the nevisReports server.
Exporting catalog files
When you export your catalog files, note the following points:
Pay attention to the following paragraph from JasperReports Server Administrator guide - Import and Export:
"The resources in the repository often have dependencies on other resources, for example a report that relies on images, input datatypes, and a data source. Exporting one resource usually includes all of its dependencies, even if they are stored in folders that were not specified in the export command. Importing a catalog that contains such dependencies will re-create the same folder structure in the target repository. Once imported, you can move and redefine the dependencies of these resources."
The implication is that even if you specified a list of URIs in your export command, it cannot be guaranteed that your catalog files will only contain those URIs. This leads to the second point below.
Your project catalog files must not contain nevisReports artifacts
nevisReports artifacts refer to the objects that exist in Standard directories, e.g., /Organization/Datasources/Standard. If your reports directly reference nevisReports artifacts, your catalog export will contain these artifacts. This is problematic for software upgrades because when you import your catalog, the copy you retain will overwrite the artifacts that are shipped with nevisReports. Making a copy into your own project directory will prevent this issue.
Therefore, always check that your exported catalogs only contain the directories you intend to export.
Export command example
Refer to the Import and Export chapter in the JasperReports Server Administrator Guide.
Note that if you are using a nevisReports appliance as your JRS development server, specify the masterPropsSource property. For example:
> JAVA_HOME=/opt/adnjdk18/
> export JAVA_HOME
> cd /opt/nevisreports/jasperreports-server-6.1.0-bin/buildomatic
> ./js-ant export -DexportArgs=\"--uris /organizations/organization_1/reports/myproject /organizations/organization_1/datasources/myproject /organizations/organization_1/shared_resources/myproject\" -DexportFile="/tmp/my-export.zip" -DmasterPropsSource="/var/opt/nevisreports/jrs/conf/nevisreports.properties"
Multiple catalog files are supported
If you wish to split your reports into multiple catalogs, you can do so. At deployment time, your catalogs will be sorted by file name and imported in that order.
Naming convention for catalog files
If you wish to split your reports into multiple catalogs, you should adopt a naming convention that will allow you to specify the import order. For example:
- 11-resources.zip
- 21-reports-set1.zip
- 22-reports-set2.zip
Deploying catalog files
At the end of your development cycle, the catalog files you exported from the development server become your deployment artifacts. You can add them to your software package or deliverables. At deployment time, you can copy them into the nevisReports appliance and run the deploy-installed-catalogs command.
> # Assumption: you have already created a nevisReports instance. See Reference Guide.
> # Install your catalog file
> cp /tmp/mycatalog.zip /var/opt/nevisreports/jrs/jrs-catalogs/
> # Deploy
> nevisreports deploy-installed-catalogs
Developing JasperReports Server report units
Using both Jaspersoft Studio and JasperReports Server as a toolset
There are many tutorials on the internet, both official and third-party, that explain how to create Jasper reports. However, most tutorials walk you through developing reports standalone in JasperSoft Studio (JSS) - without using the JasperReports Server (JRS). Here, we aim to document instructions on how to develop reports using a combined toolset of JSS and JRS. We still recommend consulting official vendor guides for general Jasper development questions.
- You have set up your JRS server and local JSS studio according to the nevisReports setup instructions.
- You have a jasperadmin account for the JRS server.
- In the JSS repository explorer, you have created a connection to your JRS server (using the jasperadmin account).
- You have published some reports to the JRS server and know about the process.
- You are familiar with basic Jasper concepts - such as parameters, sub-reports, data source, etc.
If not, see:
- For item 1 through 3: Development environment setup.
- For item 4: Jaspersoft studio guide.
- For item 5: The "Using report parameters" and "Creating Charts and Subreports" tutorials at Jasper tutorial archive.
Difference between a JRXML report document and a report unit
Developing Jasper reports (in JasperReports XML/JRXML) using JSS and publishing it to a JRS server is fairly straightforward and you might have already done so. You can refer to JasperSoft User Guide for this process.
When you publish a JRXML report (in short JRXML) from your local JSS to a remote JRS server, you are effectively creating a report unit object on the server. The distinction between a JRXML and a report unit is not important if your report is fairly simple. However, when your report grows in complexity - especially when you begin to reference sub-reports, customize data types for your input controls, etc. - understanding the difference will help you work more efficiently.
What is a report unit?
In short, a report unit is a pure JRS artifact that contains at least one JRXML report document and various other metadata needed to generate an output document. A JRXML document alone does not contain sufficient information to generate a report. For example, a JRXML does not contain information on where to fetch report data; an external framework must provide necessary report data to the Jasper Library at runtime. This is true not just for report data but also for other resources such as images. You might have noticed that you can directly run (preview) a JRXML in your JSS studio. But this is only possible because the studio automatically provides the necessary environment. For example, notice how you have to select a data adapter on the preview screen – these data adapters are configured in the JSS workspace, not inside JRXMLs.

When you upload the JRXML to a JRS server repository, the meta information needs to be bundled in some way so that an end user can simply click and generate the report. The report unit structure is Jasper's solution to bridge this gap.
A report unit contains the following:
- one or more JRXMLs (one JRXML serves as main),
- metadata for the data source to use,
- metadata for input filters,
- metadata for permissions,
- link references to other objects in the repository, and
- other resources such as images, jars, bundles.
Jasper documentation discusses report units in the section Overview of a report unit (JRS User Guide) and in the section JasperReport structure (JRS Admin Guide).
Publishing a JRXML to a server
Your JSS studio does a lot of work under the hood to create a report unit out of a JRXML that you publish. It resolves resource dependencies that your JRXML requires and prompts you to bundle these resources into the report unit. It infers parameters declared in your JRXML and prompts you to create matching input controls in the report unit, and so on.
The following diagram shows how this works. Imagine you have a fairly complex report with the following elements:
a sub-report referencing another JRXML,
an image element, and
for-prompting parameters.
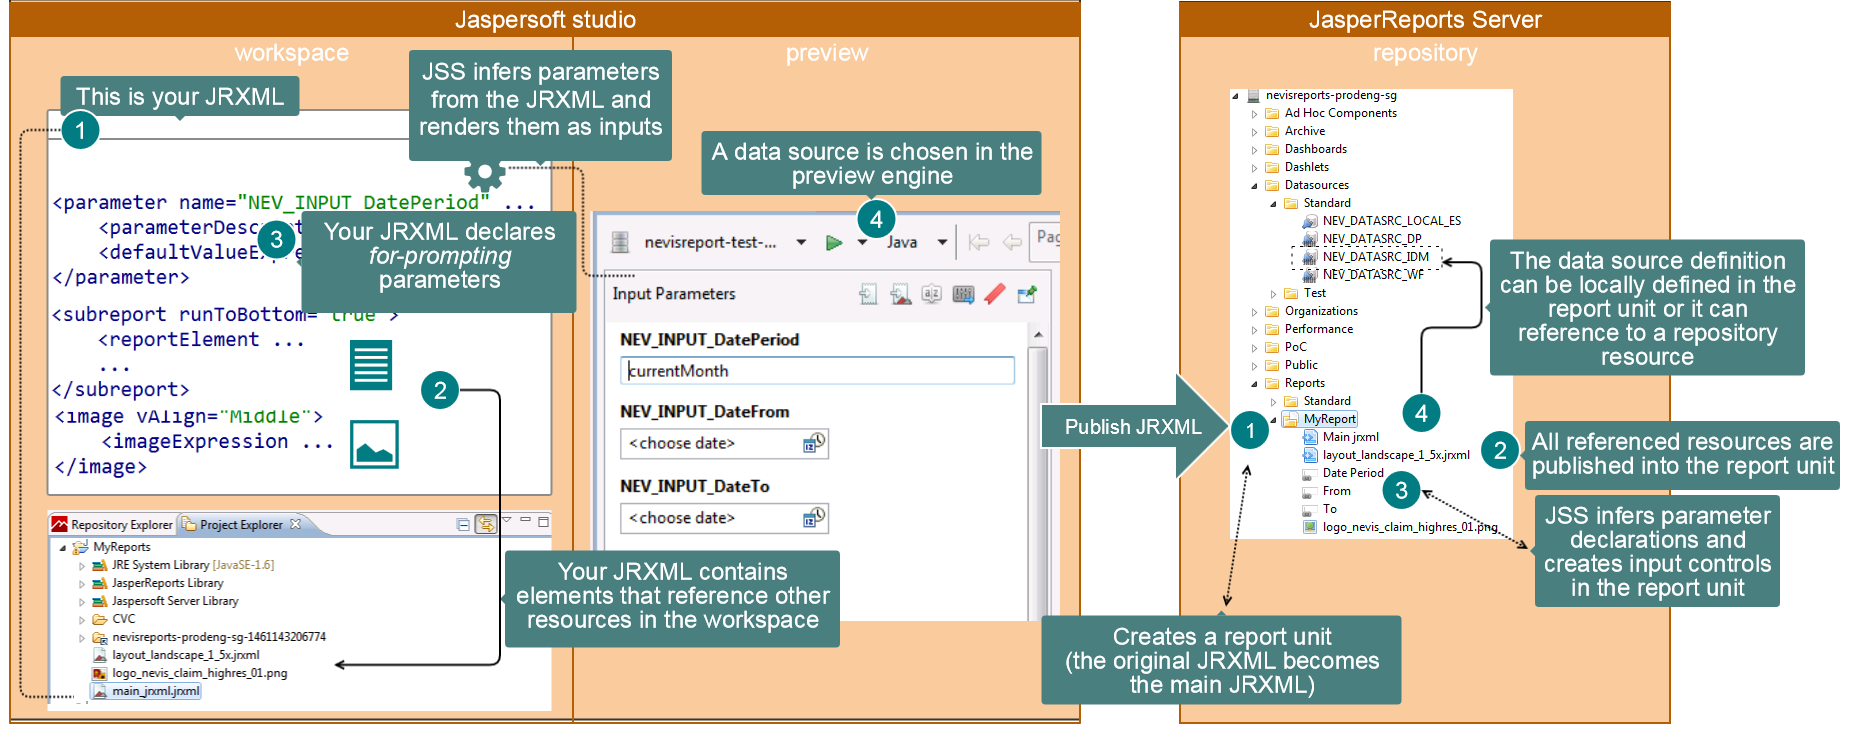
Note the following in the above example:
- Data source definitions need to be duplicated in the studio and the server. The studio cannot directly use a data source on the server, and vice versa.
- Input controls are pure JRS artifacts. They don't exist in JSS.
- JSS renders input controls on the preview screen by inferring what parameters you declare in your JRXML file.
- JRS on the other hand renders input controls in the report viewer based on input control objects defined in the report unit.
- Therefore, JRS will not render any input controls if the report unit doesn't define them. This may occur, e.g., due to a publishing error, or if input controls are deleted after initial publication. JRS will not consider the parameter declarations in the JRXML.
- JRS input controls, however, are much more powerful. They allow you to define the data type, validation, etc.
- Publishing a JRXML as a report unit is not the same as simply uploading a JRXML file. In the latter case, the JRXML file will not be executable as a report in your JRS.
Referencing other objects in the JRS repository
In the JRXML example above, some elements such as sub-reports and images require an expression like below:
<imageExpression><![CDATA["logo_nevis_claim_highres_01.png"]]></imageExpression>
JSS will normally publish a copy of all referenced resources into the report unit. But that may not always be desirable. For example, you may have multiple reports sharing common resources such as a logo image.
For this situation, we can publish a master copy of the resource into the JRS repository and have all reports reference the same image (we recommend that you put such resources in the Shared Resources directory). Jasper supports repository path references in elements such as sub-report, image, etc. For example:
<imageExpression><![CDATA["repo:/shared_resources/standard/images/logo_nevis_claim_highres_01.png"]]></imageExpression>
## repo: prefix is optional
It is still possible to preview reports that contain repository references in our local JSS. When a JRXML is successfully published to the server, Jasper will automatically inject the following meta properties into the JRXML file, both to your local JSS copy and the published copy on JRS:
 <property name="ireport.jasperserver.url" value="http://nevisreports-prodeng-sg.adnovum.sg:8773/nevisreports/"/>
 <property name="ireport.jasperserver.user" value="jasperadmin"/>
 <property name="ireport.jasperserver.report.resource" value="/Reports/MyReport/main_jrxml"/>
 <property name="ireport.jasperserver.reportUnit" value="/Reports/MyReport"/>
As long as you have a working connection to your JRS server, JSS can automatically download necessary resources from the repository, which are then rendered in preview mode.
Suggested workflow patterns for developing report units
Based on our experience, we recommend the following workflow patterns for creating and updating report units.
Creating a new report unit
- In your Jaspersoft Studio, go to the Repository Explorer.
- Browse to
<organization-root>/reports/My-Project/<create-sub-dirs-if-needed>. - Right-click New > Report Unit.
- Upload a blank JRXML file (you can always pull it back from the server and modify it later on).
- Follow the dialog. Choose data source, query, etc.
- Click Finish.
- Expand the newly created report unit node.
- Double-click the main JRXML file to start editing it.
- At this point, you can continue with our suggested workflow patterns for Editing an existing report unit.
We recommend always creating a report unit first, and then proceed from there – instead of engineering the JRXML file to completion locally in JSS and then publish it. This is due to the following reasons:
- If you need to reference resources in the repository, first upload your JRXML to the repository anyway.
- If your report involves multiple JRXMLs, it is better to slowly build up the report unit rather than uploading all files at once.
- It is recommended testing your report on the server as early as possible. JSS preview is very useful for development but it is not what end users will see.
Editing an existing report unit
In your Jaspersoft Studio, go to the Repository Explorer.
Browse to your report unit.
Expand the report unit node.
Double-click a JRXML file in the report unit.
noteThis action will cause JSS to download a cache copy of the JRXML into your JSS workspace.
 caution
If you have unpublished changes in your local cache copy (e.g., since a previous download), double-clicking the same object from the repository explorer will cause JSS to fetch it again from the server and revert any changes to your cached copy.
Work on changes. Save the file.
cautionIf JSS prompts you to publish changes to the server, we recommend selecting No.
The reason: Unlike a full publish dialog, this auto-publish option does not let you choose which resource(s) to update. Instead, it updates everything in your report unit. This is especially damaging if you have already defined custom data types and validations for your input controls. JSS will infer default input controls (based on for-prompting parameters in your JRXML) and overwrite your previously defined input controls.
Test in the JSS preview engine.
Publish to the report server.
noteIn the second step of the publish dialog, JSS is by default set to Override all referenced objects. From experience, we recommend that you change this setting to Ignore unless you are sure you made changes to these objects.
Parallel development by multiple customization developers
You might notice that sharing a single JRS server runs some risk of concurrent updates if multiple developers edit the same report unit. Although the JRS server seems to enforce optimistic locking on repository resources, we recommend avoiding concurrent updates by coordinating work among your developers.
Use caution to avoid working on the same report unit by two or more developers at the same time. To avoid conflicts, always pull the latest report unit from the JRS server before editing.
Notes on version control
When you use a version control system, you need to decide whether to commit plain JRXML files or whole report units.
We currently recommend that you track entire Jasper catalogs (exported with the buildomatic export tool) in your version control system. The Jasper catalog contains report units.
Versioning plain JRXMLs might make sense in a project which uses only the bare JasperReports Library. However, nevisReports is built on the JasperReports Server and supports buildomatic catalog files (not plain JRXML files) as the deployment artifact. If you version plain JRXMLs, you will need to find a solution (automated or manual) to create report units and package them as buildomatic catalogs for deployment into the nevisReports server.
Jasper catalogs are exported as .zip files. To make it easy to compare different versions, we recommend unpacking the .zip files before checking in, and repacking them before deployment on the server.
nevisReports tabular report template
Tabular report template
nevisReports ships with a report template that is suitable to be used as a base for developing data-centric tabular reports. The template abstracts away common elements that are repeated in each report, such as layout, styling, branding and validation. nevisReports standard report sets are developed using this template. The following screens show what a report using the template would look like in web, PDF, Word and CSV forms.
Web
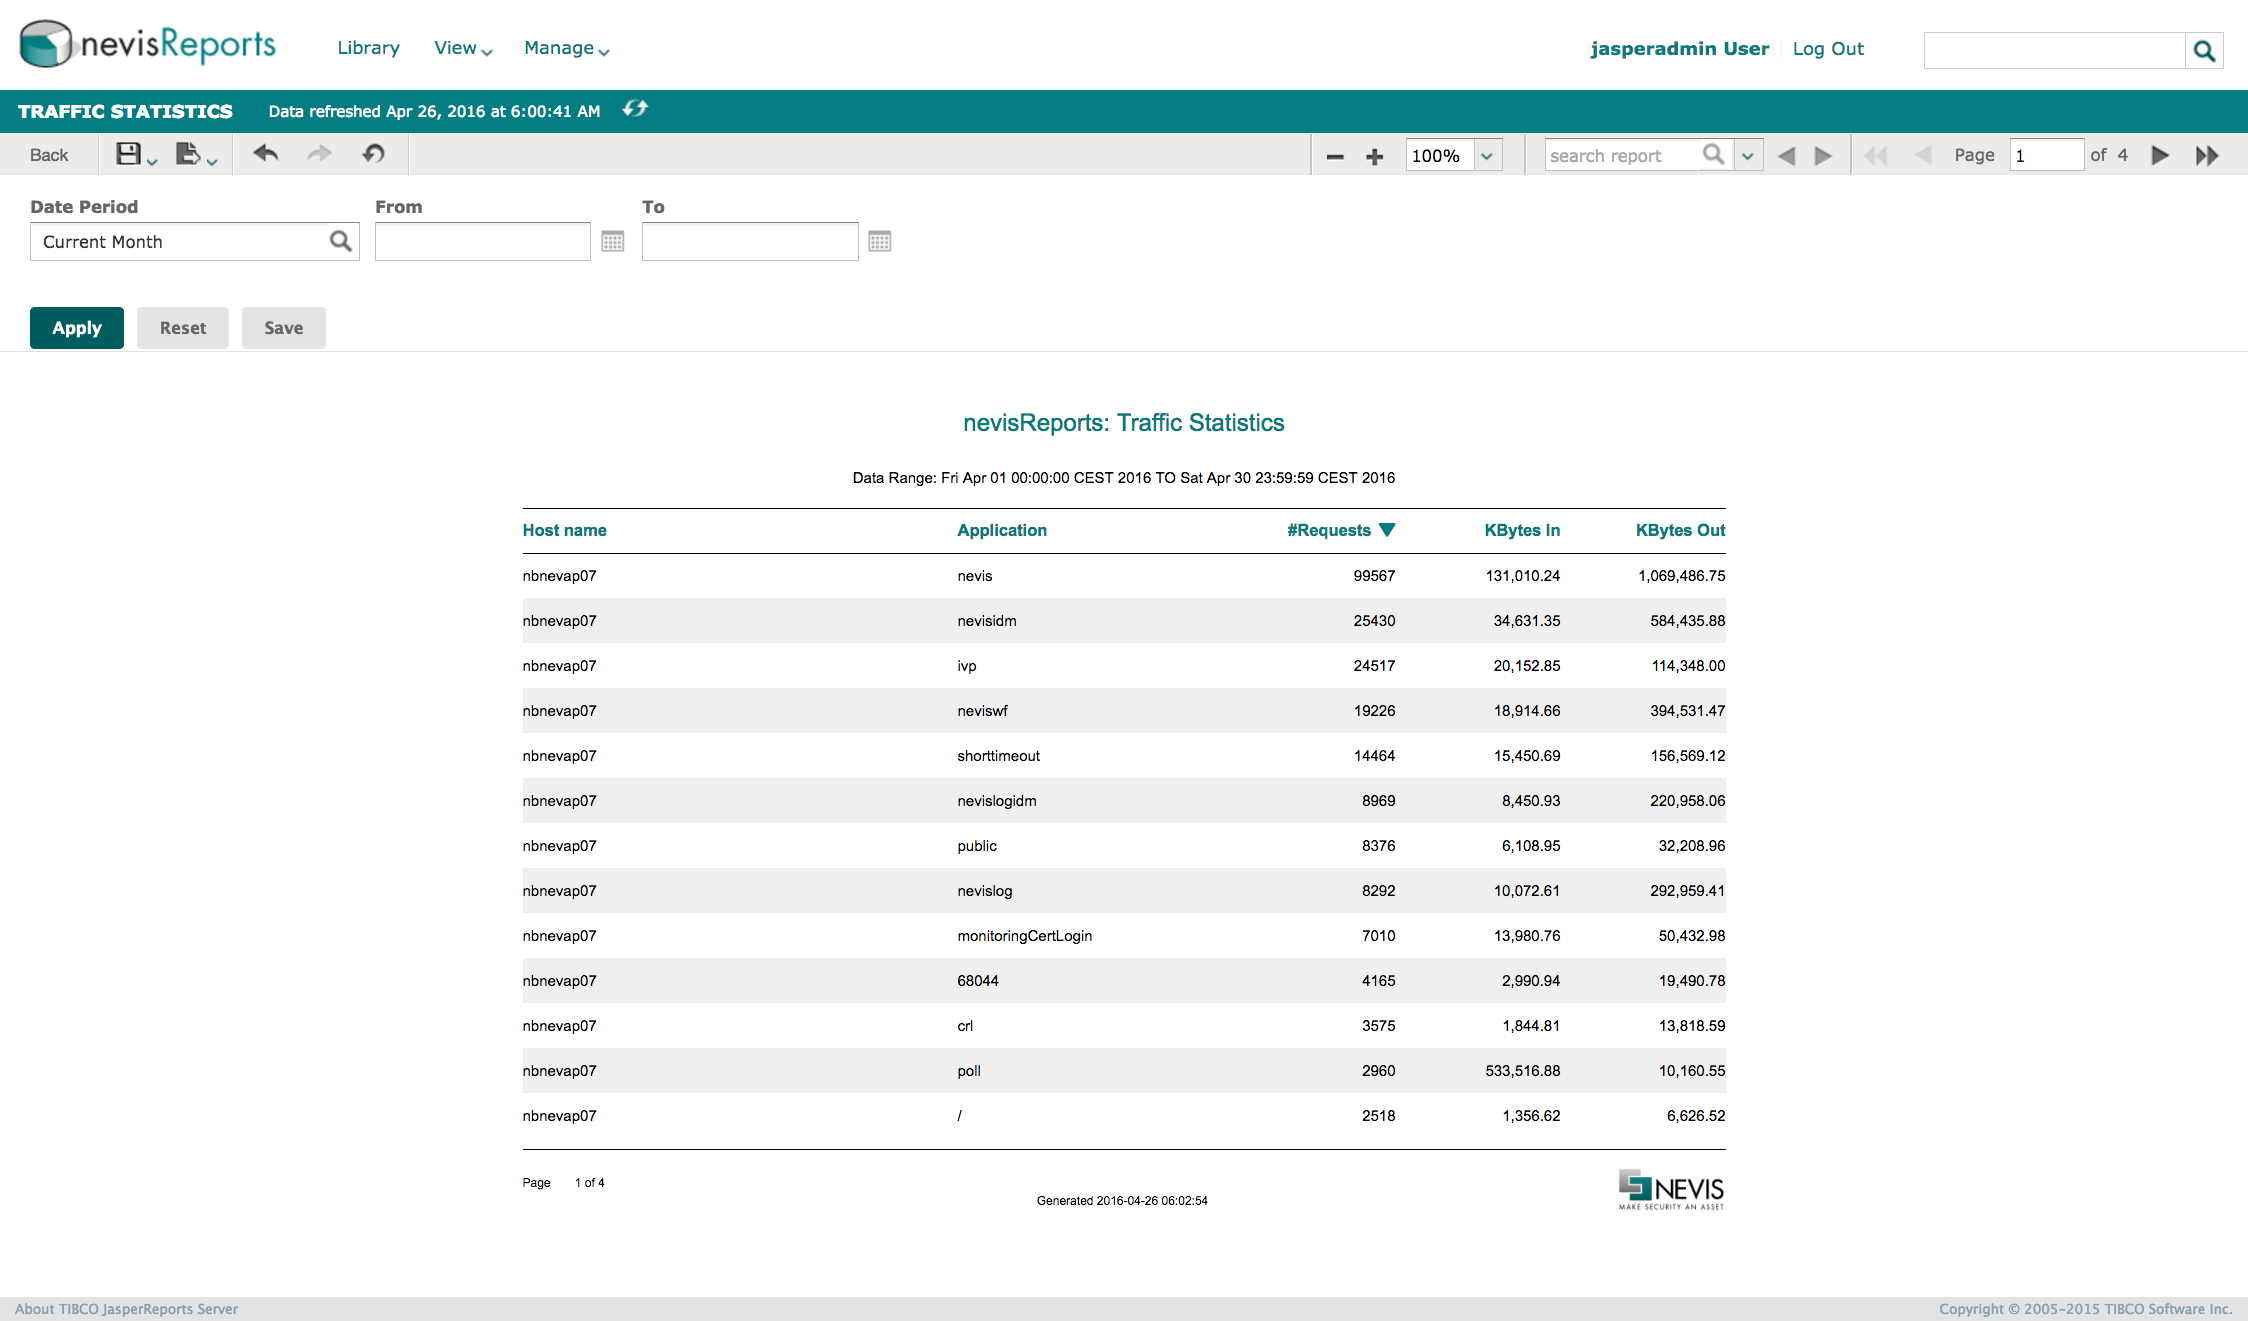
PDF
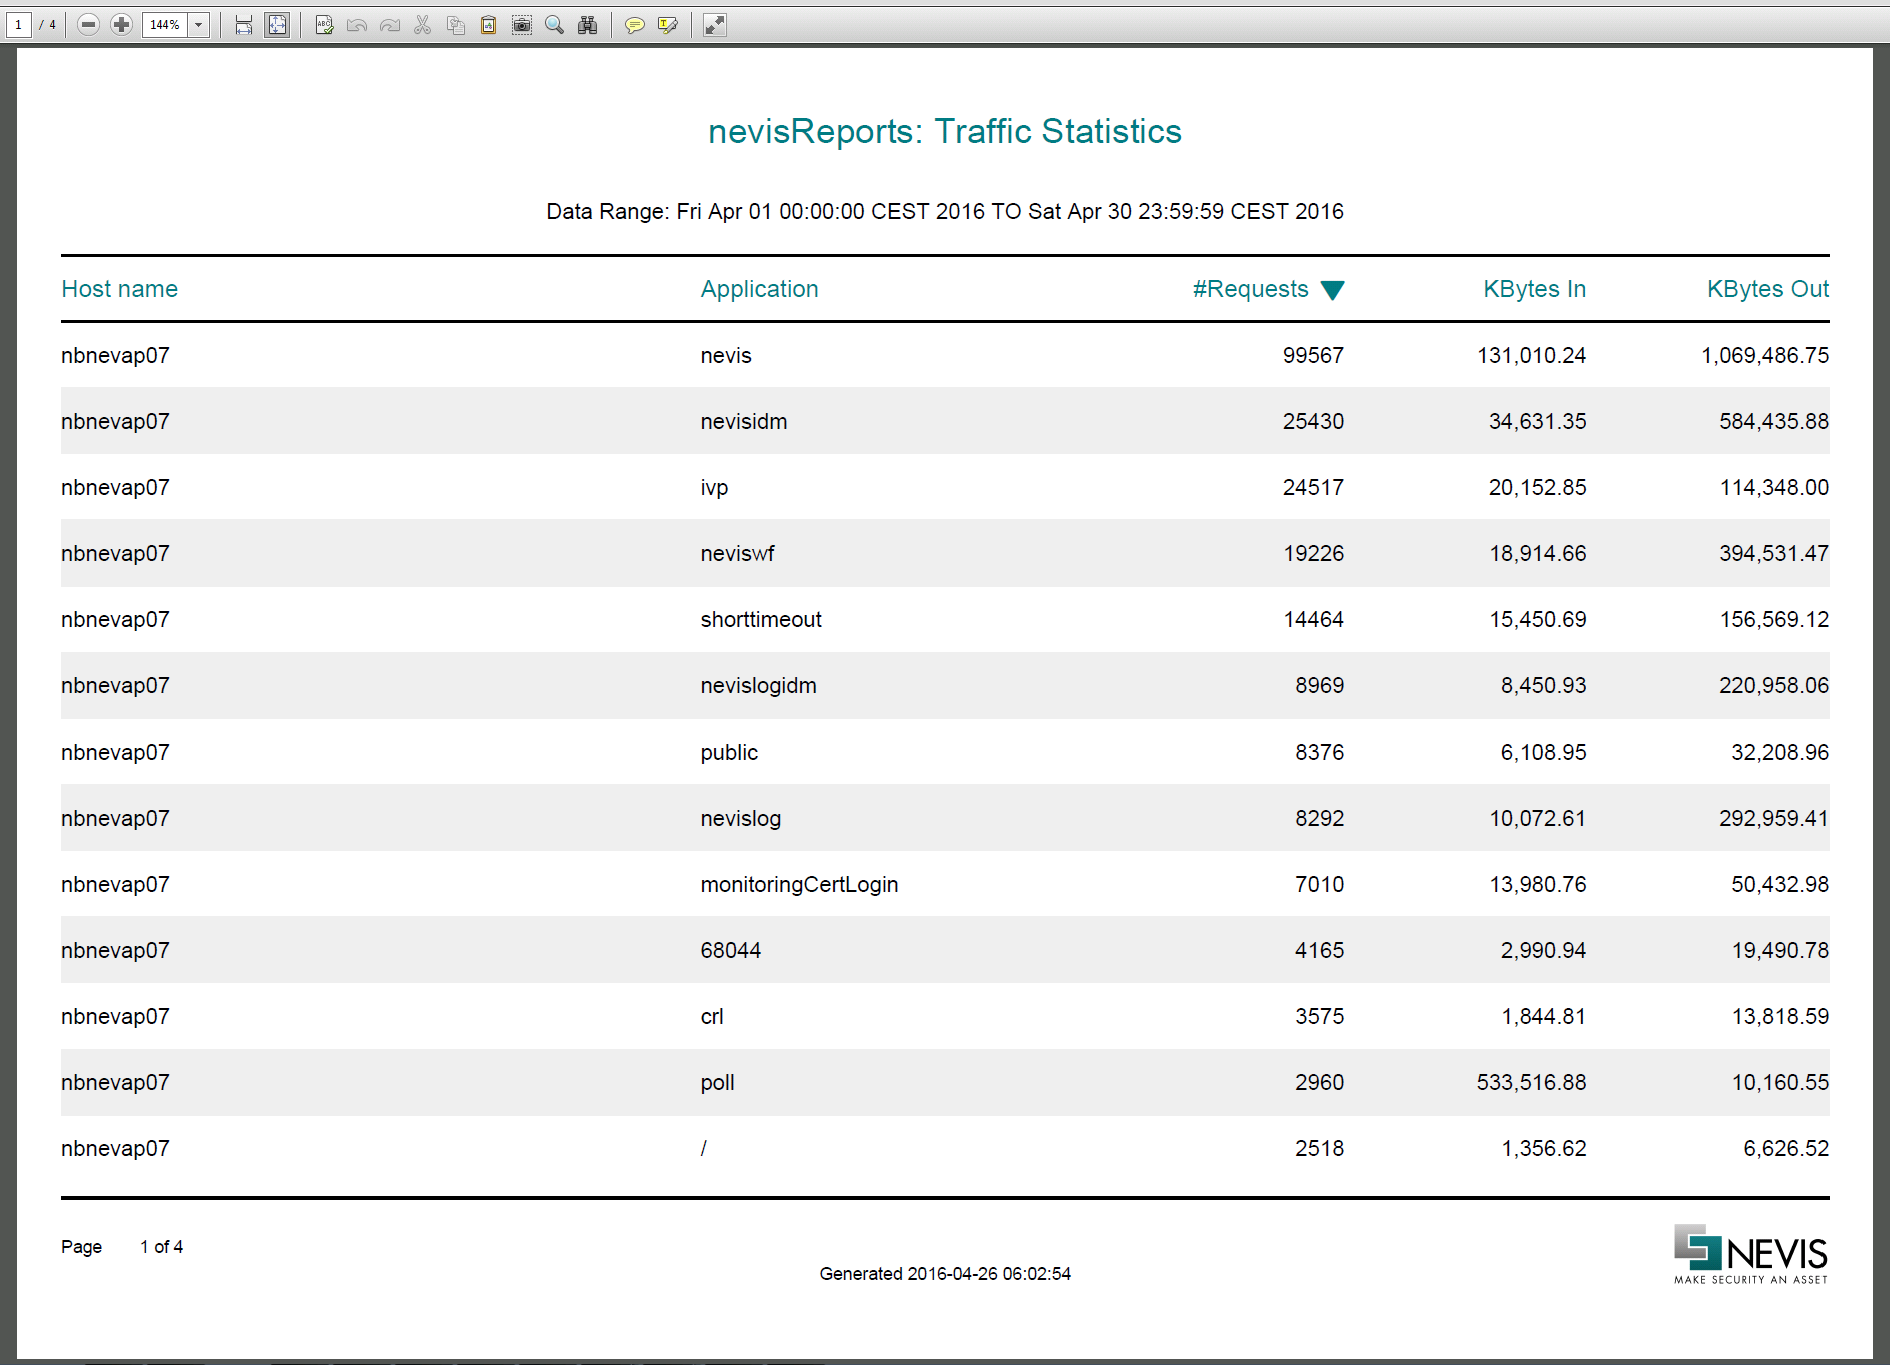
Word
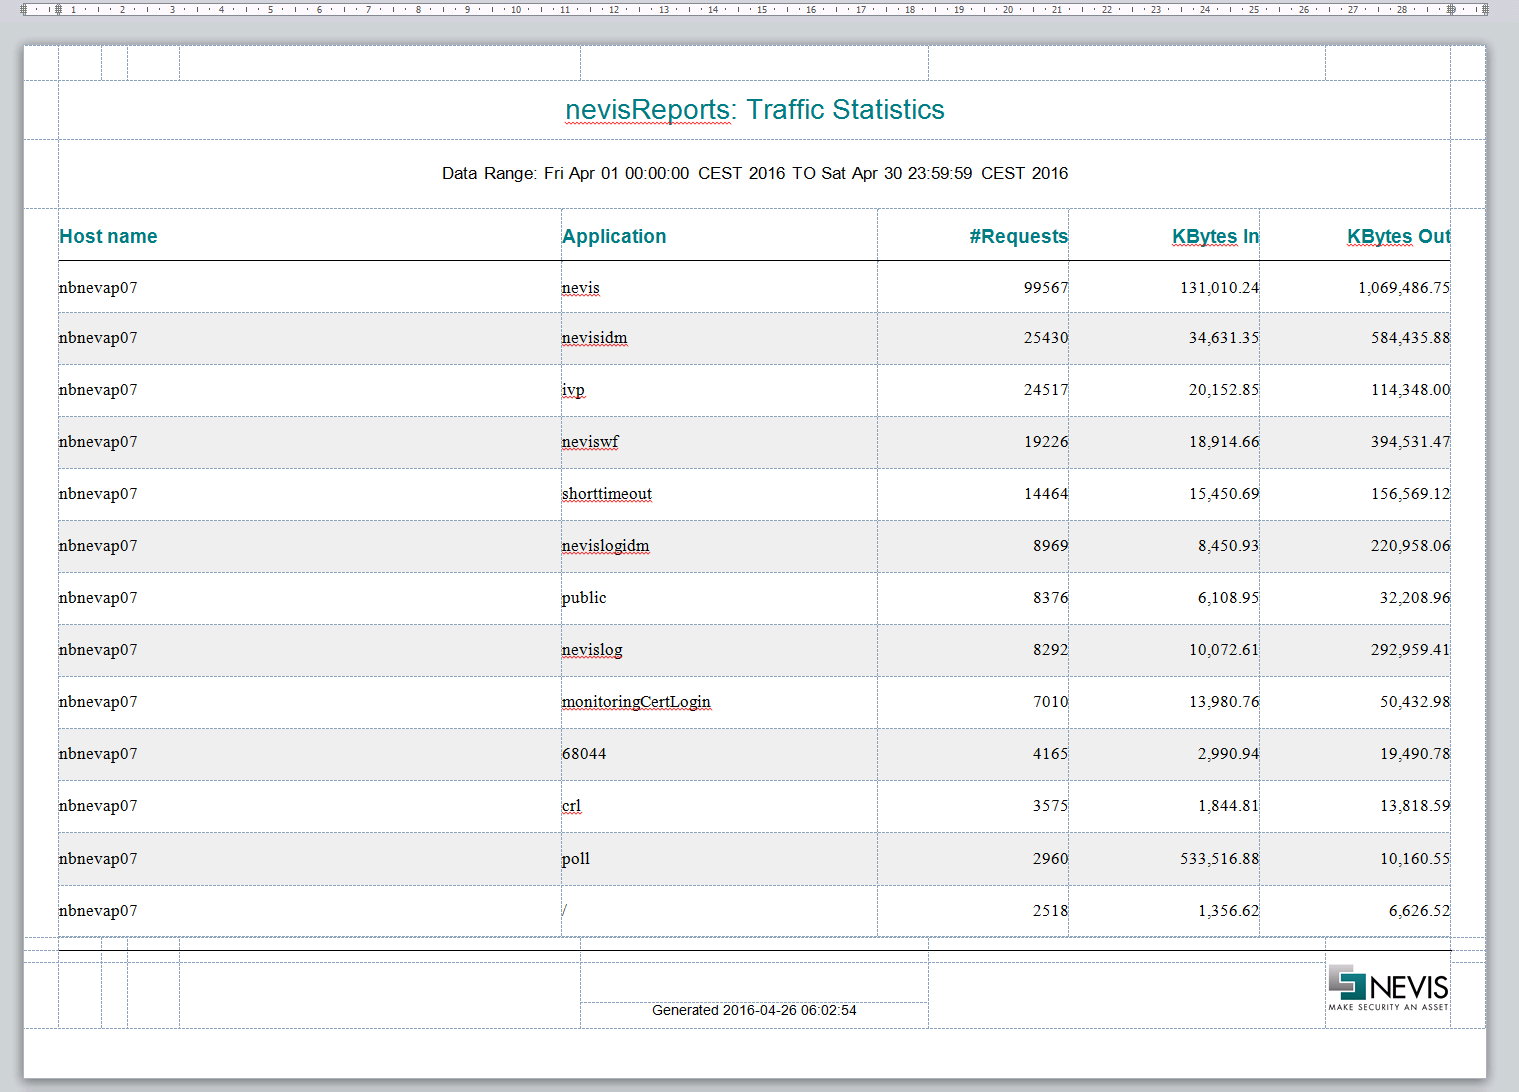
CSV
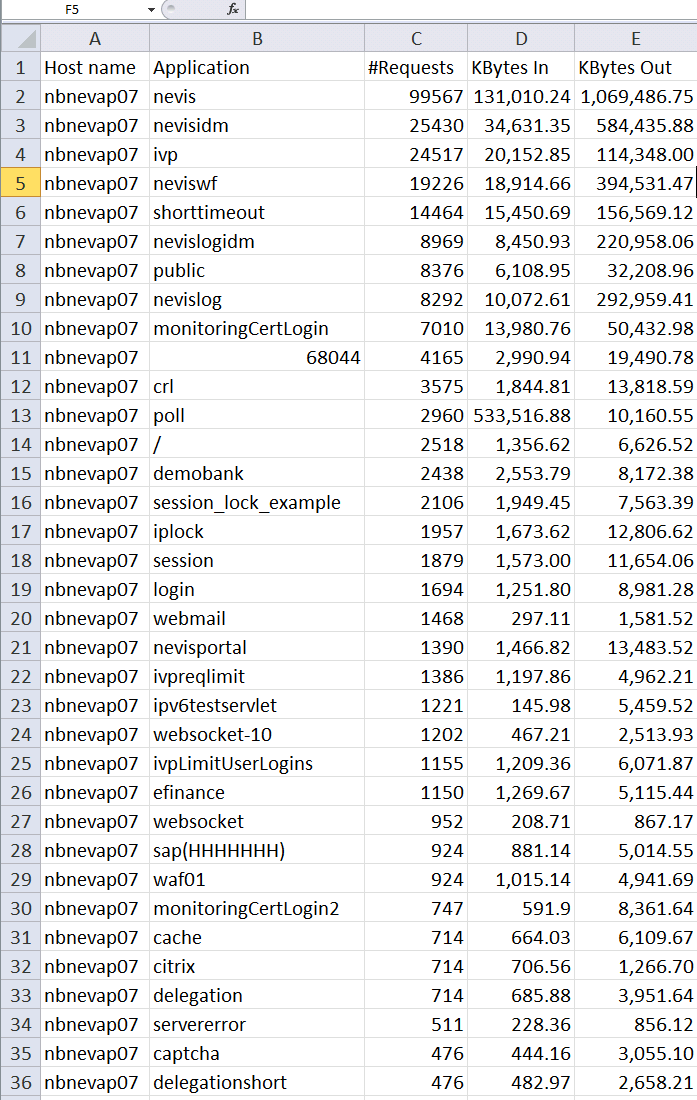
If you are developing tabular reports, consider using the template. Using (and improving if necessary) this template offers the following advantages:
- It is faster to create a tabular report. You only need to implement the table portion.
- All tabular reports will have consistent Nevis branding and style (or you may set your own branding in the template files).
- Style and branding can be easily updated across all reports.
- You can reuse common validation logic.
Overview
The template is designed using the JasperReports subreportelement. It consists of four layers of nested JRXMLs as shown below:
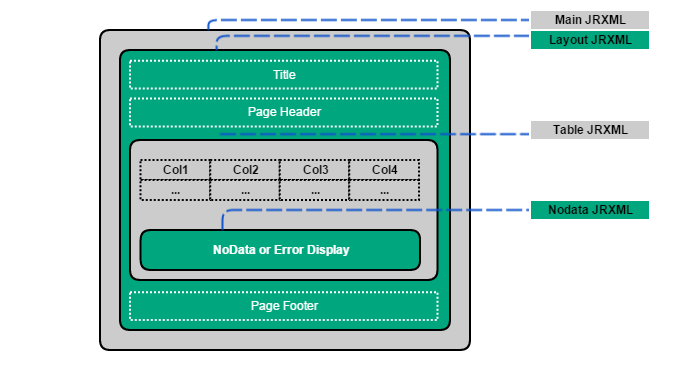
- Main JRXML: Outermost layer and entry point. It is completely empty except for the handling of input parameters and export parameters.
- Layout JRXML: Common report layout. It contains title, page header and page footer bands.
- Table JRXML: Contains the report query and table widget.
- No Data JRXML: Common No Data band display.
The Layout and No Data JRXMLs (green color) are common templates provided with the nevisReports product. By using these templates, you can inherit common style and layout. The templates assume you will follow some contracts.
Usage guide
The template files can be found in <organization-root>/shared_resources/standard/jrxmls. You should duplicate them under your own shared_resources/my-project/jrxmls directory. Future versions of nevisReports may update any objects in the shared_resources/standard directory.
The following steps are overall instructions on how to create a new report with this template. (Some details are omitted for brevity. Refer to the nevisReports sample reports for full details.)
Open Jaspersoft Studio and connect to the JasperReports Server. You can use the Repository Explorer tab to create/view/edit report units on your JasperReports Server.
Create a new report unit.
- You need to upload an initial JRXML file. Upload an empty JRXML file.
Create two JRXMLs in your report unit:
- Main JRXML: Created by default when you create a new report unit.
- Table JRXML: Add a new JRXML file to your report unit. Name it Table.jrxml.
Copy the following two JRXMLs from the /organization/organization_1/shared_resources/standard/jrxmlsdirectory into your report unit:
- NEV_JRXML_layout_landscape_1x.jrxml
- NEV_JRXML_nodata_landscape_1x.jrxml. Choose a different size if needed, e.g., *1_5x.jrxml.
In your Main JRXML, remove all bands except the Summary band.
- In the Summary band, add a subreport widget and link it to the LayoutJRXML.
In your Table JRXML, remove all bands except the Summary and No Data bands.
- In the Summary band, put your table widget.
- In the No Data band, create a subreport and link it to the No Data JRXML.
At this point, your report unit will look like this:

- Continue with the following tasks to complete your report.
- In the MainJRXML,
- Set up input parameters. Pass them to the Layout JRXML (see chapter: Parameter propagation).
- Set the ReportTitle and PageHeader parameters (not-for-prompt, java.lang.String type) and pass them to the Layout JRXML (see chapter: Parameter propagation. Refer to the Layout JRXML to see what parameters are accepted and where they are used).
- In the TableJRXML,
- Set up your report query (use input parameters passed down from outer reports).
- Create the table widget. Set columns in the table with fields or variables from your data set.
- Set the DisplayStatus and DisplayMessage parameters and pass them to the No Data JRXML for display.
Parameter propagation (from an outer report to a subreport)
Always use the parameter map expression below. This expression ensures that all parameters in your current JRXML are passed into the subreport. Layout JRXMLs do the same thing for you. This way, parameters are propagated throughout all levels of nested JRXMLs.
<subreport runToBottom="true">

</subreport>
Placeholder parameters
The Layout and No Data JRXMLs contain several placeholders (e.g., the report title). You can set the values of these placeholders by passing parameters with corresponding names (see chapter "Parameter propagation").
Date range validation
Since the date range (from and to dates) is a common set of parameters, validation support is implemented in the Layout JRXML.
To use the validation support, pass the following parameters from the Main to the Layout JRXML:
- NEV_INPUT_DatePeriod
- NEV_INPUT_DateFrom
- NEV_INPUT_DateTo
(DatePeriod is an enumeration: currentMonth, lastMonth or custom)
If you do so, the Layout JRXML will validate the parameters and pass the following validation results to your Table JRXML:
- _validationStatus: true or false
- _validationMessage: validation message string
- _DateFrom: If NEV_INPUT_DatePeriod=current/lastMonth, then _DateFromis the first day of the current or last month, respectively. IfNEV_INPUT_DatePeriod=custom, then_DateFrom=NEV_INPUT_DateFrom.
- _DateTo: same as above
- _DateFrom_stringValue: date formatted in the Elasticsearch format.
- _DateTo_stringValue: same as above
Style elements
In general, try not to set styling properties directly in the report elements. Reference to named styles instead. nevisReports templates contain a few standard named styles such as ReportTitle, NormalText,**TableHeader, etc. that you can use.
<textField>
 <reportElement forecolor="#007C82">
 <property name="com.jaspersoft.studio.unit.height" value="pixel"/>
 </reportElement>
 <textElement textAlignment="Center" verticalAlignment="Middle">
 <font fontName="Arial" size="16"/>
 </textElement>

</textField>
<style name="ReportTitle" forecolor="#007C82" hTextAlign="Center" vTextAlign="Middle" fontName="Arial" fontSize="16"/>
...
<textField>
 <reportElement style="ReportTitle"/>

</textField>
Validation and empty report display
To further standardize validation error messages or empty report display, we use the No Data JRXML. Just pass the DisplayStatus (true = regular message, false = error message) and DisplayMessage parameters to the No Data JRXML.
JasperReports Server repository naming conventions
Naming convention for JRS repository resources
Below you find the suggested naming convention for JasperReports Server repository resources. Although not mandatory, we recommend naming your own artifacts according to the convention.
New repository artifacts should follow the convention (3-letter-proj-code)(type-code)(namespace)_(name)
- 3-letter-proj-code: For nevisReports product reports, it will be NEV. Projects should use their own 3 letter code.
- type-code: Code for the artifact type. For all artifact types and their corresponding codes, see the Resource type codes table below.
- namespace: Can be either Nevis-component oriented (AUTH, PXY, IDM, WF) or business oriented (IAM, AUD, BILL). The namespace is optional but recommended for Report type artifacts.
- name: Resource name.
Examples:
- NEV_RPT_IAM_SessionStats = Nevis product report, identity and access management namespace, session statistics report.
- NEV_RPT_IAM_110_01 = Nevis product report, identity and access management namespace, report ID 110_10.
- NEV_DATASRC_LOCAL_ES = nevisReports-bundled Elasticsearch data source.
- NEV_DATASRC_IDM = nevisReports IDM data source.
- NEV_RES_unitId = Unit ID input control.
- NEV_JOB_IAM_110_01_weekly = Weekly report job schedule of the Nevis report NEV_RPT_IAM_110_01.
- NEV_VIEW_IAM_110_01_ezyfinance = Report view of the Nevis report NEV_RPT_IAM_110_01, with CompanyID=ezyfinance filter.
Report labels must contain the word Report to distinguish in listings and the repository view. The information is given in the metadata file of a report unit.
Resource type codes
| Resource type | Type code |
|---|---|
| Report dashboard | DASHBOARD |
| Report units* | RPT |
| Report JRXML* | JRXML |
| Report view | VIEW |
| Report schedule | JOB |
| Data source | DATASRC |
| Query | QRY |
| Report output files, content files(.XLS, .PDF, .doc, etc.) | OUT |
| Jasper style templates (JRTX) | JRTX |
| Any other artifacts(input controls, lists, data types) | RES |
*Report units refers to a directory-like repository artifact that contains JRXML, input controls, images, etc. and is executable as a report, whereas Report JRXML refers to pure JRXML files that are not executable by themselves but must be linked into a report unit.
WS adapter for Elasticsearch queries
Background
The WS adapter or WebServiceQuery adapter is an open source extension in Jasper. It can be used to deploy a JSON or SOAP web service as data source. Jasper provides a video tutorial here. nevisReports ships a customized version of this adapter.
Basic usage
The adapter appears as Web Service Data Source in JasperReports Server and as Web Service data adapter in Jaspersoft Studio. A query editor dialog in JSS is also added with a language called WebServiceQuery.
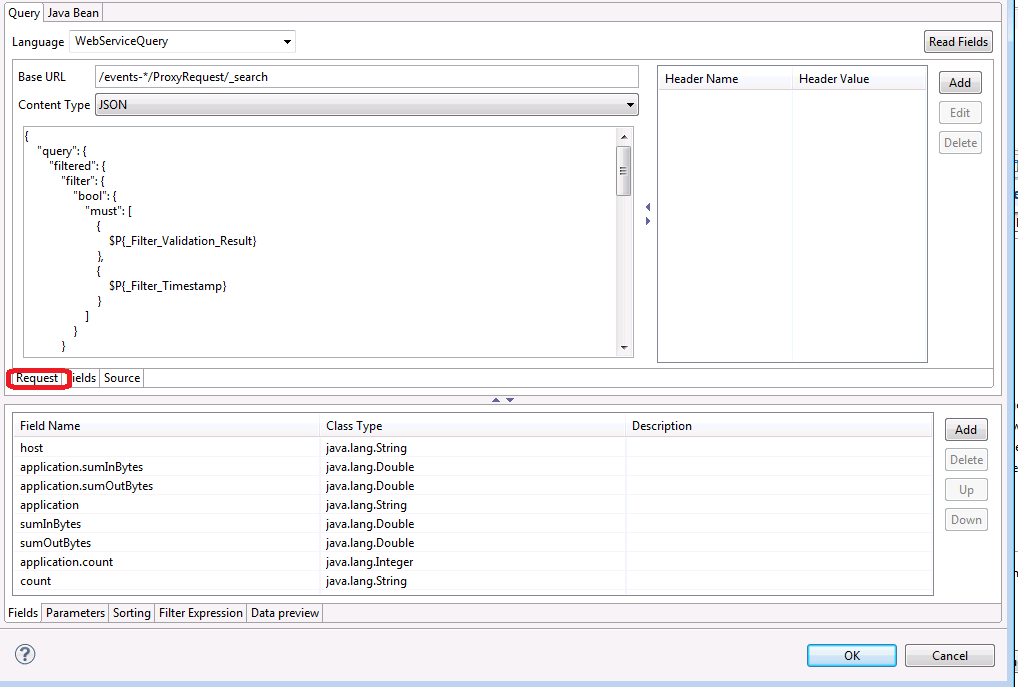
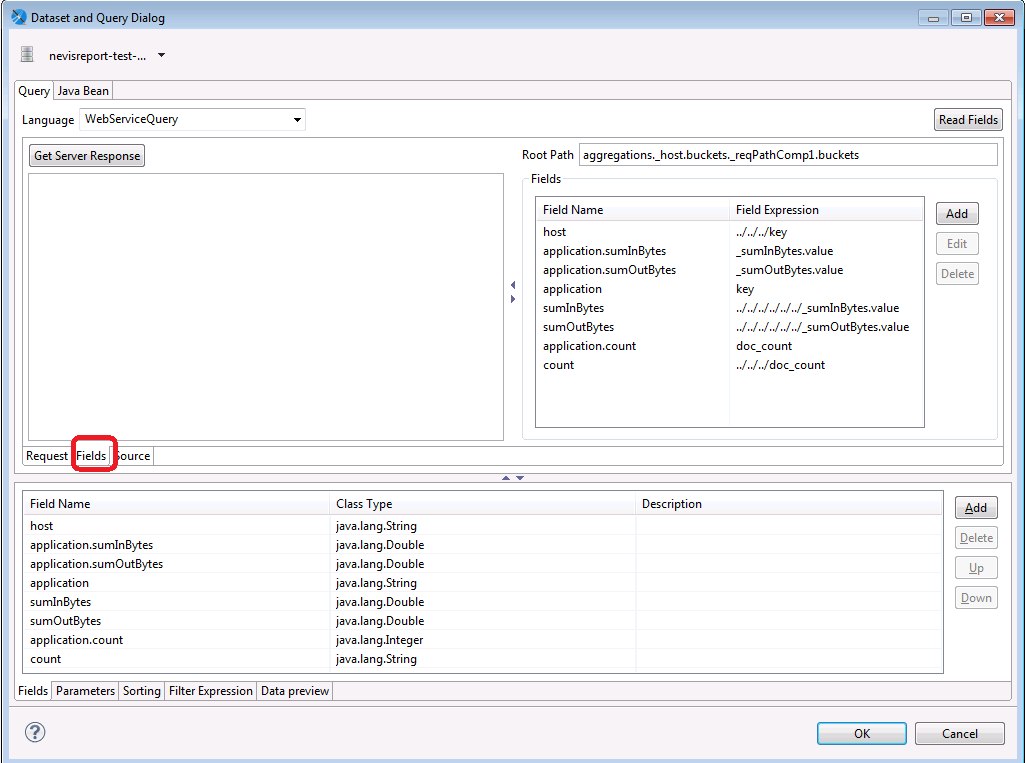
The WebServiceQuery language view consists of 3 sub-tabs (as you can see in the above screenshots):
Request tab:Specifies the web service call. Enter the base URL, content type and request body in the corresponding fields (headers are usually not required for Elasticsearch queries).
Fields tab: This tab allows you to specify how to parse the response value as a list of tuples (list of elements). Set the following values:
Root Path: Usually, the response JSON object from Elasticsearch contains a lot of metadata. We are typically only interested in some parts of the response JSON object. By means of the Root Path field, you can limit the response JSON object to those elements only. Therefore, enter a relevant expression in the field. Use an expression that will evaluate to an array. Each object of the array will be read as a tuple.
Fields: By means of this field, you can define mappings between Jasper fields ($F) and attributes of the JSON object. In the example screenshot, the Jasper field $F{application} is mapped to the key attribute of the JSON object.
After you have specified the Root Path and Fields definitions, remember to click the Read Fields button, to create the actual $F fields from the mapping definitions.
Source tab: Defines the source expression that backs the previous two tabs. Not change anything here. But this tab is useful to quickly copy the query you specified in the Request and Fields tabs (e.g., to transfer it to another report).
Using the JSON parent operator
The JSON parent operator is an enhanced feature that comes only with the nevisReports version of the WS adapter and is not available in the Jasper version.
JSON objects express data in a nested structure. JasperReports on the other hand requires data in flat tuples. This is a mismatch that sometimes makes it difficult to display the JSON response from Elasticsearch in a JasperReports report table. Consider the example below:
[
 {
 "office": "Zurich",
 "employees": [
 {
 "name": "John",
 "age": 26
 },
 {
 "name": "Mary",
 "age": 32
 }
 ]
 },
 {
 "office": "Bern",
 "employees": [
 {
 "name": "Joe",
 "age": 22
 }
 ]
 }
]
| Office | EmployeeName | Age |
|---|---|---|
| Zurich | John | 26 |
| Zurich | Mary | 32 |
| Bern | Joe | 22 | |
The WS adapter version bundled in nevisReports features a ./ parent operator to support this use case. For the example above, you can specify your root path and field mappings as below:
- Root path: office.employees
- Fields:
- Office =
../office - EmployeeName = name
- Age = age
- Office =
Advanced: Clone a report dataset into a subDataset
Unlike an SQL dataset, a WS dataset can be cloned. If you use a table widget, you only need to define one query at report level and then clone it to the subDataset of the table. Do as follows:
- At report dataset:
- Define a full query: URL, request body, root path, field mappings, etc..
- At table subDataset:
- Choose WebServiceQuery as the query language. Leave the query empty.
- Copy/paste the fields from the report dataset (this cannot be cloned).
((com.jaspersoft.webservice.data.query.IWSDataSource)$P{REPORT_DATA_SOURCE}).clone(
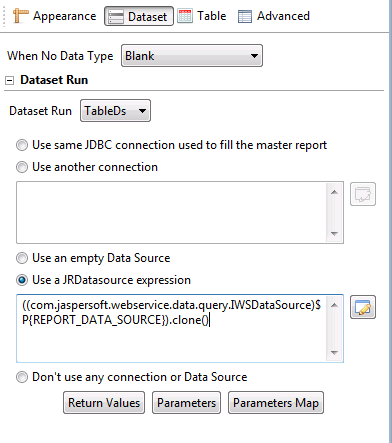
<!-- subdataset definition. Note empty query -->
 <subDataset name="TableDs" uuid="8e9f8189-22b1-49e9-801d-fd640655d730">
  <queryString language="WebServiceQuery">

  </queryString>
  <field name="host" class="java.lang.String"/>
...
<!-- report dataset definition. Full query -->
 <queryString language="WebServiceQuery">

 "fieldsMap" : {
 "host" : "./././key",
....

 </queryString>
 <field name="host" class="java.lang.String"/>
 ....

<!-- table widget expression -->
    <jr:table xmlns:jr="http://jasperreports.sourceforge.net/jasperreports/components" xsi:schemaLocation="http://jasperreports.sourceforge.net/jasperreports/components http://jasperreports.sourceforge.net/xsd/components.xsd" whenNoDataType="Blank">
     <datasetRun subDataset="TableDs" uuid="4c4cb99e-f6cf-4da3-abd6-2cf7201e6fca">

     </datasetRun>
 ...
 </jr:table>
Developing scriptlets
JasperReports may sometimes need to perform computations like validation of input parameters or evaluation of variables like string manipulation, date evaluation, REST calls and other similar operations. For such cases, JasperReports provides scriptlets. A scriptlet is Java code that is deployed as a JAR artifact with the reports catalog and triggered from the report.
Use cases
- Input parameter validation: If the report uses input controls and accepts some inputs from the user, you can use scriptlets to perform the validation of that input.
- Computation: In reports, you might need to do various kind of computations like getting the first day of the current month, the date in milliseconds, etc. These kinds of calculation could be easily offloaded to a scriptlet.
- REST calls: You can make REST calls via scriptlets during report generation. For some of the standard reports, nevisReports uses scriptlets to make REST calls to the Elasticsearch database.
- Debugging: Scriptlets can be very helpful when debugging reports. You can dump variables, fields and parameters to the log file at different events (listed above), e.g., afterReportInit, afterDetailEval. In the JasperReports Server, the log level could be changed on the fly without restarting the server, so you could debug reports in production without causing downtime.
Overview
A scriptlet class can be created in either of the following two ways:
- Extending net.sf.jasperreports.engine.JRAbstractScriptlet: This class contains a number of abstract methods (each for a different phase of the report generation) that need to be implemented in the new scriptlet class.
- Extending net.sf.jasperreports.engine.JRDefaultScriptlet: This class extends the JRAbstractScriptlet class with an empty implementation for all abstract methods. Therefore, you need to override only the methods needed for the specific use case.
Here is a list of all abstract methods you can override/implement in your scriptlet class:
public void beforeReportInit() //Called before report initialization.
public void afterReportInit() //Called after report initialization.
public void beforePageInit() //Called before each page is initialized.
public void afterPageInit() //Called after each page is initialized.
public void beforeColumnInit() //Called before each column is initialized.
public void afterColumnInit() //Called after each column is initialized.
public void beforeGroupInit(String groupName) //Called before the group specified in the parameter is initialized.
public void afterGroupInit(String groupName) //Called after the group specified in the parameter is initialized.
public void beforeDetailEval() //Called before each record in the detail section of the report is evaluated.
public void afterDetailEval() //Called after each record in the detail section of the report is evaluated.
Environment setup
We recommend using JSS for the development of scriptlets. But since it is a simple Java project, you can also use your preferred IDE to develop it.
- Open JSS in Java perspective and create a new project for the scriptlet.
- Add JasperReports-related JAR dependencies to your build path (project > Build Path > Configure Build Path > Java Build Path > Add Library: Add all three JasperReports libraries you see in the dialog box, i.e., JasperReports Libraries, JasperReport Library Dependencies and Jaspersoft Server Library).
How to develop
We follow the convention of having one scriptlet class per report and only one JAR (containing all scriptlets) for one project. We recommended you follow the pattern described below to create a new scriptlet class:
- Create a base class (e.g., BaseProjectScriptlet), which needs to extend JRDefaultScriptlet. This scriptlet class can contain some set of simple utility methods (e.g., ISO8601 date to milliseconds format) which could be used across various reports. Also, one of the tricks could be to log all variables, fields and parameters at the debug level in BaseProjectScriptlet, so it could be helpful in debugging reports.
- Create a new scriptlet class (e.g., TestScriptlet) extending the BaseProjectScriptlet class. Any scriptlet class written for a report must extend BaseProjectScriptlet.
- Add public non-static methods which you want to expose as a functionality to JasperReports.
- Build a JAR file for the project. We recommended you put all the scriptlet classes under one single JAR file.
- Now switch to Report Design perspective in JSS and open your project containing the reports.
- Add the scriptlet JAR to the build path of the reports projects.
- Create a new scriptlet in the Outline section of JSS and name the class TestScriptlet. Note that if the scriptlet is not added properly to the build path, you will not be able find the TestScriptlet class in the list of suggested scriptlet classes. See also the screenshots below.
- Now you can use the exposed methods of the TestScriptlet class in your reports. Example: Create a new parameter in the Expression Editor. For the Default Value Expression you should be able to find the TestScriptlet class and the methods it exposes.
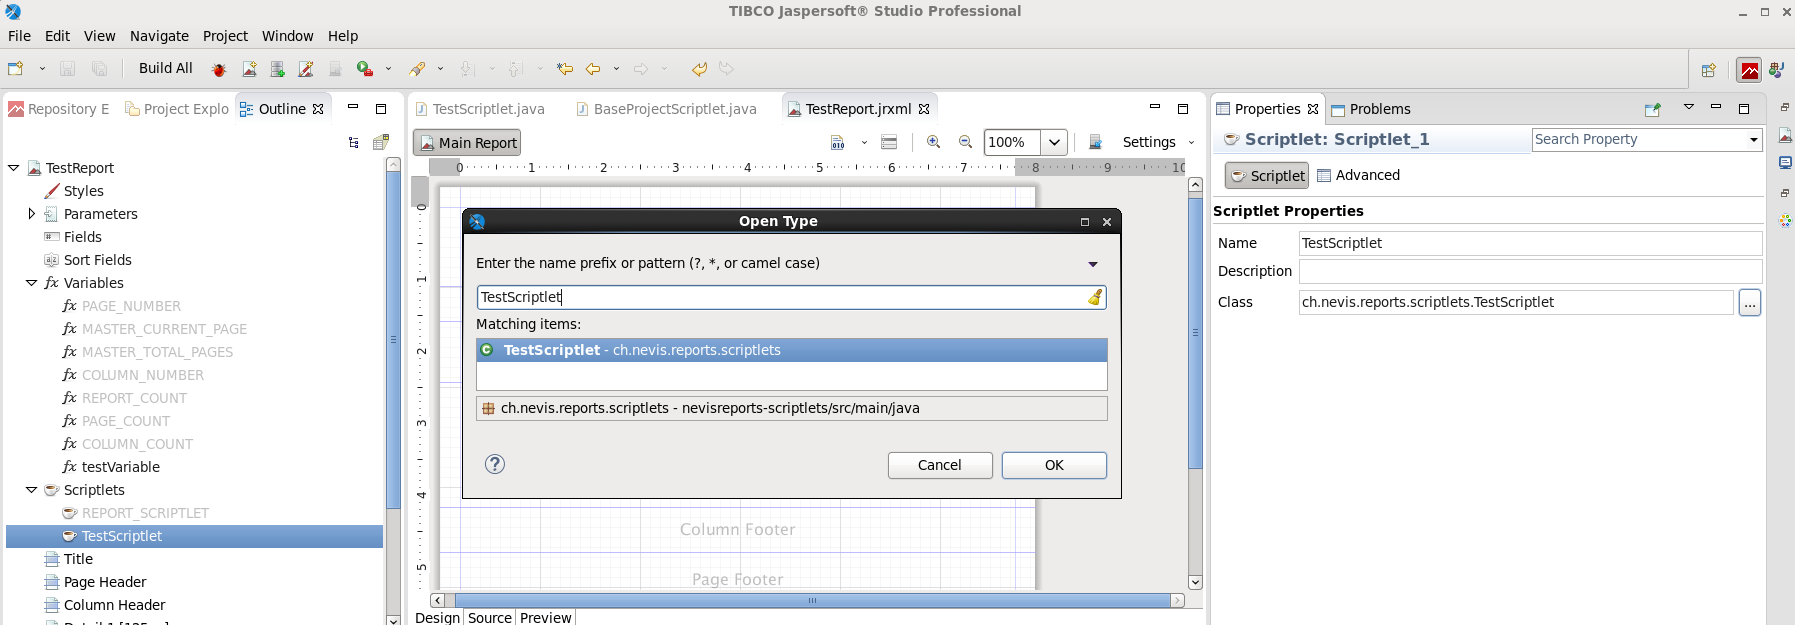
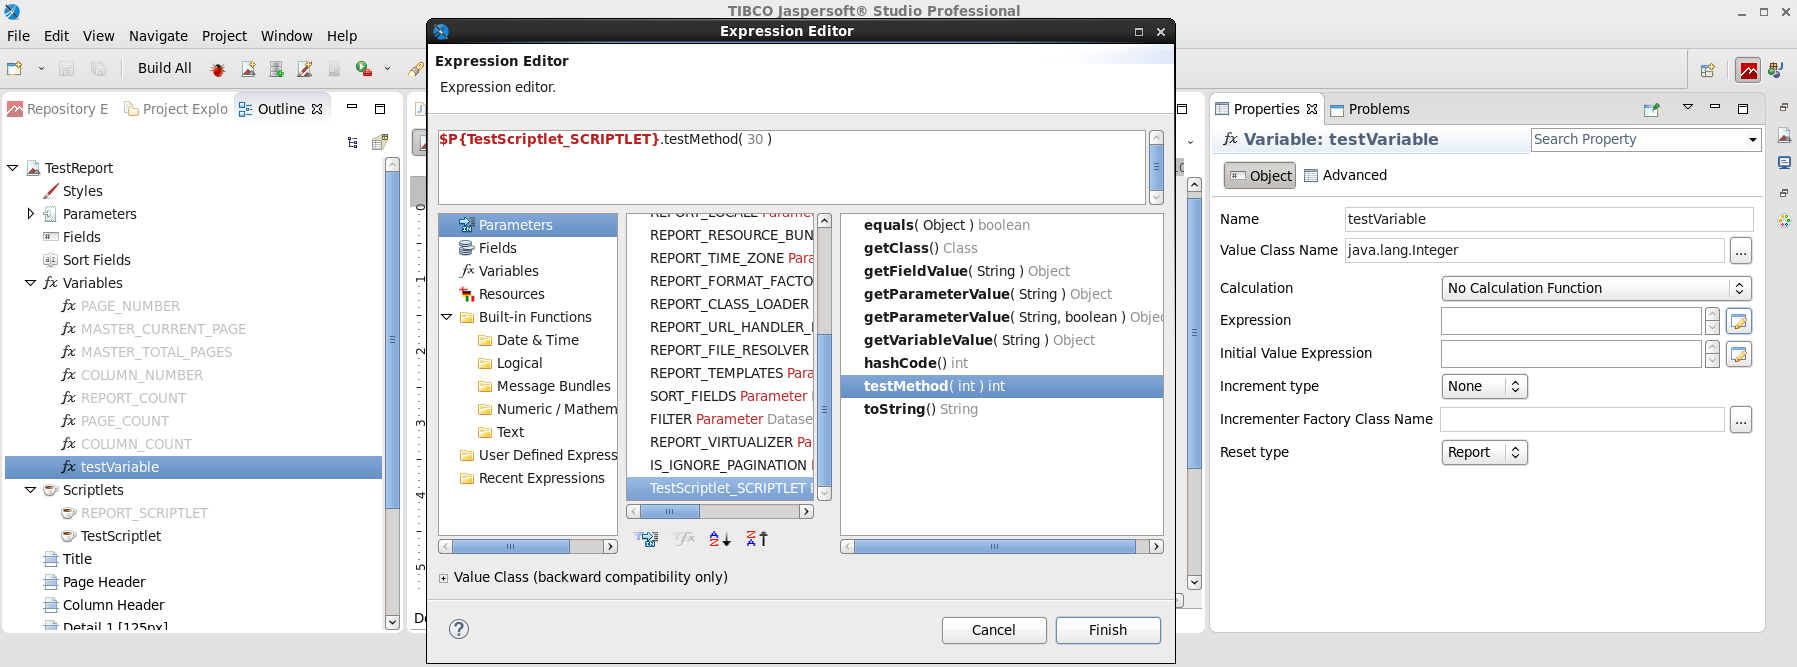
How to deploy
As one single scriptlet JAR needs to be used across all reports, it should be placed in the directory where all the shared resources of the project are kept. And each report that needs to use the scriptlet should add a resource link to the shared resource scriptlet JAR.
Best practices
- Do not use static methods in scriptlets to avoid concurrency issues.
- Avoid storing any state in member variables of a scriptlet class.
- Do not change the report parameters. Instead, pass them as arguments to the scriptlet and perform the necessary calculations or validations.
- Have one scriptlet class per report and only one scriptlet JAR for the whole project.
Known issues
- Upon deployment of a scriptlet you will need to restart the server for the changes to be effective. However, if the ID of the scriptlet is updated while publishing, the changes will be effective without a restart. You can thus speed up sriptlet development by changing the ID and avoiding a server restart.
- If you see the error unsupported version 52.0 during the deployment of scriptlets, the JAR is probably compiled with an unsupported version of the Java compiler. To resolve this error, rebuild the JAR with Java version 1.8 or higher and publish again.
Addendum - Glossary
Defines the terms used in the nevisReports reference and development guide.
| Entity | Definition |
|---|---|
| ACAA | The ACAA (Adaptive Context-Aware Authentication) module is an extension for nevisAuth to evaluate and asses historic information during each login. |
| App server | Hosts one or more applications (virtual or physical hardware). |
| Application | Business applicationFor example, web mail or shopping application. |
| Attack | See threat. |
| Beats | Beats is the platform for single-purpose data shippers. They install as lightweight agents and send data from hundreds or thousands of machines to Logstash or Elasticsearch. The nevisAppliance has filebeat installed by default to ship the logfiles to nevisReports. |
| Catalog | JasperReports zip file which contain JasperReports artifacts like JRXML, images, jars, etc. |
| ElasticElastic Stack (ELK Stack) | Elastic is the company behind the open-source products Elasticsearch, Logstash, Kibana and Beats. Elastic Stack (previously known as ELK Stack) is the combination of Elasticsearch (as a datastore), Logstash (as data ingester / transformer) and Kibana (as visualizer). nevisReports is based on the Elastic Stack, see: Architecture Overview, for details. |
| Elasticsearch | Elasticsearch is a distributed, RESTful search and analytics engine capable of solving a growing number of use cases. As the heart of the Elastic Stack, it centrally stores your data so you can discover the expected and uncover the unexpected. It is used by nevisReports to store event and stats data. |
| Filebeat | A data shipper that operates on files, part of the Beats platform. Installed by default on all nevisAppliance images to send logfiles to nevisReports. |
| Host | DNS domain name visible to end users inside the web browser. |
| JasperReports | An open-source technology toolkit in Java to build reports from a variety of datasources. It also specifies an XML description language (JRXML) to write reports and their formatting the outputs. |
| JasperReports Server (JRS) | A server component from TIBCO to run and manage JasperReports in a web application, including Dashboards, management and scheduled reports. The web frontend of nevisReports is built on top of JasperReports Server Pro. |
| Jaspersoft | See TIBCO. |
| JRXML | The XML description language to write JasperReports in. See JasperReports. |
| Logstash | Logstash is an open source, server-side data processing pipeline that ingests data from a multitude of sources simultaneously, transforms it, and then sends it to Elasticsearch. |
| Nevis component | The Nevis Security Suite consists of several products and components. Nevis components offer more functionality for one or several Nevis products, but are not stand-alone products themselves, such as nevisLogRend, nevisMeta, nevisWorkflow, nevisDataPorter, nevisAgent, nevisKeybox, and nevisCred. |
| Nevis product | The Nevis Security Suite consists of five products and several components. The five products are nevisProxy, nevisAuth, nevisIDM, nevisReports and nevisAdmin. Each product performs specific tasks and has dedicated features within Nevis and can be purchased and maintained as a stand-alone solution (except for nevisAdmin). |
| Nevis environment | A set of connected Nevis products and components (in one stage, e.g. production). For example, a number of nevisProxy, nevisAuth, nevisIDM instances installed on various servers, which work together to provide WAF and IAM functionality. |
| (NEVIS) server | (Virtual) machine hosting one or more Nevis products and components. |
| Request | HTTP request processed by a nevisProxy instance, often passed on through an application. |
| Tenant | Also called client in nevisIDM. To avoid confusion with other uses of client (for e.g., browser or end user), in nevisReports this is called tenant. |
| Threat | A potentially malicious request that was detected and mitigated by nevisProxy or other Nevis components (e.g. ACAA). |
| TIBCO | The company behind JasperReports Server and Jaspersoft Studio Pro. nevisReports is based on their commercial JasperReports Server Pro product. |
| Traffic | Data volume processed by nevisProxy instances. |
| User | End user accessing applications or authenticating via Nevis. |