Key management by nevisAdmin
If you use nevisAdmin for your key management, the key material is stored within the configuration repository of nevisAdmin and deployed to the server's nevisKeybox when a configuration snapshot gets deployed.
The key material must be generated or imported before the creation of a configuration snapshot. Otherwise they are not included in the deployment.
Key material per server
The Server view of the Infrastructure tab displays each server's key material (see no.1 and no.2 in the figure below).
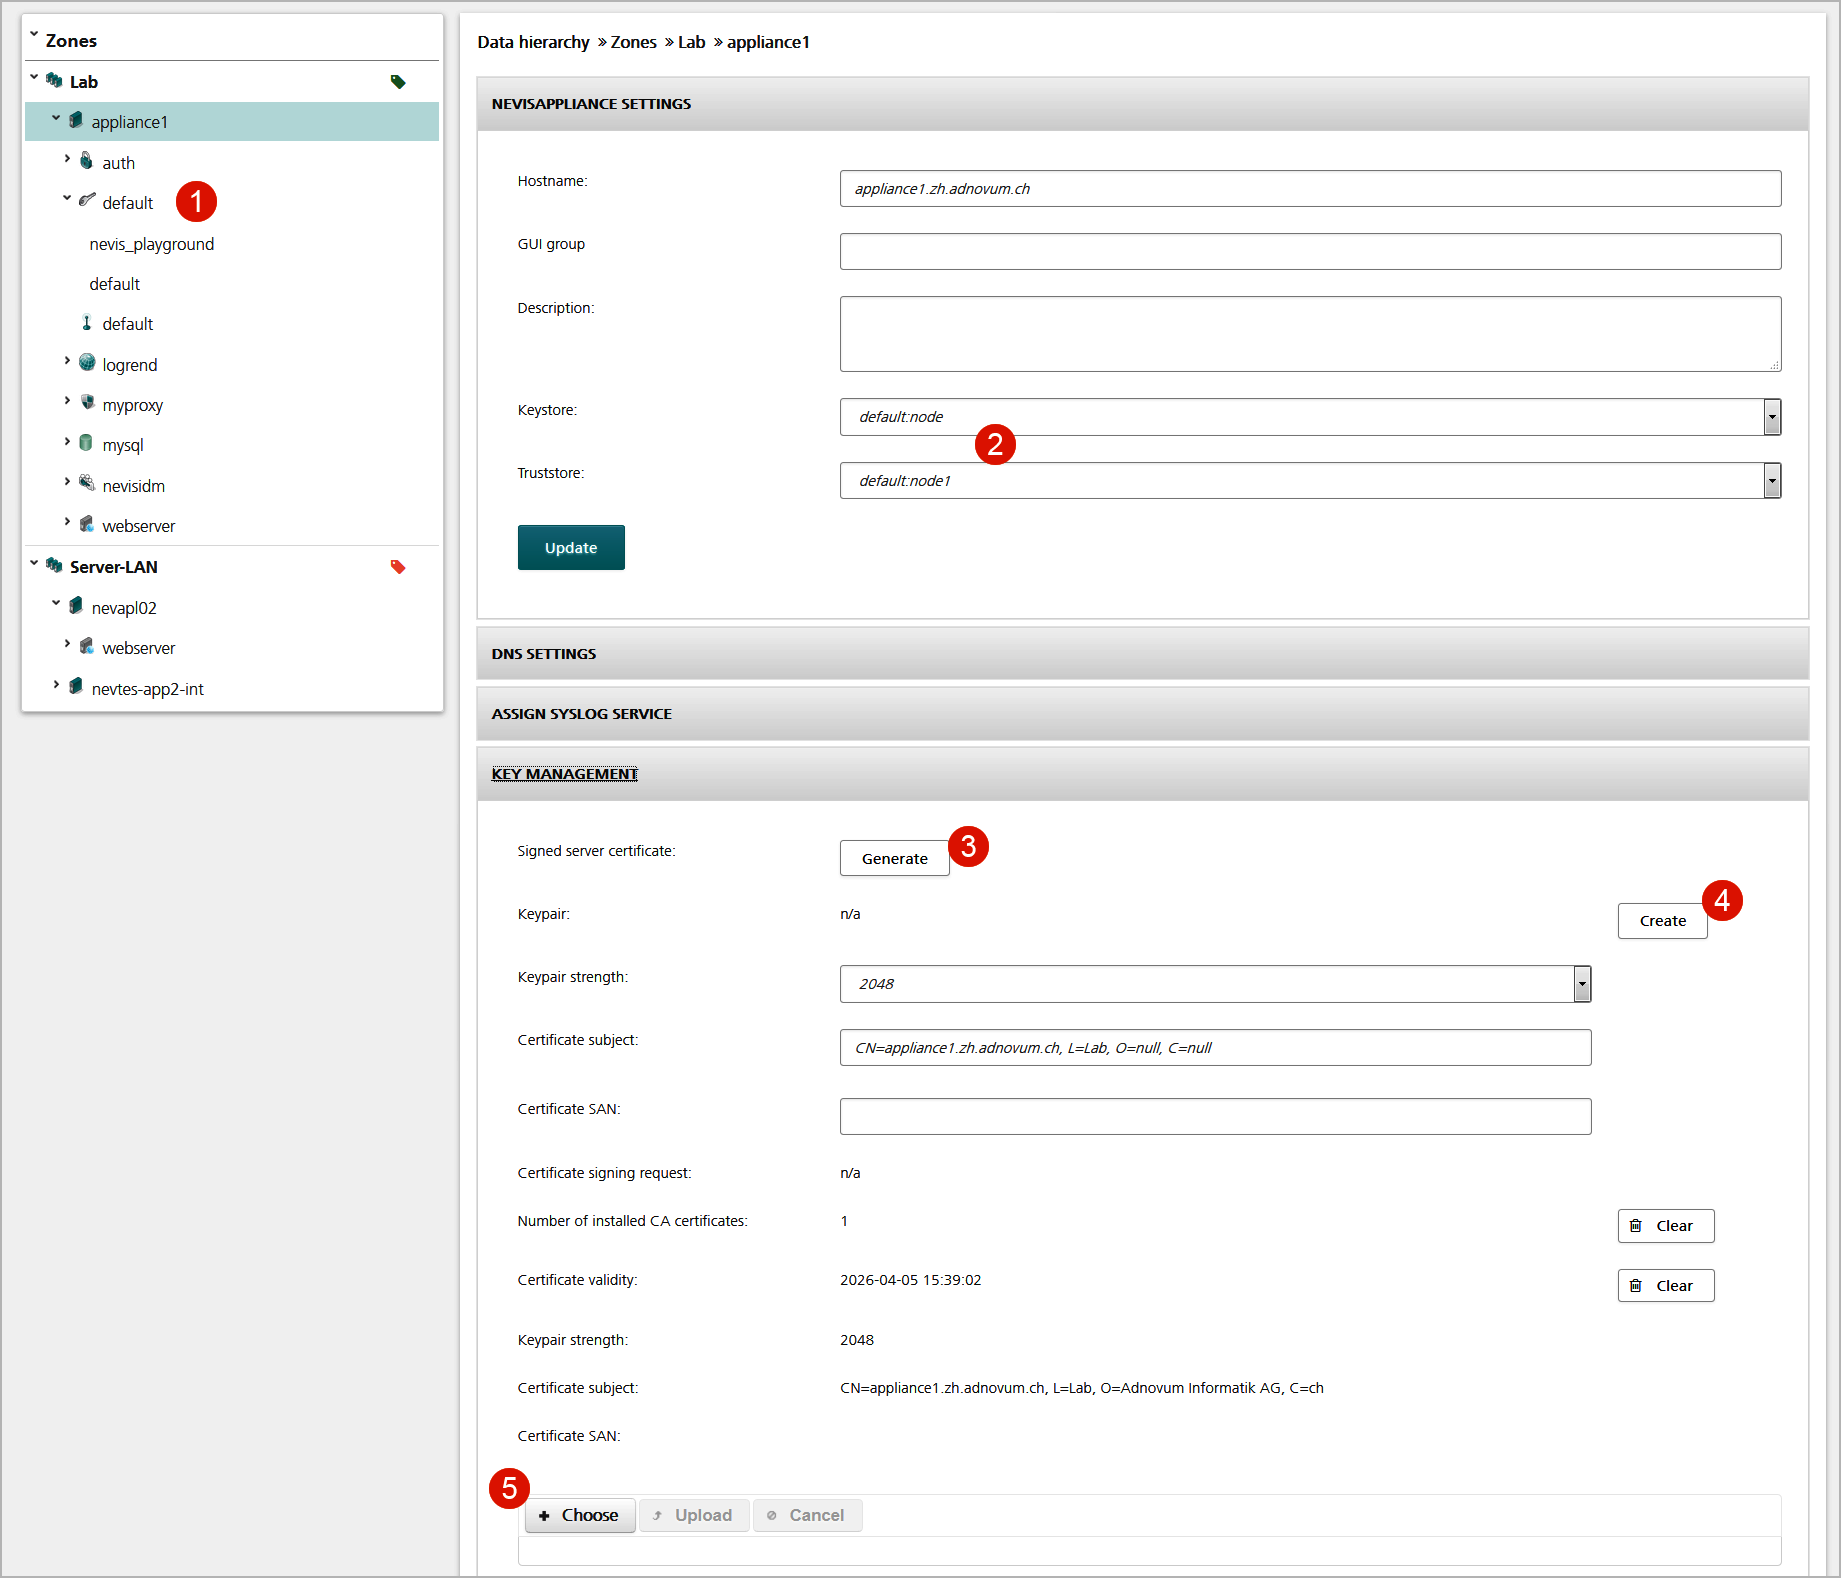
Use the Generate button in the Key Management panel to generate new key material for a server (no.3 in figure above). The key generation creates a private/public key pair and a certificate signed by the nevisAdmin CA. nevisAdmin automatically registers the new key material as being the server's keys and stores the keys within the nevisKeybox instance. The key material is identified by its slot and label.
Alternatively, you may create a private/public key, export the certificate signing request (CSR) and import the signed certificate. It's also possible to import existing key material using a PKCS12 file (no.4 und no.5 in figure above).
nevisProxy key material
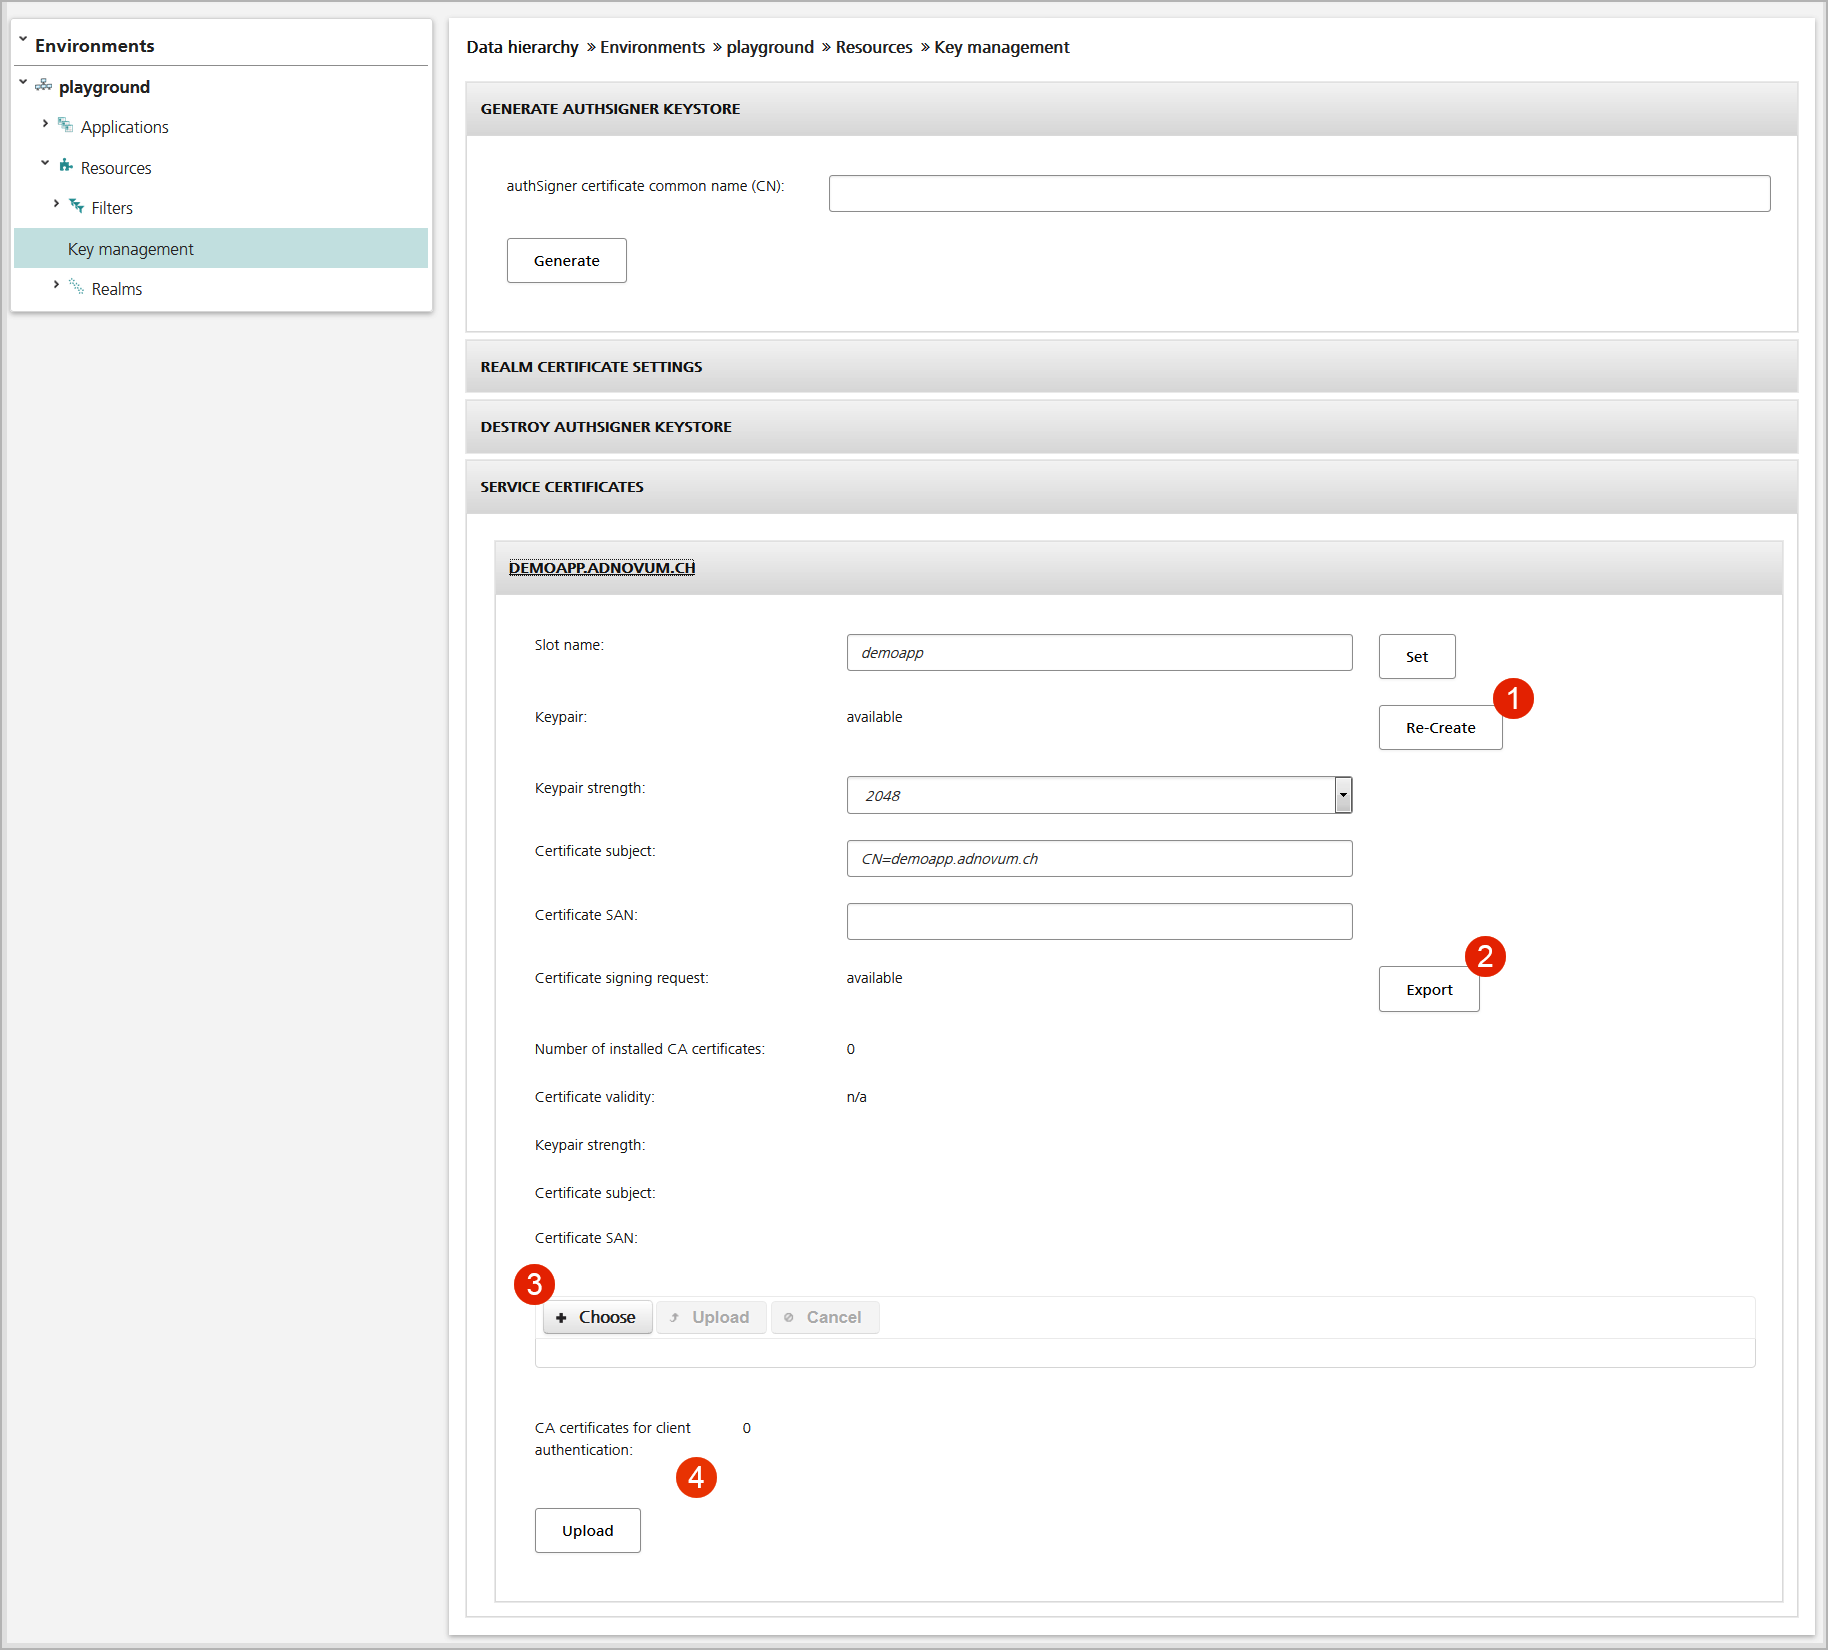
The key material for nevisProxy services is managed in the Service Certificates panel of the Key Management view of the environment using the nevisProxy service. Each service has its own sub-panel. The Key Management view is available in the Configuration tab. You have two possibilities to manage the key material:
-
Generate a key pair using nevisAdmin
- The first step is the creation of a new public/private key pair (with the Re-Create button, no.1 in the figure below).
- You then generate a certificate signing request (CSR). Use this CSR to obtain a valid server certificate from the certificate authority (CA) that issues your server certificates (with the Export button, no.2 in the figure below).
- The third step is uploading the server certificate as well as the CA root and CA intermediate certificates (no.3). These certificates can be imported as PEM files.
-
Import an existing key pair
- Besides generating a key pair with nevisAdmin, you can upload an existing private key and server certificate by means of a PKCS12 file.
noteThe key material is installed to the involved nevisProxy services when uploading new key material or when assigning a nevisProxy service to an application.
The "CA certificates for client authentication" functionality allows you to upload a separate CA root and intermediate certificates to be used for client authentication (2-way SSL) – see no.4 in the figure below.
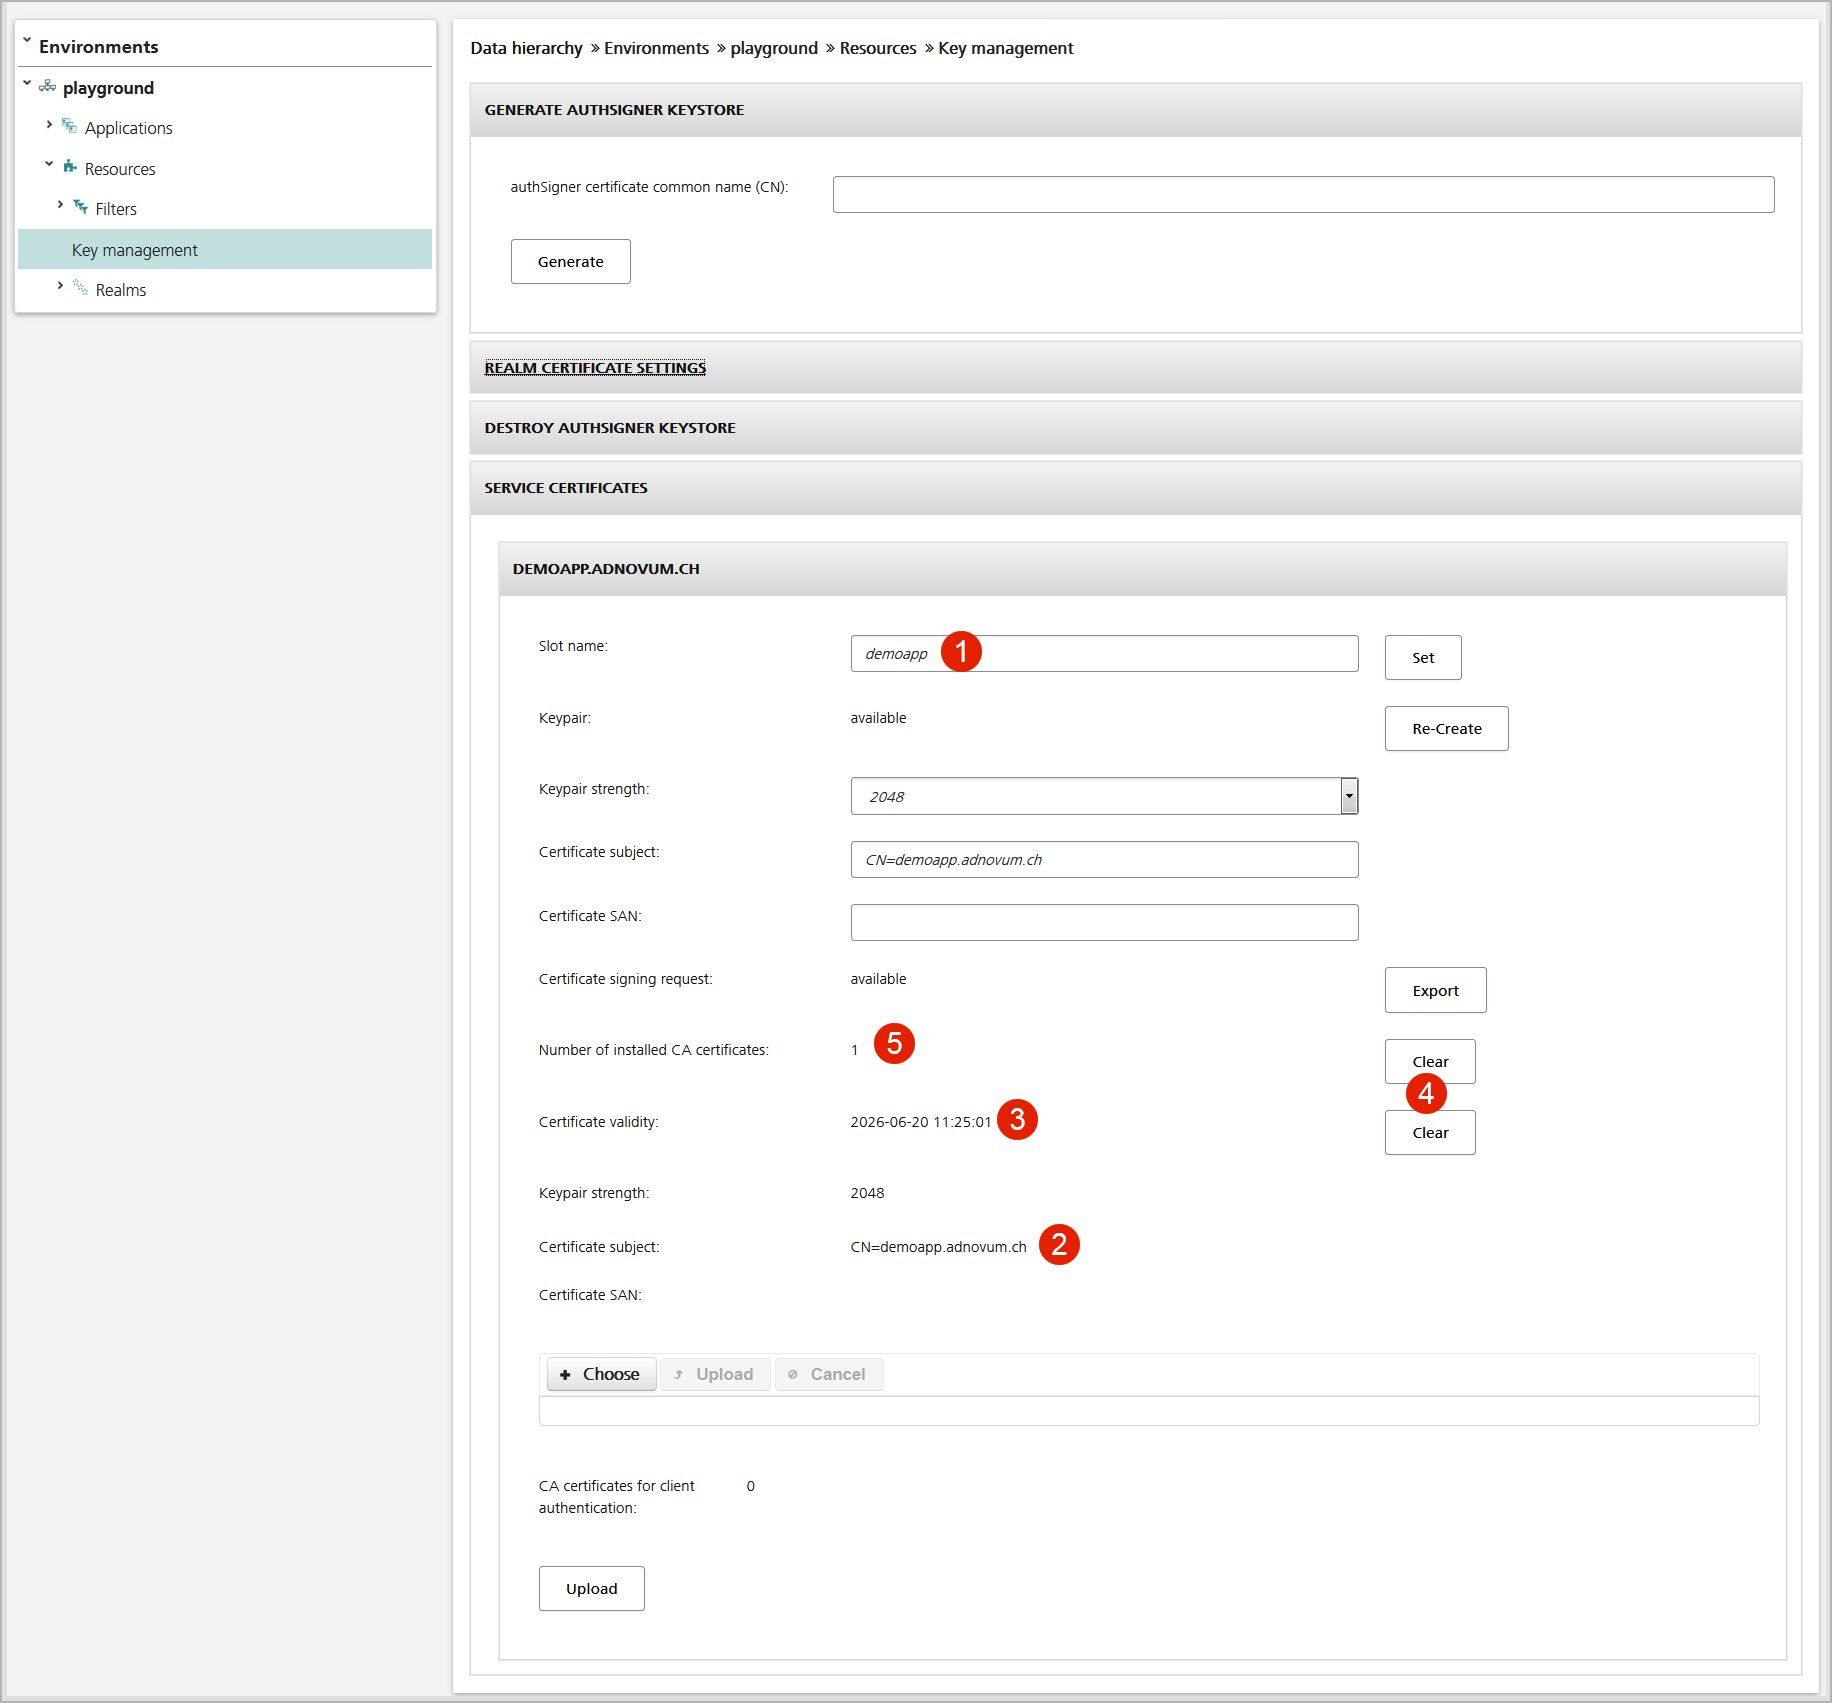
You manage each service's certificates settings in the Service Certificates panel (see Figure 6 below). The displayed settings include:
- The slot name to install the key files on the server (no.1 in the figure below).
- The server certificate subject name and expiration date (no.2 and no.3).
- The number of CA certificates in the truststore (no.5).
- One Clear button to delete the keystore with the server certificate and private key as well as another Clear button to delete the truststore with the CA root and intermediate certificates (no.4 in the figure below).
Managing the certificates for the nevisProxy service
Key material per realm
To generate and assign key material for a realm, perform the following steps:
- In the navigation pane of the Configuration tab, select the relevant environment, go to the Resources list and open the Key Management view.
- Enter a relevant common name for the realm's authSigner certificate in the Generate AuthSigner Keystore panel. Then click the Generate button to create the key material (no.1 in the figure below).
- In the Realm Certificate Settings panel, assign the authSigner keystore that contains the realm's key material to the realm (no.2 in the figure below), to automatically distribute the key material to all involved components.
Assigning the authSigner keystore to the realm makes the following happen automatically:
- Installation of the truststore with the CA and authSigner on the nevisKeybox instance of the server that hosts the nevisProxy instance (no.3 in the figure below).
- Definition of the truststore to be used for SecToken verification within the nevisProxy service (no.4). The truststore defined here refers to the 'real' truststore on the nevisKeybox instance.
- Installation of the keystore on the nevisKeybox instance of the server that hosts the nevisAuth instance (no.5 in the figure below).
- Definition of the keystore to be used for SecToken generation within the nevisAuth service (no.6). The keystore defined here refers to the 'real' keystore on the nevisKeybox instance.
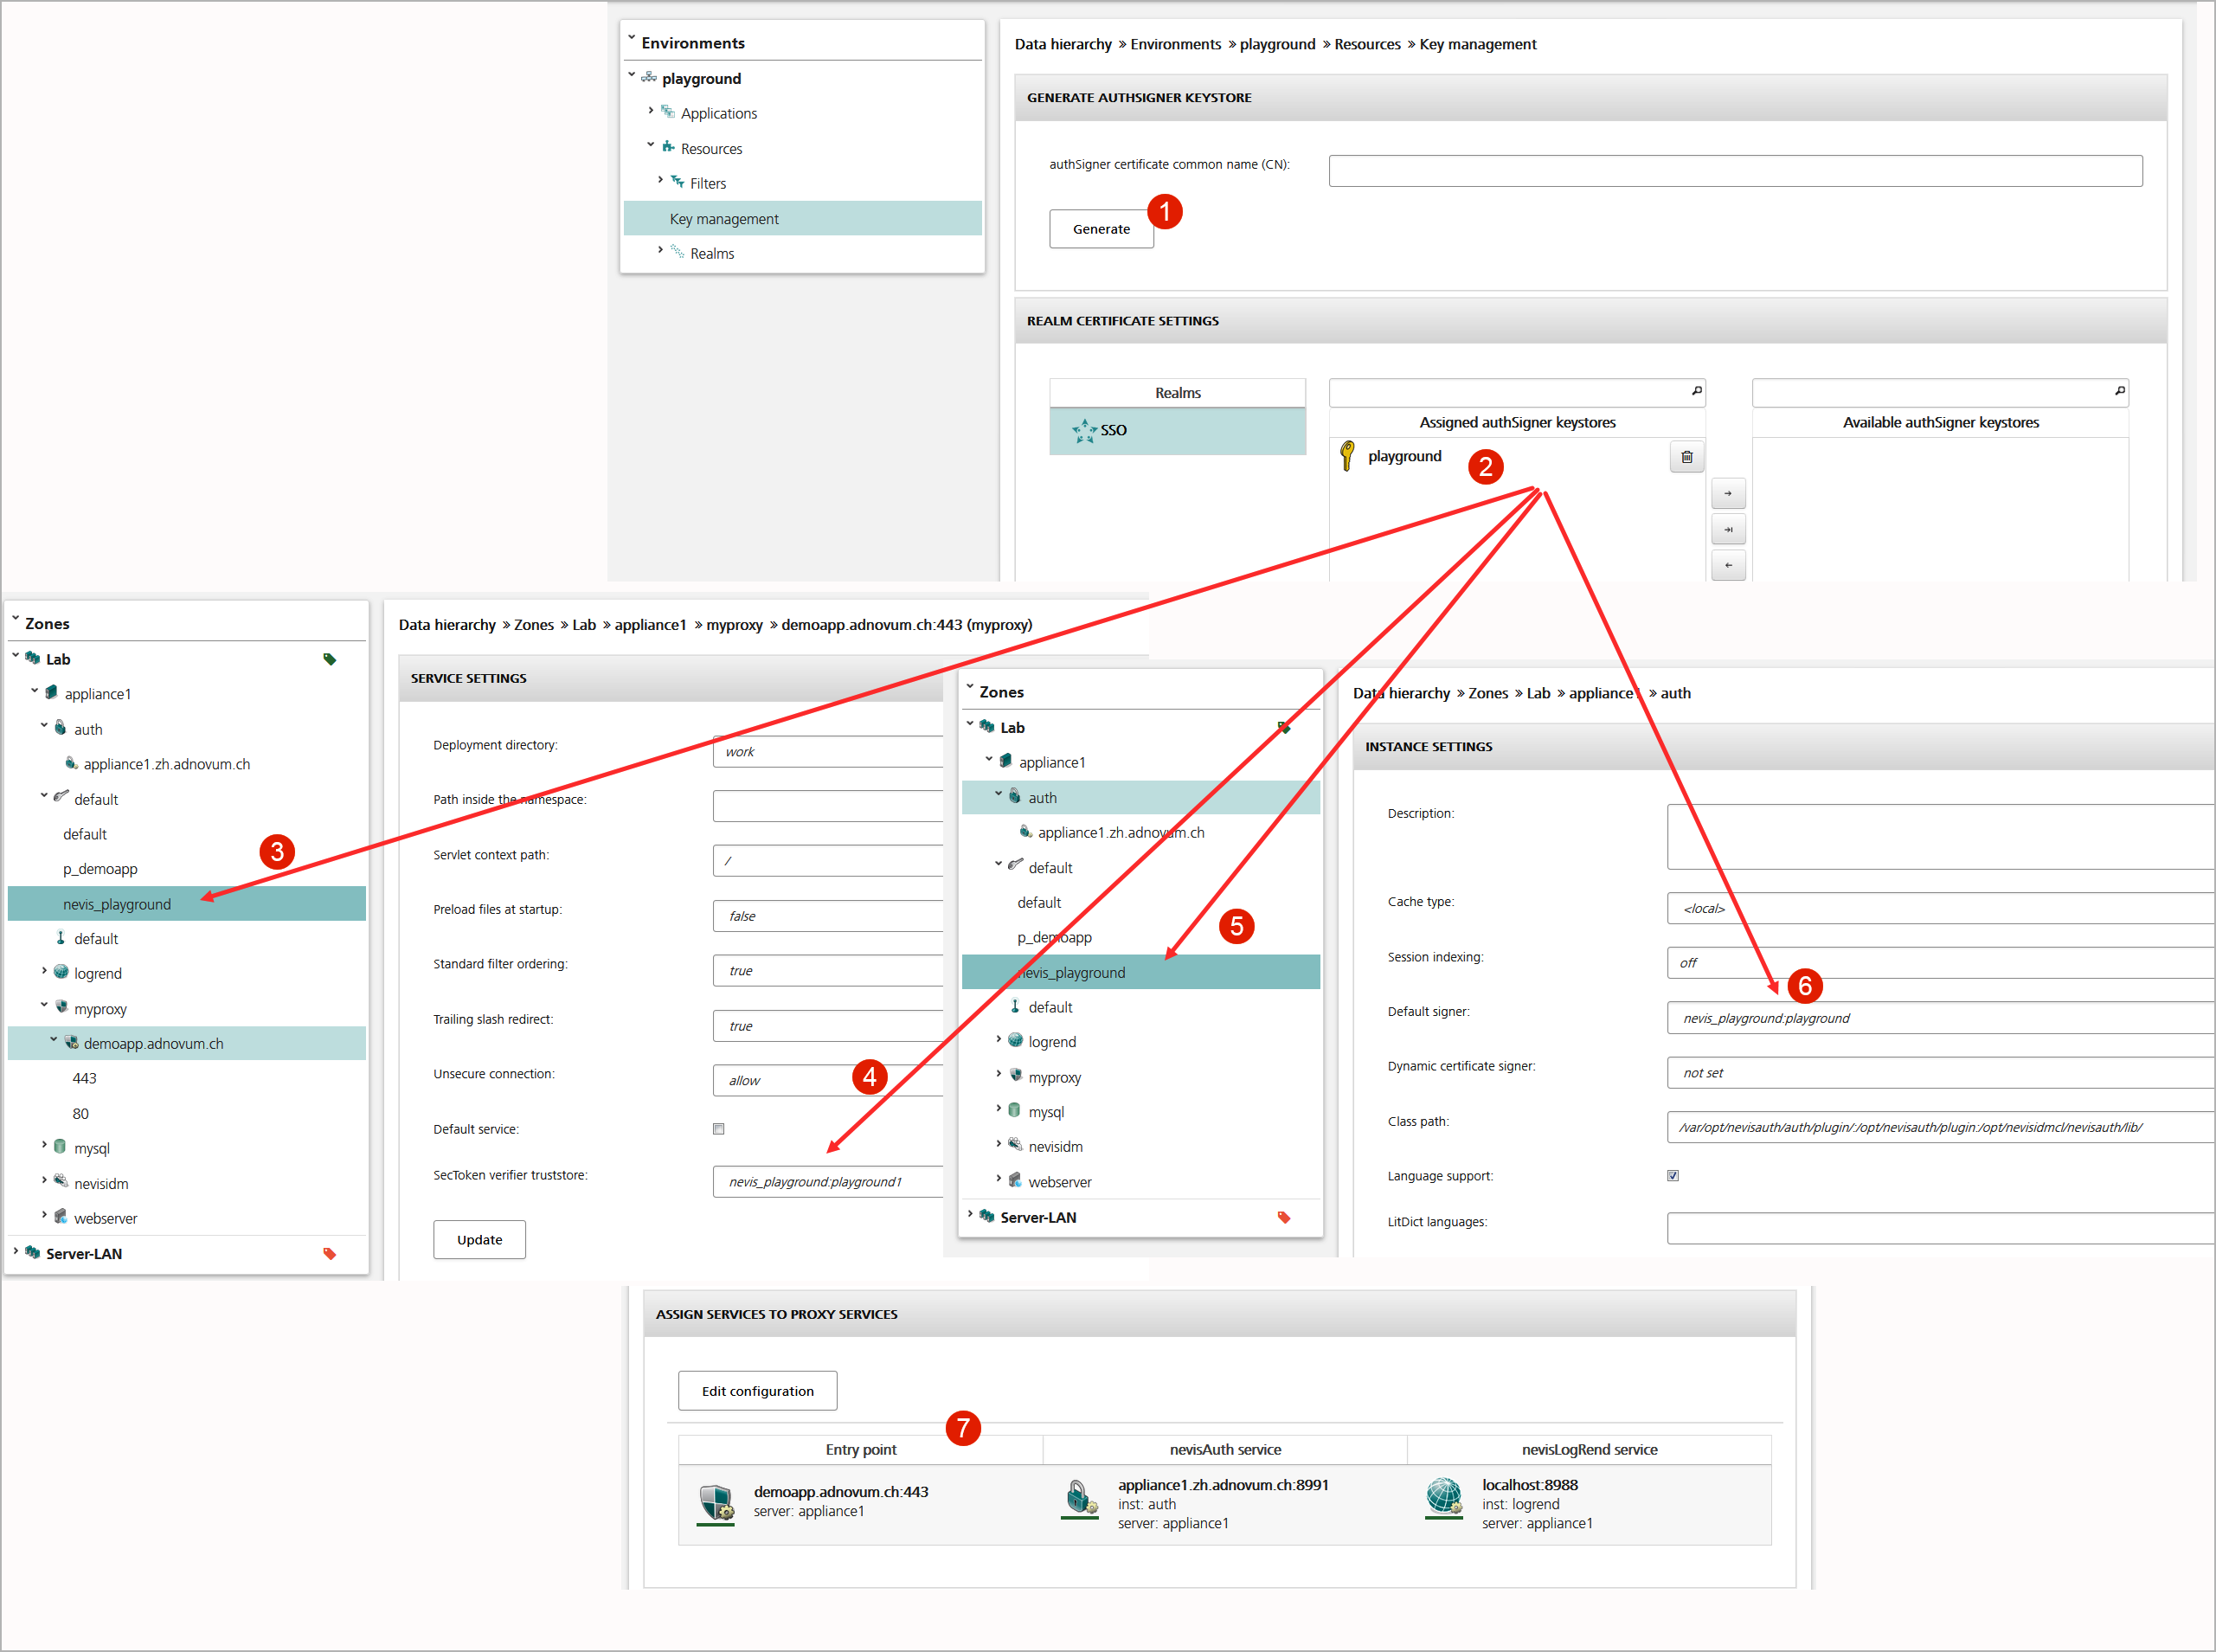
All realms hosted by the same nevisAuth instance must use the same authSigner keystore. This is because per nevisAuth instance, nevisAdmin creates only oneTokenAssembler, which in turn**uses just one default authSigner keystore.
Import key material
You may want to store key material, which has been created on the target server, within nevisAdmin, e.g., for backup or disaster recovery purposes. In this case, you can import the key files to nevisAdmin by uploading the files to the nevisKeybox within the web front end of nevisAdmin.
- Log in to the server and enter the nevisKeybox instance directory. Create a ZIP archive of the slot you want to import. The ZIP archive shall contain all key files installed on the server.
# cd /var/opt/neviskeybox/default
# zip -r ~/public.zip public
- You need to manage the nevisCred passphrase entries manually if the *keypass files use nevisCred and do not contain the plaintext passphrases.
- You can now import the ZIP archive into the nevisKeybox within the nevisAdmin web front-end.
- The key files are now stored within the configuration repository of nevisAdmin and get deployed to the server together with the instances.