Getting Started
This chapter helps you to get started with nevisAdmin 4. It provides a first introduction to the nevisAdmin 4 web application, in the form of a tutorial. This tutorial guides you through the nevisAdmin 4 GUI to create your first basic Nevis environment.
Prerequisites
To use nevisAdmin 4 in your environment, a minimal Nevis setup is required.
It is recommended starting with one of these two variants:
nevisAppliance installation with 2 VMs:
VM1 with an admin4 image, version 2019-02-20 or later. See Software Installation for image and nevisAdmin 4 installation instructions.
VM2 with the extended image, version 2019-02-20 or later. This image contains nevisProxy, nevisAuth, nevisIDM, and other components. See Software installation in the nevisAppliance documentation for image installation instructions.
infoWe recommend using remote VMs instead of installing them on the same laptop. The reason is that it can be hard to configure the required networking/routing settings in VirtualBox or VMWare Workstation.
RPM-based installation, all on the same VM:
- Start with a basic RHEL 7 VM installation.
- See "Software Installation" for RPM and nevisAdmin 4 installation instructions.
- Install the RPM for nevisProxy 3.14.0.1 or higher.
For the tutorial below, it is assumed that:
nevisAdmin 4 is up and running, and reachable via
http://nevisadmin4:9080/nevisadmin/.nevisProxy, or the nevisAppliance extended image, is installed
- The host is accessible via SSH at nevisproxy.
- After completing the tasks below, it will host a website at
https://nevis.
Depending on your environment, adapt the host names "nevisadmin4", "nevisproxy" and "nevis" as follows:
nevisAppliance installation:
- "nevisadmin4": Hostname of VM1.
- "nevisproxy": Hostname of VM2.
- "nevis": Hostname of VM2.
- Or: Add "nevis" to /etc/hosts on VM2 and on the device where the browser runs.
RPM-based installation, all on the same VM:
- "nevisadmin4": Hostname of the VM.
- "nevisproxy": Hostname of the VM.
- "nevis": Hostname of the VM.
- Or: Add "nevis" to /etc/hosts on the VM and on the device where the browser runs.
Main Concepts
Refer to Main Concepts to get familiar with the concepts powering nevisAdmin 4: patterns, projects, inventories and deployment.
Tutorial: Setting Up nevisProxy with nevisAdmin 4
The following steps will show you a basic example workflow of configuring and deploying your Nevis environment with nevisAdmin 4. It will guide you through the GUI to create your first patterns and thus configure a nevisProxy as a WAF.
The tutorial consists of the following tasks:
Each task includes a movie that illustrates the steps to perform.
Task 1: Creating Your First nevisAdmin 4 Project
The first task, after installing nevisAdmin 4, is to create a project where you can store your patterns.
Click Create Project.
In the Cr ate Project dialog:
- Skip the Enable Git setting. We will not use a version control system for our first project.
infoFor information on the versioning capabilities of nevisAdmin 4 see Publishing Projects to Git.
- En er "MY-FIRST-PROJECT" as Project key. This is the unique identifier of your project and will be displayed in the GUI.
Click Create to create your first project.
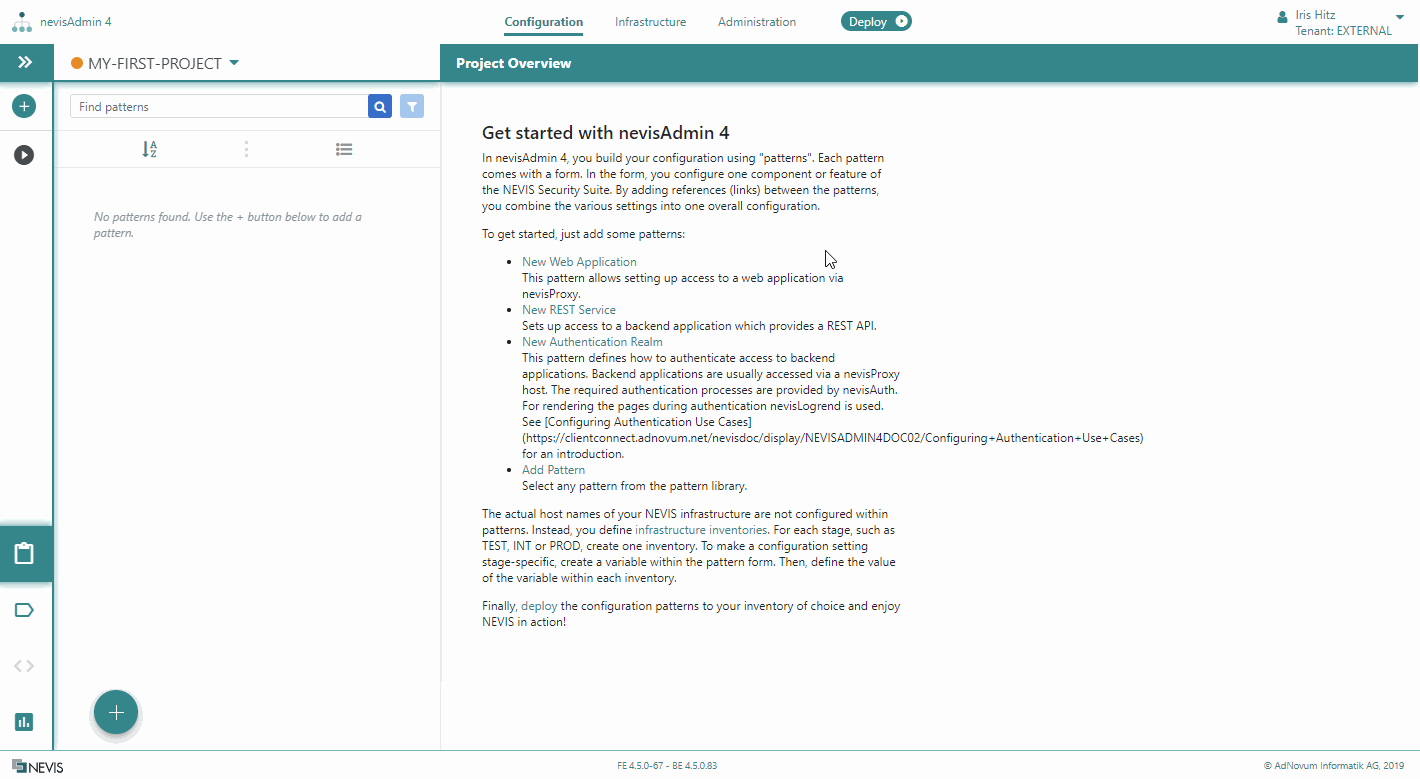
After cr ating your first project, you will see the Project information screen. This screen displays the project dependencies and user permissions. The Standard libraries section shows the plug-in versions of your project. nevisAdmin 4 has a powerful plug-in concept.
- For more information, see Editing Project Pattern Libraries.
- For further in ormation about user management and permission setup, see Managing Users and Groups via REST.
Task 2: Adding a Web Application
As an example, we will protect the publicly available website https://www.adnovum.ch with nevisProxy.
To create the necessary configuration with nevisAdmin 4, execute the following steps:
- Click New Web Application in the Get started with nevisAdmin 4 section.
- Now you have a new pattern of the type Web Application in front of you. Each pattern comes with a Pattern Editor (visible in the middle part of the screen). In this editor, you configure the features of the pattern. We call the configuration options properties.
- Click on the editor icon next to the pattern title on top of the Pattern Editor. Rename the pattern to "AdNovum Website".
- Specify the following pattern properties in the corresponding fields:
In the Basic Settingstab:
Frontend Paths: "/adnovum-web/". All requests with this path will be orwarded to the application.
Response Rewriting: "complete". This configures nevisProxy to replace "/" in the request header and page body with "/adnovum-web/".
In the Backend Connection tab:
Backend Addresses: "`http://www.adnovum.ch". nevisProxy will use this URL to access the application.
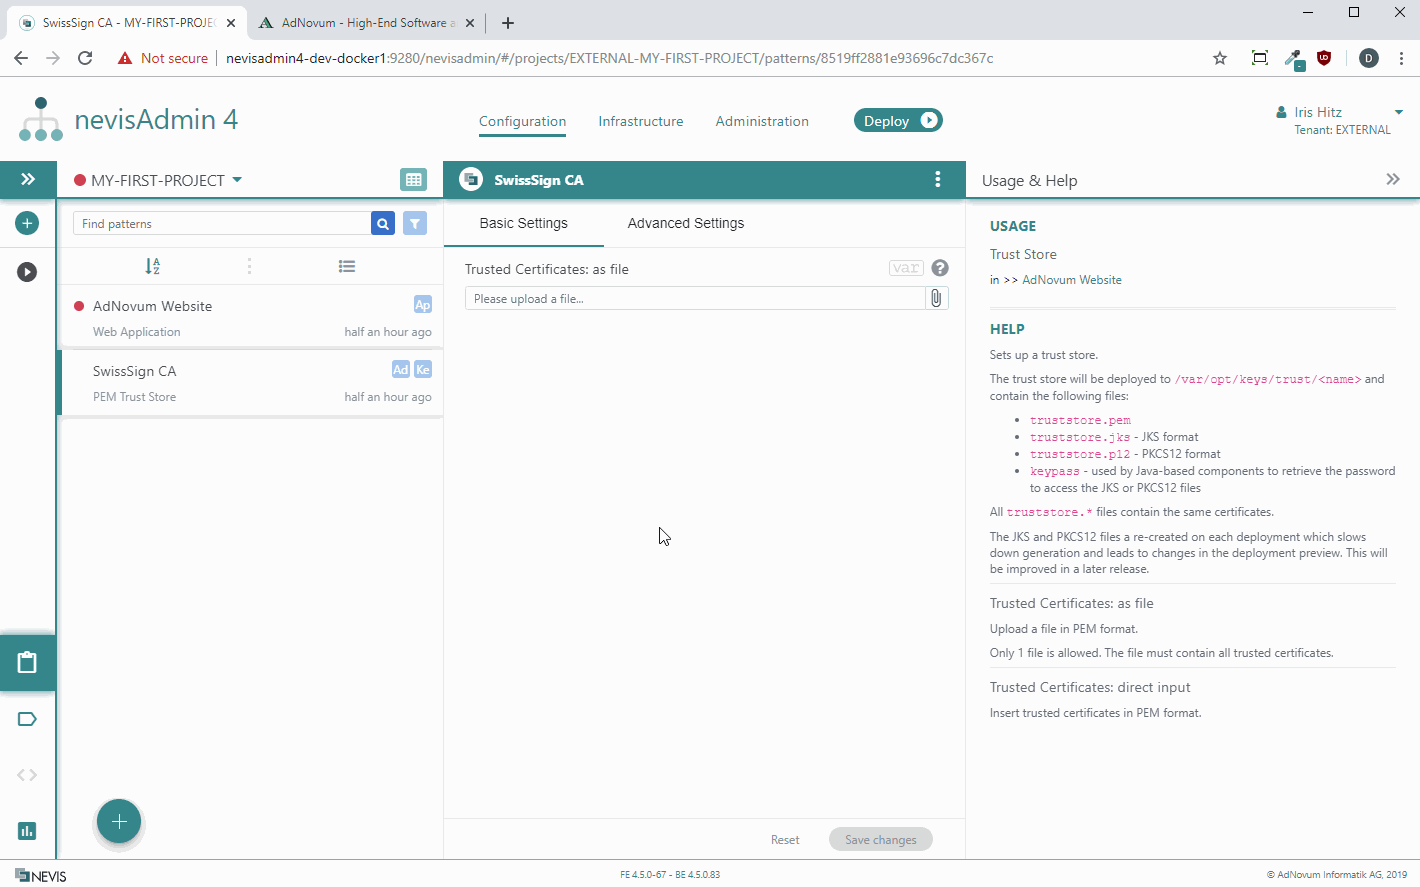
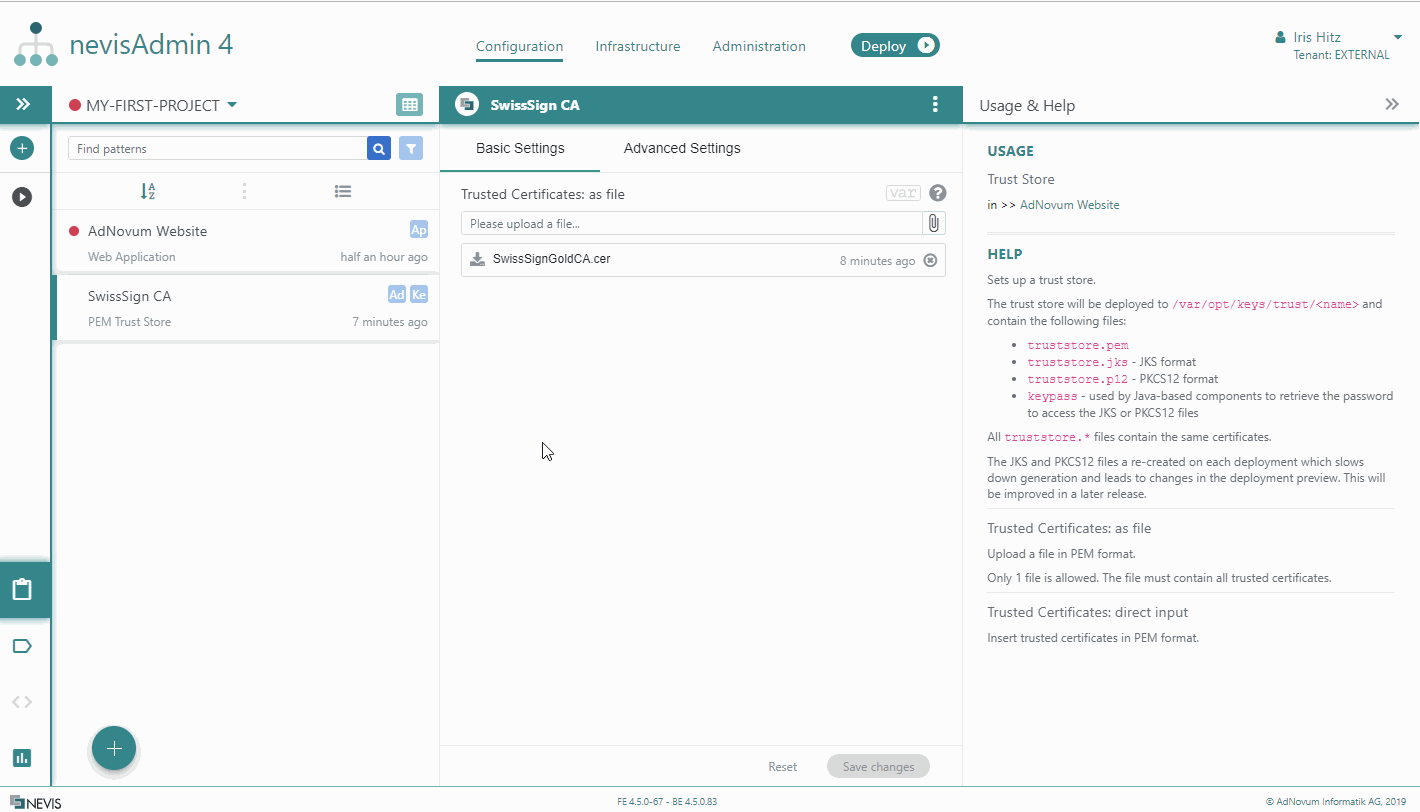
Trust Store: "SwissSign CA". Because the backend www.adnovum.ch is secured with TLS, we need to add a truststore to nevisProxy with the root CA of the page's certificate. This enables nevisProxy to validate the certificate of the web application and use it as a backend. Execute the following steps:
Enter "SwissSign CA" in the drop-down menu of the Trust Store property.
Click Add pattern 'SwissSign CA'.
Select type PEM Trust Store Provider.
Click Add pattern.
- Click Save Changes.
The public site www.adnovum.ch has an official certificate from SwissSign. nevisProxy needs to trust the certificate of this site to establish the TLS connection. Therefore, we add the CA to a PEM truststore:
- Export the root CA of https://www.adnovum.ch/ with your browser like shown in the movie.
- Naviga e to the newly added pattern SwissSign CA.
- Attach the exported CRT file into the Trusted Certificates: as file field.
- Save your modifications.
You have successfully created your first two patterns! By adding references between the patterns, you combine the various settings into one overall configuration. Our AdNovum Website pattern for example has a reference to the SwissSign CA pattern.Task 3: Protecting the Web Application with a nevisProxy WAF
After configuring the web application, we want to access it with nevisProxy as WAF in between, so we configure a virtual host for that:
- Navigate back to the AdNovum Website pattern.
- Enter "My nevisProxy Host" in the drop-down menu of the Virtual Host property.
- Click Add pattern 'My nevisProxy Host'. Click Save changes and follow the link to the newly added pattern "My nevisProxy Host".
- The properties of the pattern "My nevisProxy Host" appear in the Pattern Editor. Specify the following properties of this pattern:
- Frontend Addresses:
https://nevis. The property Frontend Addresses sets the external domain name hosted by your nevisProxy. In our example, we usehttps://nevis. Adapt this according to your Nevis setup. - A nevisProxy host context must have a reference to a nevisProxy instance. You specify this reference in the property nevisProxy. Proceed as follows:
- Enter "My Proxy" in the drop-down menu field of the nevisProxy property.
- Click Add pattern 'My Proxy'.
- Click Save changes and follow the link to the newly added pattern "My Proxy".
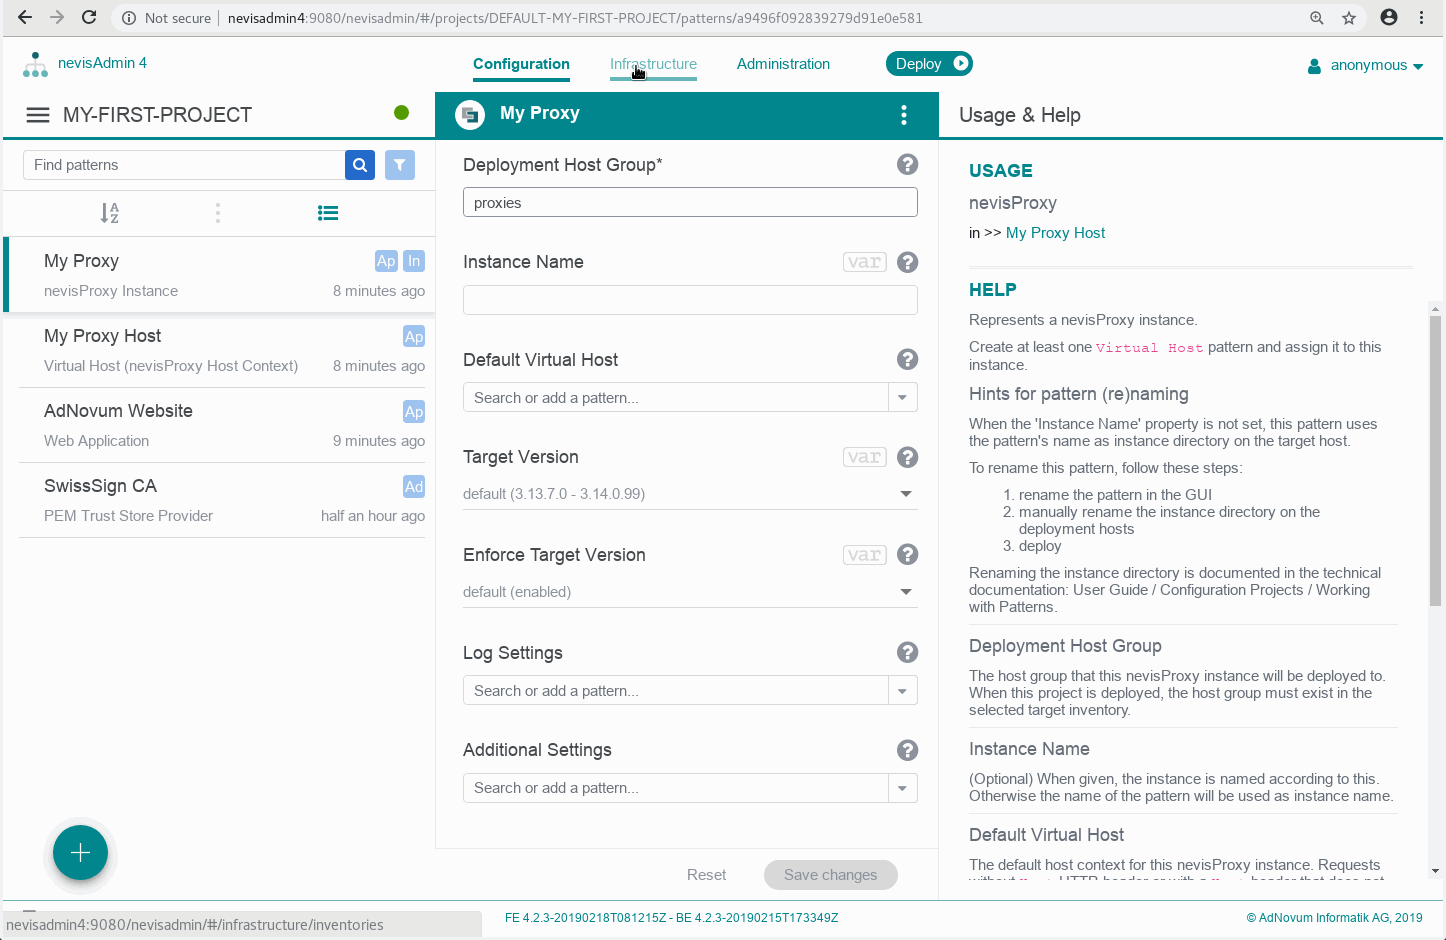
- The properties of the pattern "My Proxy" appear in the Pattern ditor. Specify the following pattern property: Deployment Host Group: "proxies". This is where the proxy should run. Instead of defining a hostname, we enter a name of the hostgroup, here "proxies". The next section explains how to configure the host group.
- Click Save changes.
Task 4: Configuring the Infrastructure Components for nevisProxy
The next step is to tell nevisAdmin 4 where to deploy our first patterns.
In nevisAdmin 4, you do not configure your Nevis infrastructure within the patterns. Instead, you define inventories. An inventory is a list of hosts, groups and corresponding variables. It describes your infrastructure environment per stage, such as TEST, INT or PROD.
For this tutorial we only need an inventory for the TEST stage. To create this inventory, navigate to the Infrastructure tab. Because you have not defined an inventory yet, the screen on the left side is empty. At the right side, a help text explains the inventory file syntax.
Perform the following steps:
- Select Create inventory in the Action menu in the sidebar of the Infrastructure screen.
- The Create inventory dialog appears.
- Enter the key "MY-INVENTORY" in the Inventory key field.
- Click Save to save your settings and to create the inventory.
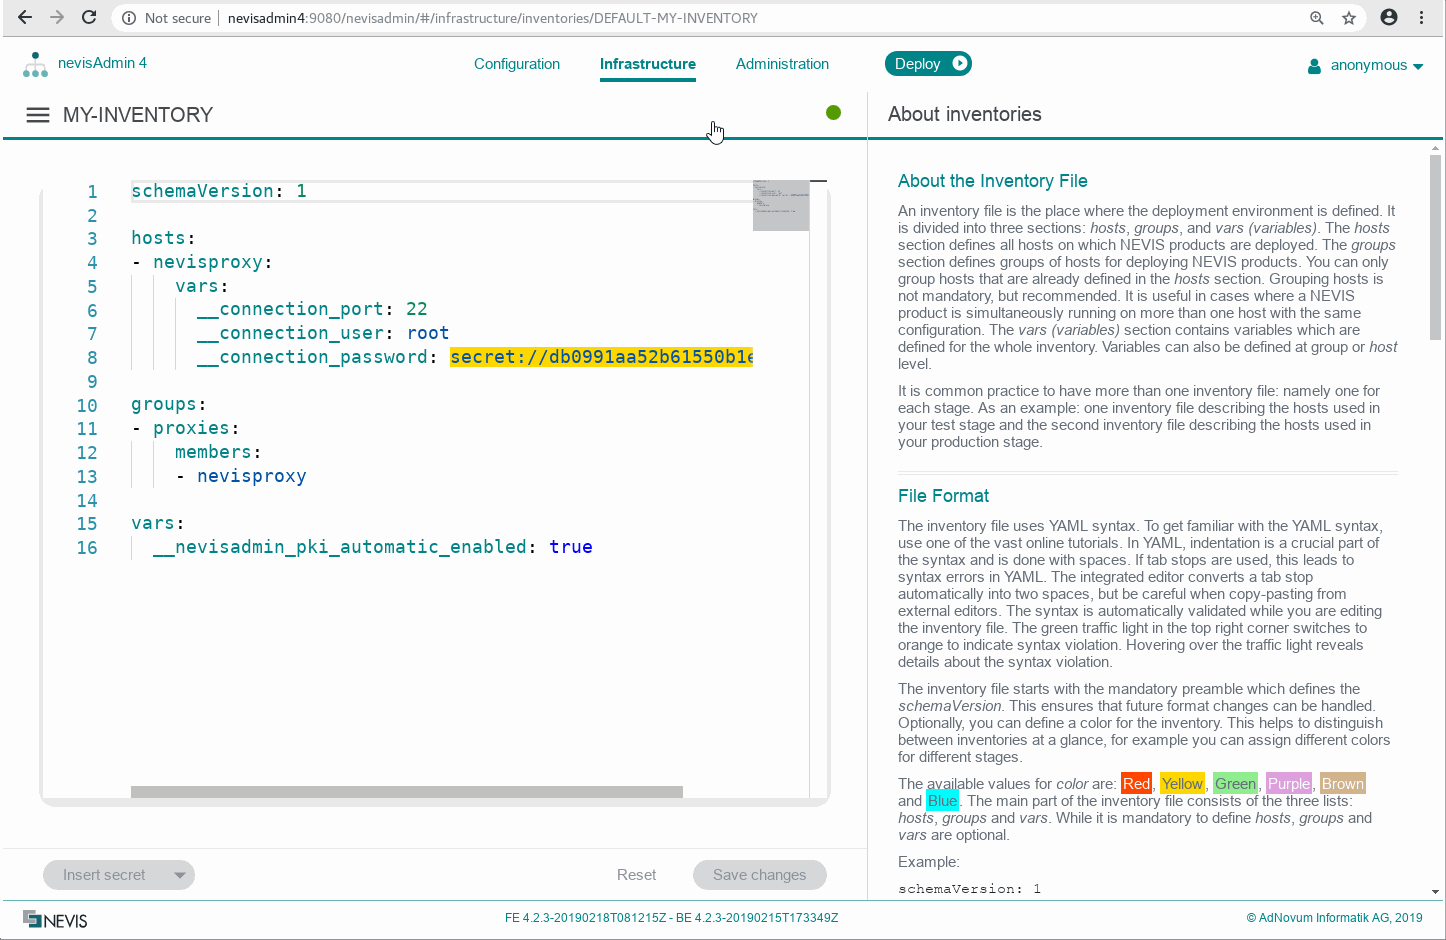
- The Infrastructure screen now shows the editor with the inventory file. Clear the default contents and paste the following into the editor:
schemaVersion: 1

hosts:
- <NEVISPROXY_HOST>:
    vars:
      __connection_port: <SSH_PORT>
      __connection_user: <SSH_USER>
      __connection_password: <SSH_PASSWORD>

groups:
- proxies:
    members:
    - <NEVISPROXY_HOST>

vars:
  __nevisadmin_pki_automatic_enabled: true
Be careful: indentation matters within this file, because it is YAML format. Use spaces for indentation, tab stops are not allowed.
- Replace the following variables with the values for your nevisProxy test instance.
- <NEVISPROXY_HOST>. Hostname of the nevisProxy installation. nevisAdmin 4 will use this to connect via SSH to deploy the configuration.
- <SSH_PORT>. This is the SSH port that nevisAdmin 4 should use for configuration deployment to the nevisProxy host. If you use the standard port 22, you can remove this line.
- <SSH_USER>. The SSH connection user. Enterrootor another user who hassudopermissions.
- <SSH_PASSWORD>. The SSH connection password. Use Insert secret to enter the password as shown in the movie. See Deployment via SSH for more secure options.
- Save the file.
How does it work:
- We have a nevisProxy instance pattern which has a reference to the host group proxies.
- This host group is defined in our inventory.
- In the host group of the inventory file, our host nevisproxy is referenced as single member of the group.
In a production set-up, a host group usually contains multiple, redundant hosts.
- The host nevisproxy defines the connection variables that are used during deployment.
- This configuration tells nevisAdmin 4 to deploy the nevisProxy configuration via SSH to the host nevisproxy.
In the next step we will deploy our project.
Task 5: Deploying Your Configuration to nevisProxy
After we have created our first simple patterns as well as our first inventory, we can deploy the resulting Nevis configuration:
- Click the Deploy button to start the Deployment Wizard. In the first screen of the wizard, you can select which project to deploy to which inventory. We will deploy our project MY-FIRST-PROJECT to the inventory MY-INVENTORY, on all hosts that we have configured (at the moment only one host for nevisProxy).
- Click Validate deployment. In case some required settings would be missing in the patterns or in the inventory, they would be shown during this step.
- Click Preview deployment to scan the target host for changes that must be done. The files-to-be-created on the proxy and the commands-to-be-executed are visible on the left side of the screen.
- Click Deploy now to perform the changes and watch the deployment progress. When done, the View log link will appear. The log shows all commands that were remotely executed.
- After deployment, we can test if the application is accessible on nevisProxy at
https://nevisproxy/adnovum-web.
Debugging Hints
If deployment was successful, but the website does not appear, you can debug the setup as follows:
- Log in manually to the target host nevisproxy.
- Run systemctl status nevisproxy@My_Proxy to check if the nevisProxy component is running. If not, try journalctl -xe and look for startup errors.
- Check the following files for errors:
Additionally, you can set up Elastic Stack to collect all Nevis logs in a central place. It features a powerful GUI, Kibana, which allows you to conveniently inspect the logs using your web browser. See Configuring Monitoring of your Nevis Infrastructure for step-by-step instructions.
Further Steps
Now you can protect your application with the WAF features supported by nevisProxy. Also, you can enable authentication and identity management by configuring further Nevis components.
See the [Nevis Configuration Guide] for more information.