Application management
Another task of the security expert is the overall management of the nevisDetect application. This includes specifying which plug-ins to include in the detection process (that is, enabling or disabling a plug-in), as well as setting the modes of operation and communication.
The following use cases are involved:
- Request filter management
- Enable or disable a plug-in
- Cleanup the request history
- Set the operation mode
- Set the communication mode
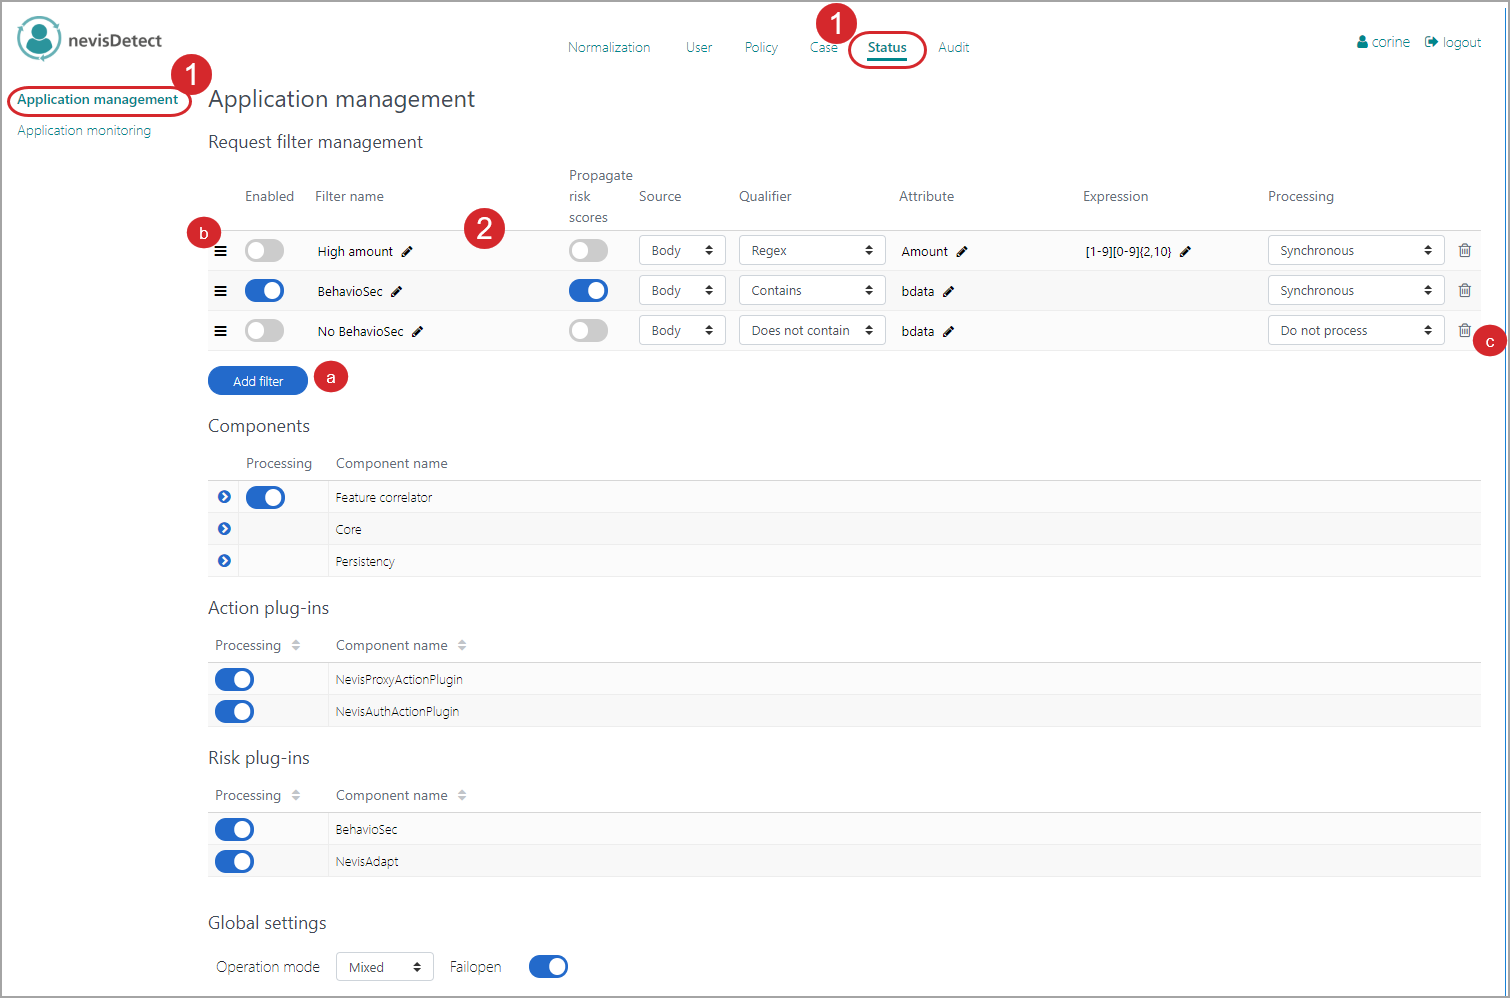
Use case: Request filter management
The security expert has the possibility to modify the request filters. The request filters are used to define the way the system deals with requests during request processing.
You add or modify the request filters in the Application management view. Proceed as follows (see the figure below - the numbers in the figure correspond with the numbered steps below):
- To open the Application management view in the nevisDetect web application,
- Select Status from the top menu.
- Then select Application management in the navigation on the left.
- You can add/edit the request filters in the Request filter management section: 3. To add a new filter, click the Add filter button. 4. To modify the order of the filters, drag the filter entry up or down. The system will execute the request filters in the order you define here. To modify a filter, click on the Pencil icons or change the selection in the drop-down menus. 3. To delete a filter, click on the Trash icon.
Each filter has the following setting options (columns):
- You enable or disable the filter by clicking on the Toggle button in the Enabled column.
- To change the name of the filter, click on the Pencil icon in the Filter name column.
- With the Propagate risk scores button, you can define whether to propagate the risk scores to the application in the backend, in case the request matches the filter. If you enable this function, the system sends the risk scores to the backend application by adding the risk scores to the request header.
- In the Source column, you define which part of the request is included in the filter check: the request Body, Uri, Query or Header.
- You set the condition in the Qualifier column. If you select "Contain" or "Does not contain", the source must include/not include the attribute entered in the Attribute column. In case you select "Regex", the source should match the defined regular expression in the Expression column.
- In the Processing column, you can override the request processing settings defined for the feature correlator in the Components field. A request that matches the filter can either be processed synchronously ("Synchronous") or asynchronously ("Asynchronous"/"Batch") or not processed at all ("Do not process").
Use case: Enable or disable an action or risk plug-in
Enabling and disabling an Action or Risk plug-in takes place in the Application management view of the Status section. The procedure is the same for Action and Risk plug-ins, we show here it here for an Action plug-in. Proceed as follows (see the figure below - the numbers in the figure correspond with the numbered steps below):
- To open the Application management view in the nevisDetect web application,
- Select Status from the top menu.
- Then select Application management in the navigation on the left.
- The Action plug-ins and Risk plug-in parts of the view lists all available plug-ins and nevisDetect components.
- To enable or disable a plug-in, click the On/Off button on left side of the relevant plug-in entry.
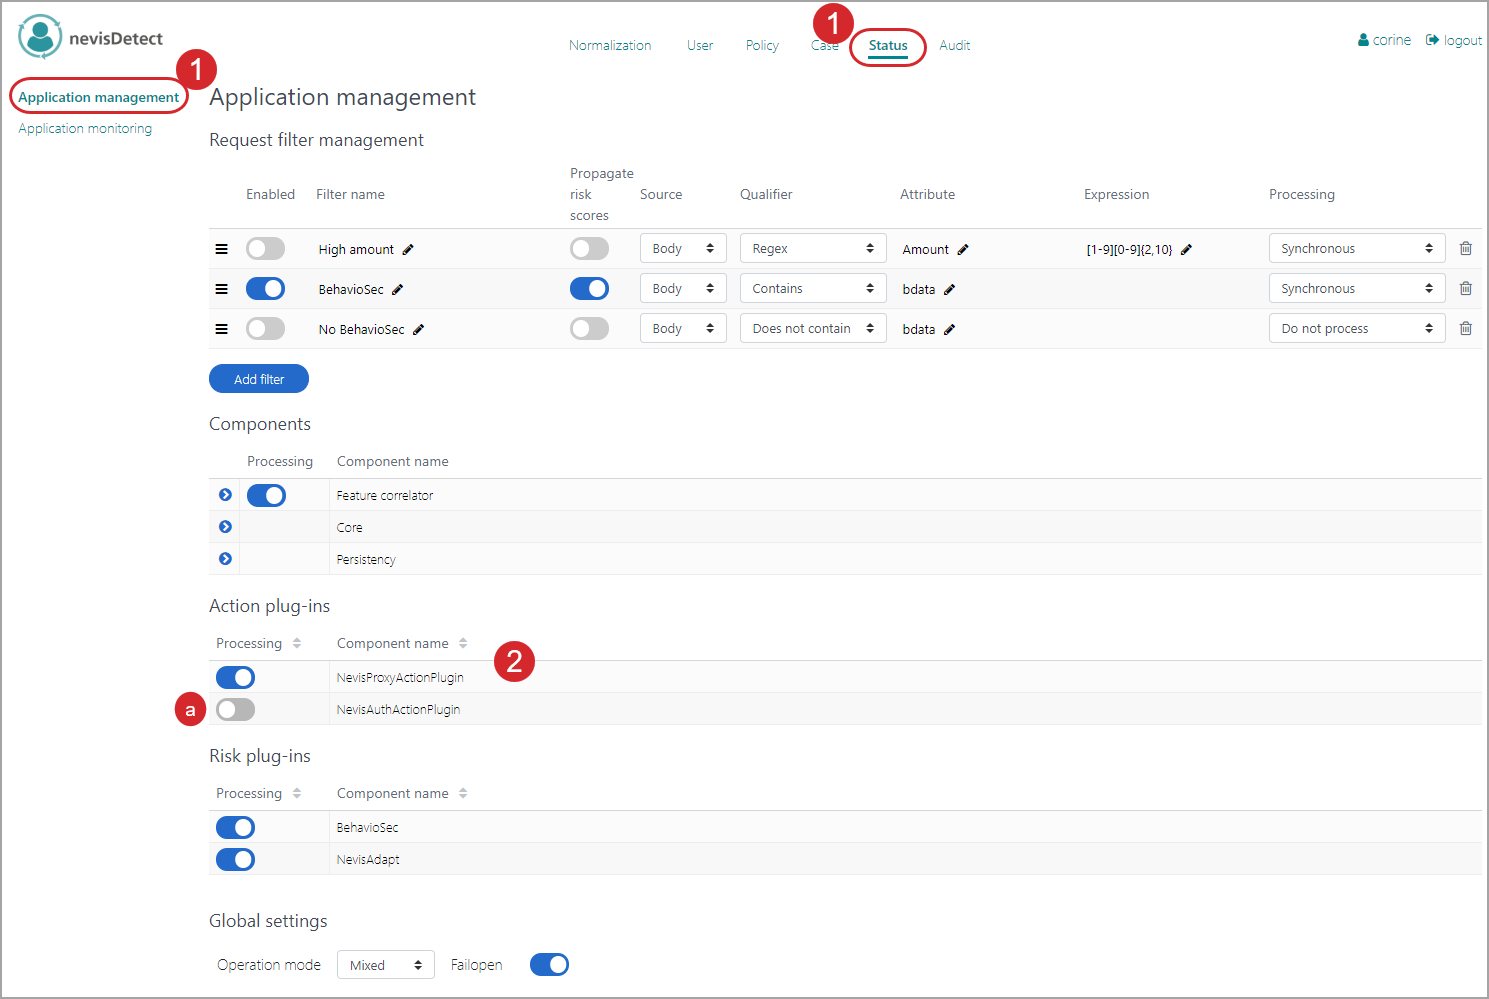
For more information on the Application management view, see the chapter Status section.
Use case: Clean up the request history
It is possible to clean up the request history, to reduce the amount of data stored in the database. The security expert can either clean up the request history himself, or make the system do this. In the latter case, the security expert must specify when the system should perform the cleanup. Proceed as follows (see the figure below - the numbers in the figure correspond with the numbered steps below):
- To open the Application management view in the nevisDetect web application,
- Select Status from the top menu.
- Then select Application management in the navigation on the left.
- Go to the Persistency component entry (in the Components part of the screen.) Click on the arrow icon for a detailed view. You can specify the following cleanup settings:
- To trigger an immediate cleanup, click the Cleanup button. If you want to keep the most recent requests/risk scores, enter the number of past days to exclude from the cleanup in the Request history/Risk score history fields just above. Selecting the checkbox All means that all history is kept in the database.
- You can also let the system do the cleanup, via a cron job in the background. First specify the settings for the cleanup in the Request history and Risk score history fields (Settings section). For the meaning of these fields, see above. Then click the Save button to save your settings.
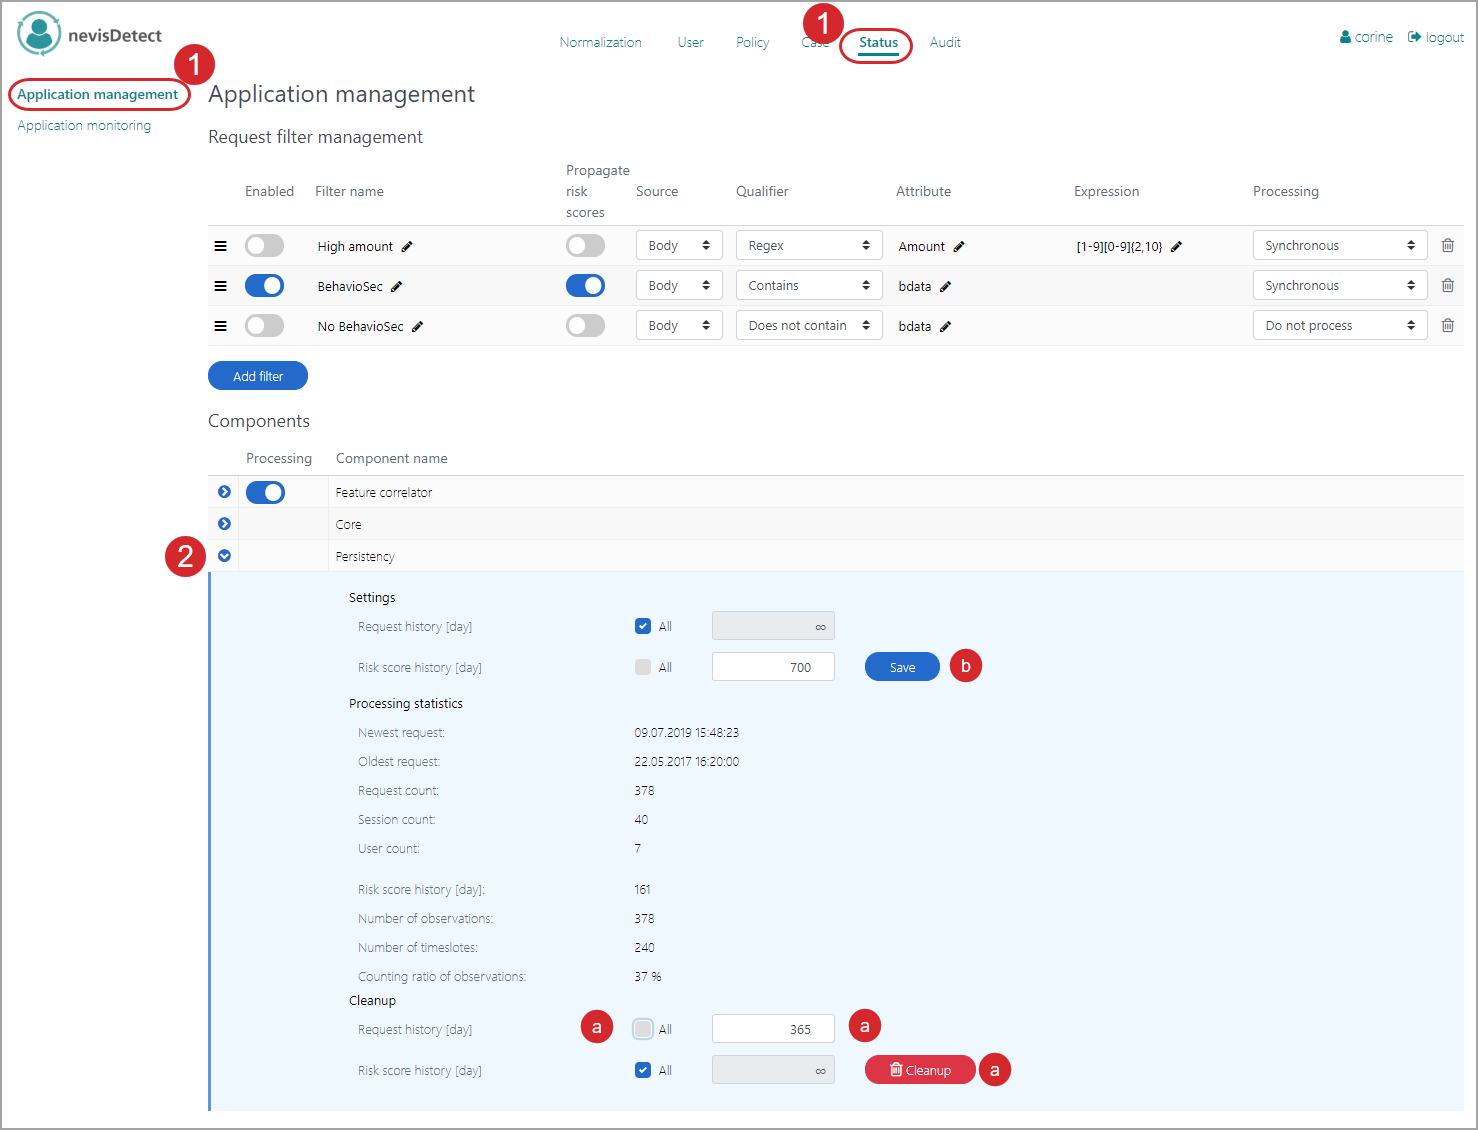
For more information on the Application management view, see the chapter Status section.
Use case: Set the operation mode
An important use case of the security expert is to decide in which mode nevisDetect must operate. Before nevisDetect can start detecting malicious HTTP requests, it must pass a training phase. During this phase, nevisDetect is just collecting data, so that the detection technologies can train their models. A specific plug-in/detection technology has collected enough data of a specific user, if for this user the average plug-in risk score (the mean) and the variance do no longer change from day to day. From that point on, you can switch the plug-in into the detection phase.
It is the security expert's task to specify when the moment has come to switch from the training into the detection phase. You set these operation modes in the Application management view. Proceed as follows (see the figure below - the numbers in the figure correspond with the numbered steps below):
- To open the Application management view in the nevisDetect web application,
- Select Status from the top menu.
- Then select Application management in the navigation on the left.
- You set the operation mode in the Operation mode field/drop-down menu. There are three options:
- In the "Training" operation mode, nevisDetect is just collecting data, so that the detection technologies can train their models.
- In the "Detection" operation mode, the system blocks the requests of an untrained user by creating a rule with a BLOCK action. This operation mode makes sense if there is a closed user group, and all users have participated in the training phase.
- In the "Mixed" operation mode, the system processes the requests of an untrained user as if it is in the training phase. This operation mode is useful if not all users have participated in the training phase, or if new users have been onboarded after completion of the training phase.
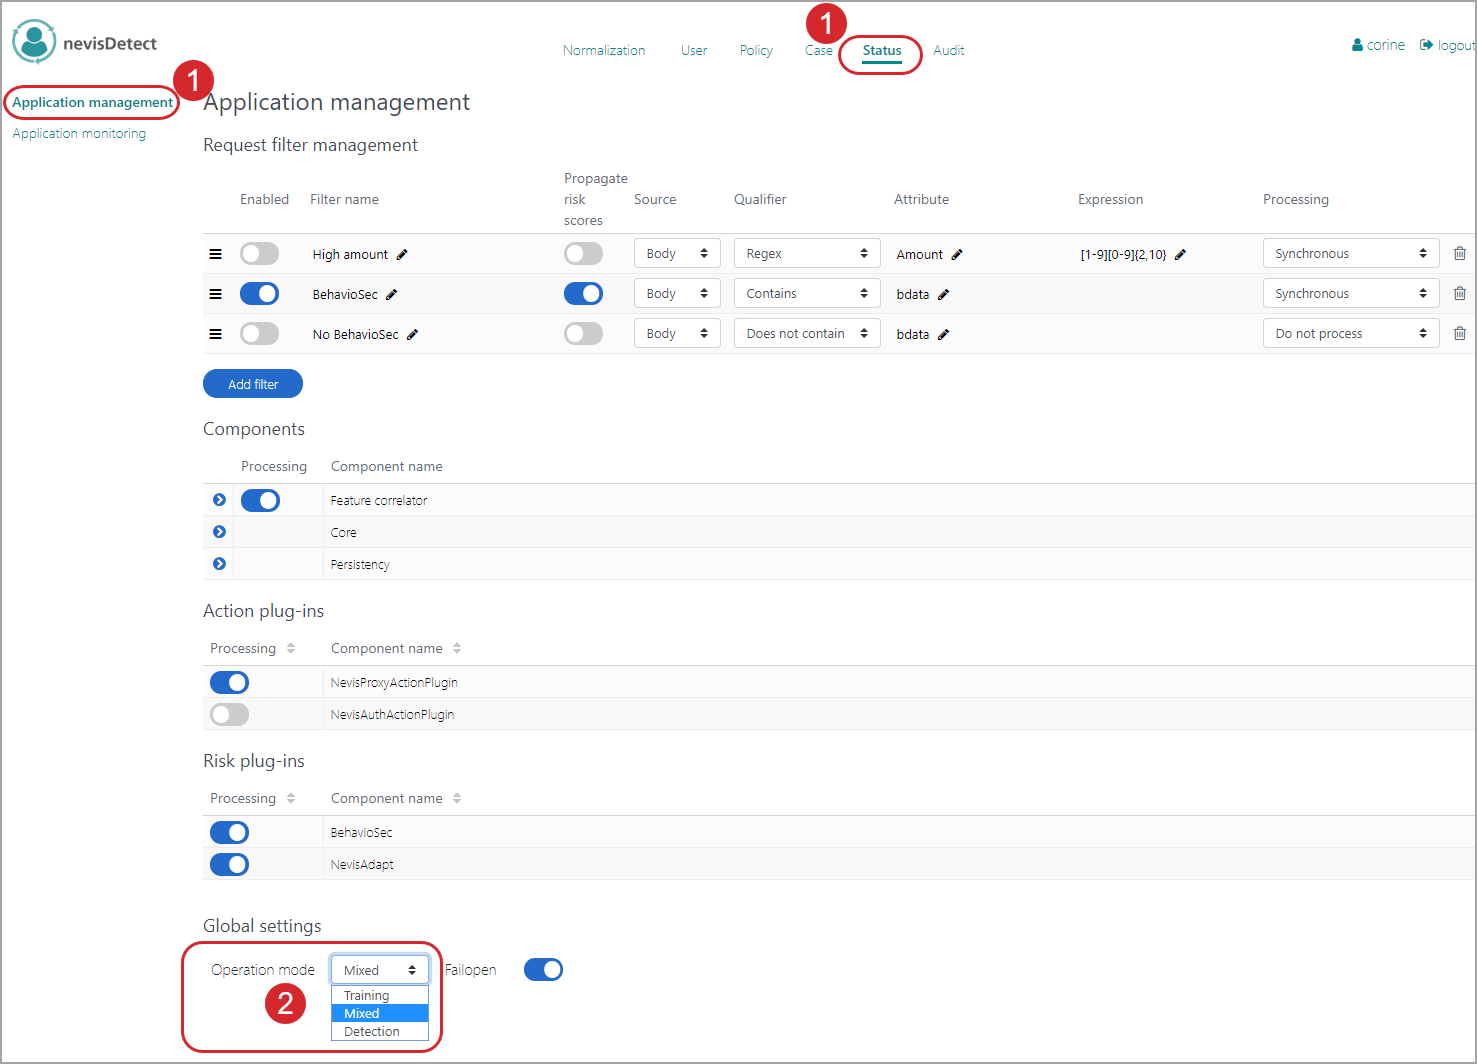
For more information on the Application management view, see the chapter Status section.
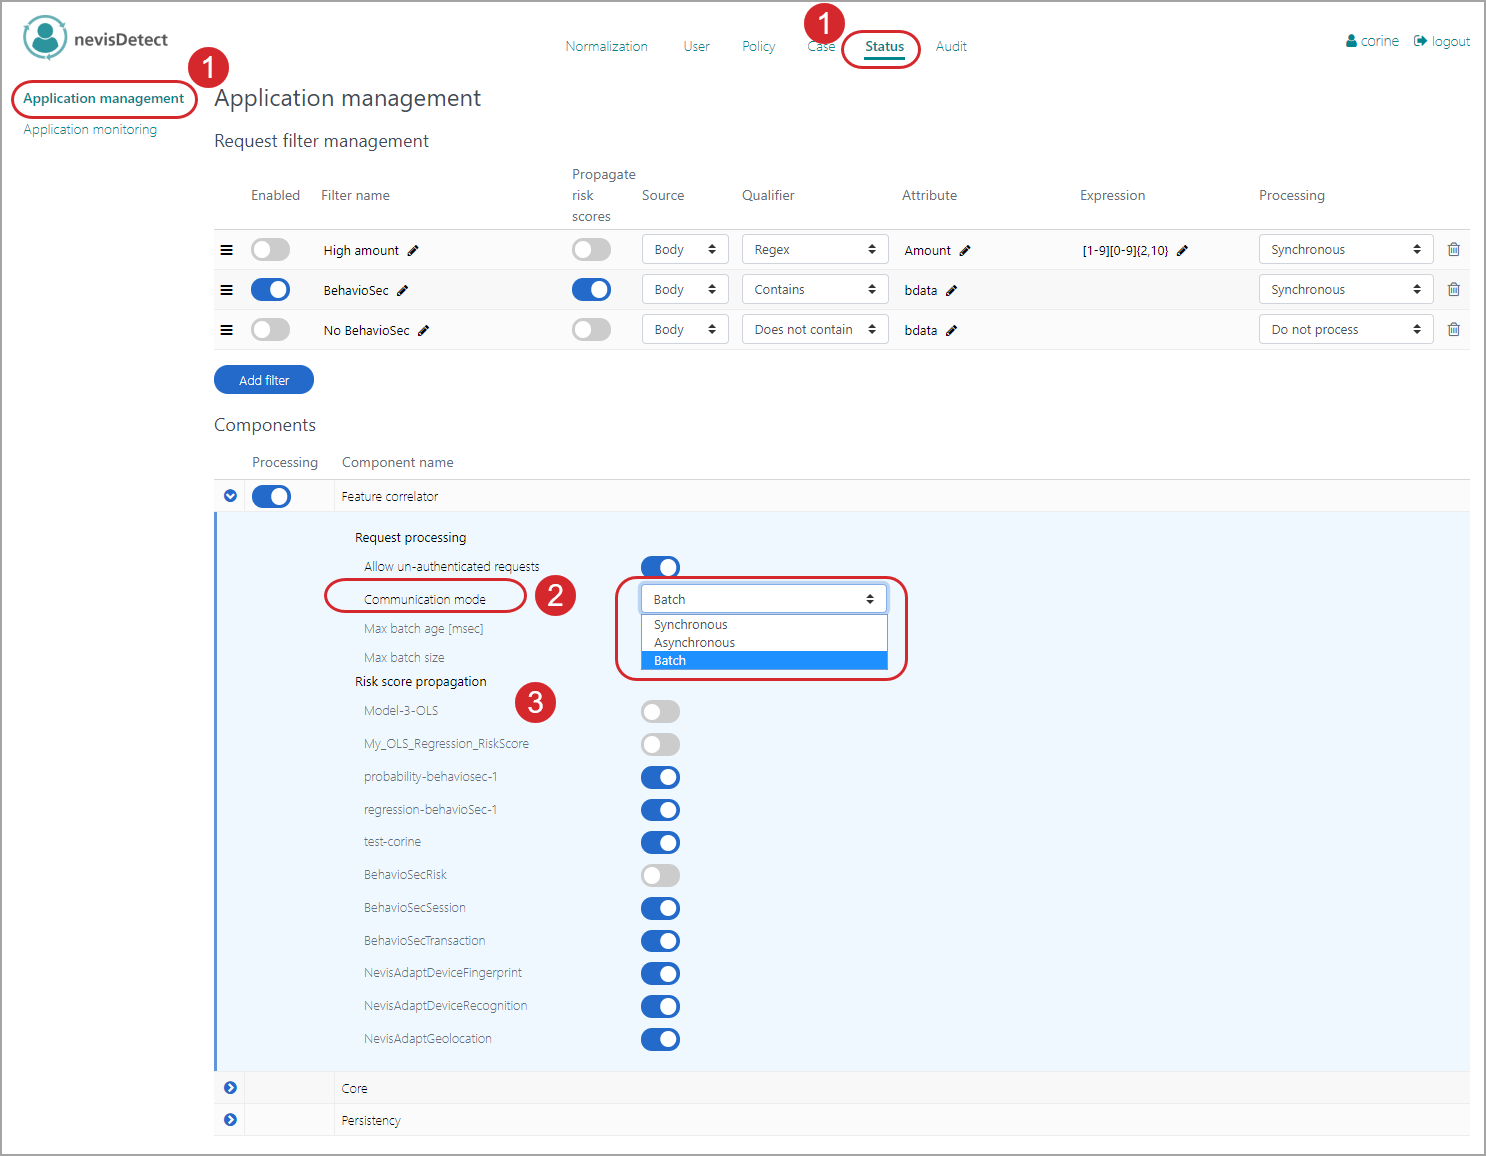
Use case: Set the communication mode
Another important use case of the security expert is to set the communication mode. The communication mode defines how nevisDetect communicates with nevisProxy. If a policy classifies a user request as fraudulent, the NevisProxyActionPlugin is invoked. The communication mode specifies how and when the NevisProxyActionPlugin propagates the created rule to nevisProxy.
You set the communication mode in the Application management view. Proceed as follows, see the figure below:
To open the Application management view in the nevisDetect web application,
- Select Status from the top menu.
- Then select Application management in the navigation on the left.
You set the communication mode in the Communication mode field of the Feature correlatorcomponent entry (in the Components part of the screen). There are three options:
- In case of a "Synchronous" communication mode, nevisProxy is notified by the NevisProxyActionPlugin before the fraudulent request is passed on to the application in the back end. The request will be blocked.
- In the "Asynchronous" communication mode, the fraudulent request is passed on to the application in the back end. nevisProxy will be notified by the NevisProxyActionPlugin in an asynchronous manner. That is, not this request, but the subsequent request of the same user will be blocked by nevisProxy.
- The "Batch" communication mode is like the "Asynchronous" mode. The only difference is that due to performance optimization a batch of requests will be processed together.
You can also specify which risk score (rules) are propagated to the backend. You do this in the Risk score propagation list, by enabling the respective risk score.
For more information on the Application management view, see chapter Status section.