Out-of-Band Registration Client Code Examples
As mentioned in Out-of-Band Registration, one way of performing an out-of-band registration is by using a QR code. Information, such as a token, is transmitted from a laptop to a mobile device by scanning a QR code.
This section describes how to build a web application that uses a QR code for registration. It is assumed that the registration application is protected in the same realm/domain as the nevisFIDO Dispatch Registration Token service. Furthermore, Nevis is configured to transmit the SecToken to the registration application once the user is authenticated. The JavaScript snippets below use the jQuery library.
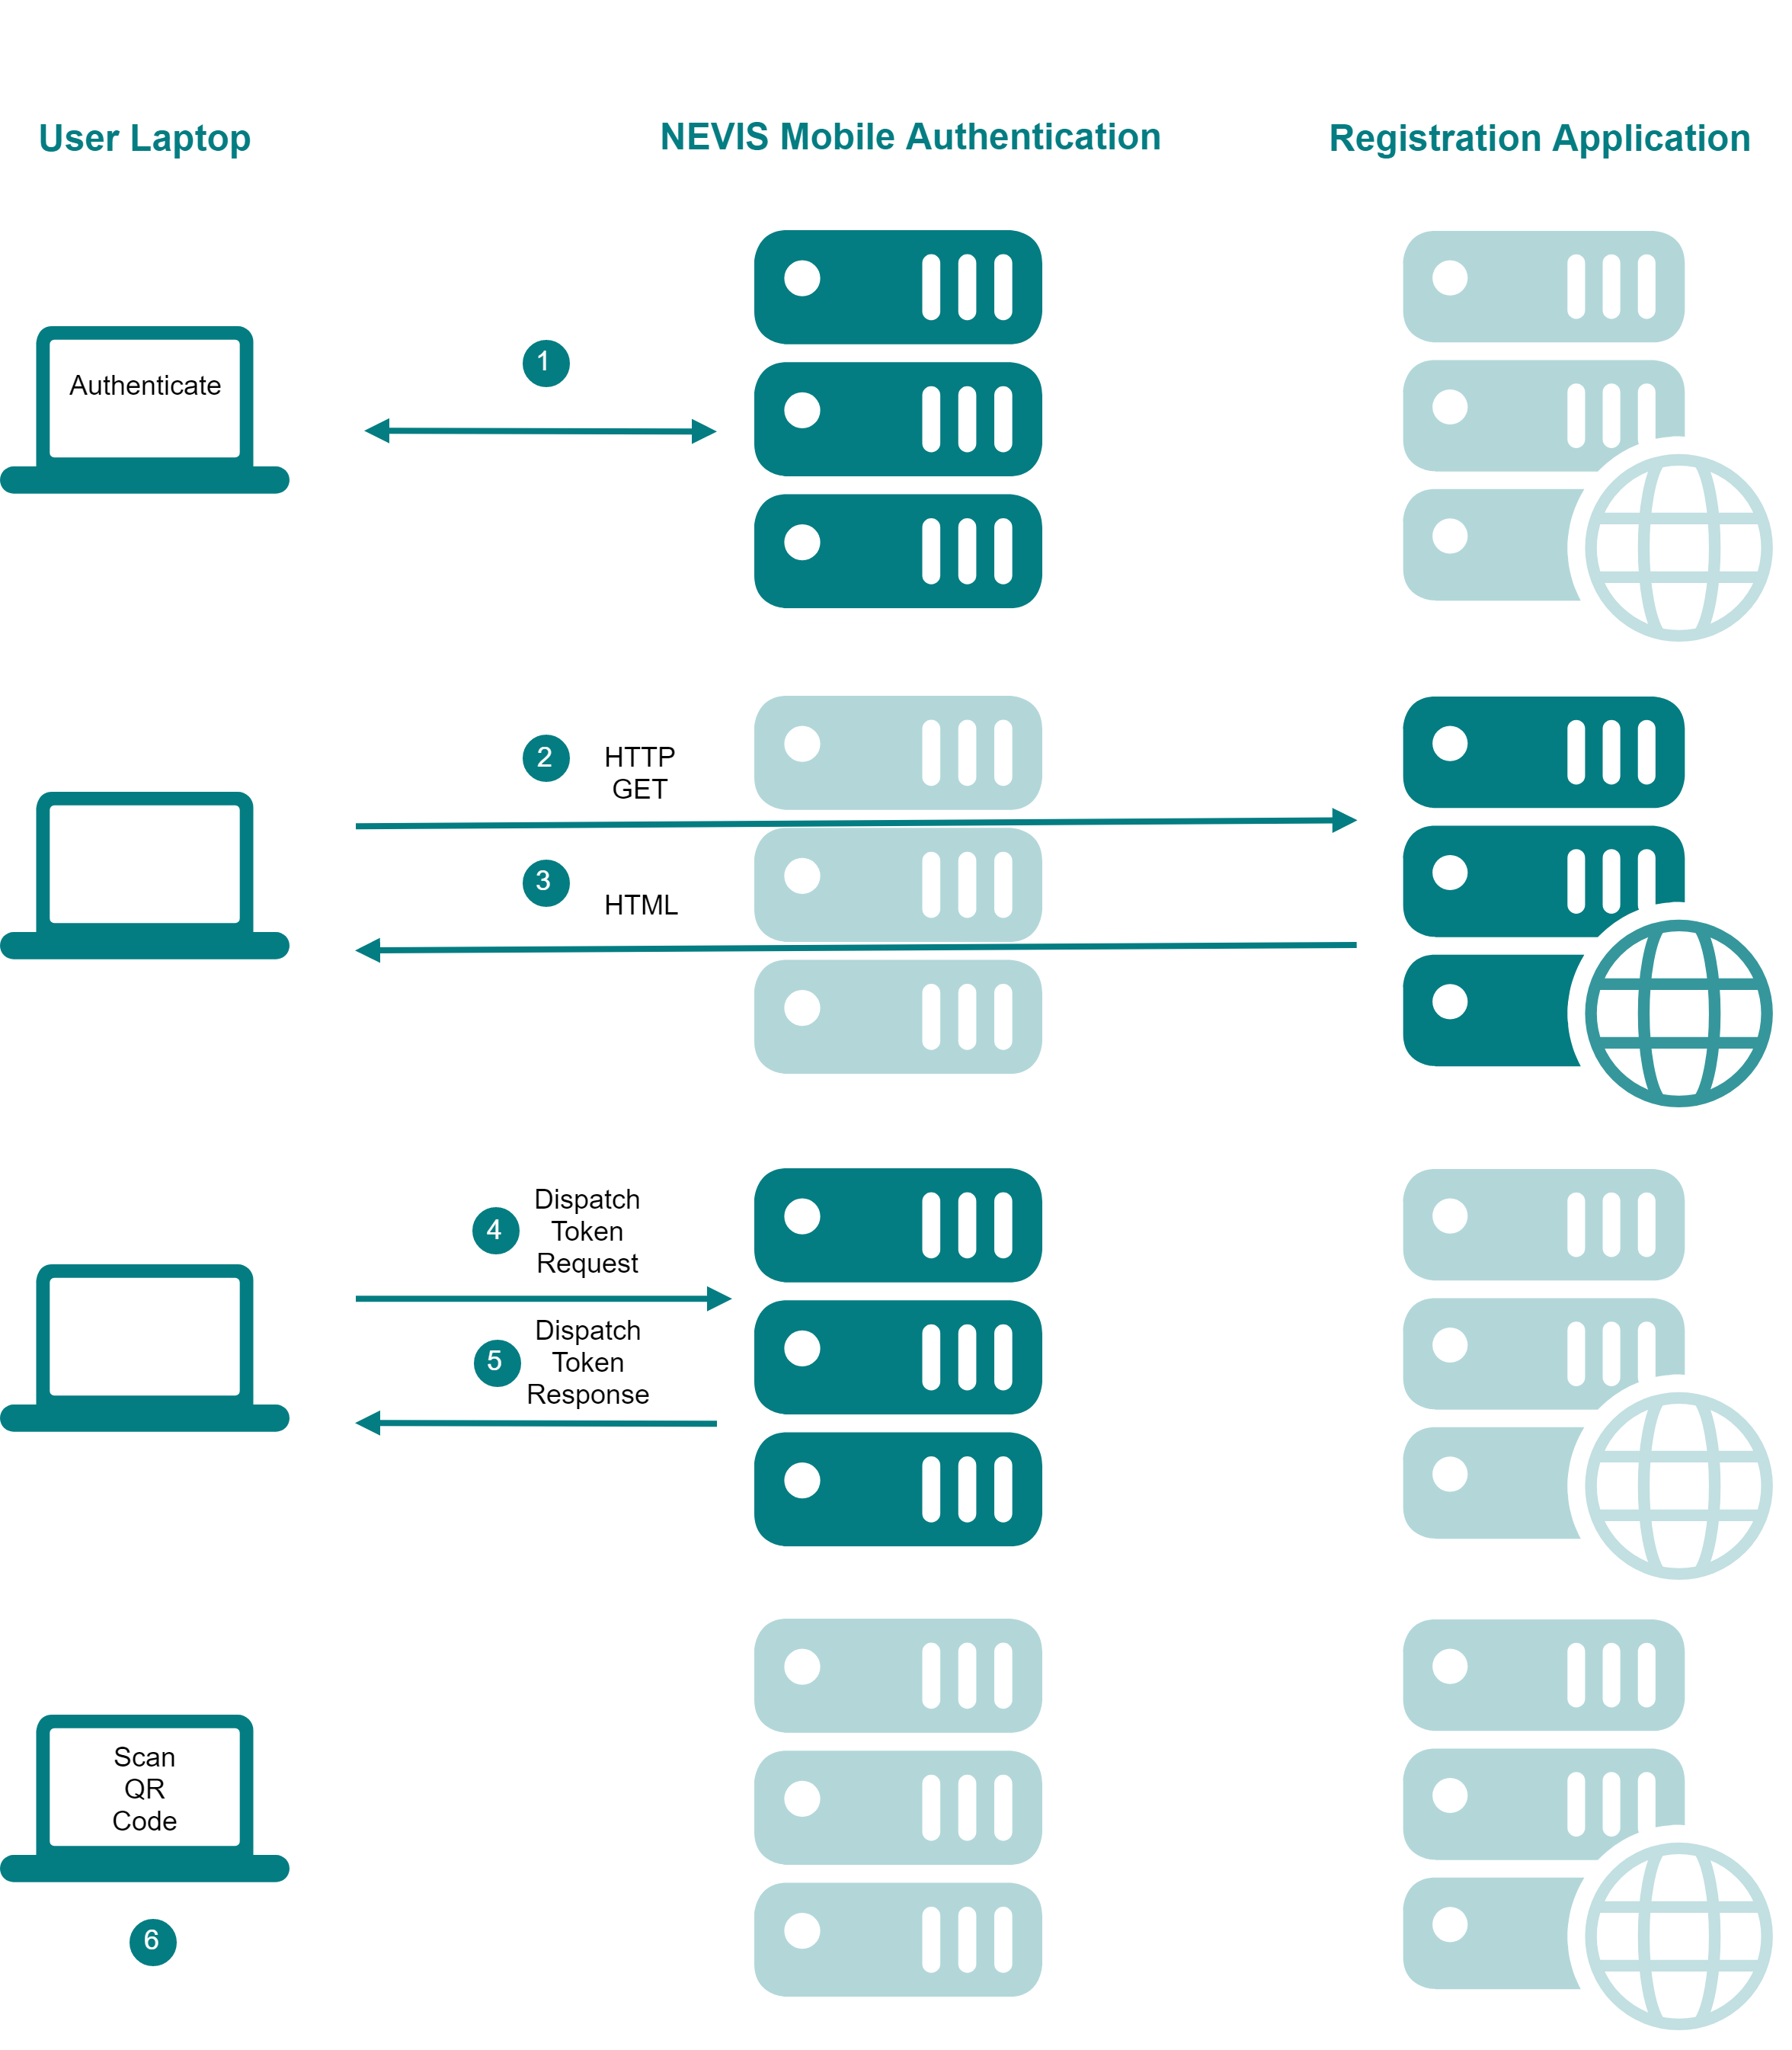
The application works as follows (the numbers in the description below correspond with the numbers in the next figure:
The client authenticates using a web browser and a laptop. Note that this is a legacy login, not the Nevis Mobile Authentication login.
The client accesses the registration application. In terms of the HTTP protocol, this typically is a GET operation.
The HTTP request to the registration application contains a SecToken. The registration application parses the SecToken to extract the username to authenticate.The registration application returns an HTML page containing:
- the username,
- the dispatch registration token URL,
- the status service URL, and
- JavaScript code. Click here for a sample configuration of the HTML page.
After loading the HTML page, the JavaScript sends a Dispatch Registration Token request. The dispatcher used is the QR Code Dispatcher, which returns the contents to be scanned inside a QR code. For this, it uses the dispatch registration token URL and the username from the HTML page.
Click here for a JavaScript example of how to create the Dispatch Registration Token request.Nevis returns the Dispatch Registration Token response with the QR code.
The JavaScript parses the response with the token and renders the QR code returned by nevisFIDO.
Click here for a JavaScript example of how to render the returned QR code.The user uses a FIDO enabled application in the mobile phone to scan the QR code, redeem the token and proceed with the registration.
Note that after sending the Dispatch Registration Token request, the JavaScript can invoke the Status Service for information on the registration status. The Status Service helps finding out whether the user redeemed the token by scanning the QR code, and whether the registration was completed successfully. Click here for a sample configuration of the status query.
HTML Page
<html>
  <!-- ... -->
  <body>
    <form>
      <!-- ... -->
      <input id="dispatchTokenUrl" type="hidden" value="https://www.siven.ch/nevisfido/token/dispatch/registration"/>
      <input id="statusUrl" type="hidden" value="https://www.siven.ch/nevisfido/status"/>
      <input id="username" type="hidden" value="jeff"/>

      <div id="qrCode" style="height:300px"></div>
    </form>
    <!-- ... -->
    <script th:src="@{/webjars/jquery/3.3.1/jquery.min.js}"></script>
    <script type="application/javascript">
    /**
     * Start the registration process after the document is loaded
     */
    $( document ).ready(function () {
      sendDispatchRegistrationTokenRequest();
    });
    <!-- ... -->
    </script>
  </body>
</html>
Send Dispatch Registration Token Request
function sendDispatchRegistrationTokenRequest() {
    var username = $('#username').val();
    var getUafRequest = {
        op: "Reg",
        context: JSON.stringify({username: username})
    };
    var dispatchTokenRequest = {
        dispatcher: "png-qr-code",
        getUafRequest: getUafRequest,
        dispatchInformation: {
            encodingParameters: {
                width: 300,
                height: 300,
                foregroundColor: "rgb(4, 125, 130)",
                backgroundColor: "rgb(255, 255, 255)"
            }
        }
    };
    var dispatchTokenUrl = $('#dispatchTokenUrl').val();

    var stringifiedBody = JSON.stringify(dispatchTokenRequest);
    jQuery.ajax({
        'type': 'POST',
        'url': dispatchTokenUrl,
        headers: {
            'Accept' : 'application/json; charset=utf-8',
            'Content-Type': 'application/json; charset=utf-8'
        },
        'data': stringifiedBody,
    }).done(function (data) {
        dispatchRegistrationTokenCallback(data);
    }).fail(function () {
        // Handle the error
    });
    return status;
}


function dispatchRegistrationTokenCallback(data) {
    var pngQrCode = data['dispatcherInformation']['response'];
    renderQrCode(pngQrCode);
}
QR Code Generation
/**
 * Render the registration QR code.
 * @param pngQrCode the QR code in PNG format
 */
function renderQrCode(pngQrCode) {
    let imageAsHtml = '<img src="data:image/png;base64,' + pngQrCode +
        '" alt="Scan the QR code to trigger the registration process in your mobile device." />';
    $('#qrCode').html(imageAsHtml);
}
Status Query
/**
 * Query the current registration operation status
 * @returns {string} the status
 */
function queryRegistrationStatus(sessionId) {
    var stringifiedBody = JSON.stringify({sessionId: sessionId});
    jQuery.ajax({
        'type': 'POST',
        'url': $('#statusUrl').val(),
        headers: {
            'Accept' : 'application/json; charset=utf-8',
            'Content-Type': 'application/json; charset=utf-8'
        },
        'data': stringifiedBody,
    }).done(function (data) {
        statusResponseCallback(data);
    })
    .fail(function () {
        // Handle error
    });
    return status;
}


function statusResponseCallback(data) {
    var status = data['status']
    if (status == 'succeeded') {
        // Registration was successful
    } else if (status == 'clientRegistering') {
        // The token was redeemed
    } else if (status == 'failed') {
        // Registration failed
    } else if (status == 'tokenCreated') {
        // Waiting for token to be redeemed (has the user scanned it?)
    }
}