Integrating the JavaScript Client Application in Out-of-Band Login Flows
To enable integration of out-of-band login flows, a JavaScript application library must be provided to browser clients that interact with Nevis Mobile Authentication. The Nevis component that provides the JavaScript library is nevisLogRend.
This section describes the configuration and integration steps required to integrate the JavaScript library in a login application.
The JavaScript Login Application is considered an experimental feature. It is prone to change in future releases, with no ensured backwards compatibility.
Installation
The JavaScript library is distributed within the nevisFIDO client RPM delivery. It is installed at /opt/nevisfidocl/nevislogrend/lib/nevisMobileAuthLogin.js.
Configuration
The JavaScript application, once integrated, can be configured at initialization time. That is, when init() is called. See the following section for the integration instructions. The configuration options are documented in detail in the nevisFIDO Reference Guide.
Integration in the nevisLogRend Login Application
To integrate the library for out-of-band login in nevisLogRend, perform the following configuration steps:
- Copy the JavaScript library to the js resources directory of a nevisLogRend instance. The example below shows the path of the default nevisLogRend instance:
cp /opt/nevisfidocl/nevislogrend/lib/nevisMobileAuthLogin.js /var/opt/nevislogrend/default/data/applications/def/webdata/js/nevisMobileAuthLogin.js
- In the default.vm Velocity template of the same nevisLogRend instance, include the nevisMobileAuthLogin.js JavaScript library and snippet at the end of the page body, to make it available to integrators. The path to the default.vm file is /var/opt/nevislogrend/default/data/applications/def/webdata/template/default.vm.
<script src="${login.appDataPath}/js/nevisMobileAuthLogin.js"></script>
<script type="text/javascript">#[[
document.addEventListener("DOMContentLoaded", function (event) {
    var authLogin = nevisMobileAuthLogin();
    authLogin.init({autoSubmit: true});
});
]]#</script>
In the above snippet, the statement authLogin.init({...}); is where configuration options may be passed to the library.
- Also in the default.vm template, remove the following code block (near the bottom):
#if ($isAjaxRequest)
    $response.setStatus(401)
    $response.setHeader("WWW-Authenticate","$gui.domain")
#end
Integration in nevisAuth
You can use an AuthGeneric AuthState to generate the information required by the nevisMobileAuthLogin.js library. Have a look at the sample nevisAuth configurations further below.
In order for the client-side JavaScript code to be executed upon rendering of the login form, the name of the form must match the formDomSelector configuration attribute of the login library.
In the below configuration snippets (which reflect the default configuration), the name of the form (GUI) is "oobloginform":
nevisAuth Configuration
<Gui name="oobloginform">
This is reflected by the login library attribute:
login library configuration
formDomSelector: "form[name=oobloginform
Out-of-band Mobile Authentication as first factor
When the out-of-band mobile authentication is used as the first authentication factor, the configuration contains one AuthState, SubmitUsername, where the user provides the user identifier. The second AuthState, SubmitOutOfBandParameters, renders a number of hidden fields read by the nevisMobileAuthLogin.js. The OutOfBandFidoUafAuthState then consumes the usernames posted by the JavaScript client. This is implied by the configuration of the property fidoUafUsername, which is set to "${inargs:o.username.v}".
nevisAuth Configuration
[...]
    <Domain name="OOB_FIDO_UAF" default="false" reauthInterval="0" inactiveInterval="1800">
      <Entry method="authenticate" state="SubmitUsername" />
    </Domain>
[...]
    <AuthState name="SubmitUsername" class="ch.nevis.esauth.auth.states.standard.AuthGeneric">
        <ResultCond name="default" next="SubmitOutOfBandParameters" />
        <ResultCond name="error" next="AuthError" />
        <ResultCond name="failed" next="AuthError" />
        <Response value="AUTH_CONTINUE">
            <Gui name="submitusername" label="Login">
                 <GuiElem name="isiwebuserid" type="text"   label="userid.label"          value="${notes:loginid}" />
                 <GuiElem name="submit"       type="button" label="continue.button.label" value="continue" />
            </Gui>
        </Response>
    </AuthState>
    <AuthState name="SubmitOutOfBandParameters" class="ch.nevis.esauth.auth.states.standard.AuthGeneric">
        <ResultCond name="default" next="ExampleOutOfBandFidoUafAuthState" />
        <ResultCond name="error" next="AuthError" />
        <ResultCond name="failed" next="AuthError" />
        <Response value="AUTH_CONTINUE">
            <Gui name="oobloginform">
                <GuiElem name="isiwebuserid" type="text" value="${inargs:isiwebuserid}" optional="true" />
                <GuiElem name="redeemUrl"    type="hidden" value="https://www.siven.ch/nevisfido/token/redeem/authentication" optional="true" />
                <GuiElem name="submit"       type="button" label="continue.button.label" value="continue" optional="true" />
            </Gui>
        </Response>
    </AuthState>
    <AuthState class="ch.nevis.auth.fido.uaf.authstate.OutOfBandFidoUafAuthState" final="false" name="OutOfBandFidoUafAuthState">
        <ResultCond name="dispatchFailed" next="DispatchFailed"/>
        <ResultCond name="error" next="AuthError"/>
        <ResultCond name="failed" next="OOBFIDOAuthFailed"/>
        <property name="fidoUafUsername" value="${inargs:o.username.v}"/>
        <property name="fidoUafServerUrl" value="https://localhost:9443/nevisfido"/>
        <property name="fidoUafTransactions" value="${inargs:o.transaction.v}"/>
    </AuthState>
[...]
Out-of-band Mobile Authentication as second factor
There is an important distinction to be made when the out-of-band mobile authentication is used as the second authentication factor. In this case, the source of the username must not be the user agent (that is, the JavaScript plug-in). Instead, the username must come from the session, where the first factor authentication has already stored the name.
The following configuration shows how to achieve this:
nevisAuth Configuration
[...]
    <Domain name="OOB_FIDO_UAF" default="false" reauthInterval="0" inactiveInterval="1800">
      <Entry method="authenticate" state="FirstFactor" />
    </Domain>
[...]
    <AuthState name="SubmitOutOfBandParameters" class="ch.nevis.esauth.auth.states.standard.AuthGeneric">
        <ResultCond name="default" next="ExampleOutOfBandFidoUafAuthState" />
        <ResultCond name="error" next="AuthError" />
        <ResultCond name="failed" next="AuthError" />
        <Response value="AUTH_CONTINUE">
            <Gui name="oobloginform">
                <GuiElem name="isiwebuserid" type="text" value="${session:ch.nevis.session.loginid}" optional="true" />
                <GuiElem name="redeemUrl"    type="hidden" value="https://www.siven.ch/nevisfido/token/redeem/authentication" optional="true" />
                <GuiElem name="submit"       type="button" label="continue.button.label" value="continue" optional="true" />
            </Gui>
        </Response>
    </AuthState>
    <AuthState class="ch.nevis.auth.fido.uaf.authstate.OutOfBandFidoUafAuthState" final="false" name="OutOfBandFidoUafAuthState">
        <ResultCond name="dispatchFailed" next="DispatchFailed"/>
        <ResultCond name="error" next="AuthError"/>
        <ResultCond name="failed" next="OOBFIDOAuthFailed"/>
        <property name="fidoUafUsername" value="${session:ch.nevis.session.loginid}"/>
        <property name="fidoUafServerUrl" value="https://localhost:9443/nevisfido"/>
        <property name="fidoUafTransactions" value="${inargs:o.transaction.v}"/>
    </AuthState>
[...]
Note that compared to the first factor example, there is no need for any generic AuthState to post the username in the above example. We can simply reference the existing loginid from the session (see "${session:ch.nevis.session.loginid}"), in both the SubmitOutOfBandParameters and the OutOfBandFidoUafAuthState AuthStates.
Login Flow
The following flow illustrates the communication between Nevis and the User Agent (the browser).
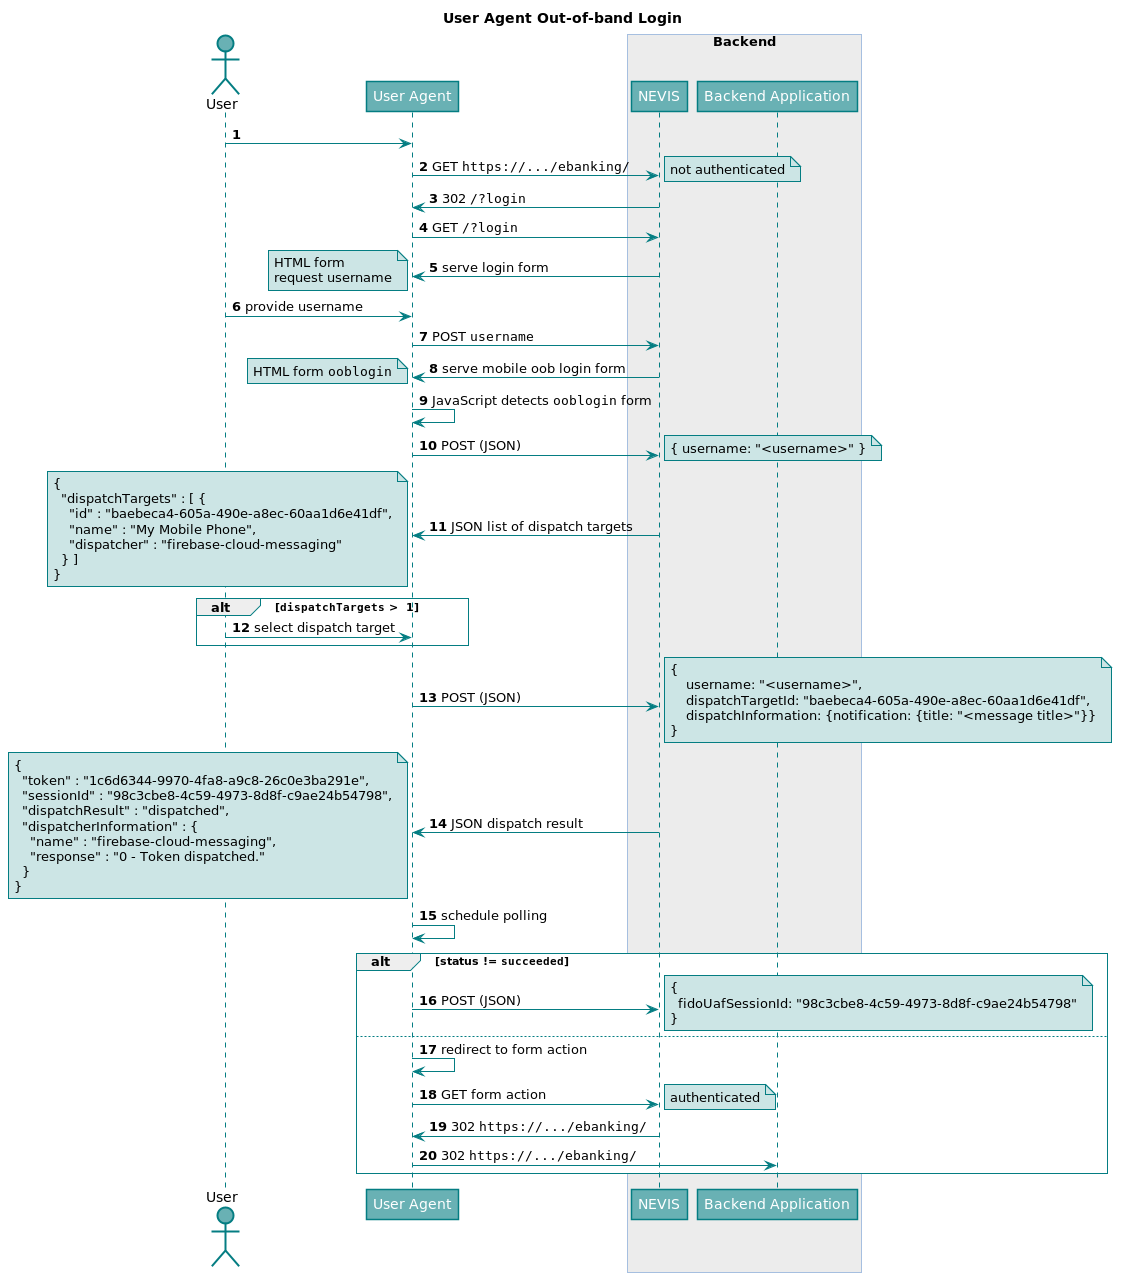
The steps in the previous figure have the following meaning (the numbers in the list below correspond with the numbers in the figure):
- The user opens a browser (called User Agent in the figure) and visits a protected application.
- The User Agent requests the protected application.
- Nevis sends a HTTP 302 redirect to the login page.
- The User Agent requests the login page from Nevis.
- Nevis provides the login page containing the (static) login form.
- The user enters his username and submits the form.
- The User Agent posts the username to Nevis.
- Nevis provides the out-of-band login form.
- The JavaScript login application detects the form based on its name and is initialized.
- The login application posts the username to Nevis (if autoSubmit is set to true).
- Nevis returns a JSON containing the list of available dispatch targets for the given username.
- The user selects the desired dispatch target (if more than one is available).
- The login application posts the selected dispatch target along with the username and the push message title.
- Nevis returns the dispatching result.
- The login application starts polling Nevis for the current authentication status.
- The login application posts the FIDO UAF session ID to query the current authentication status.
- On authentication success, the login application redirects to the form action.
- The User Agent requests the current form action to complete authentication.
- Nevis sends a HTTP 302 redirect to the originally requested page.
- The User Agent forwards the user to the protected application.