Integration
This chapter discusses various aspects of integrating nevisIDM with other Nevis components such as nevisProxy, nevisAuth, nevisAdmin, etc.
Establishing trust between components
To establish trust between nevisIDM and nevisAuth, the nevisIDM login module must trust the nevisAuth certificate. The sections below describe how to achieve this for the standalone deployment and the adnwildfly deployment.
Standalone deployment
In case of a standalone deployment, you establish trust between nevisIDM and nevisAuth by setting the truststore in the file nevisidm-prod.properties:
server.auth.ninja.truststore=/var/opt/neviskeybox/default/nevis/truststore.jks
adnwildfly deployment
In case of an adnwildfly deployment, you configure trust in the file standalone.xml. You can edit this file with the following cli command:
nevisidm config server
The Signer Certificate is configured in the section login-module. Make sure that the certificate points to the right truststore:
<login-module code="ch.nevis.ninja.jboss.auth.NinjaJbossLoginModuleImpl" flag="required" module="ch.nevis.ninja">
 <module-option name="NevisSignerCertificate" value="/var/opt/neviskeybox/default/nevis/truststore.jks"/>
  <module-option name="UserGetter" value="AttributeUserGetter(source=loginId)"/>
 <module-option name="AdjustIdentity" value="true"/>
 <module-option name="LogDebug" value="false"/>
 <module-option name="RoleGetters" value="ch.nevis.ninja.commons.mapping.StaticRoleGetter, ch.nevis.ninja.commons.mapping.TokenRoleGetter"/>
</login-module>
Installing nevisAuth and nevisIDM on different machines
To integrate nevisIDM into nevisAuth, you need to install the package nevisidmcl on the nevisAuth machine. See the following command:
Linux: rpm -i <nevisidmcl-RPM>
After you have entered this command, no instance will be available yet, but nevisAuth will detect the package and load its libraries automatically. This happens during the creation of a new nevisAuth instance based on the nevisIDM server URL variable IDM_SERVER_1_URL. You will need to configure the location of nevisIDM in the nevisAuth state, too.
Mapping nevisIDM under a URL
The default setup of nevisIDM with nevisProxy maps nevisIDM directly under -/nevisidm/. However, nevisIDM is implemented as a proxy-aware application and could also be mapped to /nevis/nevisidm/.
A small workaround is required, however, as the javascript library DWR v2 used by nevisIDM is not completely proxy-aware. A simple rewrite directly performed by the servlet connector in nevisProxy nevertheless enables integration of nevisIDM under a different URL. Add the following parameters to the nevisIDM servlet connector in nevisIDM and restart nevisProxy:
- name: AutoRewrite
- value: "on"
- name: ResponseRewrite.IgnoreInlineJS
- value: "true"
- name: ResponseRewrite.JavaScriptRegexps
- value:
^.*=\s*\'](/nevisidm)/admin/dwr\']\s*$
- value:
- name: RewriteBufferSize
- value: "750000"
Additionally, with nevisIDM 2.23.0.0 and newer, we supply a default internal application filter (DwrJsContentTypeFilter) to make sure that all javascript files dynamically generated by DWR v2 hold the correct content type.
Limitations for integration with nevisProxy
nevisProxy offers WAF filters that are not compatible with dynamic web applications using JavaScript. This includes the nevisIDM web GUI. Specifically, nevisIDM does not support the following nevisProxy filters:
- ch::nevis::isiweb4::filter::validation::CSRFFilter
- ch::nevis::isiweb4::filter::validation::EncryptionFilter
For CSRF protection, customers are advised to use the built-in CSRF protection capabilities of nevisIDM (see the next section for details). However, no equivalent functionality is available for the additional protections provided by the EncryptionFilter.
Configuring CSRF protection for the nevisIDM Web GUI
As of nevisIDM 2.66, the nevisIDM web GUI offers built-in protection against CSRF attacks. To ensure that the web GUI continues to function correctly, also adjust the nevisProxy configuration.
nevisProxy integration
When using the web GUI, an alert might pop up with the message: OWASP CSRFGuard JavaScript was included from within an unauthorized domain!. If this is the case, configure a new nevisProxy RewriteFilter, to rewrite the backend URL of nevisIDM to the frontend URL of nevisProxy. Proceed as follows:
Use the following sample code for the configuration of the new RewriteFilter. The system automatically transfers the part
ENV\:HTTP_Host;into the nevisProxy frontend hostname.Do not change any special character, such as
"and:and:PT, in the sample code. Otherwise, the code may not work correctly.<filter>
<filter-name>Nevis_IdmCSRFConfigFilter</filter-name>
<filter-class>::ch::nevis::isiweb4::filter::rewrite::RewriteFilter</filter-class>
<init-param>
<param-name>ResponseBody</param-name>
<!-- Replace nevisidm.internal.example.local with the nevisIDM hostname -->
<param-value>PCRE/(if\s?\(isValidDomain\(document.domain,).*$/:$1(function(h) { var i = h.indexOf("\:"); return h.substring(0, i != -1 ? i \: h.length) })("ENV\:HTTP_Host;"))) {:PT</param-value>
</init-param>
<init-param>
<param-name>ResponseBody.Mode</param-name>
<param-value>replacement</param-value>
</init-param>
</filter>Ensure that /nevisidm/JavaScriptServlet uses the same identity creation filter (IdentityCreationFilter) and session management as the nevisIDM web GUI.
Additionally, map the previously created filter to /nevisidm/JavaScriptServlet:
<filter-mapping>
 <filter-name>Nevis_IdmCSRFConfigFilter</filter-name>
 <url-pattern>/nevisidm/JavaScriptServlet</url-pattern>
</filter-mapping>
Disabling
As of nevisIDM 2.67.1, it is possible to disable the built-in CSRF protection in nevisIDM. You do this in the nevisidm-prod.properties configuration file, by setting the parameter security.web.csrf.enabled to "false" (see also Configuration files).
This is not recommended and dramatically weakens the security of your system, as nevisIDM administrators are now susceptible to CSRF attacks! If the CSRF protection is disabled, ensure there are other (transparent) protections configured on the WAF to protect nevisIDM against CSRF.
Integration of nevisIDM SOAP interface
Versioning of the SOAP interface
There was no minor versioning of the SOAP interface before nevisIDM 2.14.x because nevisIDM used a restrictive strategy for new features to guarantee backward compatibility:
- never remove an existing method
- never remove existing objects or existing attributes of objects
Thus, new features always resulted in an extension of the current interface and web service clients using the interface simply ignored the new methods, objects, or attributes of the response if they were implemented based on an older interface. This former definition of "backward compatibility" was, however, not bulletproof. If a web service client performs a schema validation of the SOAP response, the interface extension would cause the validation to fail. That is why the minor versioning of the interface has been published.
The table below shows available SOAP interface versions aligned with the nevisIDM version they have been released with:
| SOAP interface version | nevisIDM version |
|---|---|
1.34 and earlier: SOAP interface versions <1.35 are deprecated. | Removed since 2.69.0.0 |
| 1.35 | 2.52 |
| 1.36 | 2.55 |
| 1.37 | 2.57 |
| 1.38 | 2.64 |
| 1.39 | 2.65 |
| 1.40 | 2.66 |
| 1.41 | 2.67 |
| 1.42 | 2.70 |
| 1.43 | 2.72 |
| 1.44 | 2.75 |
The version v1 always maps to the latest SOAP version. Nevertheless, it is recommended that you use a fix SOAP version for clients. This is because the schema may be extended in the latest version, which could break the schema validation on the client.
All minor versions of the SOAP interface have their own namespace as well as a separate location (servlet mapping), where the respective SOAP interface is exposed and accessible. Every nevisIDM instance will expose the SOAP interface for all minor versions.
Note that only the admin and selfadmin SOAP interface is minor versioned. The login interface, which is only used by nevisAuth internally, has no minor versioning because nevisAuth does not perform any schema validation of the SOAP response.
URL mappings
The following URL mappings are provided for the different versions of the SOAP interface.
Admin interface
nevisidm/services/<version>/AdminService: direct URL to the respective interface version. When implementing new web service clients, use these version-based URLs.nevisidm/services/v1/AdminService: always points to the latest version of the SOAP interface (published in the namespaceservices/v1instead ofservices/<latest version>). Used for nevisIDM auth states only.
Hints to write custom nevisIDM auth states:
- new state should extend IdmAuthStateBase
- new state should call the following method to get the admin service: ch.adnovum.nevisidm.ws.services.v1.AdminService getAdminService()
SelfAdmin interface
nevisidm/services/<version>/SelfAdminService: direct URL to the respective interface version. When implementing new web service clients, use these version-based URLs.nevisidm/services/v1/SelfAdminService: always points to the latest version of the SelfAdmin SOAP interface (published in the namespaceservices/v1instead ofservices/<latest version>). Not recommended for production usage.
Login interface
nevisidm/services/v1/LoginService: only available URL for the login interface as there is no minor versioning on the login interface. Note that this interface is only for internal Nevis use and has no public contract, i.e., it might be modified and breaking backward compatibility.
In all of the above URLs, <version> refers to the minor version of the corresponding SOAP interface. The point in the version number is replaced by an underscore and the string is prefixed with "v", e.g., "1.43" as version means that <version> should be replaced with "v1_43". The interface definition (WSDL file) can be retrieved by accessing the interface with the parameter wsdl. For example: nevisidm/services/v1_43/AdminService?wsdl&login
If you get the WSDL file dynamically from the nevisIDM server, by default, the schema location refers to the localhost instead of the host used in the request. If you want the schema location to refer to the host in the request, you have to set the JBOSS_BIND_ADDRESS environment variable accordingly:
nevisidm config env
JBOSS_BIND_ADDRESS=<hostname>
nevisidm restart
Integration with nevisAuth
The configuration of nevisIDM auth plug-ins ) in nevisAuth should point to the following URLs:
- nevisidm/services/v1/LoginService
- nevisidm/services/v1/AdminService
Because the nevisIDM auth plug-ins are released with every nevisIDM release and thus are modified so that they use the latest SOAP interface version, the above URLs will always point to the correct version of the admin service.
For further details, refer to the nevisAuth reference guide.
Integration with nevisProxy
Accessing the nevisIDM SOAP services through nevisProxy
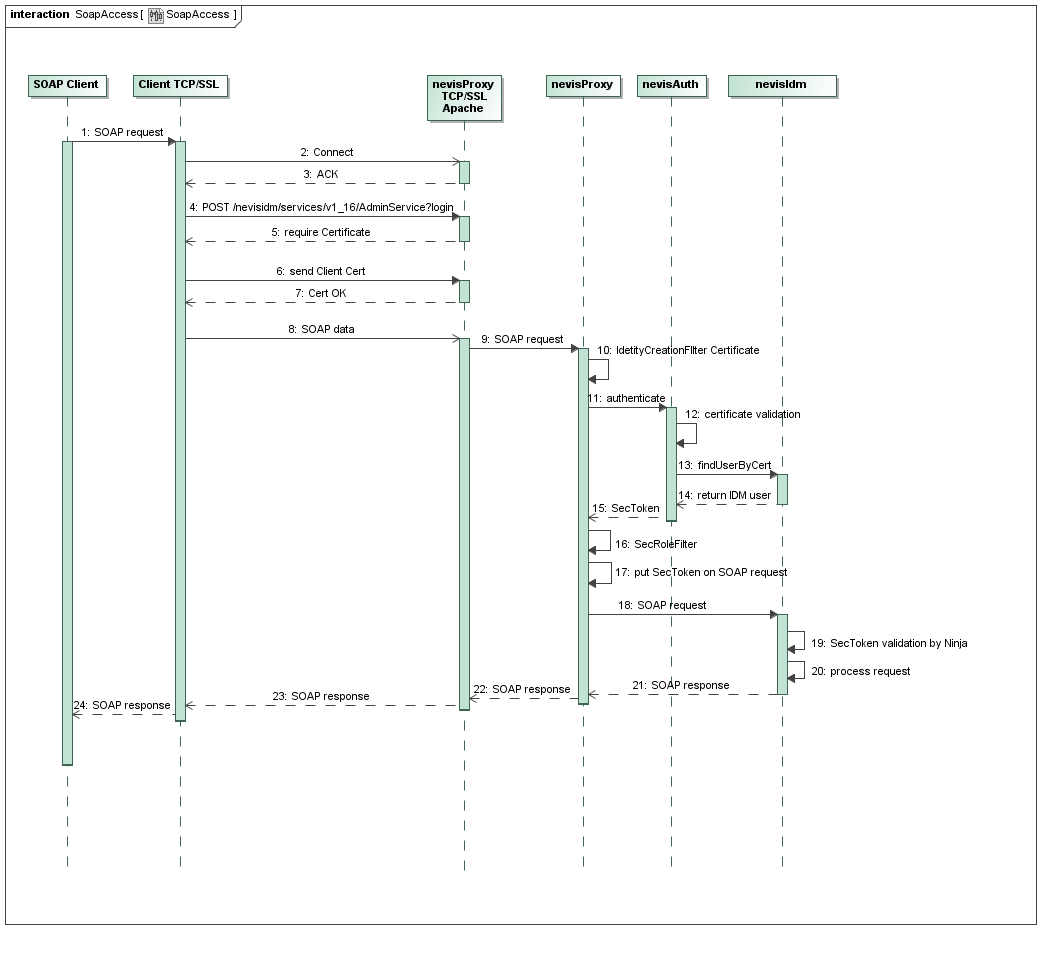
The web service can be accessed via a nevisProxy instance. We recommend using two-way TLS based on client certificates to access the SOAP interfaces with a custom web service client. Doing so, the authentication can be performed automatically by the web service client and nevisProxy/nevisAuth. Once the web service client is authenticated, nevisProxy can then automatically delegate the corresponding security token (Nevis SecToken or SAML 2.0 assertion) for verification by nevisIDM (using Ninja). Authorization for the web service interface is achieved by the nevisIDM role model.
Figure 1 below shows the exact authentication process for the 2-way-TLS configuration mentioned above.
Wrong schema locations in WSDLs
The schema location in the WSDLs of the SOAP interface are defined by the web service stack (Metro or Axis2). The web service stack cannot know of any reverse proxy in front of nevisIDM and thus uses the URLs of nevisIDM for the definition of the schema locations. As a consequence, if the WSDL files are retrieved via nevisProxy (see chapter Accessing the nevisIDM SOAP services through nevisProxy) by a web service client, the schema locations are wrong from the perspective of the client. Fortunately, nevisProxy has the toolset required to rewrite the schema location on the fly when the WSDL files are requested. Configure a rewrite filter as shown in the example below:
<filter>
 <filter-name>NevisIdmSoapWsdlRewriteFilter</filter-name>
 <filter-class>::ch::nevis::isiweb4::filter::rewrite::RewriteFilter</filter-class>
 <init-param>
 <param-name>ResponseBody</param-name>
 <param-value>
(.)schemaLocation='https?\://localhost\:8989/(.):$1schemaLocation='https\://actual.url.ch/$2:PT
(.)location='https?\://localhost\:8989/(.):$1location='https\://actual.url.ch/$2:PT
 </param-value>
 </init-param>
 <init-param>
 <param-name>ResponseBody.Mode</param-name>
 <param-value>replacement</param-value>
 </init>
 <filter-mapping>
 <filter-name>NevisIdmSoapWsdlRewriteFilter</filter-name>
 <url-pattern>/nevisidm/services/*</url-pattern>
 </filter-mapping>
Note that
- this filter will parse the body of all responses that are coming from
/nevisidm/services/*and therefore has a performance impact. actual.url.chshould be replaced with the URL that is used by the web service clients to access the web service.
Directly accessing the nevisIDM web services
If your web service client is running behind nevisProxy, it should directly access the nevisIDM web services as opposed to the description in chapter Accessing the nevisIDM SOAP services through nevisProxy. There are two alternative approaches:
- Directly call nevisIDM via 2-way TLS using a client certificate identifying a technical nevisIDM user. The additional configuration required for this approach is described in more detail in the following chapter.
- Use the SecToken to submit the SOAP request to nevisIDM by putting the SecToken in the Basic Authentication HTTP header. No additional configuration is required, as the SecToken is the default authentication option in nevisIDM and enabled by default. To obtain a valid SecToken you can:
Configuring certificate login (2-way TLS) for accessing nevisIDM web services
This section explains how to configure the access to the nevisIDM web services for a certificate-based 2-way TLS login.
For standalone deployment
The setup of 2-way TLS is simplified for the standalone deployment. If TLS is enabled, you are also able to connect via two-way TLS. You can reach the nevisIDM application via the standard path "/nevisidm/". There is no need to configure an additional servlet.
To enable TLS, set the following parameters:
server.tls.enabled=true
server.tls.keystore=PATH_TO_APP_KEYSTORE
server.tls.keystore-passphrase=PASSWORD_OF_KEYSTORE
server.tls.truststore=PATH_TO_APP_TRUSTSTORE

// Optional
server.tls.truststore-passphrase=PASSWORD_OF_TRUSTSTORE
Make sure that the CA of the client certificates is the truststore.
- Optionally, you can enforce the two-way TLS, by setting the following property in the
nevisidm-prod.propertiesconfiguration file:
server.tls.require-client-auth=true
For adnwildfly deployment
For adnwilfly, the approach is to map the client certificate provided by the client to establish the 2-way SSL connection to the certificate credential and assigned user as stored in the nevisIDM database.
Note that the CertLoginModule is used in combination with web application "nevisidmcc", which is mapped to a different context root "nevisidmcc". Therefore, you have to adapt the URLs if you want to access the nevisIDM SOAP web services per client cert. "nevisidmcc" holds exactly one servlet, the "ForwardServlet", which forwards the requests to the original web app "nevisidm". Note that the ForwardServlet is disabled by default and has to be enabled by system properties as described below.
Enable the HTTPS connector enforcing ClientAuth:
Execute the following command:
nevisidm config serverAdd a new security-domain (automatically done with new instances):
<security-domain name="NevisIDMClientCertDomain" cache-type="default">
 <authentication>
 <login-module code="ch.adnovum.nevisidm.jaas.CertLoginModule" flag="required">
 <!-- <module-option name="Debug">true</module-option> →
 </login-module>
 </authentication>
</security-domain>
Add a new https-listener to the 'default-server' subsystem (automatically done with new instances):
<subsystem xmlns="urn:jboss:domain:undertow:1.2">
 <buffer-cache name="default"/>
 <server name="default-server">
 ...
 `<http-listener name="cc-ssl" socket-binding="cc-https" security-realm="SslRealm" verify-client="required"/>
 ...
 </server>
 ...
 </subsystem>
Add a new socket-binding (automatically done with new instances):
<socket-binding-group name="standard-sockets" default-interface="public" port-offset="${jboss.socket.binding.port-offset:0}">
 ...
 <socket-binding name="cc-https" port="8443" fixed-port="true"/>
</socket-binding-group>
Enable the ForwardServlet of nevisidmcc by setting the corresponding system properties:execute "nevisidm config vmargs" and add the following two lines:
-Dch.adnovum.nevisidm.web.servlets.ForwardServlet.Enabled=true**-Dch.adnovum.nevisidm.web.servlets.ForwardServlet.ForwardPath=/services/"nevisidm restart"
Create a certificate credential for the (technical) nevisIDM user you want to use. Upload the client certificate to this certificate credential. Obviously, the client certificate has to be signed by a CA, which is part of the truststore used in step 1.
Configure your web service client to access web services using the client certificate for 2-way SSL. Adopt the web service URL to the new context root "nevisidmcc", e.g.,
https://<hostname>:<port>/nevisidmcc/services/v1/AdminService.