GUI walkthrough
The template store is a very compact section containing only the template manager that will be described next. To access the template store or the template manager respectively, click on the corresponding link in the nevisIDM navigation tree.
Template manager
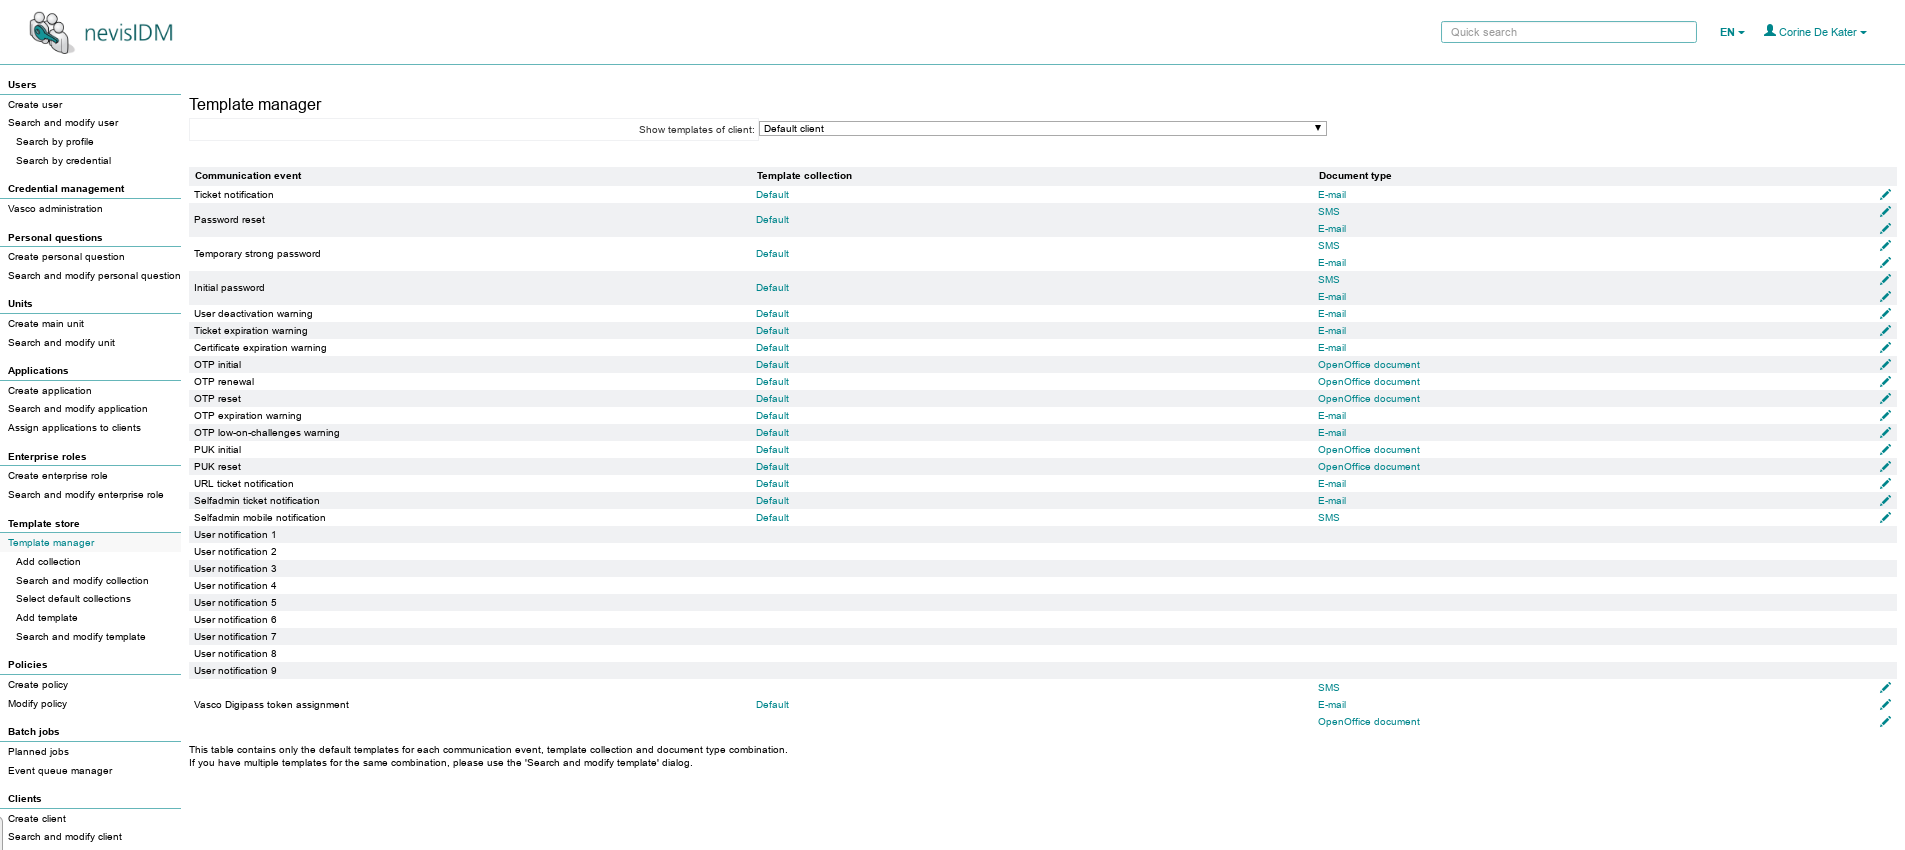
The template manager is the core function of the template administration in nevisIDM. A single table summarizes the current template collections, templates and their assignments (see the figure below).
The table lists all available communication events (first column), their associated template collections (second column) and the currently available default templates associated with each template collection. A template always has a document type (third column) and can contain template texts in one or more user languages.
The table shows only the default templates for all combinations of template collection, communication event and document type. To edit a template collection or template, click on the relevant entry in the table. Available template texts are editable by clicking on the pencil icon.
The table lists all menu items related to templates that are available in the navigation pane of the nevisIDM GUI, in the Template store section.
| Menu item | Description |
|---|---|
| Template manager | Opens the Template manager view/table. |
| Search and modify collection | Allows you to search for and modify existing template collections (see the chapter Searching for a collection. |
| Search and modify template | Allows you to search for and modify existing templates . |
| Add collection | Allows you to create a new template collection (see the chapter Adding a new collection. |
| Add template | Allows you to create a new template. |
| Select default collections | Allows you to define a default template collection for each nevisIDM client. |
The template collection management can be accessed only in case the application.feature.templatecollection.default.enabled application property is false. Otherwise only three menu items appear in the GUI in the Template store section: Template manager, Add template and Search and modify template.
Adding a new collection
It is possible to create a new template collection via the Add collection menu item. After clicking the menu item, the New collection view appears. It contains the following fields:
- Collection name (mandatory): Defines the unique name of the collection.
- Description (optional): Describes the collection.
- Client (mandatory): Defines the corresponding client.
The table describes the buttons that are available in the New collection view:
| Button label | Description |
|---|---|
| Reset | Clears the input fields. |
| Save | Validates the uniqueness of the input and creates a new template collection from the input. |

Searching for a collection
For an explanation of how to search for an existing collection, see the chapter: Search.
Modifying a collection
To modify an existing collection, first search for the collection via the Search and modify collection menu item. In the search result list, go to the entry of the relevant collection and click on the pencil icon on the right of the collection entry. This will open the Modify template collection view with the collection's attributes and their current values. Modify the collection attributes according to your wishes.
The table describes the buttons that are available in the Modify template collection view:
| Button label | Description |
|---|---|
| Back / Back to search | Leads back to the Template manager view / Collection search view. |
| Delete | Removes the collection. A confirmation dialog will be shown before the collection is actually removed. Deletion is only possible if there are no templates associated with the collection. |
| Save | Validates and saves the modified collection attributes. |
Creating a new template
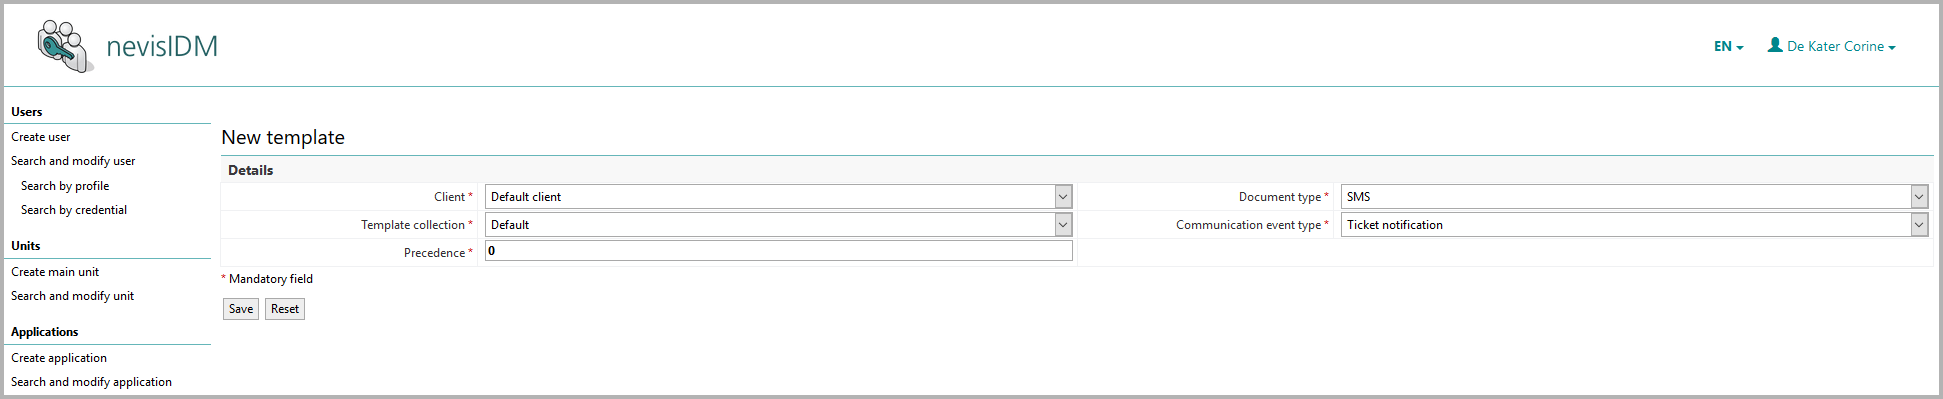
To create a new template, click on the Add template menu item in the navigation menu. The New template view appears (see the figure below).
It is possible to define multiple templates for one template collection/document type/communication event combination. In this case, the templates are differentiated by their precedence number. The template with the lowest precedence number is considered the default template.
To determine which template to use for the communication with a user, set the template's precedence number in the templatePrecedence parameter of the corresponding credential policy. If this parameter is not set, the system takes the default template.
The table describes the input fields in the New template view:
| Input field | Description |
|---|---|
| Client | Selecting a client from the drop-down list will automatically limit the available template collections to the one related with the selected client. |
| Document type | Defines the document type of the template: OpenOffice, SMS or e-mail. |
| Template collection | Defines the template collection the new template belongs to. Only the template collections assigned to the current client are available. |
| Communication event type | Defines the communication event type for which this template is used, e.g., "Password reset" or "OTP initial". Communication event types are predefined in nevisIDM. |
| Precedence | Defines the template's precedence number. It is possible to define multiple templates per template collection/document type/communication event combination (e.g., "Default" collection/"SMS" document type/"Password reset" communication event). In this case, the templates are differentiated by their precedence number. The precedence is mandatory to set. The lowest precedence denotes the default template. |
The table describes the buttons that are available in the New template view:
| Button label | Description |
|---|---|
| Reset | Clears all input fields. |
| Save | Validates the input fields and creates a new template. |
Searching for templates
For an explanation of how to search for an existing template, see the chapter: Search.
Modifying a template
There are two ways to modify a template:
- In the Template manager view, click on the link to the relevant template.
- The Template manager only lists one template per collection/document type/communication event combination, namely the default template with precedence
0. To modify a template of this combination with precedence1or higher, use the Search and modify template menu item (see below).
- The Template manager only lists one template per collection/document type/communication event combination, namely the default template with precedence
- In the navigation pane, select the Search and modify template menu item and search for the template you want to modify.
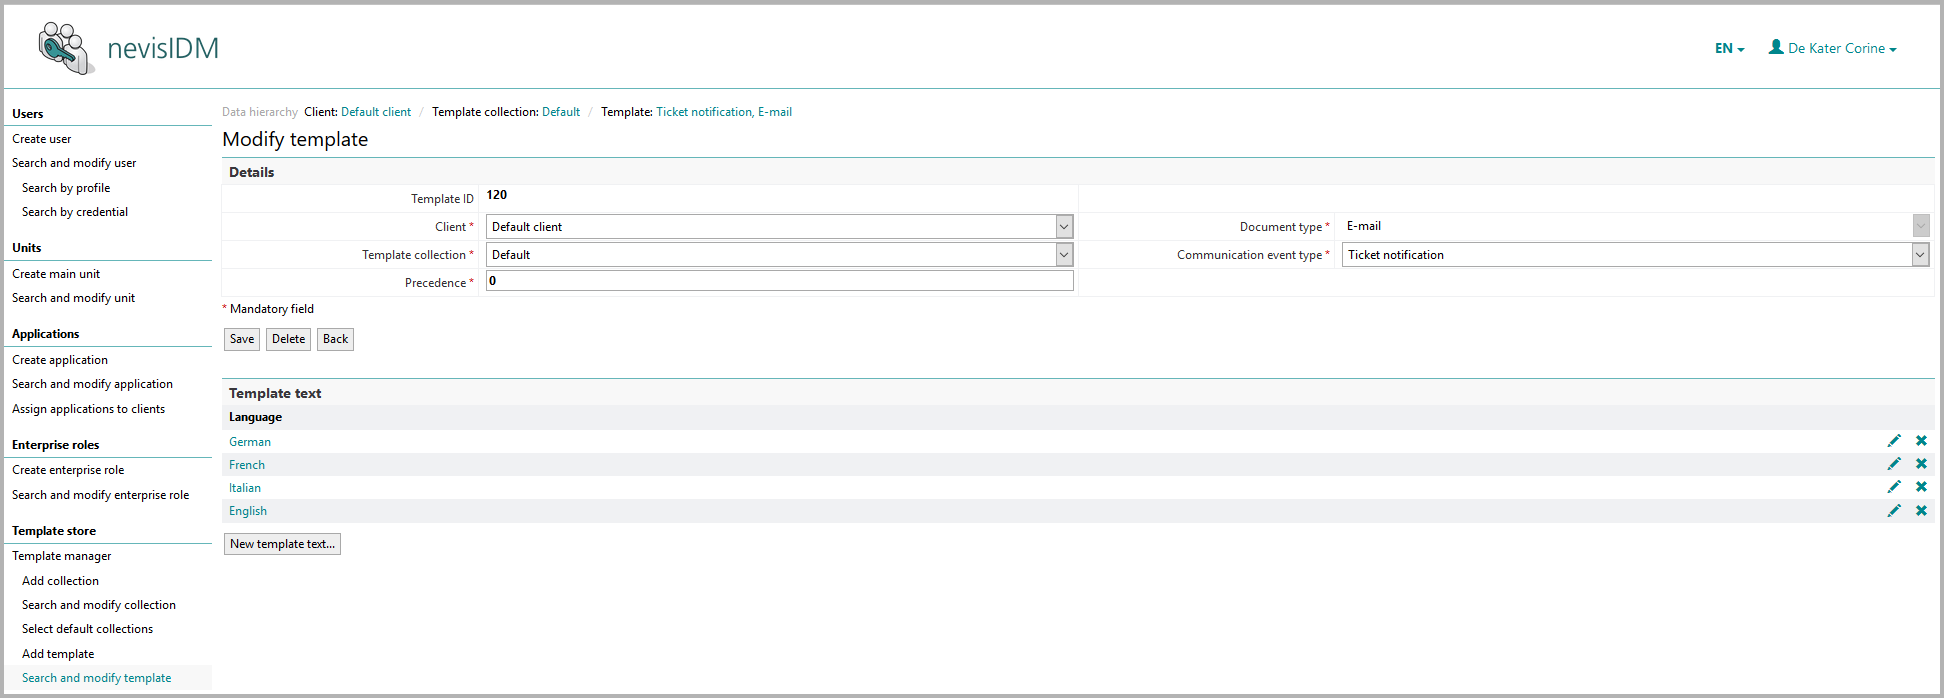
- The Modify template view looks similar to the New template view, except that all fields are filled with the current template's data. There is also one additional field, Template ID, showing the ID of the template. This field cannot be modified. For a description of the other fields in the Modify template view, see the table below.
- The Template text section of the view shows a list of languages in which this template is available. Clicking on a language name (or on the pencil icon) opens the Modify template text view with the templace text in the corresponding language (see the chapter Adding/modifying a template text). To delete a template text, click the
Xicon.
The table describes the buttons that are available in the Modify template view:
| Button label | Description |
|---|---|
| Back / Back to search | Returns to the Template manager view / Template search view |
| Delete | Deletes the template. This is only possible if there are no more template texts attached to the template. |
| New text template | Opens the view to add or modify a text template. |
| Save | Validates the input fields and saves the input data. |
Adding/modifying a template text
The view for adding or modifying template texts differs per document type (SMS, e-mail, OpenOffice document, etc.). The view contains two sections. The upper section defines the settings of the template text. It always contains the fields Template collection, Communication event type and Language. Which other fields are available depends on the document type. The lower section shows a list with placeholders (see the figures below).
Placeholders are explained in Placeholders section.
OpenOffice template view
The Modify template text view contains the following fields that are specific to the OpenOffice document type (see Fig. 1):
- Document type: This field is set automatically by the system.
- File name: Defines a file name for the generated PDF file. If the field is left empty, the communication event name that triggered the PDF generation is taken as PDF file name (in lower case, separated with underscore). E.g., if no value is set in the File name text field for an initial OTP card creation, the name of the PDF is set to: "otp_init.pdf". The .pdf file extension is automatically appended to the file name. Placeholders cannot be used for the file name.
- OpenOffice template file: Used to browse to the relevant OpenOffice template file.
To upload the relevant OpenOffice template file, perform the following steps:
- Click the Browse button in the OpenOffice template file field, to browse to the ODT file you want to upload.
- To actually upload the file, click the Upload button underneath the field. While uploading the file, nevisIDM validates the template file. It tests the file type (only OpenOffice Writer documents with extension .odt are allowed) and whether the file can be opened with the OpenOffice daemon (adnooprint package).
E-mail template view
The fields in the Modify template text view specific to the e-mail template represent the default input fields you find in every e-mail (see Fig. 2):
- Sender
- Receiver
- Cc/Bcc
- Subject
- Text
The list of placeholders in the lower section of the view appears as soon as you save the e-mail template text. It shows all placeholders used in the text.
HTML e-mail template view
The Modufy template text view for the HTML e-mail template contains the same fields as for the e-mail template text. Only the text field is now a file upload field.
The list of placeholders in the lower section of the view appears as soon as you have uploaded the HTML e-mail text file. It shows all placeholders used in the text.
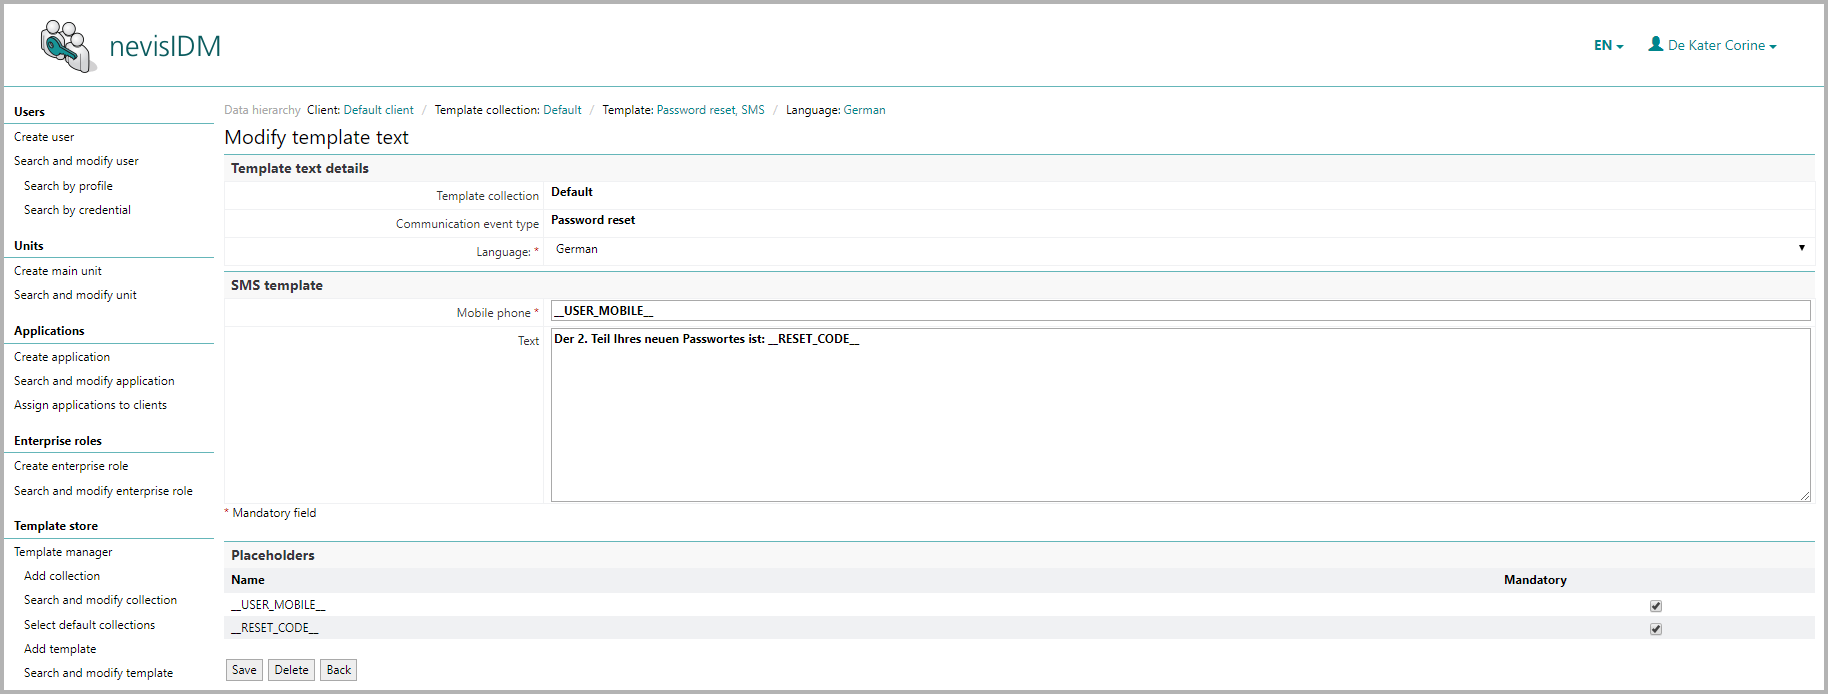
SMS template view
The Modify template text view contains the following fields that are specific to the SMS document type (see Fig. 3):
- Mobile phone: Holds the user mobile phone number
- Text: Defines the text in the SMS
The list of placeholders in the lower section of the view appears as soon as you save the SMS template text. It shows all placeholders used in the text.
List of placeholders
On every view for adding/modifying a template text, the lower part of the view shows a list of placeholders (which is only visible when a template text has been saved).
Every placeholder in a text template is either optional or mandatory, which can be defined within the placeholder list. By default, all placeholders are first assumed optional. The meaning of optional and mandatory placeholders is:
- Optional placeholders never cause fails when the template is transformed to the actual document (PDF, e-mail, etc.). If the value of an optional placeholder cannot be determined, the placeholder string is simply removed.
- Mandatory placeholders cause an error whenever they cannot be resolved to a value. E.g., if USER_TELEFAX is defined mandatory, it causes an error if the user has no telefax defined.
Changes to the mandatory flag of placeholders are not automatically saved. To do so, click the Save button.
Fig. 1: Modifying/creating an OpenOffice template text

Fig. 2: Modifying/creating an e-mail template text
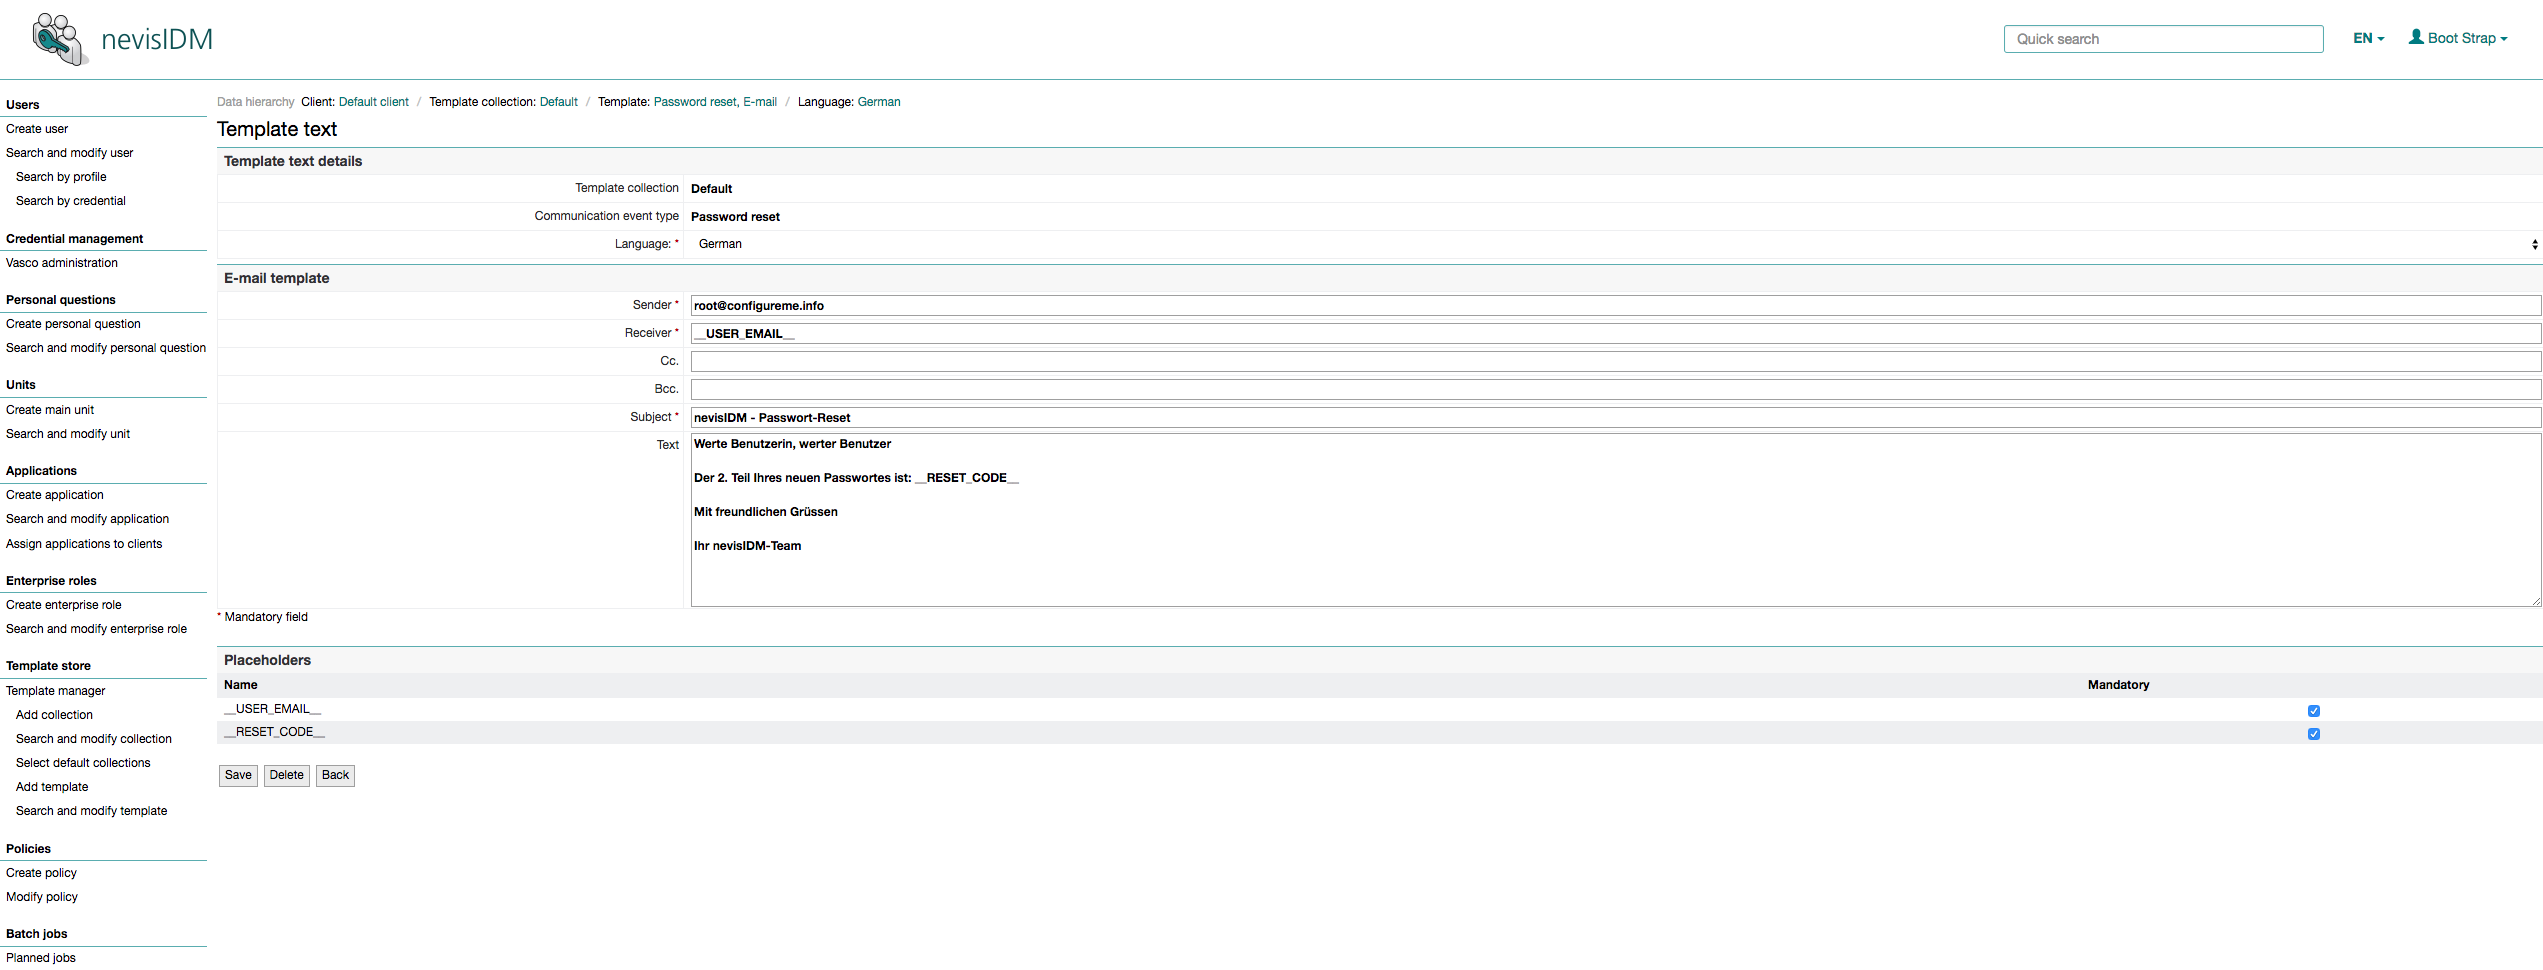
Fig. 3: Modifying/creating an SMS template text