Best practices
When securing web applications we recommend a bottom-up approach, see level 1 . This approach has the benefit of quickly achieving a high level of security while requiring low effort. Begin by configuring HTTP protocol validation and limitation. This is generally not application-specific and requires little effort and testing. Proceed by activating URL-signing and form-signing. This step also requires only little configuration effort, and should work fine as long as the HTML generated by your web application is not severely broken. Initially, it may be useful not to block unsigned URL and form requests (instead, an error is traced to the log) to identify places where the signing has failed (i.e. JavaScript, or broken HTML). As a final measure, apply input validation on HTML forms by specifying the types and ranges (through regular expressions) of the form fields. This step requires considerable configuration and testing effort, and is application-specific, but very effective against injection attacks.
Content filtering should always be combined with an ErrorFilter ) showing an appropriate error message when denying a request as well as with an HTTP request validation filter, e.g., by using the HTTP-Validation-Length profile, to limit the HTTP request size processed by nevisProxy.A sample web application
For the following sections, assume a sample web application with the following URI namespace:
/
/js/*       JavaScript
/css/*       Stylesheets
/img/*       Images
/appl/static/*     Static HTML pages
/appl/servlet/*    Dynamically generated content
Configuring HTTP protocol validation and limitation
HTTP protocol validation and limitation is not application-specific and generally does not lead to integration problems. You configure HTTP protocol validation and limitation by adding a ModsecurityFilter with the OWASP Core Rule Set CRS, which contains rules for protocol enforcement as well as against protocol attacks. These rules will block requests that do not meet the HTTP RFC requirements, or that attack the HTTP protocol, such as HTTP Request Smuggling and Response Splitting. Map the filter close to the root of the application, so that invalid requests will be blocked before they reach sensitive parts.
The section Configuring application-specific protection advises you to map the ModsecurityFilter where it is needed because of limited resources. However, the OWASP CRS should be mapped on the root. This is because these rules also protect against Denial of Service DoS attacks and the like. Whereas application specific rules must be mapped where they are needed.
Configuring URL signing and form signing
To protect against cross-site request forgery (CSRF) and forceful browsing attacks, you can enable URL- and Form-Signing by configuring an EncryptionFilter.
<filter>
 <filter-name>SigningFilter</filter-name>
 <filter-class>ch::nevis::isiweb4::filter::validation::EncryptionFilter</filter-class>
 <init-param>
   <param-name>ErrorPolicy</param-name>
   <param-value>
     PLAIN:block:403
     UNKNOWN_KEY:block:403
     FAILED:block:403
   </param-value>
 </init-param>
 <init-param>
   <param-name>URLMode</param-name>
   <param-value>hmacsha1</param-value>
 </init-param>
 <init-param>
   <param-name>FormMode</param-name>
    <param-value>formsig</param-value>
 </init-param>
 <init-param>
   <param-name>EntryURL</param-name>
   <param-value>
     /appl/
     /appl/bookmarkable-url/
   </param-value>
 </init-param>
 <init-param>
   <param-name>GlobalRandom</param-name>
   <param-value>blwgfcu3owghc9743pyrdfhx43uewhgc963w</param-value>
   <description>Defines a random seed used for HMAC tagging any signed or encrypted URL.</description>
 </init-param>
</filter>
Here we have configured an EncryptionFilter that will sign links and forms in the HTML content. We have configured two entry URLs, these can be accessed unsigned for a detailed list of all the options.
It can be useful, especially in the beginning, to enable URL signing but only trace an error to the log if an unsigned request arrives. This can be configured using an ErrorPolicy of TRACE. The logs can then provide hints as to which URLs are being accessed without signature (e.g. bookmarks). Also it might reveal that the offending request originated from a JavaScript action or broken HTML, which could not be successfully parsed and rewritten.
Configuring application-specific protection
To protect your web application against common scripting and injection attacks, you can download the latest modsecurity rules from http://www.modsecurity.org/. Once you have downloaded, stored (in e.g., /var/opt/modsecurity-rules) and unpacked the rules, you can place a configuration file modsecurity.cfg into the conf directory of your instance. See the following sample code:
SecRuleEngine On
SecDebugLog /var/opt/nevisproxy/<instance>/logs/debug.log
SecDebugLogLevel 0
SecRequestBodyAccess On
SecDataDir /var/opt/nevisproxy/<instance>/run

Include /var/opt/modsecurity-rules/modsecurity_crs_10_setup.conf
Include /var/opt/modsecurity-rules/base_rules/*.conf
Include /var/opt/modsecurity-rules/optional_rules/*.conf
and configure the ModsecurityFilter like this:
<filter>
 <filter-name>PentestModsecurityFilter</filter-name>
 <filter-class>ch::nevis::nevisproxy::filter::modsecurity::ModsecurityFilter</filter-class>
 <filter-lib>libModsecurityFilter.so.1</filter-lib>

 <init-param>
  <param-name>ConfigFile</param-name>
  <param-value>/var/opt/nevisproxy/<instance>/conf/modsecurity.cfg</param-value>
 </init-param>
</filter>

<filter-mapping>
 <filter-name>PentestModsecurityFilter</filter-name>
 <url-pattern>/appl/*</url-pattern>
</filter-mapping>
In this example, we mapped the filter in front of the application and not close to the root, since images, JavaScript and style sheets are static, and therefore no content can be injected. It is good practice to map filters only where they are needed. Thus you decrease request processing time in the proxy (lower response times, less CPU utilization). Configuring input validation
For fine-grained input validation you can configure a HeaderValidationFilter for request and response headers, or a ParameterValidationFilter that restricts the set of values your web application can receive (for example, from form submissions).
An example web application may contain a form where the user can enter an account number of the form "aa-nnn", and a numerical amount to transfer. Any other input is disallowed. You can implement this use case with the ParameterValidationFilter:
<filter>
  <filter-name>ParameterValidationFilter</filter-name>
  <filter-class>ch::nevis::nevisproxy::filter::validation::ParameterValidationFilter</filter-class>
  <init-param>
   <param-name>ParameterRules</param-name>
    <param-value>
 ^accountno$:^[a-zA-Z][a-zA-Z]-[0-9][0-9][0-9]$:allow
 ^accountno$:.*:deny
 ^amount$:^[0-9]*$:allow
 ^amount$:.*:deny
  </param-value>
  </init-param>
</filter>

<filter-mapping>
  <filter-name>ParameterValidationFilter</filter-name>
  <url-pattern>/*</url-pattern>
</filter-mapping>
This type of fine-grained input validation is very powerful, but requires you to have detailed knowledge of your web application. Also the configuration has to be kept in sync with any updates in the application (see the chapter below Self-learning of input validation.Self-learning of input validation
The necessary FormNameValueWhiteList patterns, which shall be used to protect an application, may be learned by the InputValidationFilter. This learning mechanism is based on two components. The first is an audit log containing the data transferred from clients to the server. This audit log may be generated by the InputValidationFilter which has been mapped to the application's URL. The second component is a rule generator which processes the audit log data and creates FormNameValueWhiteList rules matching the captured data.
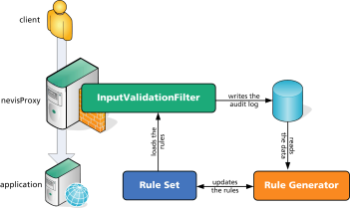
The following steps are necessary to learn a new rule set:
- Create an InputValidationFilter and map it to the URL of the application. Configure the audit.log facility of the filter. You also need to specify the decodings you want to apply to the incoming data. It's important to use exactly the same decodings during the learning phase that you are going to use later when the rules are enforced.
Example filter configuration:
<filter>
 <filter-name>ApplInputValidationFilter</filter-name>
 <filter-class>
 ch::nevis::isiweb4::filter::validation::InputValidationFilter
 </filter-class>
 < init-param>
   <param-name>AuditLog.FileName</param-name>
   <param-value>
   /var/opt/nevisproxy/default/logs/appl.audit
   </param-value>
 </init-param>
 <init-param>
   <param-name>AuditLog.Key</param-name>
   <param-value>
   pipe:///var/opt/neviskeybox/default/public/node_keypass
   </param-value>
 </init-param>
 <init-param>
   <param-name>AuditLog.RotationPolicy</param-name>
   <param-value>time:hourly</param-value>
 </init-param>
 <init-param>
   <param-name>DecodingRules</param-name>
   <param-value>URL_decode_unicode</param-value>
 </init-param>
</filter>

<filter-mapping>
 <filter-name>ApplInputValidationFilter</filter-name>
 <url-pattern>/appl/servlet/</url-pattern>
</filter-mapping>
- Run the rule generator multiple times, e.g., every hour. The rule generator processes the audit log as well as the existing rules and updates them. Repeat this process multiple times (usually for several days) until the rules don't change anymore.
Example script:
#!/bin/sh
PATH=/usr/bin:/bin:/opt/nevisproxy/bin
RC=1
# runs the generator until it does not learn any new rules (you still may
# have to restart the script later when new data has been captured)
while; do
# wait an hour to get new audit log data
SLEEP=`date '+%M'`
# next hour
SLEEP=`expr 60 - $SLEEP`
if; then
 SLEEP=1
fi
SLEEP=`expr 60 \* $SLEEP`
# one minute later
SLEEP=`expr $SLEEP + 60`
sleep $SLEEP
# note: appl.audit is renamed to appl.log.<timestamp> at rotation
logfile=`ls -t1 /var/opt/nevisproxy/default/logs/appl.log.* \
 2>/dev/null | tail -1`
if; then
 echo "'date': update ('wc -l $logfile')"
 # start rule generation
 nevisproxy default whitelist \
 appl \
 /var/opt/neviskeybox/default/public/node_keypass \
 $logfile \
 /var/opt/nevisproxy/default/conf/appl.rules \
 utf8
 RC=$?
 grep Description \
 /var/opt/nevisproxy/default/conf/appl.rules |\
 grep updates | awk -F',' '{print $3}'
 # we don't need the log file any longer
 rm -rf $logfile
fi
done
- Append the generated rules to the rule profile ).
cat /var/opt/nevisproxy/default/conf/appl.rules >> \
/path/to/your/custom.profiles.properties
- Load the new profile into your InputValidationFilter. The audit log is no longer necessary.
<filter>
 <filter-name>ApplInputValidationFilter</filter-name>
 <filter-class>
 ch::nevis::isiweb4::filter::validation::InputValidationFilter
 </filter-class>
 <init-param>
    <param-name>Profile</param-name>
    <param-value>appl</param-value>
 </init-param>
 <init-param>
    <param-name>AuditLog.Key</param-name>
    <param-value>
    pipe:///var/opt/neviskeybox/default/public/node_keypass
    </param-value>
 </init-param>
 <init-param>
    <param-name>DecodingRules</param-name>
    <param-value>URL_decode_unicode</param-value>
 </init-param>
</filter>
<filter-mapping>
<filter-name>ApplInputValidationFilter</filter-name>
<url-pattern>/appl/servlet/</url-pattern>
</filter-mapping>
- Update your rule set if you see false rule violations (false positives) within the navajo.log file.Note: The rule generator can parse the navajo.log file (instead of a separate audit log) to do so.
Where should we learn?
You may learn rules (by activating the audit log) either within a production or test environment.
| Environment | Advantages | Disadvantages |
|---|---|---|
| Production | You may run the rule generator until there are no further updates to the rules. The new profile may then directly been activated. The generator can learn from real data which provides an accurate ruleset. | You risk learning rules from invalid user input or even an attempted attack. |
| Test | No risk of learning rules from an invalid pattern or potential attack. | You have to define test patterns to learn from. The generated profile needs to be tested in the production environment in permissive mode (BlockOnError=false). |
The rule generator creates two profiles. The first profile contains the value patterns which are used to implement the input validation. The second profile contains the names of all known parameters and may be used in log mode to detect new parameters not covered by the current rule profile (indicating that the learning phase should be repeated).
Options
You may use the „nevisproxy <instance> whitelist" command with the additional option „varnames" if your application uses dynamic/generated parameter name identifiers. These parameter names will then be represented by regular expressions too and the generated rule set uses the ParameterRules configuration parameter.
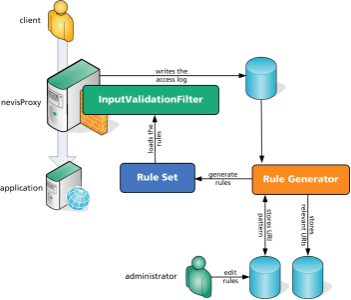
URI whitelisting
A whitelist of all allowed URIs (path portion) may be generated based on existing access.log files. These rules are used to restrict access to known handlers of the application only, and may be used in addition to the parameter whitelisting described in the previous section (Self-learning of input validation]. The following example demonstrates a shell script which generates/updates a request path whitelisting.
#!/bin/sh
PATH=/usr/bin:/bin:/opt/nevisproxy/bin

# the OPTIONS variable controls the rule generation, enter "nevisproxy default genrules"

# for a list of available options
OPTIONS="-h"

# PFX is the name (path portion) of your application
PFX="appl"

# this sample script uses the "default" proxy instance

# the log file contains all relevant URIs and is used every time you update the rules
LOG=/var/opt/nevisproxy/default/logs/$PFX.log

# the rule db file contains the URI pattern you may edit
DB=/var/opt/nevisproxy/default/logs/$PFX.db
TMP=$DB.tmp

# filters the access.log file by the defined application path /$PFX cat /var/opt/nevisproxy/default/logs/access.log | \
cut -d ' ' -f 7 | cut -d '?' -f 1 | grep "^/$PFX/" > $LOG.tmp
touch $DB
touch $LOG
cat $LOG >> $LOG.tmp
nevisproxy default genrules -i $LOG.tmp -c $DB $OPTIONS > $TMP
rm -f $LOG.tmp
grep "# ADD line " $TMP | cut d ' ' -f 5 > $LOG
grep "^QS_PermitUri +QSF" $TMP > $DB
rm -f $TMP

echo "ch.nevis.isiweb4.filter.validation.$PFX.Description=generated for /$PFX"
echo "ch.nevis.isiweb4.filter.validation.$PFX.BlockOnError=true"
echo "ch.nevis.isiweb4.filter.validation.$PFX.DecodingRules=URL_decode_unicode"
echo "ch.nevis.isiweb4.filter.validation.$PFX.RegexpType=PCRE"
cat $DB | awk '{print substr($0, 27, length($0)-27)}' | \
 awk -F'"' '{ print "ch.nevis.isiweb4.filter.validation..URIWhiteList." NR-1 "=" $2}'| \
 sed -e "s::$PFX:g"
Such a script may be executed multiple times until it has learned all possible URIs and the output ).
HTTP security headers
Browser developers have integrated features to counter different types of attacks. As attacks often exploit the fact that clients trust the web server and the content received from it, optional HTTP protocol headers were introduced. These headers allow the application to propagate its intentions to the browser. This information enables the browser to detect discrepancies between the policies (what the application had been intending to send) and the content of the HTTP response body (what the browser actually receives), such as JavaScript code or references to other websites.
List of optional HTTP headers and their advantages:
- X-Frame-Options
The X-Frame-Options HTTP response header specifies whether to allow a browser to render a page in a frame (
<frame>), inline frame (<iframe>) or object (<object>). Sites can use the header to avoid clickjacking attacks, by ensuring that the site content is not embedded into other sites. It also helps against various other attacks, such as drag and drop cross-site scripting (XSS), copy and paste XSS, invisible sitewide XSS, docmode downgrades, frame busting as well as side channels and cross-origin leaks. Example: X-Frame-Options: SAMEORIGIN - Strict-Transport-SecurityThe server can advise the browser to interact exclusively via HTTPS by specifying a period of time during which the browser shall access the server in a secure fashion, that is, via HTTPS only. This prevents a fallback to an insecure HTTP connection in the case where an HTML page contains non-HTTPS references. It also helps to detect man-in-the-middle attacks where a proxy between the client and server converts an HTTPS to an HTTP connection. It is supported by all browsers (except for Opera Mini). Example: Strict-Transport-Security: max-age=63072000;
- X-Content-Type-OptionsSetting X-Content-Type-Options to "nosniff" prevents Internet Explorer from MIME-sniffing a response away from the declared content type. This helps prevent media types from being interpreted as HTML or JavaScript code, e.g., a JavaScript XSS vector that has been uploaded as an image to a Wiki server. Example: X-Content-Type-Options: nosniff
- Content-Security-PolicyThis header enables the specification of complex policies that describe allowed actions in detail. See the "getting started" at the Mozilla Developer Network for further information resp. the CSP specification at w3.org. Example: Content-Security-Policy: default-src 'self'
The following example illustrates how you can add these security headers to HTTP responses using a DelegationFilter within the nevisProxy configuration.
<filter>
<filter-name>SecurityHeaders</filter-name>
<filter-class>ch::nevis::isiweb4::filter::delegation::DelegationFilter</filter-class>
<init-param>
<param-name>DelegateOutbound</param-name>
<param-value>
CONST:SAMEORIGIN:X-Frame-Options
CONST:max-age=63072000;:Strict-Transport-Security
CONST:nosniff:X-Content-Type-Options
CONST:default-src 'self':Content-Security-Policy
</param-value>
</init-param>
</filter>