Adaptive MFA using a mobile device
The project template
The Adaptive MFA project template is designed to balance the security level and the convenience of the user experience by enforcing multi-factor authentication only when needed. Typically, the first factor is a username and password pair and the second factor is a PIN code or biometric authentication but due to the flexibility of Nevis Identity Suite configuration, various use-cases can be implemented.
For demonstration purposes, the template also includes a demo application called “adaptapp” (showcasing the reporting REST API of nevisAdapt) that helps to overview the risk scores of login and session details.

About risks scores and following actions
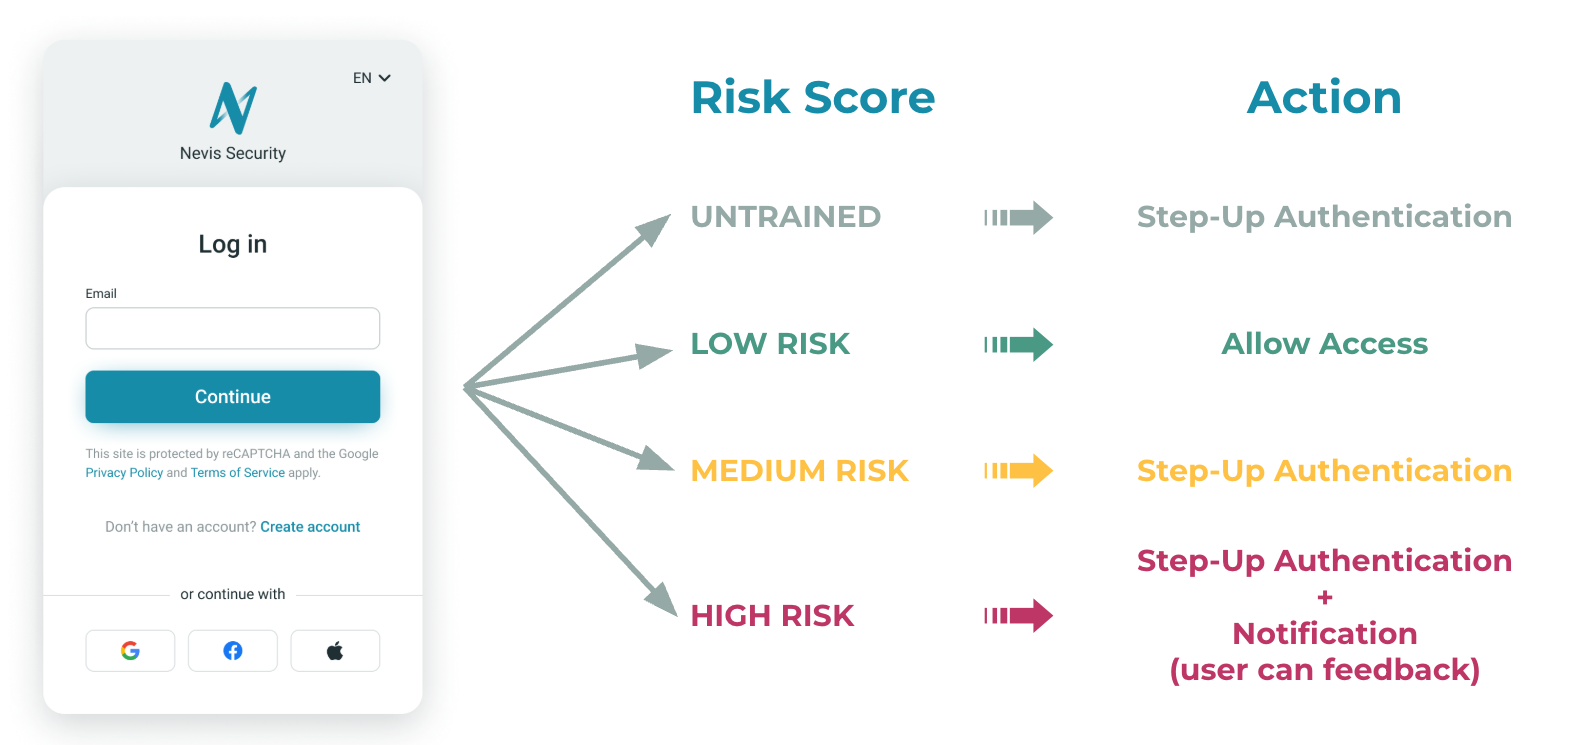
In this project template, there are four different actions configured and forced depending on the calculated risk score:
- untrained: Risk score is not yet calculated, this usually happens during the first login attempt of a user. It results in a step-up authentication every time, meaning, requiring the second factor from the user.
- low: The calculated risk is low (e.g., a known user from a known device with a known IP), no further actions taken, the user can access directly the web application.
- medium: The calculated risk score detected some changes in the user's usual behavior (e.g., using a different browser on the same device) and a notification email is sent to the user to confirm whether the authentication was legit or not.
- high: The calculated risk score shows that there is a major change in the learned behavior, therefore it is required to use a second factor authentication by the user.
To learn more about how risk profiles are built click here.
Scenario for testing a successful deployment
This project template is pre-configured to access an otherwise unprotected web application (https://www.nevis.net/login-success) while enforcing a username and password based authentication. As the second factor, via the FIDO U2F protocol a QR code has to be scanned with a mobile device. Depending on the calculated score in the advanced risk profiling, the second factor is required in an adaptive way.
Configuration
- Install the Nevis Access mobile application for Android or iOS on your mobile device.
- Register to a supported IP geolocation data source provider or presenting geolocation data in a CSV file (see more in the nevisAdapt configuration pattern).
- Configure the required variables as described in the Adaptive MFA Authentication project description in nevisAdmin4.
- Perform the deployment as described here.
User registration and login
- Access the protected example web application at https://domain_name/app/?login - find the actual URL in Configuration / Reports / inventory-name / Frontend address of “example-app” Application.
- At the login screen, select the “Self registration” option and create a new user with a login email.
- Part of the registration process, there’s a step to validate the email address used for login, which is a PIN code shared via email (eTAN). For testing purposes, it is recommended to use eTAN in test mode so that you can enter the code “111111” without sending emails. See the details in the Configuration Patterns Reference documentation.
- In the next step, set a password for the user; check the password complexity rules at the top of the screen.
- As the next step, a QR code is displayed on the screen. Open the Nevis Access application on your mobile device and tap “Scan QR code” and scan the QR code on the screen. Once it was done successfully, you can protect it with a PIN code or biometric identification such as a fingerprint or face recognition. At this point, the user’s risk profile is untrained.
- After successfully setting up the second factor, the access is now granted to the example web application and the “Login Successful” message is displayed from the website Login Success.
- Now log out from the protected web application via https://domain_name/app/?logout
- Access the web application (https://domain_name/app/?login) one more time with the same user, in the same browser with the same IP address, the QR code is requested once again. Log out via https://domain_name/app/?logout. At this point, the user’s risk profile is medium.
- Repeat the previous step, and recognize that the QR won’t be required at this time as the system has enough data to check the user’s authentication against their risk profile and due to the low score (because it’s the same username, with the same browser from the same IP address) it allows access in a less strict way. At this point, the user’s risk profile is low.
Risk profiling
- In the next step, the previously created user has to be enabled to access the risk profiling interface of nevisAdapt. First, access nevisIDM administration interface via https://domain_name/nevisidm/admin/UserSearchEntry.do - find the actual URL in Configuration / Reports / inventory-name / Frontend address of “idm-admin-app” Application.
- Login with the “bootstrap” user. Find the user under the “Search and modify user” and select it by clicking on its login ID. Scroll down to Profiles and click on the assigned profile. At the bottom of the screen, click on the “Add Roles” button, and find the corresponding line with the nevisAdapt application where the role is “user” and select the checkbox at end of that line, and finally click “Add roles” to save it.
- Now access nevisAdapt web interface to check the built profiles and risk scores at https://domain_name/adaptapp - find the actual URL in Configuration / Reports / inventory-name / Frontend address of “adapt-demo-hosting-service” Application. Sign in with user used in the testing scenario. Under “Sessions” you can find the currently active sessions, while under “Event History” you can find a historical overview of session belongs to the current user. For more information about the profiles and risk scores click here.
- Now you can try to trigger different risk scores when accessing the web application by using an incognito browser, a different device, or establish a connection though a VPN, and so on and then check the results in the nevisAdapt web interface and see how the risk scores change.