OpenID Connect
Like SAML, OpenID Connect (OIDC) is an authentication protocol, facilitating the exchange of authorization credentials and basic profile information between identity providers and reliant parties (aka service providers). In other words, OIDC is a set of defined process flows for federated authentication. These flows are built using the OAuth 2.0 process flows as a base, adding a simple identity layer over it to allow for federated authentication.
OpenID Connect works both for web and mobile applications. Considering the fact that SAML only works for web applications, OIDC is the standard to follow when it comes to mobile applications and Javascript.
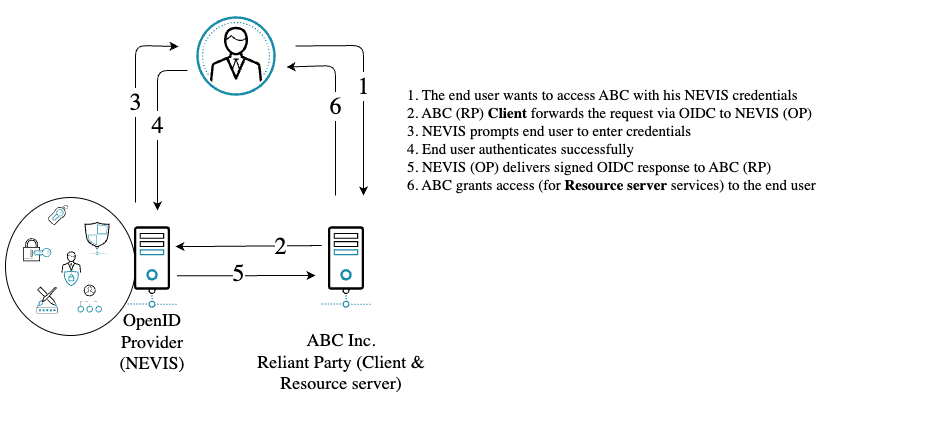
OpenID Connect lets reliant parties (RP’s) authenticate users across websites and apps without having to own and manage password files. Thanks to OIDC the reliant party knows at anytime what the identity of the person, currently using the browser or native app, is, without having to manage the users identity themselves.
For further information you could read more here.
The Project template
The Nevis project template OpenID Connect Provider supports username / password login infrastructure.
Scenario for testing a successful deployment
Before hooking your services you can fairly simply make sure your deployment works as intended. Following the step-by-step guide below you would be able to verify the major OpenID Connect calls e.g. obtaining access tokens.
The purpose of the Authorization Code flow with PKCE is to acquire an Access Token, which can be added as Bearer token to REST calls made towards a Resource Server.
This flow should be used by single-page (SPA) and other client-side applications which cannot store a client secret as it could easily be extracted.
In order to run a very basic verification you must configure a couple of items as follows:
- Launch your nevisMETA GUI application at
https://your_domain_goes_here/nevismeta- replace “your_domain_goes_here” with your real domain name! - Login using bootstrap.
- Choose the pre-configured Default setup.
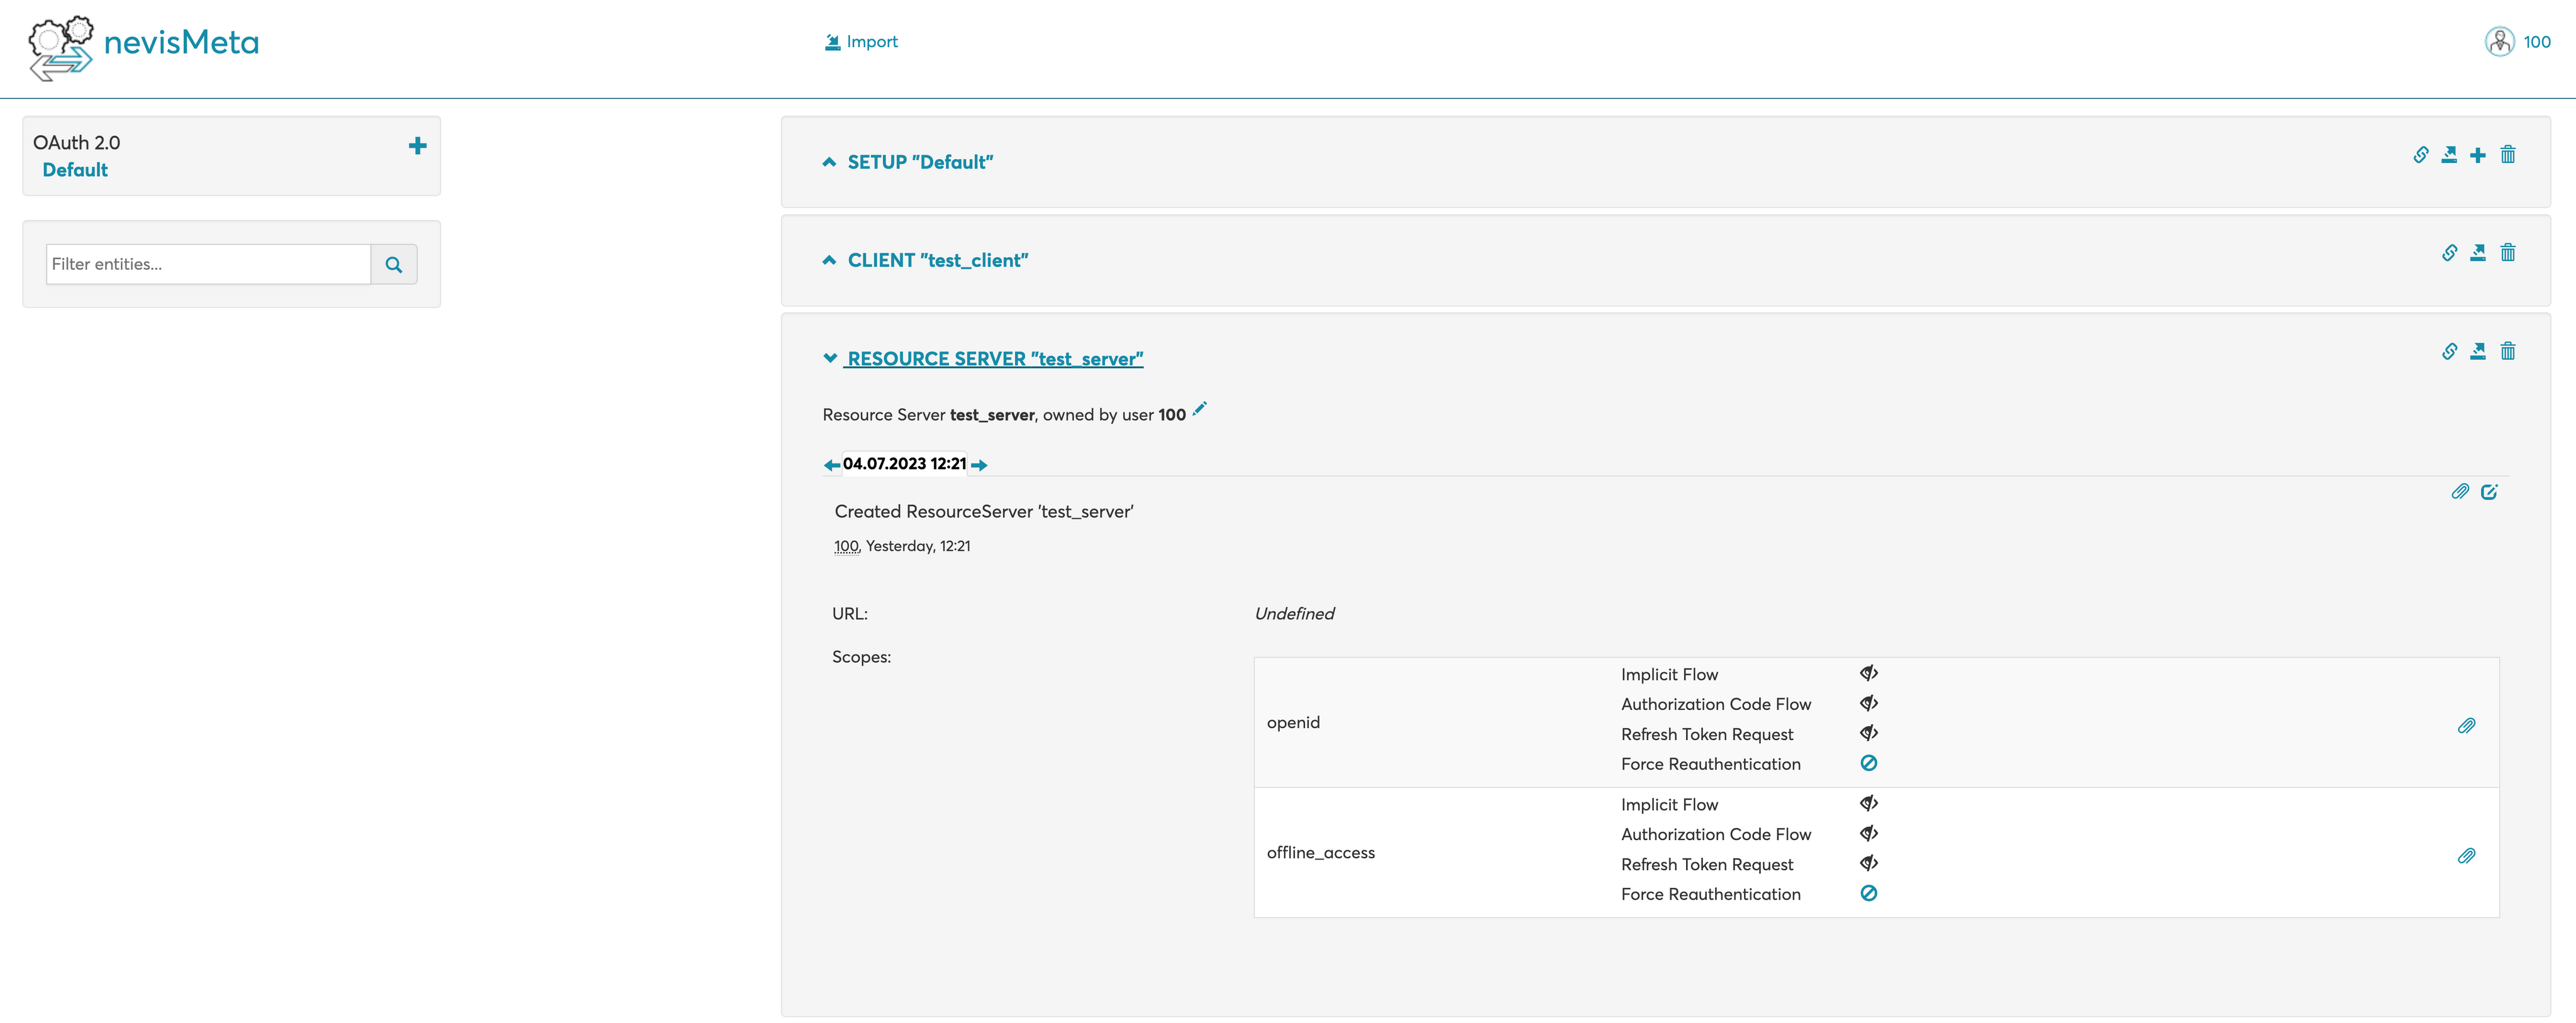
- Add & configure META resource server (using the + icon in the upper right corner).
- Add custom name.
- For
scopeADDopenid&offline_accesswith all flow consent set to NO CONSENT REQUIRED (by default this is set to CONSENT REQUIRED).
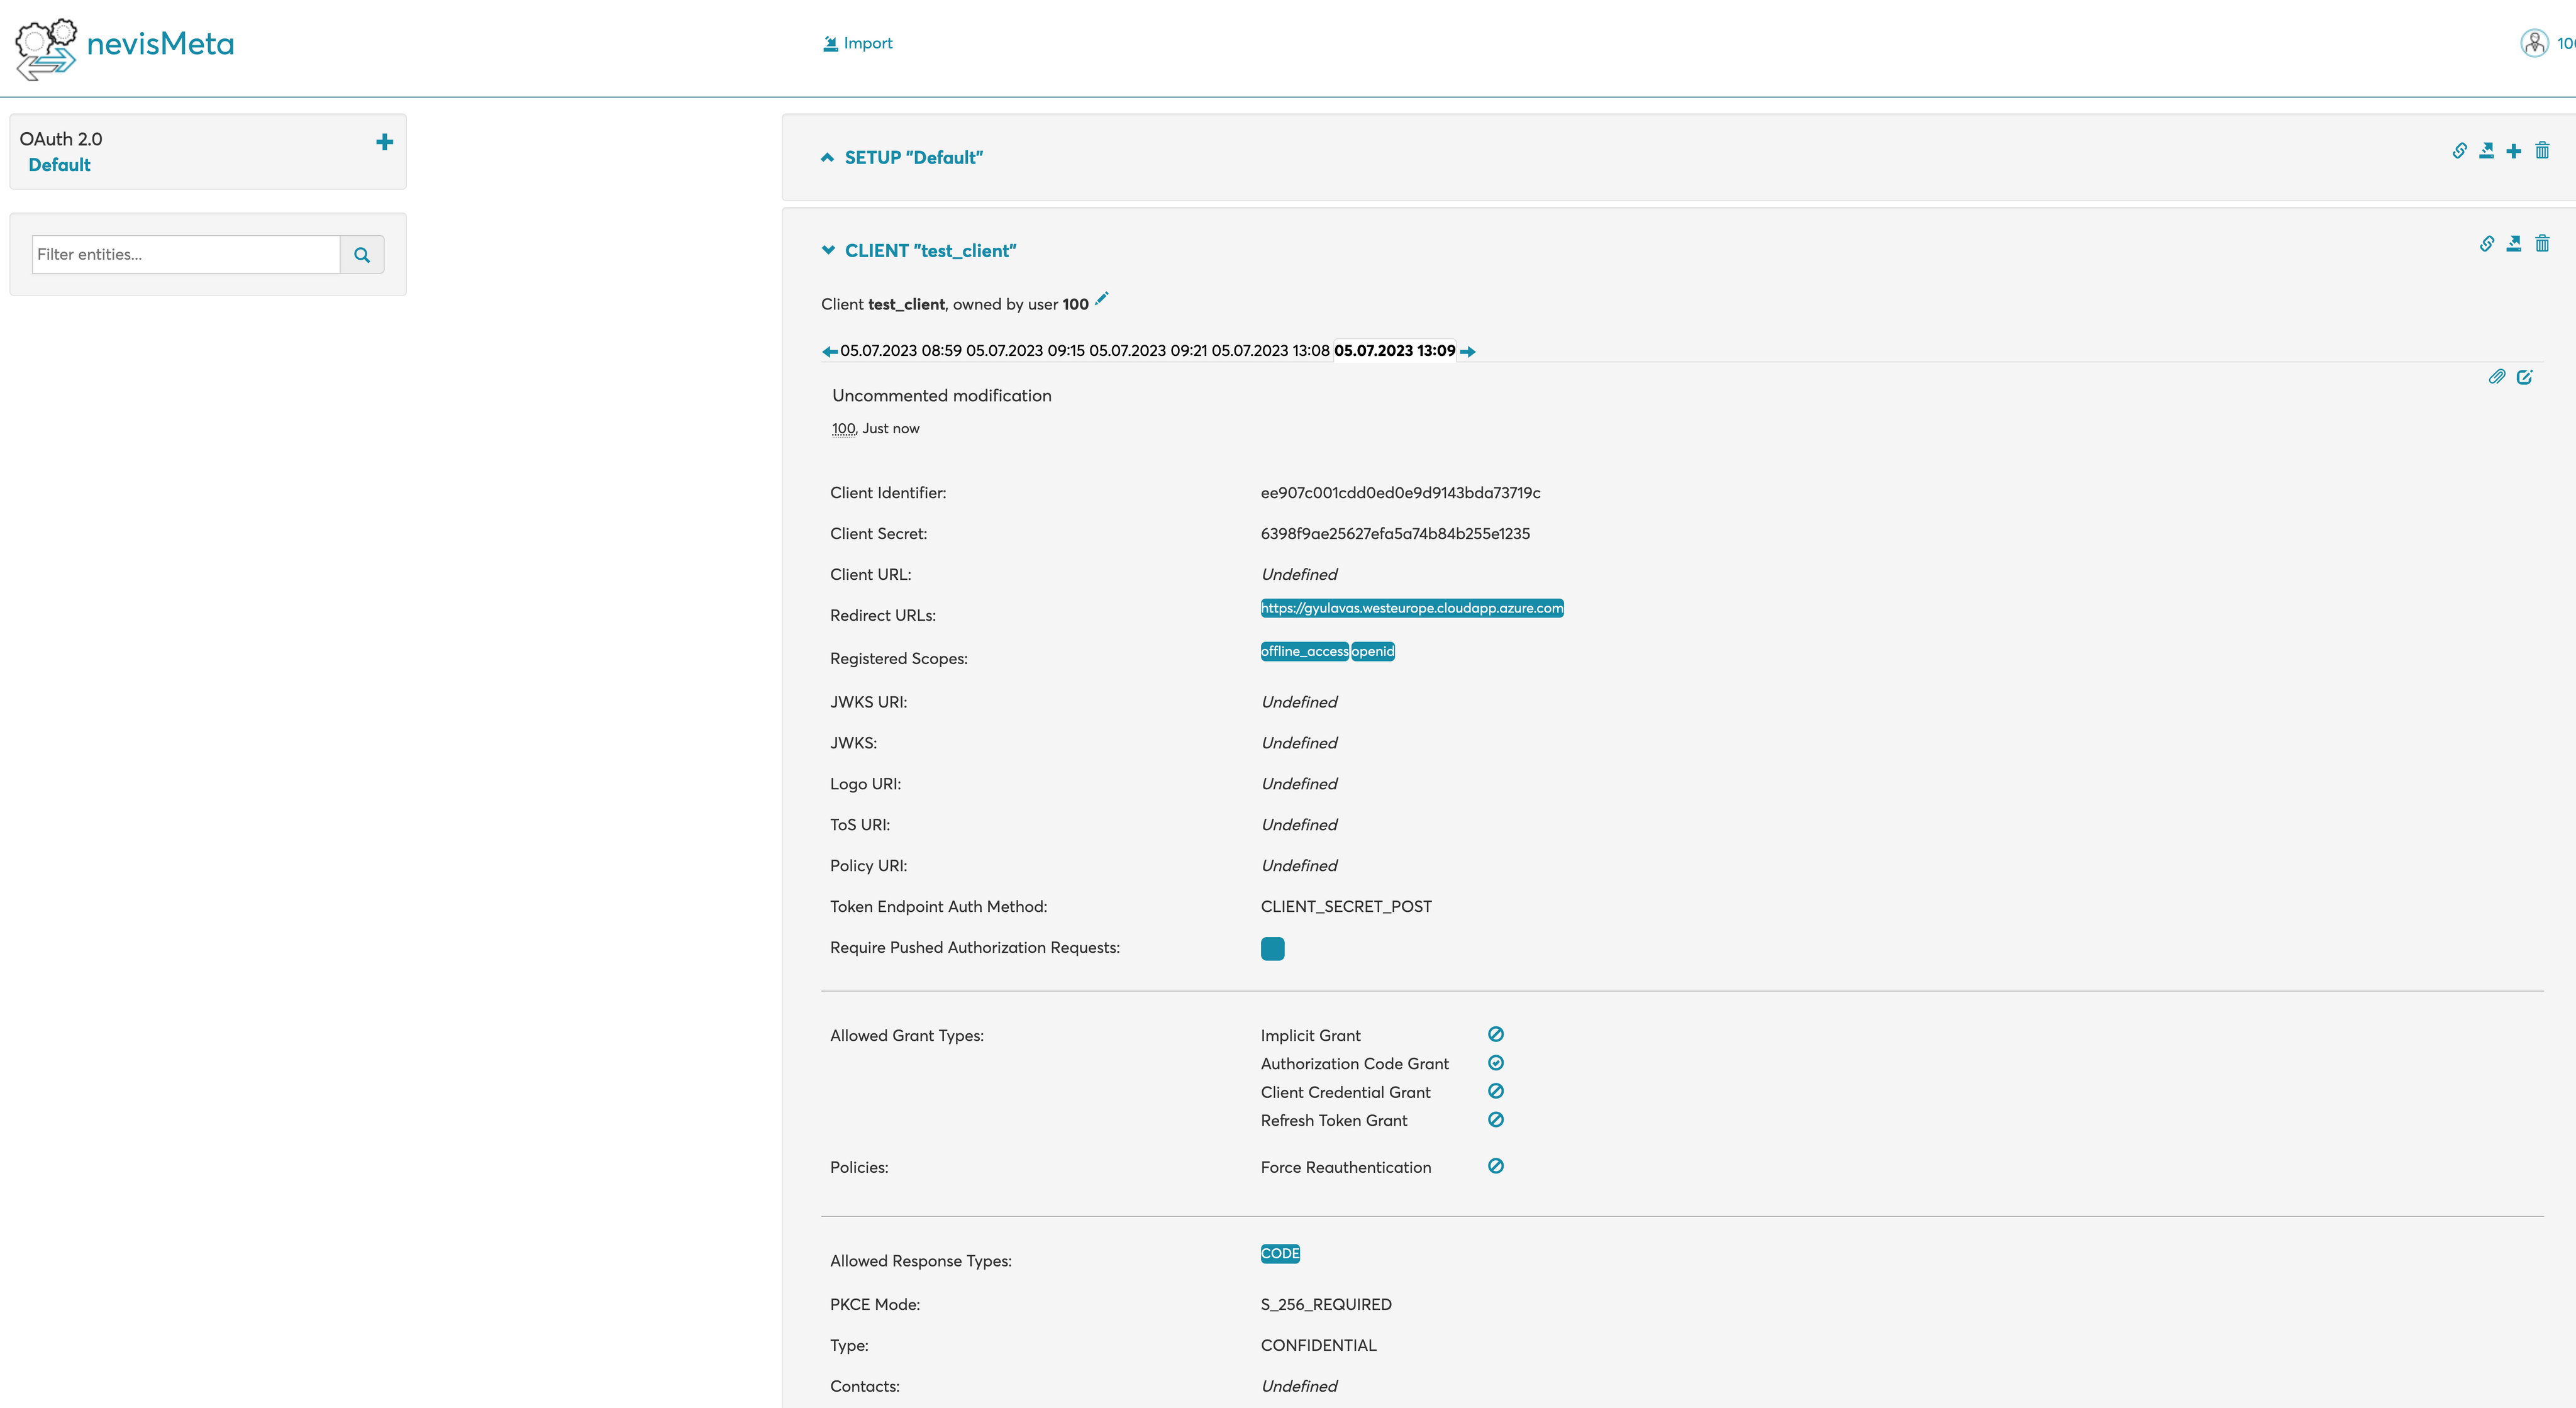
- Add & configure META client (using the + icon in the upper right corner).
- Add custom name.
- Redirect URLs:
<put your Azure domain name here> - Registered Scopes: Put both openid & offline_access (start typing the name, then select from the popup list, this way the server and client are associated).
- Token Endpoint Auth Method: in this example since POSTMAN calls are going to be performed, set this to
CLIENT_SECRET_POST - PKCE Mode:
S_256_REQUIRED
- Prepare the POSTMAN calls (get authorization code, get access token, get refresh token).
There is a need to generate 2 codes for PKCE:
code_verifier- must be a randomStringand at least 43 characters long.code_challenge- URL-safe base64 encoded SHA256 hash of thecode_verifier. The codes ensure message integrity. Even if an attacker intercepts the Authorization Code, they won't be able to obtain an Access Token as they also need thecode_verifierand thecode_challenge.
Example Angular code to generate code_challenge from code_verifier:
import * as CryptoJS from 'crypto-js';

private generateCodeChallenge(code_verifier: string): string {
  return this.base64URL(CryptoJS.SHA256(code_verifier));
}

private base64URL(value) {
  return value.toString(CryptoJS.enc.Base64)
    .replace(/=/g, '').replace(/\+/g, '-').replace(/\//g, '_');
}
Alternatively you can visit PKCE Tools and quickly get the codes needed.
On behalf of the client we need to simulate an HTTP GET request to the Identity Suite Authorization endpoint. Example URL (HTTP GET), using POSTMAN GET call:
https://<yourserver>.westeurope.cloudapp.azure.com/oauth/authorize
 ?response_type=code
 &code_challenge=U2ZQIMYt1dJ-Vft83__UiJihGh40zoXX5GoOnsDo4BE
 &code_challenge_method=S256
 &client_id=dbd00f622a1f005f
 &redirect_uri=https://<yourserver>.westeurope.cloudapp.azure.com
 &scope=openid,offline_access
Besides setting the parameters defined above you’d also need to provide user credentials explicitly in POSTMAN since we do not have a real client running, just simulating it using POSTMAN. Go to the Authorization tab and provide bootstrap user credentials (see example below).
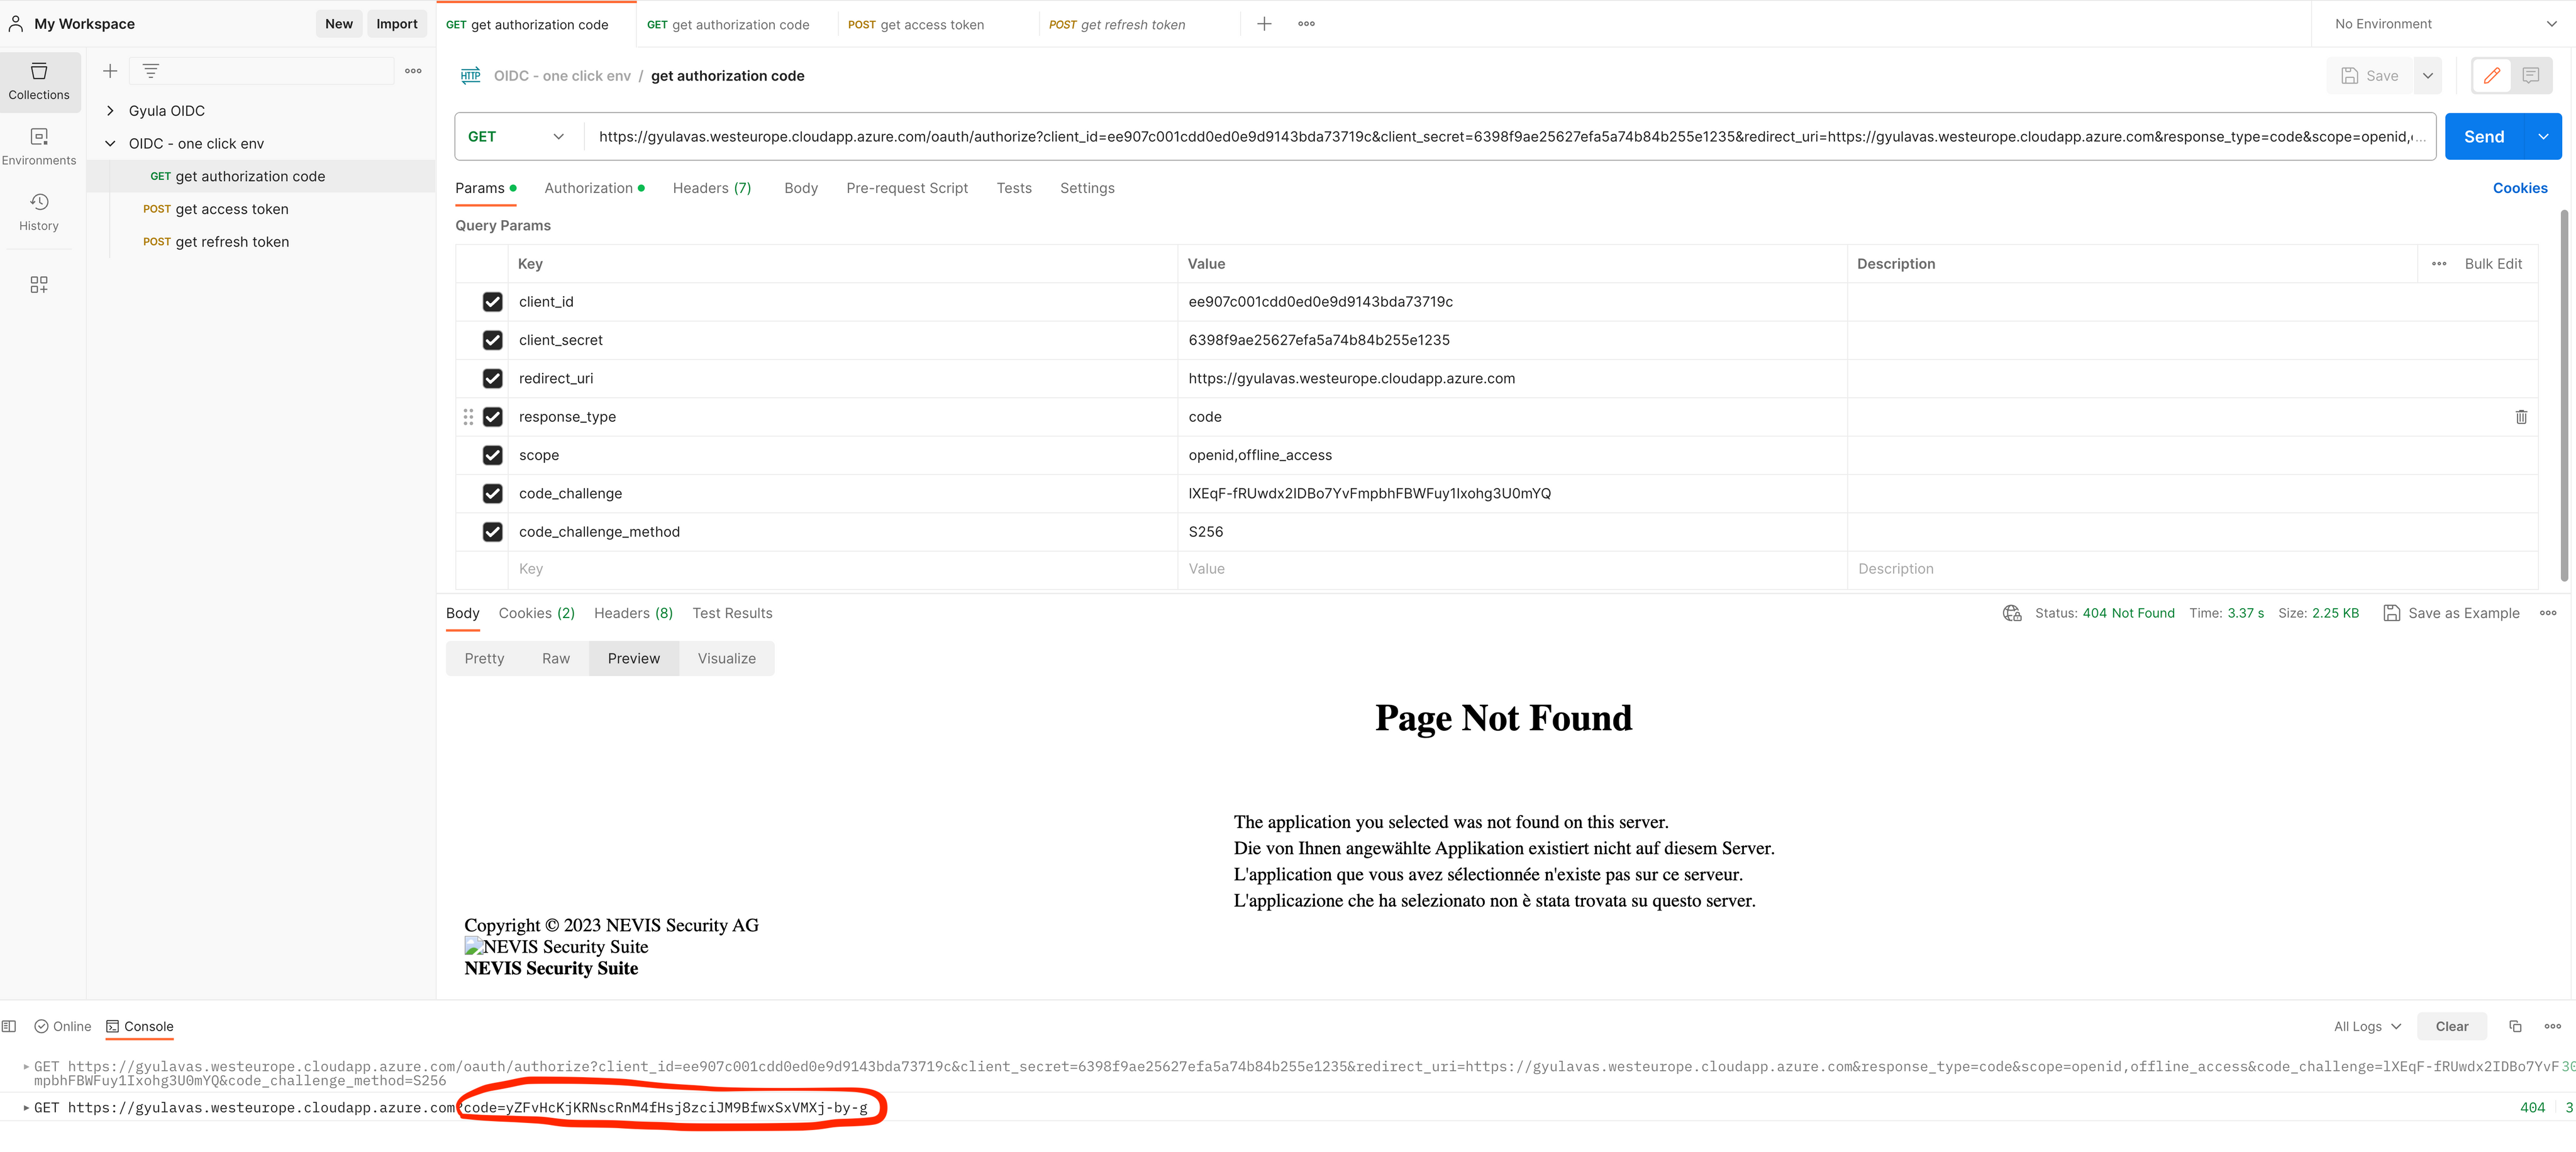

Upon successful authentication, the authorization endpoint stores the code challenge, generates an Authorization Code, and redirects the user to the return_uri (in case of the example there is no service developed therefore → Page not found) The code is however added as a query parameter. Example URL (HTTP GET):
https://<yourserver>.westeurope.cloudapp.azure.com?code=WyZIgDiGQ0DIvbZM7vmBW2ADw6hzwekZac0oe_ucfYo
On behalf of the client we now need to simulate an HTTP POST request to the Identity Suite Token endpoint (together with the code_verifier). Example URL (HTTP POST), using POSTMAN GET call:
https://<yourserver>.westeurope.cloudapp.azure.com/oauth/token
grant_type=authorization_code
&client_id=dbd00f622a1f005f
&client_secret=
&code_verifier=DP0DueG8PR9rj6ITsWg7YHEUEg5QPttl84wq6xA7NNo9z0vLmCWNTYPKYrjCC9hh
&code=WyZIgDiGQ0DIvbZM7vmBW2ADw6hzwekZac0oe_ucfYo
&redirect_uri=https://<yourserver>.westeurope.cloudapp.azure.com
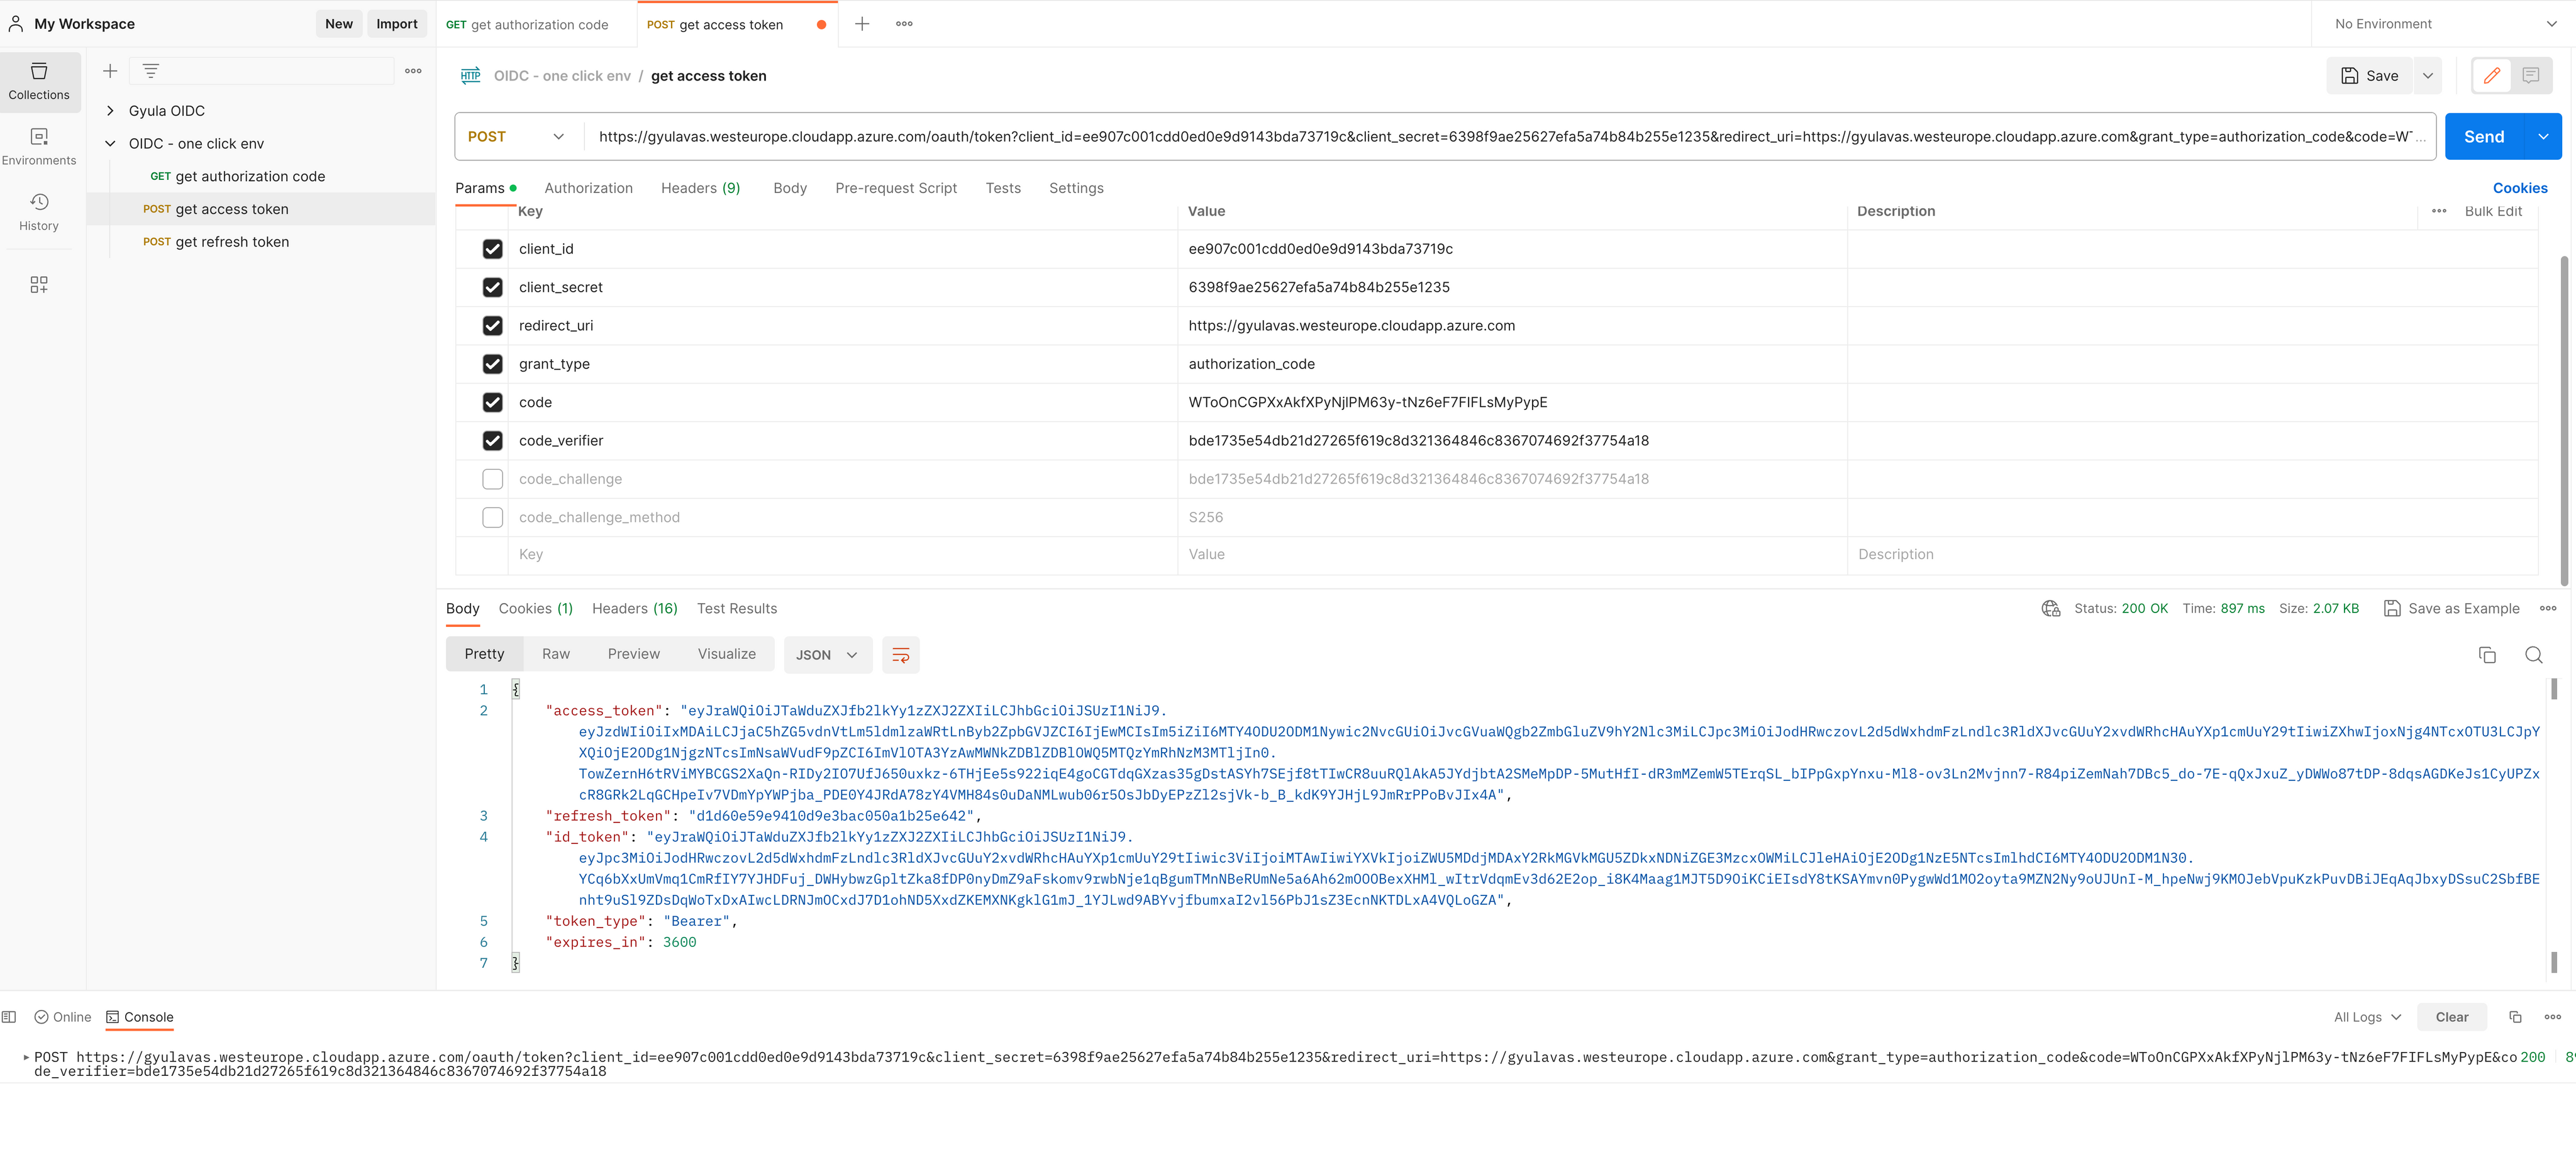
The token endpoint verifies the code_challenge and the code_verifier. The token endpoint returns an Access Token. Depending on the scopes requested, additional tokens will be returned:
- ID Token: scope
openid - Refresh Token: scope
offline_access
{
  "access_token":"...",
  "refresh_token":"...",
  "id_token":"...",
  "token_type":"Bearer",
  "expires_in":3600
}
- Now it is time to configure your own resource server(s) & client and enjoy the Nevis security experience!