Adaptive Authentication with one-time password
The project template
The Nevis project template Adaptive Authentication is configured to use the nevisIDM Admin GUI application by default as the protected web service. It supports username / password login infrastructure as first authentication step and further, additional security elements (silent e-mail notification, step-up authentication) according to the risk evaluation results. This is subject to change by the user.
For simplicity, this template uses e-mail TAN code as second factor. For a more complex use case using mobile authentication for step up authentication see the Adaptive MFA project template.
For demonstration purposes, the template also includes a demo application called adaptapp (showcasing the reporting REST API of nevisAdapt) that helps to overview login and session details.
About risks scores and following actions
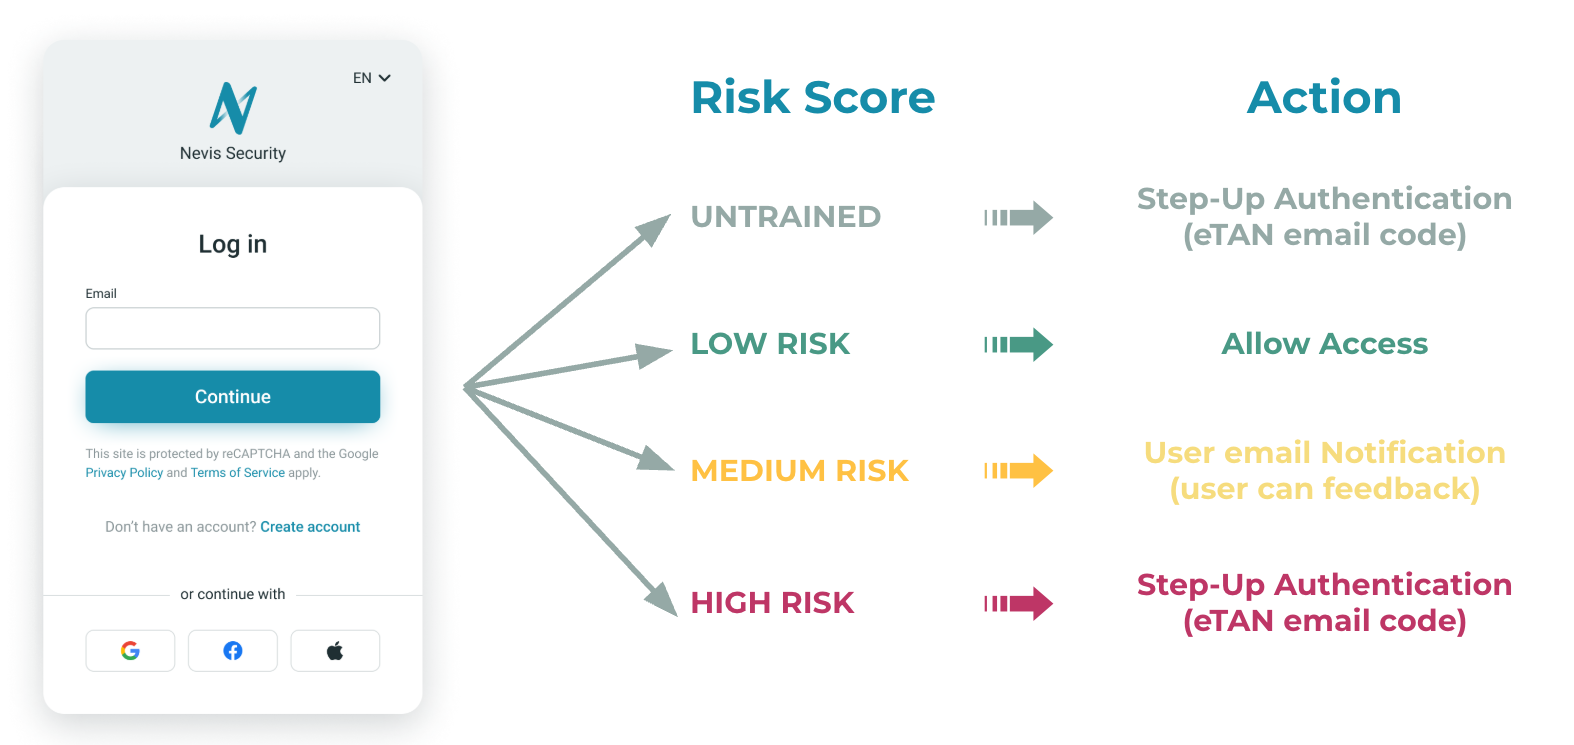
In this project template, there are four different actions configured and forced depending on the calculated risk score:
- untrained: Risk score is not yet calculated, this usually happens during the first login attempt of a user. It results in a step-up authentication every time, meaning, requiring the second factor from the user.
- low: The calculated risk is low (e.g., a known user from a known device with a known IP), no further actions taken, the user can access directly the web application.
- medium: The calculated risk score detected some changes in the user's usual behavior (e.g., using a different browser on the same device) and a notification email is sent to the user to confirm whether the authentication was legit or not.
- high: The calculated risk score shows that there is a major change in the learned behavior, therefore it is required to use a second factor authentication by the user.
To learn more about how risk profiles are built click here.
Scenario for testing a successful deployment
- Access the nevisIDM Administration GUI application at https://domain_name/nevisidm/admin/UserSearchEntry.do - find the actual URL in Configuration / Reports / inventory-name / Frontend address of “idm-admin-app” Application.
- Login with the “bootstrap” user and the default password; follow the instructions to change the default password.
- Part of the registration process, there’s a step to validate the email address used for login, which is a PIN code shared via email (eTAN). For testing purposes, it is recommended to use eTAN in test mode so that you can enter the code “111111” without sending emails. See the details in the Configuration Patterns Reference documentation.
- Logout!
- Perform a second login without changing environment (browser, user, IP, etc.) → NO second factor authentication is required since the connection is already a known one, login is granted → nevisIDM Admin GUI appears.
- Now it is time to replace the exposed example application by your own service and enjoy the Nevis security experience!