WebViews
WebViews provide a practical solution to leverage existing web content or facilitate cross-platform development. They allow for faster development, reduced costs, and easier content updates. While they may not offer the same level of performance or native UI integration as fully native apps, WebViews strike a balance between efficiency and functionality, making them a popular choice for many app developers.
Across Android and iOS there are different technologies available to embed web content, that serve a different need.
Android
Chrome Custom Tabs (CCCT)
-
UX
Overlay: Uses Chrome to render the web content, using the user's Chrome settings ensures consistent web browsing between native app and browser. Part of the browser UI is visible to the user, like the back/forward button or the URL.
-
Control
Medium: Limited customization options, like no JavaScript injection, visible browser URL bar, and shown as overlay.
-
Isolation
Runs in the Chrome's Process: Custom Tabs is part of the Chrome process and has the same security sandbox. Shared: It’s possible to use a shared cookie JAR and session storage.
-
Limitations
No JavaScript injection: JavaScript execution is blocked within the app for increased security and privacy. Requires Chrome app: Chrome app must be installed, which is not available for all users or devices.
WebView
-
UX
Native feeling: Web content appears as a native part of the app, because it’s possible to control many aspects of the WebView to match the apps' look and feel.
-
Control
High: Extensive customization and configuration available and many APIs for interacting with web content.
-
Isolation
Separated: No cookies and sessions are shared with the users' Android browser; users won't be automatically logged in or reuse existing sessions.
-
Limitations
Performance: Performance can be slower, compared to Chrome Custom Tabs (CCT), for example.
No Google login: WebView can’t be used for “Sign-in with Google” due to security concerns, only possible with CCT.
iOS
WKWebView
-
UX
Native feeling: Web content appears as a native part of the app, because it’s possible to control many aspects of the WKWebView to match the apps' look and feel. Including support for autofill from Safari.
-
Control
High: Extensive customization and configuration available and many APIs for interacting with web content.
-
Isolation
Separated: No cookies and sessions are shared with Safari; users won't be automatically logged in or reuse existing sessions.
-
Limitations
Performance: Performance can be slower, compared to SFSafariViewController, for example.
Partial WebAuthN support: Passkeys generally supported, but no support for security keys.
SFSafariViewController
-
UX
Overlay: Uses Safari to render the web content, using the user's Safari settings ensures consistent web browsing between native app and browser. Part of the browser UI is visible to the user, like the back/forward button or the URL.
-
Control
Medium: Limited customization options, like no JavaScript injection, visible browser URL bar, and shown as overlay.
-
Isolation
Separated: No cookies and sessions are shared with Safari; users won't be automatically logged in or reuse existing sessions.
-
Limitations
No JavaScript injection: JavaScript execution is blocked within the app for increased security and privacy. Some browser functionality is limited, like no JavaScript alerts.
SFAuthenticationSession / ASWebAuthenticationSession (special mention)
SFAuthenticationSession and ASWebAuthenticationSession are specialized WebViews designed for OAuth/OpenID Connect authentication flows. They create a protected environment for user login, shielding credentials and sensitive data from the app itself. By sharing cookies and website data with Safari, these sessions maintain a smooth and unified user experience, particularly during authentication in either the browser or the app.
Solution Approach
As generally a native approach is wanted and this isn’t just used for sign-in/login only or auxiliary content, the hybrid apps leverage WKWebView iOS or WebView (Android).
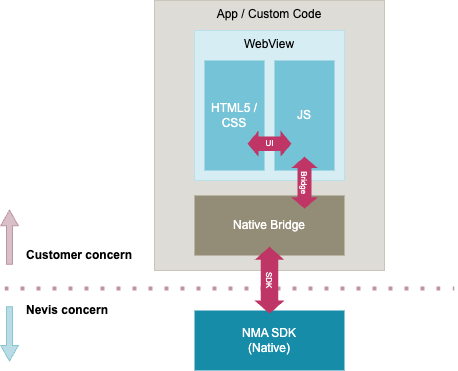
There are three different boundaries (see pink arrows) in the overview:
- UI: Updating the HTML5/CSS-based UI through JavaScript.
- Bridge: Interaction between the JavaScript-layer within the WebView and native parts, like first-party extension, OS-functionality or third-party SDKs (like the Nevis Mobile SDK).
- SDK: Boundary between the “App code” / “Custom code” and the Nevis Mobile SDK.
- Anything that is part of the “App / Custom code” is not related to the Nevis Mobile SDK, it has no control over it.
- There’s no direct interaction necessary nor required between the WebView and the Nevis Mobile SDK. Any interaction is controlled and facilitated by the “Native Bridge”.
- The Native Bridge is a custom code, designed and implemented by the customer or partner working on the mobile and integrating our SDK.
In the sequence diagrams on this page, "Native Bridge" represents the combination of the bridge mechanism (for example, @JavascriptInterface on Android or WKScriptMessageHandler on iOS) and the native code responsible for SDK interactions. In some application architectures, these two responsibilities are implemented as separate components, where the bridge handles the WebView communication and the native part calls the SDK directly.
Example: In-App Authentication via WebViews
This example uses the Nevis Authentication Cloud backend, however the concept is applicable to the Nevis Identity Suite as well.
- The user clicks “Login” in the HTML5 UI, which triggers the JavaScript web app.
- The JS part of the app communicates with the native part of the app via the bridge. On Android commonly exposed via @JavascriptInterface and addJavascriptInterface; and on iOS with WKScriptMessageHandler.
- The Native Bridge translates the message and seeing that the wanted action is “login” starts the FIDO UAF in-app authentication via the SDK. The native bridge interacts with the SDK as described in the authentication operation chapter.
- The SDK calls the
onSuccesstrigger with the native bridge, which includes the JWT token. - The JWT token can safely be returned to the web-app running in the WebView using either the
evaluateJavaScriptmethods or the previously mentioned@JavascriptInterfaceinterface to handle interactions between the WebView layer and the native parts. - The web app sends the JWT token back to its backend for finalization and verification.
- The backend interacts with the Authentication Cloud introspection endpoint.
- The result is processed by the custom backend, like: ensuring
status=true, detecting token re-use, or old tokens (iat). If all checks are successful, issue any relevant session, or access tokens as required by the app. - Return the session / your token back to the web app. The user is successfully authenticated.
Example: Out-of-Band Operation via WebViews
In this example, the WebView invokes the link dispatcher to obtain the out-of-band payload that the Mobile SDK can use to do the operation.
- The user interacting with the Web UI needs to do an operation: registration if the user must be enrolled or authentication if authorization is required.
- The WebView triggers the out-of-band operation using the link dispatcher.
- nevisFIDO responds. The link dispatcher response contains the out-of-band payload. The payload is in the
dispatchTokenResponsequery parameter of theresponseattribute, see Dispatch Token Response Format for details. - The WebView forwards the link with the OOB payload to the native part over the bridge.
- The native application decodes the contents of the
dispatchTokenResponsequery parameter (which is base64 URL encoded), and then passes it to theOutOfBandPayloadDecodejava, swift, objc, flutter, react native to obtain anOutOfBandPayloadjava, swift, objc, flutter, react native object. - The SDK returns the
OutOfBandPayload. - The native application starts an
OutOfBandOperationwith theOutOfBandPayload. See details for registration and authentication. - When the SDK operation completes, the native part sends a bridge callback to notify the WebView.
- In the case of authentication, when the operation completes, the WebView sends a request to obtain the session cookie. nevisAuth verifies the OOB authentication status with nevisFIDO before issuing the session. If this is an on-premise deployment, the request to be sent depends on how the out-of-band
AuthStateis configured as described here.
The diagram above shows the OOB payload forwarded directly from the WebView to the native application over the bridge. This is the most direct and reliable approach. Some applications trigger the OOB operation through alternative channels:
- Push notification: The backend sends a push notification to the native application, which then handles the OOB operation without the WebView passing the payload over the bridge. This requires push notification infrastructure (for example, Firebase Cloud Messaging) and is subject to platform-level delivery constraints — push notifications can be delayed or not delivered, making this less reliable than direct bridge communication. For more information on push notifications, see Push Support.
- Pending OOB operations polling: The native application polls the backend for pending OOB operations. This introduces additional latency and increases battery and network usage compared to receiving the payload directly. It is typically used as a fallback when push notifications are not received. For more information on the fetch channel, see Out-of-Band Payload from Pending Operations.
When using these alternative approaches, the WebView typically polls the backend session endpoint periodically to detect when the native operation completes, rather than relying on a bridge callback.
Security Considerations
When building apps based on WebViews the security boundaries are different, and need to be closely managed by the app. These security risks are independent of Nevis or using the Nevis Mobile SDK. Such as:
- To ensure no untrusted content is loaded in the WebView, like executing malicious JavaScript.
- Security tied to the sandbox offered by the WebView.
- Hardening offered by the Nevis Mobile SDK is limited to the operation of the Nevis Mobile SDK only.