Quickstart Guide
This guide shows you how to configure the Nevis Mobile Authentication SDK example applications to compile and run them against the Nevis Customer Authentication Cloud or Nevis Identity Suite.
What you need
Before you can start compiling and using the example applications, ensure you have the following ready:
- An Authentication Cloud instance provided by Nevis.
- An access key to use with the Authentication Cloud. You need to enter this later in the Authentication Cloud testing page.
- The example application sources cloned from GitHub for the platforms you want to try out.
Getting the example application
For each of the supported platforms, we provide an example application as source code. See the public Nevis GitHub Repositories to obtain the example apps you need.
You can simply clone an app of your choosing by using the command line:
- Android/Kotlin
- iOS/Swift
- Flutter/Dart
- React Native/TypeScript
git clone https://github.com/nevissecurity/nevis-mobile-authentication-sdk-example-app-android.git
git clone https://github.com/nevissecurity/nevis-mobile-authentication-sdk-example-app-android-coroutines.git
We provide two kinds of Android example applications: a simple and a coroutines one.
- The implementation of the simple version is as simple as it can be and follows the app architecture suggested by Google, all SDK invocations can be found in the corresponding
ViewModelimplementations. - The Coroutines version follows the principles of Clean Architecture and app architecture recommendations as well and all SDK invocations are wrapped into a coroutine call in a use-case implementation.
Choose the application based on your needs and mobile engineering experience, the functionalities provided by the apps are the same.
The Android example application references (is built) only with debug version of Nevis Mobile Authentication SDK. The release version of the SDK and the related finalizer plugin cannot be published because of licensing constraints, but they are needed to build an application that includes the protected and finalized version of the SDK and that can be uploaded to and distributed by Google Play Store.
To obtain a release version of Nevis Mobile Authentication SDK and the finalizer plugin, contact us on [email protected].
More detailed information regarding the Nevis Mobile Authentication SDK for Android installation can be found in the installation section.
git clone https://github.com/nevissecurity/nevis-mobile-authentication-sdk-example-app-ios.git
git clone https://github.com/nevissecurity/nevis-mobile-authentication-sdk-example-app-ios-rx.git
We provide two kinds of iOS example applications: a declarative and a reactive one.
- The implementation of the declarative version is as simple as it can be. The MVP presentation pattern is used and all SDK invocations can be found in the corresponding presenter.
- The reactive version follows the principles of Clean Architecture with the help of reactive technologies (RxSwift) and uses the MVVM pattern in the Presentation layer (RxSwift and RxCocoa).
Choose the application based on your needs and mobile engineering experience, the functionalities provided by the apps are the same.
git clone https://github.com/nevissecurity/nevis-mobile-authentication-sdk-example-app-flutter.git
git clone https://github.com/nevissecurity/nevis-mobile-authentication-sdk-example-app-react.git
Build and run
Follow the information provided in the README.md file of the example application to build and run it.
Using the example application
The example application is intended to be used in conjunction with the Authentication Cloud testing page.
- Visit
https://<your-cloud-instance>.mauth.nevis.cloud/test.html. - Expand the Setup & Tokens panel, and provide your access key in the Access Token text field.
- Click Check + Continue. The message "Provided token and URL are valid, you are good to go!" appears.
You are now ready to continue.
All example applications have a similar look and feel. They demonstrate some features provided by the SDK, which are all exposed through the app's main screen:
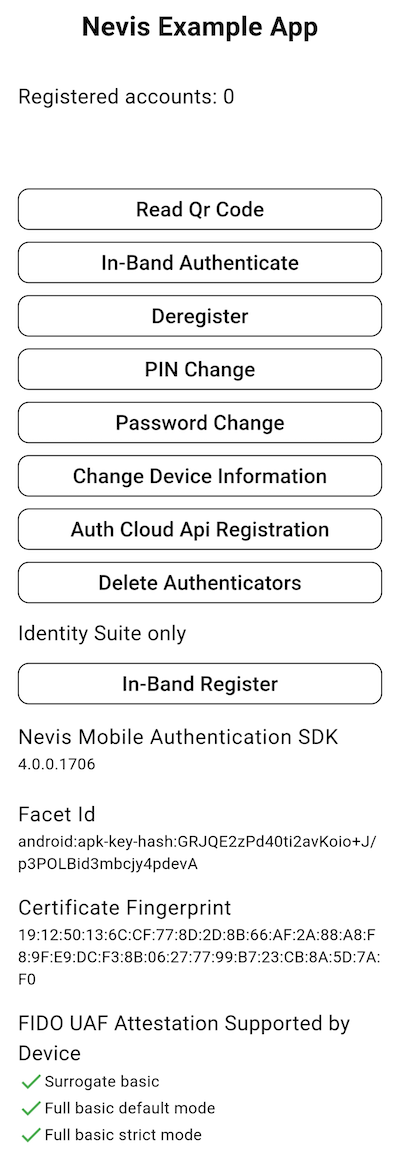
Registered accounts
In the top left corner you see the number of registered accounts. The example application is able to handle multiple accounts.
This information can be retrieved with the local data object
Read Qr code
You typically start with this, as it allows you to register one or more accounts and authenticators.
Registration
- Open the Authentication Cloud testing page and select the Enroll a new authenticator tab.
- Provide a username in the Username text field.
- After clicking Enroll, a QR code is displayed. Scan this QR code with the example application.
- The example app asks you to pick one of the authenticators available on the device. The PIN and Password authenticator is always available, and PIN prompts you to enter a 6-digit number, and similarly Password authenticator requires 6-character long password. The device passcode authenticator is available if a device lock is enabled in the operating system settings. The biometric authenticators depend on the device capabilities.
Authentication
After registering at least one account, you can do an out-of-band authentication by scanning an authentication QR code generated by Authentication Cloud testing page.
- Click the App/Push + SMS tab, enter a previously registered username and select QR Code in the Approval Method drop down menu
- Click Send Approval. A QR code is displayed.
- Scan the QR code with the previously built application and proceed with the authentication. The app confirms a successful authentication with a simple screen.
You need to fit the authentication QR code into the transparent square or it may not be recognised.
- The QR code scanning demonstrates the out-of-band communication channel.
- Visit the operations chapters for registration and authentication for more details.
In-band authenticate
The in-band authentication simulates what you typically do, when using the SDK to authenticate your application to access authentication protected backend APIs.
- After clicking the button, the example application prompts you to select the user to authenticate. Note that only the technical UUID identifier is shown, and not the username entered in the Authentication Cloud testing page.
- The application prompts you to select an authenticator the user previously registered.
- The application shows the authentication result after you provide the necessary authentication credentials, that is, PIN, Password, biometric information or device passcode.
Deregister
Deregister demonstrates client-initiated account and authenticator deregistration. Note that the example application deregisters all accounts at once, and does not allow you to select a specific account or authenticator for deregistration.
For more information, see Deregistration.
PIN / Password change
Changing the PIN or the Password is only available if one account has a registered the corresponding authenticator. You need to enter the old and a new PIN or Password credentials to successfully change it. As neither the PIN nor the Password is never stored on the backend, this operation is local.
Additional details can be found in the operations PIN Change or Password Change chapters.
Change device information
You can change the device name registered with the backend using this feature. This information is propagated to the backend.
For more information, see Device information change.
Authentication Cloud API registration
You can use the Authentication Cloud API registration to simulate the registration process using links. You typically use this for starting a registration process on the same device, letting the user click a link on the mobile browser or inside your custom application.
-
Open the Authentication Cloud testing page, and select the Enroll a new authenticator tab.
-
Provide a username in the Username textbox.
-
After clicking Enroll, you have two options to continue:
- Copy and paste the JSON enrollment response into the Enroll response text field in the example application.
- Copy the link of the Send to Access App button into the App Link Uri text field in the example application
-
Push ok to select an authenticator for enrollment, and complete the process.
For more information, see Out-of-band registration.
In-band registration
Performing in-band registration is only available for the Identity Suite, as Authentication Cloud does not support the scenario.
Enter an existing username and password to start the in-band registration process. After logging in with existing credentials, you are prompted to select an authenticator for registering mobile authentication credentials.
For more information, see Identity Suite in-app registration.
Meta Data
The main screen displays the information of the Nevis Mobile Authentication SDK and the enclosing application, such as the version of the SDK and the FacetId used by the SDK.
For more information, see SDK MetaData.
Device Capabilities
The main screen displays the information about what the device can support. Currently, this API is only available for Android, and it informs about whether the device supports full basic FIDO UAF attestations.
For more information, see Device Capabilities.