Server configuration
The initial server configuration can be set by using the nevisappliance command, either at the server's console or with a secure shell (ssh).
Basic settings
The minimal server settings include the configuration of the server's network interface, including the server's name, IP address and the default gateway. Also set the network time server.
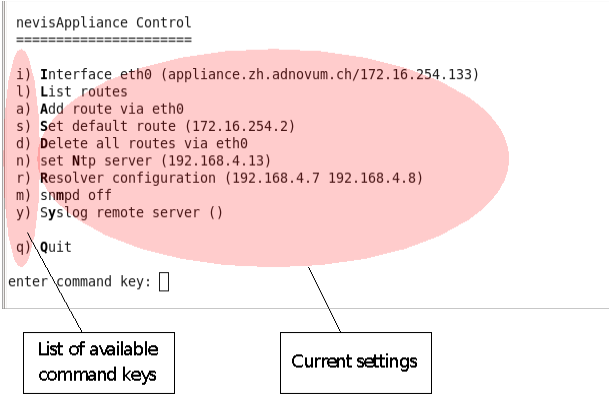
- Start the
nevisappliancecommand on the console. - Choose option
ito set the server's host name and primary IP address of the Ethernet interfaceeth0. - Then set the appropriate routes for the server by using option
aand/ors. - Set the NTP server's IP address by using option
n.
Name resolution is either done by adding the IP addresses and host names to the /etc/hosts file or by adding the name server using the command option r.
Network settings
The server's basic network settings require the following attributes:
- The server's full qualified host name
- The server's IP address
- The netmask of the IP network
- The IP address of the network's router
- The destination network address (if you don't use the default route)
- Network time protocol server's host name or IP address
- Optional: the IP addresses of the domain name system (DNS) servers
These settings are usually configured with the nevisappliance command line tool. This tool can be used in interactive mode if you invoke the command without any command line parameters (default behavior).
Sample setup: single-homed
In a single-homed setup, the server is connected to a single IP network using its first Ethernet interface eth0.
The following example uses the host name appliance.zh.adnovum.ch, the IP address is 172.16.254.133 and the netmask for the network is 255.255.255.0, its only interface is eth0 (the first Ethernet interface of the server).
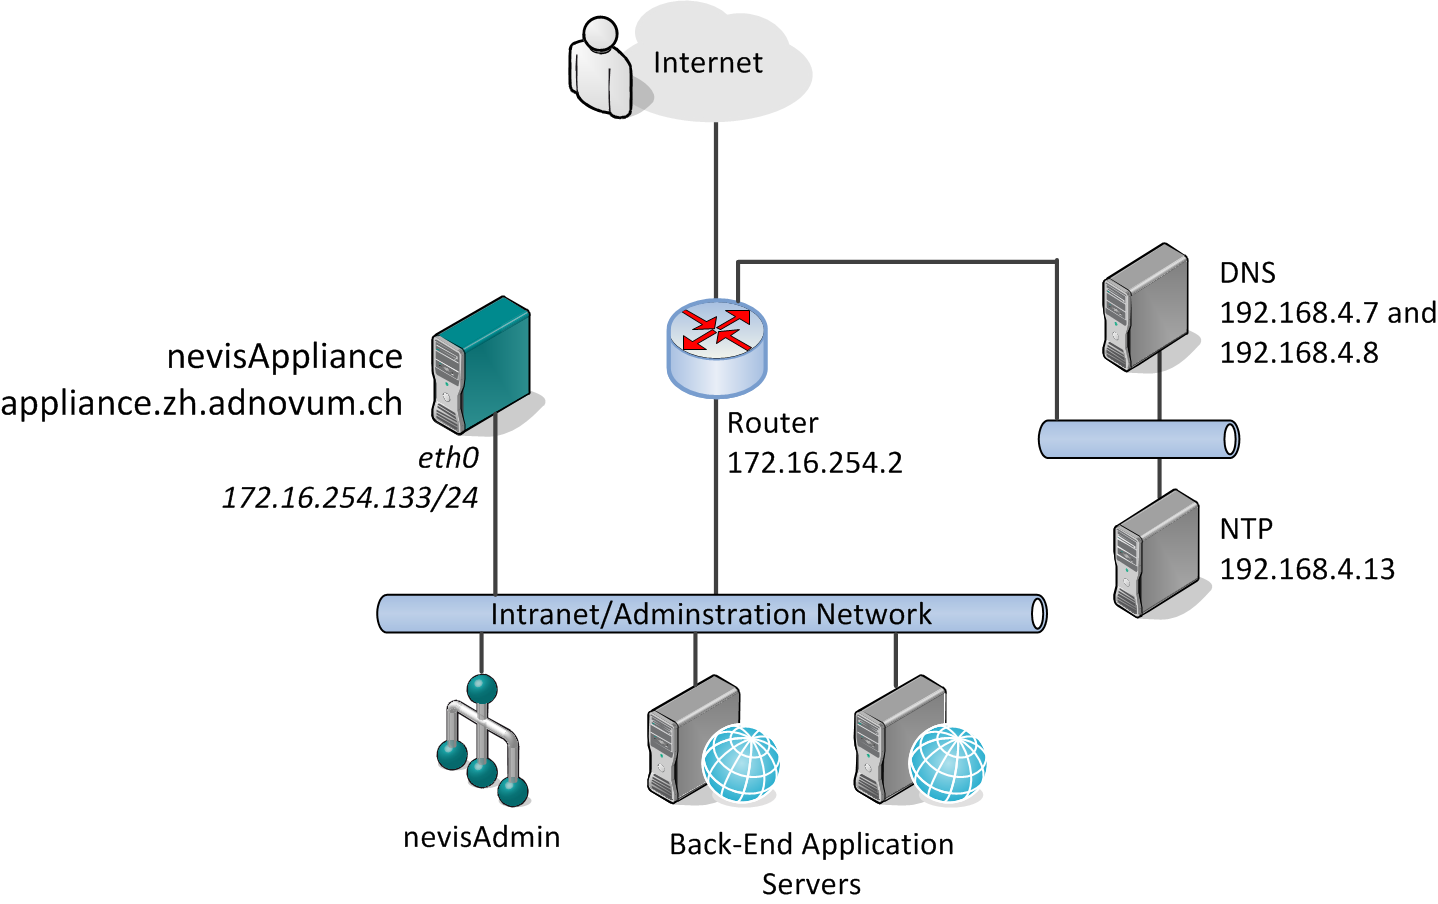
The gateway (router) of the network has the IP address 172.16.254.2 and every server is reachable via either the locally attached network itself or via this gateway. This means that you are going to configure a single Ethernet interface (eth0) by setting the server's host name, IP address and netmask. You are also going to configure a single route: the default gateway.
All these settings can be applied with the nevisappliance command:
- Use the command
ito set the server's host name (appliance.zh.adnovum.ch), IP address (172.16.254.133) and netmask (255.255.255.0). - Use the command
sto set the default gateway (172.16.254.2). - Optionally: Use the command
rto set the DNS servers' IP address and the commandnto set the NTP server's IP address or host name.
Sample setup: dual-homed
In a dual- (or multi-)homed setup, the nevisAppliance uses two or more Ethernet interfaces connected to different networks. The first Ethernet interface eth0 is still connected to the internal network. This interface is used for administrative purposes and lets your nevisAppliance connect to other servers within your company's network, e.g., nevisProxy connecting to your back-end application servers.
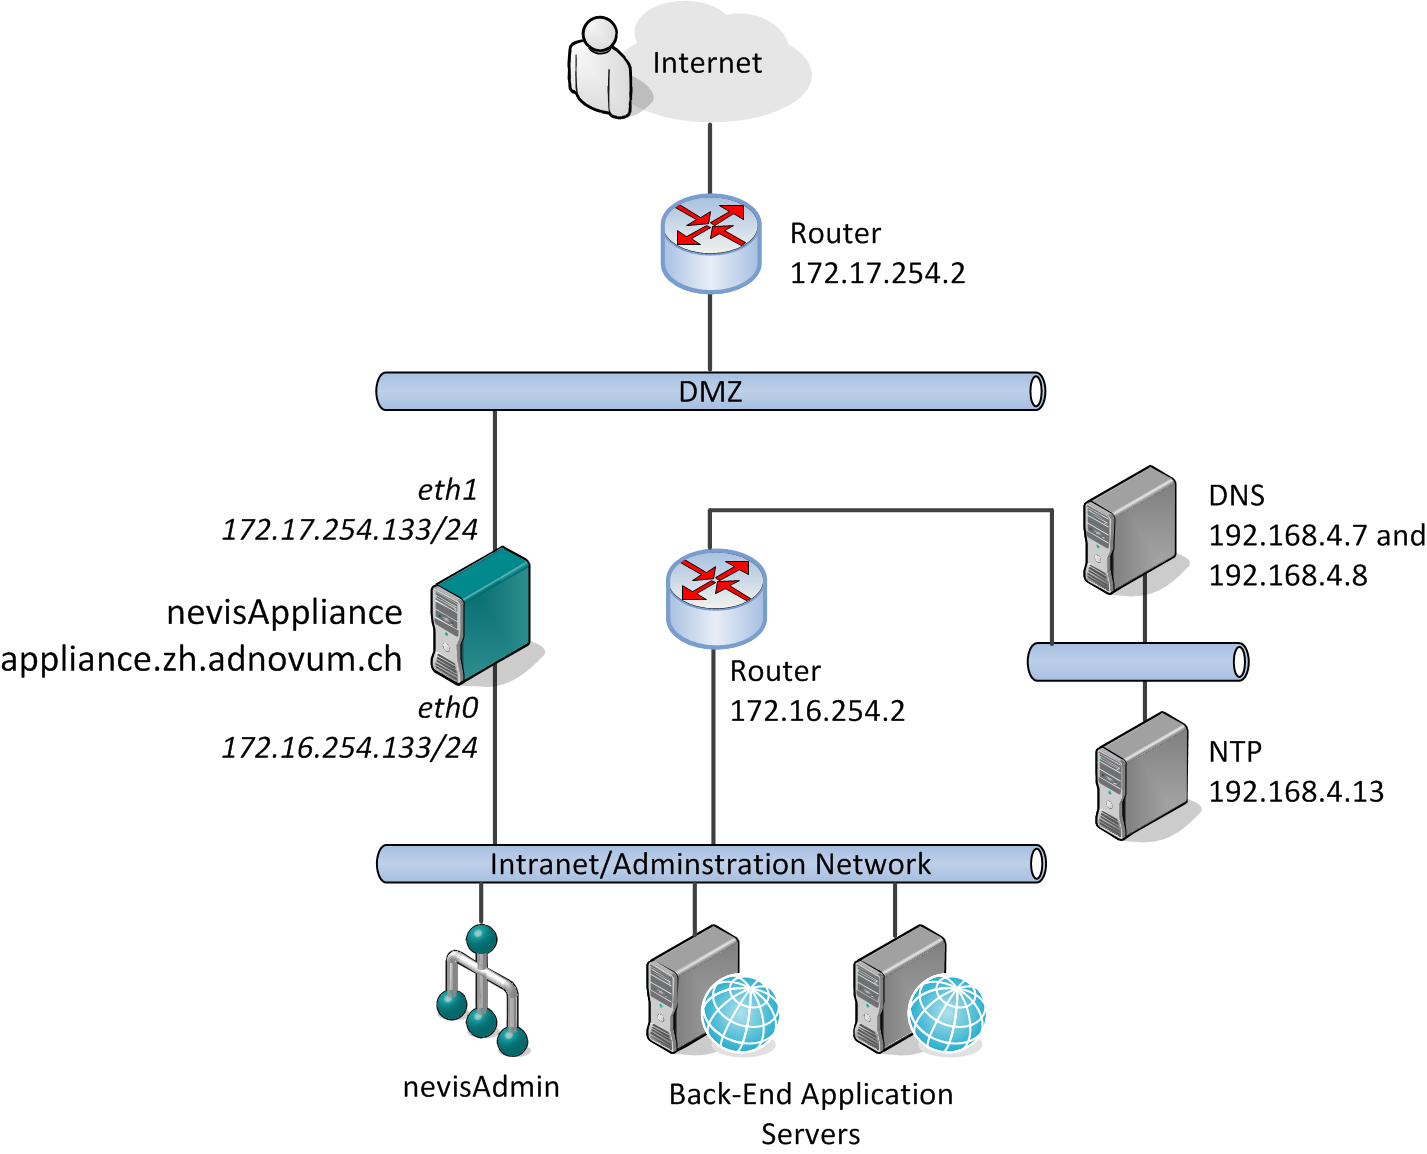
The nevisappliance command allows the following settings:
- Use the command
ito set the server's host name (appliance.zh.adnovum.ch), IP address (172.16.254.133) and netmask (255.255.255.0). - Use the command
ato set one or multiple routes for the servers that are accessed internally via the internal router (172.16.254.2). - Optionally: Use the command
rto set the DNS servers' IP address and the commandnto set the NTP server's IP address or host name.
The external Ethernet interface eth1 (172.17.254.133) is either configured manually or with nevisAdmin. For manual configuration, you create the ifcfg-eth1 file within the /etc/sysconfig/network-scripts/ directory. Usually, you create multiple files using subinterfaces (ifcfg-eth1:0, ifcfg-eth1:1, etc.), one for each IP address you want to use. See also the chapter Subinterfaces.
The default gateway is the external router connected to the DMZ interface. This router is used to reach any (also unknown) IP addresses within the internet.
Subinterfaces
Your server may have multiple IP addresses to support multiple services. For example, one IP address is used by your company website, the other one by the company's web mail application and a third one by the company's online trading platform.
The nevisappliance command can be used to assign the server's main IP address to the Ethernet interface eth0. Additional addresses are either configured automatically by nevisAdmin/nevisAgent if you are using a failover cluster, or manually by creating additional ifcfg-eth* files within the /etc/sysconfig/network-scripts/ directory.
Example of a server with three IP addresses assigned to its first Ethernet interface eth0:
# cat /etc/sysconfig/network-scripts/ifcfg-eth0
DEVICE=eth0
BOOTPROTO=static
ONBOOT=yes
HWADDR=00:0C:29:24:BA:BF
IPADDR=172.16.254.133
NETMASK=255.255.255.0
USERCTL=no
NM_CONTROLLED=no

# cat /etc/sysconfig/network-scripts/ifcfg-eth0:0
DEVICE=eth0:0
BOOTPROTO=static
ONBOOT=yes
IPADDR=172.16.254.134
NETMASK=255.255.255.0
USERCTL=no
NM_CONTROLLED=no

# cat /etc/sysconfig/network-scripts/ifcfg-eth0:1
DEVICE=eth0:1
BOOTPROTO=static
ONBOOT=yes
IPADDR=172.16.254.135
NETMASK=255.255.255.0
USERCTL=no
NM_CONTROLLED=no
Bonding
Multiple Ethernet interfaces can be used in active/standby mode to have a fault-tolerant network connection.
The following steps are necessary to configure two interfaces to share one IP address and to run in an active/standby mode.
- Define a new virtual interface called "bond0" within the /etc/modprobe.d/bond0.conf file. Setting "mode" to "1" enables the active/standby mode (you can also use another mode, e.g., "2" for load balancing):
alias bond0 bonding
options bond0 miimon=100 mode=1
- Create a new interface which specifies the IP address to be used:
# cat /etc/sysconfig/network-scripts/ifcfg-bond0
DEVICE=bond0
BOOTPROTO=none
ONBOOT=yes
IPADDR=172.16.254.133
NETMASK=255.255.255.0
USERCTL=no
- Configure the two Ethernet interfaces to be slave of this bond interface:
# cat /etc/sysconfig/network-scripts/ifcfg-eth0
DEVICE=eth0
BOOTPROTO=none
MASTER=bond0
SLAVE=yes
USERCTL=no

# cat /etc/sysconfig/network-scripts/ifcfg-eth1
DEVICE=eth1
BOOTPROTO=none
MASTER=bond0
SLAVE=yes
USERCTL=no
- Last, activate the new settings:
# systemctl restart network.service
Example of a running configuration (ifconfig command output):
bond0: flags=5187<UP,BROADCAST,RUNNING,MASTER,MULTICAST> mtu 1500
  inet 172.16.254.32 netmask 255.255.255.0 broadcast 172.16.254.255
  inet6 fe80::20c:29ff:fe3c:47ee prefixlen 64 scopeid 0x20<link>
  ether 00:0c:29:3c:47:ee txqueuelen 0 (Ethernet)
  RX packets 82 bytes 6768 (6.6 KiB)
  RX errors 0 dropped 6 overruns 0 frame 0
  TX packets 63 bytes 9058 (8.8 KiB)
  TX errors 0 dropped 0 overruns 0 carrier 0 collisions 0

eth0: flags=6211<UP,BROADCAST,RUNNING,SLAVE,MULTICAST> mtu 1500
  ether 00:0c:29:3c:47:ee txqueuelen 1000 (Ethernet)
  RX packets 705 bytes 69546 (67.9 KiB)
  RX errors 0 dropped 0 overruns 0 frame 0
  TX packets 501 bytes 140174 (136.8 KiB)
  TX errors 0 dropped 0 overruns 0 carrier 0 collisions 0

eth1: flags=6211<UP,BROADCAST,RUNNING,SLAVE,MULTICAST> mtu 1500
  inet6 fe80::20c:29ff:fe3c:47ee prefixlen 64 scopeid 0x20<link>
  ether 00:0c:29:3c:47:ee txqueuelen 1000 (Ethernet)
  RX packets 6 bytes 360 (360.0 B)
  RX errors 0 dropped 6 overruns 0 frame 0
  TX packets 8 bytes 648 (648.0 B)
  TX errors 0 dropped 0 overruns 0 carrier 0 collisions 0