Out-of-Band Registration
Description
The out-of-band authentication requires the creation of FIDO UAF credentials both on the user's device and on the FIDO UAF server. This operation is called Registration. Without registration, a user will not be able to authenticate. The security requirements of the application protected by Nevis define the nature of the authentication. This could be fingerprint, PIN/password, face recognition, or a combination of several authentication mechanisms.
The out-of-band registration differs from the in-band registration by the additional communication channel, which the out-of-band registration uses to obtain the FIDO UAF Registration Request. A common out-of-band scenario is where a user accesses a resource via laptop or desktop computer, but would like to authenticate with his mobile device (which must be FIDO UAF-enabled). Typically, the application on the mobile device fetches the Registration Request based on a QR code.
Prerequisites
- The application generating the credentials has FIDO capabilities. It contains an embedded FIDO Client with access to one or several FIDO Authenticators.
- The user already has existing credentials (a password, for instance) that can be used to authenticate.
- Nevis is configured in such way that only authenticated clients can register FIDO UAF credentials.
- Based on the provided information, the Relying Party Backend Application is able to render the QR code required for registration.
Rendering the registration QR code is not part of the Nevis Mobile Authentication Solution as the registration is typically done directly in the Relying Party Application itself. The documentation provides hints and code snippets to guide the integration.
Example Using QR Code
In the following example, a QR code is used to embed a mobile device into the registration flow. It thereby provides an additional channel ('out-of-band') outside the connection between laptop and Nevis Mobile Authentication. It is assumed that the user has two devices: A laptop to access an e-banking application, and a mobile device with FIDO capabilities to generate the FIDO UAF credentials. The e-banking application is protected in the same realm/domain as the nevisFIDO Create Registration Token Service.
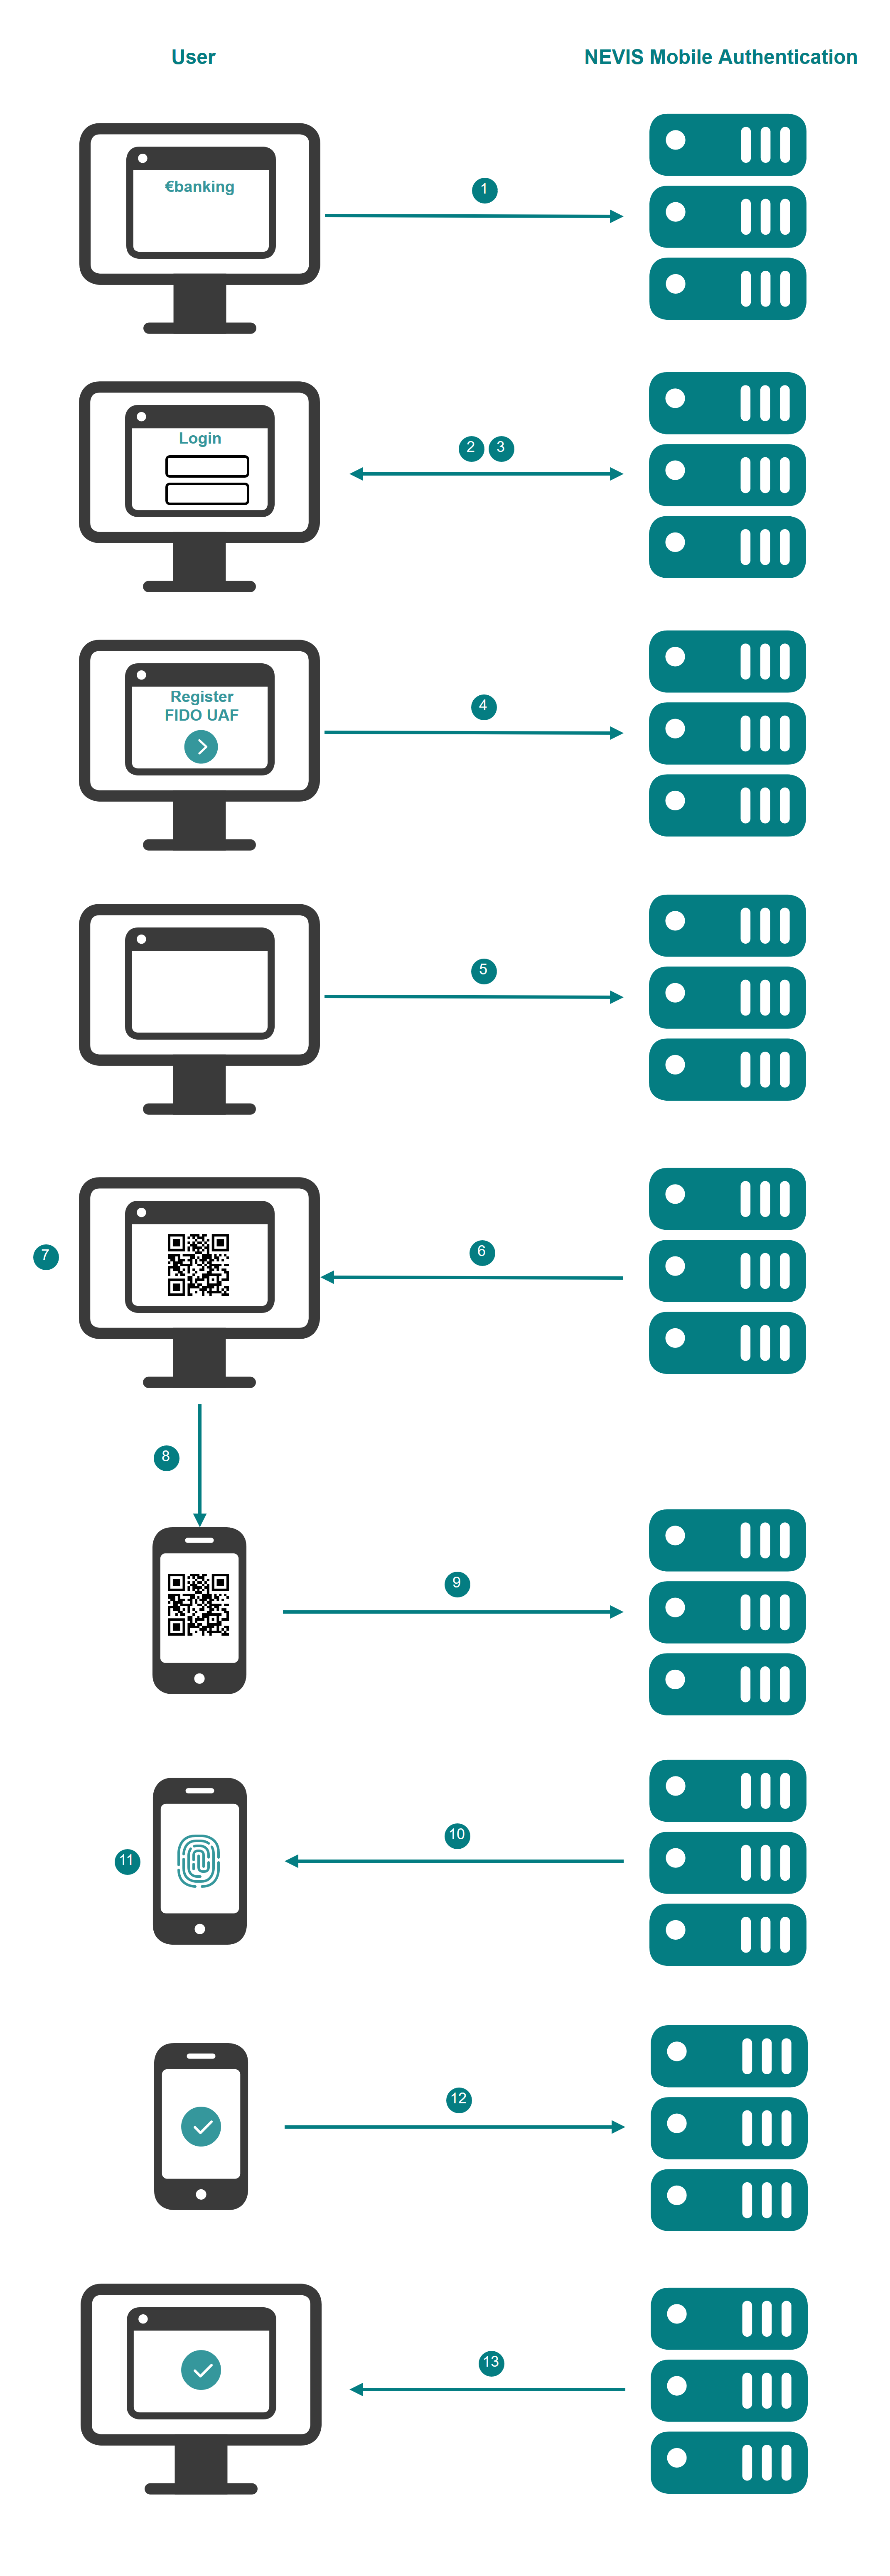
The numbers in the description below correspond with the numbers in the next figure.
- The user tries to access the e-banking application from a laptop's web browser.
- Nevis detects that an unauthenticated user is trying to access the e-banking application. Nevis asks the user to authenticate. This authentication must follow the security policy required to register new FIDO credentials (a password).
- The user authenticates by providing a password. The user is allowed to access the e-banking application through his browser.
- The user asks the e-banking application to perform a registration.
- The e-banking application loads some JavaScript in the web browser. Once loaded, the JavaScript sends a request to register to Nevis, which forwards it to the Create Registration Token Service. Both the registration application and the Create Registration Token Service are defined in the same realm/domain. This means that the registration application is allowed to access the Create Registration Token Service.
- Nevis generates a token and returns it to the browser. The JavaScript in the browser encodes the token and the token redemption URL in a QR code.
- The QR code is presented to the user in the browser screen. The user is instructed to scan the QR code using a mobile device.
- The user scans the QR code using a FIDO enabled application in the mobile device.
- The application in the mobile device decodes the QR code and sends the token to the specified redeem token URL. The redeem token URL is assumed to be unprotected.
- Nevis responds to the mobile device. This response includes the authentication methods (fingerprint) allowed by the e-banking application protected by Nevis Mobile Authentication.
- The user authenticates using an authenticator that complies with the requirements of the e-banking server application. New FIDO credentials are created on the mobile device.
- The credentials are sent to Nevis.
- The mobile application stores the credentials and notifies the user about the successful registration.
Note that from step 7 onwards, the JavaScript in the user's browser can query the nevisFIDO Status Service, to show progress and provide hints to the user in the laptop's screen.
For examples of JavaScript snippets that cover steps 5, 6 and 7 on browser level, see Out-of-Band Registration Client Code Examples.
Dispatch Target Registration
Also part of a complete, successful out-of-band registration is the registration of the mobile device for authentication using push notifications. This procedure is called dispatch target creation. It is out-of-scope of the FIDO UAF Registration and covered by the Nevis Mobile SDK.
This is how it works in a nutshell: Immediately after successful completion of the example flow described above, the mobile device creates a dispatch target ID in Nevis Mobile Authentication. The backend application can later use this dispatch target ID to send out-of-band authentication requests via push notifications to the mobile device. Refer to Dispatch Target Management for details.
Technical Flow
The technical flow in the next figure explains the component interaction in detail. The step numbers in the figure do not correlate with the simplified example above.
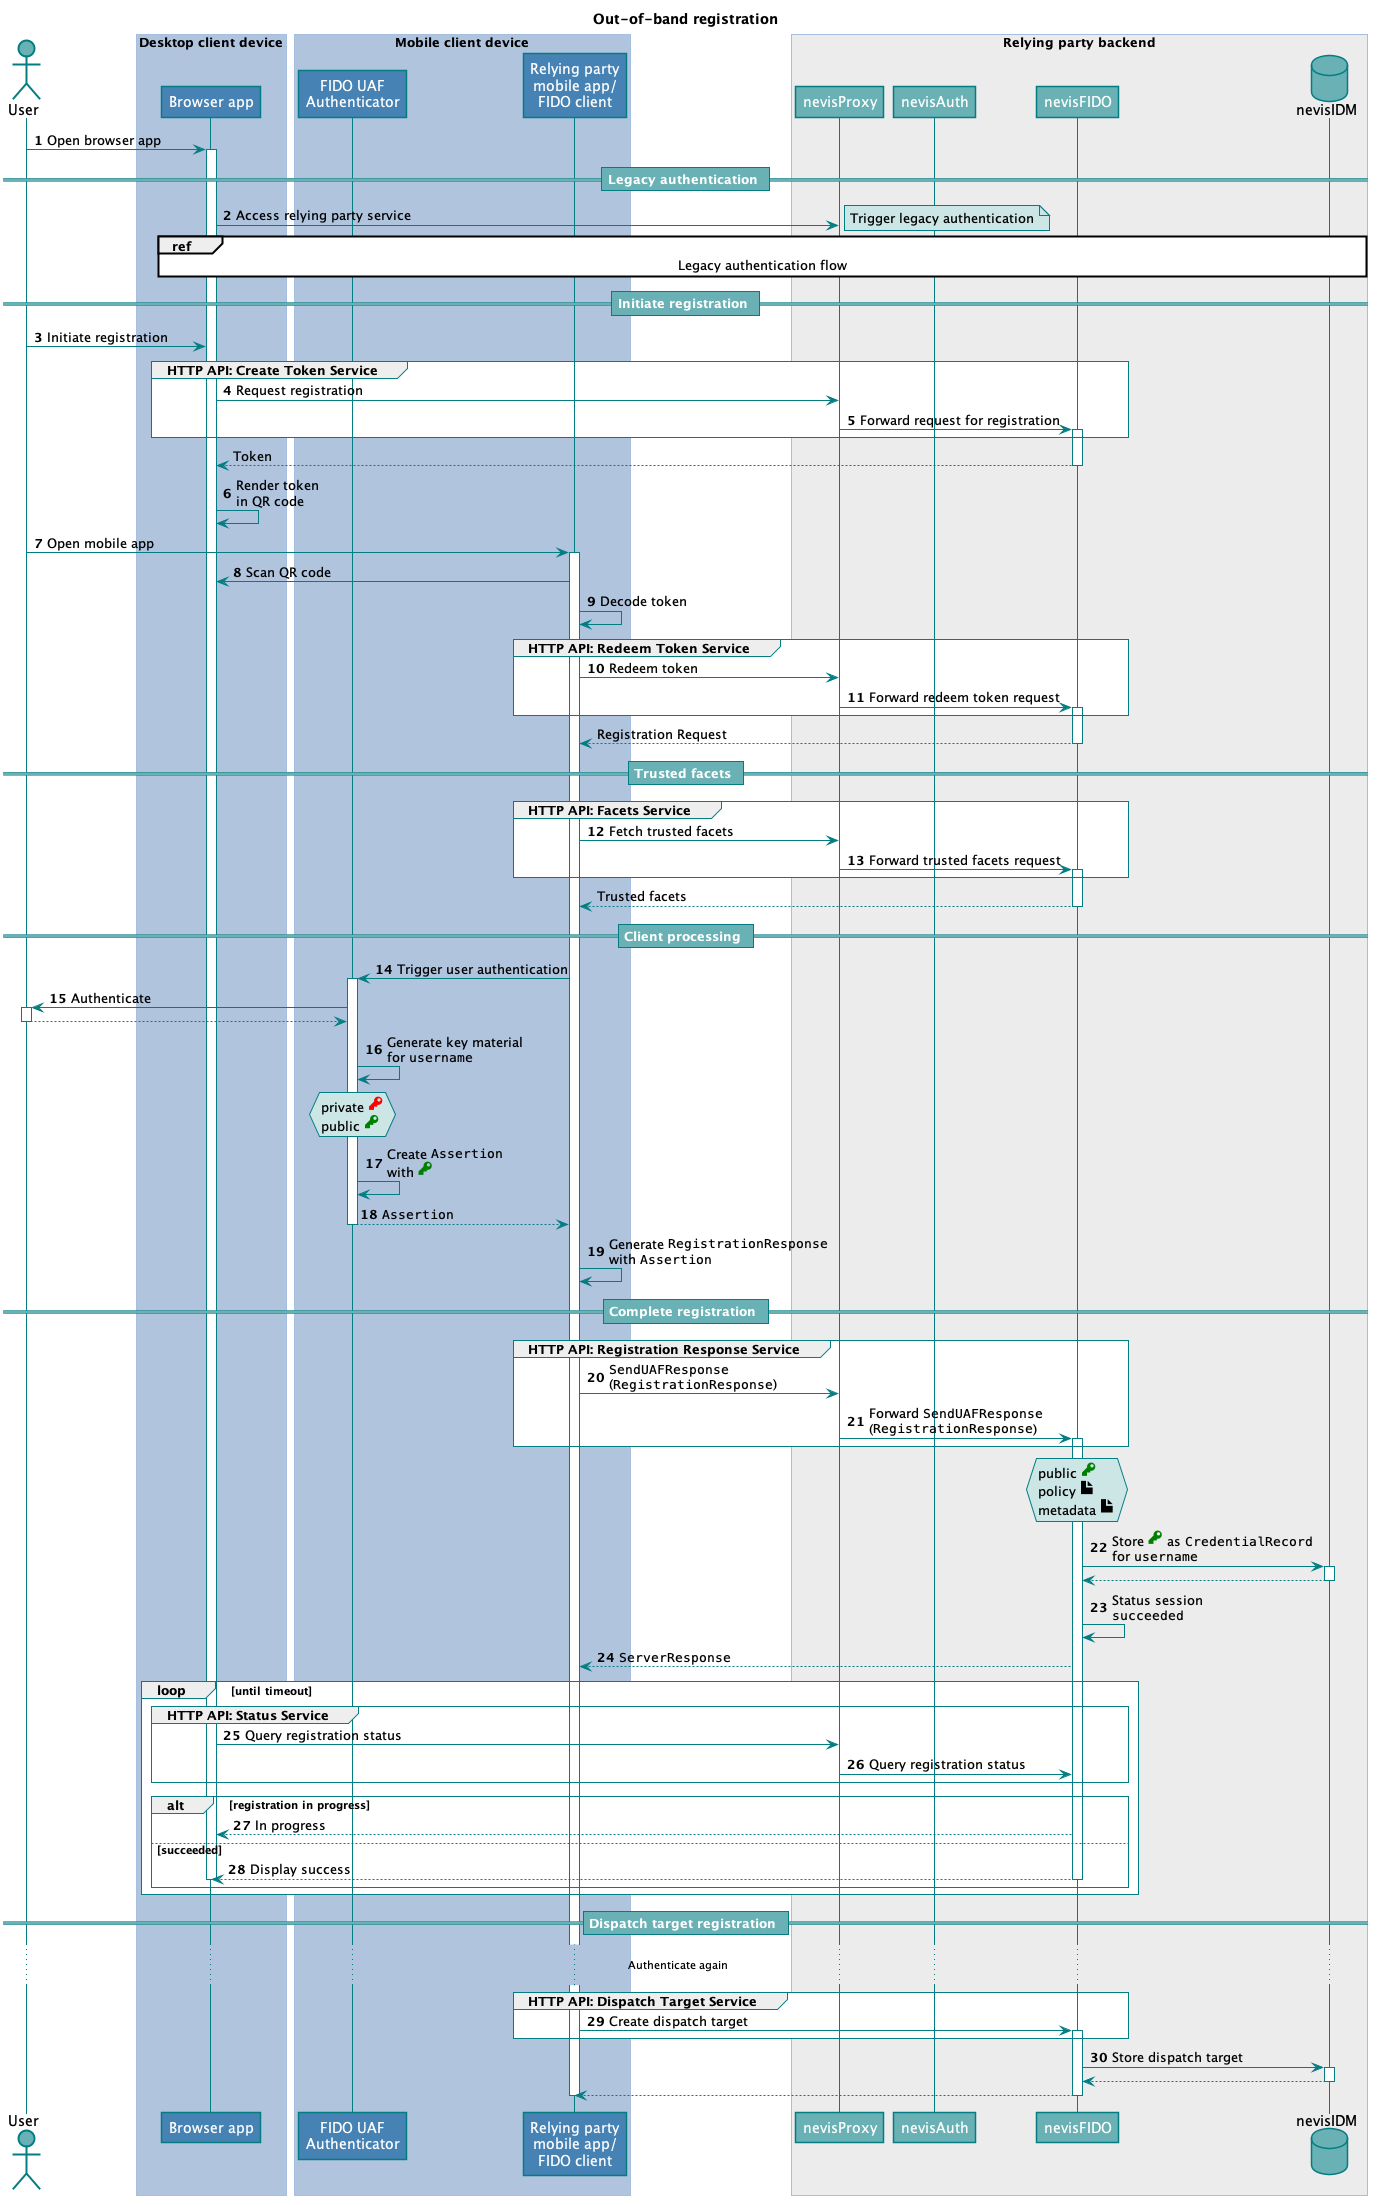
The complete out-of-band registration flow described here also contains a final conversation that is foreign to the FIDO UAF Registration: the dispatch target registration flow. This secondary flow enables the use of push notifications for FIDO UAF authentication – without registering a dispatch target, no push messages can be sent later.
Refer to Dispatch Target Management for an in-depth description.
The following table describes the steps in the previous figure. The numbers in the table correlate with the step numbers in the previous figure.
| Nr. | Description | Endpoint | References |
|---|---|---|---|
| 1. | The user opens the relying party application in a browser. | - | - |
| 2. | The browser is pointed at the protected relying party resource. nevisProxy detects that the user is not authenticated. A legacy login flow is initiated by nevisAuth. | https://<nevisProxy-host>:<nevisProxy-port>/ebanking | The legacy login flow is not documented as it heavily depends on the customer's requirements. |
| 3. | The user initiates the FIDO UAF registration process from inside the app in the browser " | ||
| 4. | The app requests registration by accessing the Registration Request Token endpoint of Nevis Mobile Authentication at nevisProxy. | https://<nevisFIDO-host>:<nevisFIDO-port>/nevisfido/token/create/registration | nevisFIDO Reference Guide:- Chapter "Create Token Service"FIDO Specification:- GetUAFRequest |
| 5. | nevisProxy transparently forwards the request to the nevisFIDO HTTP API. nevisFIDO answers with a token (for a Registration Request, to be retrieved out-of-band). | - | - |
| 6. | The browser application uses a bit of JavaScript code to render the token into a QR code. The QR code is used to tie a second channel into the flow: the mobile device ". | ||
| 7. | The user opens the Nevis FIDO UAF-enabled mobile application on a mobile device. This mobile device must be furnished with a camera. The user selects the option Register using QR code reader in the mobile app. This triggers the device to read the QR code. | - | - Out-of-Band Message Transmission |
| 8. | The mobile app reads the QR code from the desktop computer screen. | - | - |
| 9. | The mobile app decodes the scanned QR code, which yields a token. The token is an opaque piece of data, which can only be redeemed once, to initiate a proper FIDO UAF Registration Operation. | - | nevisFIDO Reference Guide:- Chapter "QR Codes" |
| 10. | The mobile app redeems the token at the Redeem Token endpoint. | https://<nevisFIDO-host>:<nevisFIDO-port>/nevisfido/token/redeem/registration | nevisFIDO Reference Guide:- Chapter "Redeem Token Service" |
| 11. | nevisProxy forwards the redeem token request to nevisFIDO. In turn, nevisFIDO sends a Registration Request to the FIDO UAF client on the mobile device. | - | - |
| 12. | The FIDO UAF client fetches the trusted facets. | https://<nevisProxy-host>:<nevisProxy-port>/nevisfido/uaf/1.1/facets | - |
| 13. | nevisProxy forwards the trusted facets request to nevisFIDO, upon which nevisFIDO returns the trusted facets back to the FIDO UAF client. | https://<nevisProxy-host>:<nevisProxy-port>/nevisfido/uaf/1.1/facets | nevisFIDO Reference Guide:- Chapter "Facets Service"FIDO Specification:- Facets |
| 14. | Now the FIDO UAF client/mobile app begins a user interaction procedure to authenticate the user. The necessary information is first transferred to the mobile device's FIDO UAF Authenticator. | - | - |
| 15. | The actual user interaction takes place: The user must authenticate using any of the acceptable methods (fingerprint, username/password, etc.). | - | - |
| 16. | After successful authentication, the FIDO UAF Authenticator generates the necessary key material for the authenticated user. | - | - |
| 17. | The authenticator creates a FIDO UAF Assertion containing the crypto information, especially the new public key, for the new registration. | - | - |
| 18. | The authenticator returns the assertion to the FIDO UAF client/mobile app. | - | - |
| 19. | The FIDO UAF client/mobile app packages the assertion in aRegistration Response, in accordance with the FIDO UAF protocol. | - | - |
| 20. | The mobile app sends the Registration Response, wrapped up in a SendUAFResponse, to the Registration Response endpoint. | https://<nevisProxy-host>:<nevisProxy-port>/nevisfido/uaf/1.1/registration | FIDO Specification:- SendUAFResponse |
| 21. | nevisProxy forwards the SendUAFResponseto nevisFIDO. | https://<nevisFIDO-host>:<nevisFIDO-port>/nevisfido/uaf/1.1/registration | nevisFIDO Reference Guide:- Chapter "Registration Response Service" |
| 22. | nevisFIDO performs necessary validation on the incoming Registration Response. When validation is successful, a Credential Record for this registration is stored in nevisIDM. | - | - |
| 23. | nevisFIDO marks the FIDO UAF session for this conversation as succeeded. | - | nevisFIDO Reference Guide:- Chapter "Response Body" |
| 24. | nevisFIDO returns the Server Response to the mobile app. | - | nevisFIDO Reference Guide:- Chapter "Response Body"FIDO Specification:- "FIDO UAF ServerResponse" |
| 25. | All the while during the out-of-band procedure negotiations via the mobile device, the desktop browser app queries nevisFIDO for the status of the ongoing FIDO UAF Registration Operation. For this purpose, the browser app uses a JavaScript app that repeatedly queries the Status endpoint. | https://<nevisFIDO-host>:<nevisFIDO-port>/nevisfido/status | nevisFIDO Reference Guide:- Chapter "Status Service" |
| 26. | nevisProxy forwards the status query to nevisFIDO by querying the Status endpoint of nevisFIDO. | - | - |
| 27. | As long as nevisFIDO has not yet received and validated a Registration Response from the mobile app, the out-of-band registration is still in progress. In this case, nevisFIDO will return an "in progress" status (as always via nevisProxy). | - | - |
| 28. | The out-of-band registration is successfully completed when nevisFIDO has received a Registration Response from the mobile app, validated and processed it. In this case, nevisFIDO will return a "succeeded" status (as always via nevisProxy), and mark the FIDO UAF session as "done". The mobile app then displays a success message like "Registration successful" to the user. | - | - |
| 29. | After successfully completing the registration, the secondary process of dispatch target registration immediately follows. A prerequisite for this process is another authentication, using the just-registered authenticator. The mobile app sends a request for dispatch target creation to the Dispatch Target Creation endpoint.As an alternative, it's possible to provide dispatch targets for creation in the RegistrationResponse sent in step 20. This simplifies the registration as: no additional backend call are required to register the dispatch target the client doesn't need to perform an additional authentication to be able to access the create dispatch target endpoint (this has direct impact on the user experience on the client side as the user is not asked to present his/her credentials twice during registration | https://<nevisFIDO-host>:<nevisFIDO-port>/nevisfido/dispatch/targets | Nevis Component Configuration Examples"nevisFIDO Reference Guide:- Chapter "Create Dispatch Target" |
| 30. | nevisFIDO stores the dispatch target information in nevisIDM, and indicates success/failure back to the client. | - | - |
Configuration Snippets
Refer to Nevis Component Configuration Examples for sample configuration snippets regarding all involved components.