
Authentication

Description

A user is trying to access an HTTP application, for example an e-banking application, which requires authentication. The user must provide the required authentication with a FIDO2 capable authenticator. Furthermore, the HTTP application is protected by Nevis (notably nevisProxy and nevisAuth).

Prerequisites

  • The user's device and browser must support FIDO2.
  • The user already has existing FIDO2 credentials which can be used to authenticate, see Registration.

Example

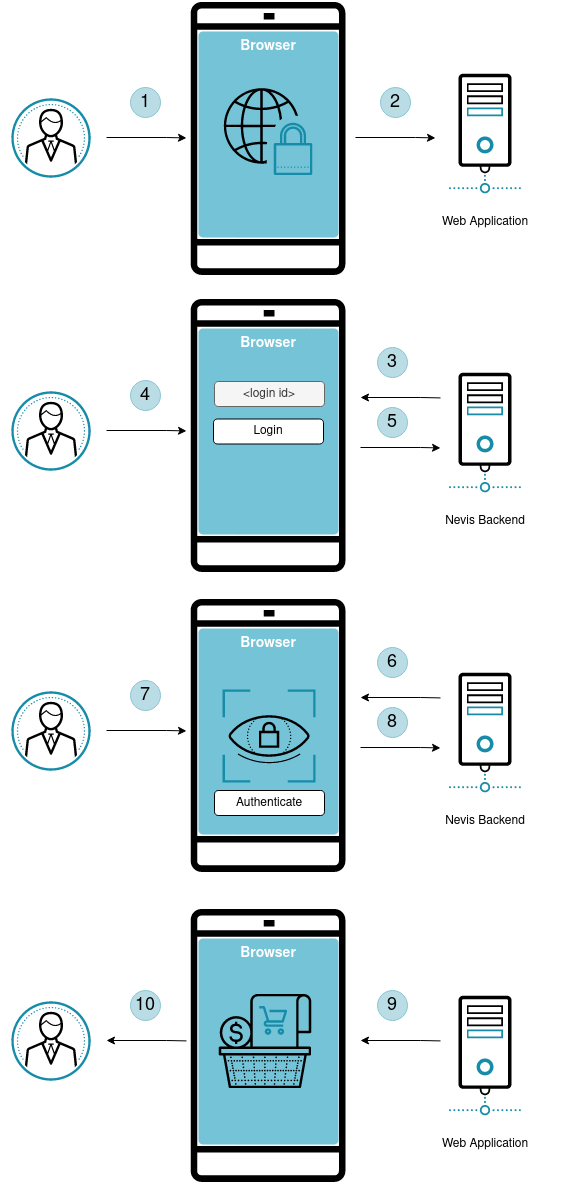
  1. The user opens the web application in the browser.
  2. The browser tries to access the web application to display information to the user.
  3. Nevis detects that the browser is not authenticated. It asks the user to provide his login identifier to authenticate.
  4. The user provides his login information.
  5. The login information is sent to the Nevis backend.
  6. After identifying the user, Nevis asks the user to provide FIDO2 authentication.
  7. The user authenticates using the FIDO2 Authenticator available on the client device.
  8. The signed FIDO2 assertion is sent to the Nevis backend for validation.
  9. The user is now authenticated and able to access the web server.
  10. The user is now logged in and able to access the web application.
FIDO2 Authentication Example

Technical flow

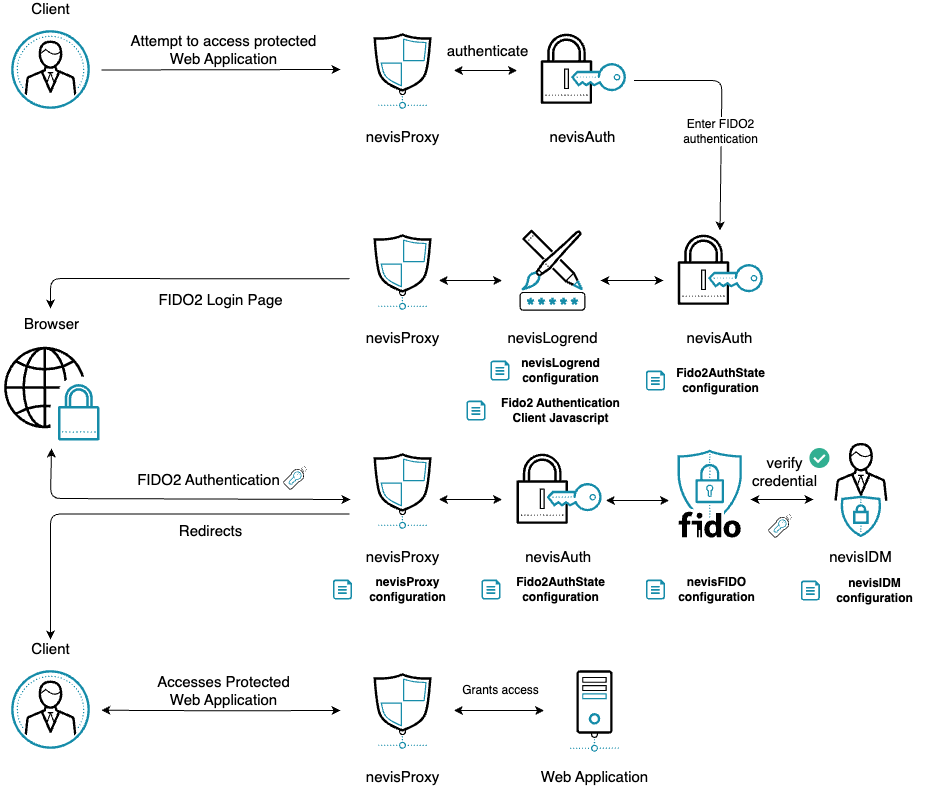
The technical flow in the following figure explains the component interaction in detail. The step numbers in the next figure do not correlate with the simplified example above.

note

The following flow is a simple compact example. Depending on requirements, changes or different approaches might be required. The key fix points are:

  • WebAuthn API in the browser.
  • FIDO2 HTTP API in nevisFIDO.
  • nevisAuth must be aware of the status of the FIDO2 authentication.
  1. User accesses protected resource.

  2. nevisProxy detects the user is not yet authenticated to access the protected resource, dispatches to nevisAuth.

  3. nevisAuth enters the authentication flow with Fido2AuthState, which requests rendering a login page, that includes FIDO2 Authentication Client Javascript.

  4. A login page is loaded in the browser, alongside the FIDO2 Authentication Client Javascript.

  5. User provides its username.

  6. The FIDO2 Authentication Client Javascript's authenticate(username) method is called.

  7. The username is posted to nevisAuth.

  8. Fido2AuthState recognizes it received a username and posts a ServerPublicKeyCredentialGetOptionsRequest to nevisFIDO, initiating FIDO2 Authentication. Endpoint: https://<nevisFIDO-host>:<nevisFIDO-port>/nevisfido/fido2/attestation/options

    Reference: nevisFIDO Reference Guide

  9. nevisFIDO queries the FIDO2 credentials from nevisIdm.

  10. Challenge is generated and the ServerPublicKeyCredentialGetOptionsResponse is built.

  11. The ServerPublicKeyCredentialGetOptionsResponse is returned to the FIDO2 Authentication Client Javascript.

  12. The FIDO2 Authentication Client Javascript initiates an authentication using the received Options response via the WebAuthn API in the browser.

  13. Dialog presented to the user by the browser to unlock the private key.

  14. The user authenticates.

  15. The WebAuthn API generates an assertion and returns it to the FIDO2 Authentication Client Javascript.

  16. The FIDO2 Authentication Client Javascript posts the ServerPublicKeyCredential with the assertion to nevisFIDO directly.

    Endpoint: https://<nevisProxy-host>:<nevisProxy-port>/nevisfido/fido2/assertion/result

    Reference: nevisFIDO Reference Guide

  17. nevisProxy forwards the request to the nevisFIDO endpoint, which is unprotected.

  18. nevisFIDO session lookup. (This session is independent of the nevisAuth session)

  19. nevisFIDO queries the FIDO2 credentials from nevisIdm.

  20. The FIDO2 credential is updated with a new SignCounter, to prevent cloned authenticators. (the counter is not increased by a predefined number)

  21. FIDO2 session is updated to reflect the current status.

  22. ServerResponse is returned stating the status of the FIDO2 authentication.

  23. The FIDO2 Authentication Client Javascript uses the fido2SessionId in the header to access nevisAuth and signal that the Authentication ceremony has been succeeded.

  24. nevisAuth receives the fido2SessionId header and compares it with the one it stashed into the session.

  25. Fido2AuthState verifies the status of the ceremony by accessing the status service of nevisFIDO.

    Endpoint: https://<nevisFIDO-host>:<nevisFIDO-port>/nevisfido/fido2/status

    Reference: nevisFIDO Reference Guide

  26. Session lookup in nevisFIDO.

  27. nevisFIDO returns the found status success.

  28. The Fido2AuthState finishes processing by setting the result condition ok and nevisAuth continues the authentication flow based on the result.

  29. An AuthDone AuthState is reached.

  30. nevisAuth returns to nevisProxy with a SecToken.

  31. nevisProxy redirects the client based on the result to the original resource, which can now be accessed by the authenticated client.

Integration

Overview

The following diagram illustrates the integrated flow, as well as the main points of configuration.

FIDO2 Authentication

General Considerations

  • Everytime you copy and create a file, make sure it is readable by nvauser, and is thus accessible by Nevis components.

Disclaimer

The guide assumes the Nevis components nevisProxy, nevisAuth, nevisFIDO, nevisLogrend and nevisIDM are already installed and setup in some configuration.

Integrate FIDO2 Authentication

  1. Create Fido2AuthState configuration in nevisAuth.

    Fido2AuthState configuration
    /var/opt/nevisauth/<instance>/conf/esauth4.xml
    <AuthState name="Fido2" class="ch.nevis.auth.fido.fido2.authstate.Fido2AuthState" final="true" resumeState="true"
    classPath="/opt/nevisfidocl/nevisauth/lib">
    <ResultCond name="ok" next="AuthDone"/>
    <ResultCond name="failed" next="AuthError"/>
    <ResultCond name="error" next="AuthError"/>
    <Response value="AUTH_CONTINUE">
    <Gui name="fido2_auth" label="FIDO2 Dialog" target="">
    <GuiElem name="lasterror" type="error" label="${notes:lasterrorinfo}" value="${notes:lasterror}"/>
    <GuiElem name="username" optional="true" type="text" label="Username" />
    <GuiElem name="btnFido2Authentication" type="button" label="Authentication" />
    <GuiElem name="btnFido2Cancel" type="button" label="Cancel" />
    </Gui>
    <Arg name="originalResource" value="${request:resource}"/>
    </Response>
    <property name="fido2SessionIdHeader" value="nevis-fido2-session-id"/>
    <property name="fido2UserName" value="${inargs:o.username.v}"/>
    <property name="fido2ServerUrl" value="https://<nevisfido-host>:<nevisfido-port>/nevisfido"/>
    </AuthState>

    Substitute nevisfido-host and nevisfido-port to together point to your nevisFIDO instance.

    For detailed configuration, please visit Fido2AuthState.

  2. Copy the FIDO2 Authentication Client Javascript and the base64 library.

    FIDO2 Authentication Client Javascript
    /var/opt/nevislogrend/<instance>/data/applications/def/resources/fido2_auth.js
    function authenticate(username) {
    fetch("", {
    method: "POST",
    headers: {
    "Content-Type": "application/json",
    },
    body: JSON.stringify({
    username
    }),
    })
    .then((res) => res.json())
    .then((options) => {
    options.challenge = base64url.decode(options.challenge);
    options.allowCredentials = options.allowCredentials.map((c) => {
    c.id = base64url.decode(c.id);
    return c;
    });
    assertion(options);
    })
    .catch((err) => console.error("error: ", err));
    }

    async function assertion(options) {
    const assertion = await navigator.credentials.get({
    publicKey: options
    });

    // Construct the JSON data to be sent in the POST request
    const postData = {
    id: assertion.id,
    type: assertion.type,
    response: {
    clientDataJSON: base64url.encode(assertion.response.clientDataJSON),
    authenticatorData: base64url.encode(assertion.response.authenticatorData),
    signature: base64url.encode(assertion.response.signature),
    },
    };

    // Make the JSON POST request
    fetch("/nevisfido/fido2/assertion/result", {
    method: "POST",
    headers: {
    "Content-Type": "application/json",
    },
    body: JSON.stringify(postData),
    })
    .then((res) => {
    await updateNevisAuth(options.fido2SessionId);
    })
    .catch((err) => console.error("error: ", err));
    }

    async function updateNevisAuth(fido2SessionId) {
    const updateNevisAuthResponse = await fetch("", {
    method: 'GET',
    credentials: 'same-origin',
    headers: {
    'nevis-fido2-session-id': fido2SessionId,
    }
    })
    .then((res) => {
    // page should be redirected
    })
    .catch((err) => console.error("error: ", err));
    }
    Base64url encoding library
    /var/opt/nevislogrend/<instance>/data/applications/def/resources/base64url.js
    /*
    * Base64URL-ArrayBuffer
    * https://github.com/herrjemand/Base64URL-ArrayBuffer
    *
    * Copyright (c) 2017 Yuriy Ackermann <[email protected]>
    * Copyright (c) 2012 Niklas von Hertzen
    * Licensed under the MIT license.
    *
    */
    (function() {
    "use strict";

    var chars = "ABCDEFGHIJKLMNOPQRSTUVWXYZabcdefghijklmnopqrstuvwxyz0123456789-_";

    // Use a lookup table to find the index.
    var lookup = new Uint8Array(256);
    for (var i = 0; i < chars.length; i++) {
    lookup[chars.charCodeAt(i)] = i;
    }

    var encode = function(arraybuffer) {
    var bytes = new Uint8Array(arraybuffer),
    i, len = bytes.length, base64 = "";

    for (i = 0; i < len; i+=3) {
    base64 += chars[bytes[i] >> 2];
    base64 += chars[((bytes[i] & 3) << 4) | (bytes[i + 1] >> 4)];
    base64 += chars[((bytes[i + 1] & 15) << 2) | (bytes[i + 2] >> 6)];
    base64 += chars[bytes[i + 2] & 63];
    }

    if ((len % 3) === 2) {
    base64 = base64.substring(0, base64.length - 1);
    } else if (len % 3 === 1) {
    base64 = base64.substring(0, base64.length - 2);
    }

    return base64;
    };

    var decode = function(base64) {
    var bufferLength = base64.length * 0.75,
    len = base64.length, i, p = 0,
    encoded1, encoded2, encoded3, encoded4;

    var arraybuffer = new ArrayBuffer(bufferLength),
    bytes = new Uint8Array(arraybuffer);

    for (i = 0; i < len; i+=4) {
    encoded1 = lookup[base64.charCodeAt(i)];
    encoded2 = lookup[base64.charCodeAt(i+1)];
    encoded3 = lookup[base64.charCodeAt(i+2)];
    encoded4 = lookup[base64.charCodeAt(i+3)];

    bytes[p++] = (encoded1 << 2) | (encoded2 >> 4);
    bytes[p++] = ((encoded2 & 15) << 4) | (encoded3 >> 2);
    bytes[p++] = ((encoded3 & 3) << 6) | (encoded4 & 63);
    }

    return arraybuffer;
    };

    /**
    * Exporting and stuff
    */
    if (typeof module !== 'undefined' && typeof module.exports !== 'undefined') {
    module.exports = {
    'encode': encode,
    'decode': decode
    }

    } else {
    if (typeof define === 'function' && define.amd) {
    define([], function() {
    return {
    'encode': encode,
    'decode': decode
    }
    });
    } else {
    window.base64url = {
    'encode': encode,
    'decode': decode
    }
    }
    }
    })();
  3. Configure nevisLogrend.

    Edit one of the .vm configuration files in your nevisLogrend instance. Prefer a header.vm or a .vm file dedicated for script imports.

    Import the FIDO2 Authentication Client Javascript into the HTML
    /var/opt/nevislogrend/<instance>/data/applications/def/webdata/template/header.vm
    #if ($gui.name == "fido2_auth")
    <script src="<app-data-path>/resources/base64.js"></script>
    <script src="<app-data-path>/resources/fido2_auth.js"></script>
    #end
  4. Configure nevisProxy.

    The FIDO2 calls of the FIDO2 Authentication Client Javascript must come through nevisProxy. If there is none yet, create a connector in nevisProxy towards nevisFIDO.

    Create the nevisFIDO connector with AutoRewrite off
    /var/opt/nevisproxy/default/work/WEB-INF/web.xml
    <servlet>
    <servlet-name>FidoConnector</servlet-name>
    <servlet-class>ch::nevis::isiweb4::servlet::connector::http::HttpsConnectorServlet</servlet-class>
    <init-param>
    <param-name>InetAddress</param-name>
    <param-value>localhost:9443</param-value>
    </init-param>
    <init-param>
    <param-name>AutoRewrite</param-name>
    <param-value>off</param-value>
    </init-param>
    <init-param>
    <param-name>SSLClientCertificateFile</param-name>
    <param-value>/var/opt/keybox/default/node_keystore.pem</param-value>
    </init-param>
    <init-param>
    <param-name>SSLCACertificateFile</param-name>
    <param-value>/var/opt/keybox/default/truststore.pem</param-value>
    </init-param>
    </servlet>

    Replace localhost:9443 with the endpoint nevisFIDO is accessible at in your network.

    nevisFIDO FIDO2 connector mappings
    /var/opt/nevisproxy/default/work/WEB-INF/web.xml
        <servlet-mapping>
    <servlet-name>FidoConnector</servlet-name>
    <url-pattern>/nevisfido/fido2/assertion/result</url-pattern>
    </servlet-mapping>

    <servlet-mapping>
    <servlet-name>FidoConnector</servlet-name>
    <url-pattern>/nevisfido/fido2/status</url-pattern>
    </servlet-mapping>
  5. Configure FIDO2 at nevisFIDO.

  6. Configure nevisIDM.

  7. Restart the instances, FIDO2 Registration should be operational!