Registration with nevisAuth
In this use-case, the FIDO2 Registration is implemented with ScriptStates in nevisAuth. For a generic description and prerequisits, please see Registration.
The presented example solution simplifies nevisAuth configuration by hiding most of the logic in the Groovy ScriptState including the HTTP API calls to nevisFIDO.
The Nevis Identity Suite provides an nevisAdmin4 pattern named nevisFIDO FIDO2 Self-Admin App which contains a FIDO2 / WebAuthn capable client JavaScript. Use it or build upon it, but note that it is considered to be experimental, we might change it or remove it in the future.
Technical Flow
The initial authentication depends on the custom integration as well as the existing means of authentication the end user possesses. Thus, the initial authentication steps are not explained in detail but only referenced.
The following flow is a simple compact example. Depending on requirements, changes or different approaches might be required. The key fix points are:
- WebAuthn API in the browser.
- FIDO2 HTTP API in nevisFIDO.
- nevisAuth must be aware of the status of the FIDO2 registration.
The user initiates the FIDO2 registration.
The ScriptState returns a GuiDescriptor configuring the nevisLogRend template to include the JS client.
The JS client submits an empty form POST to get the
ServerPublicKeyCredentialCreationOptionsResponse. In this example implementation theServerPublicKeyCredentialCreationOptionsRequestis generated by the Groovy ScriptSate.The
ServerPublicKeyCredentialCreationOptionsRequestis created byScriptStateand calls the nevisFIDO Options endpoint.Endpoint:
https://<nevisFIDO-host>:<nevisFIDO-port>/nevisfido/fido2/attestation/optionsReference: nevisFIDO Reference Guide
nevisFIDO queries the FIDO2 credentials from nevisIdm.
Challenge is generated and the
ServerPublicKeyCredentialCreationOptionsResponseis built.A direct response is prepared using the
ServerPublicKeyCredentialCreationOptionsResponse.JS client receives the
ServerPublicKeyCredentialCreationOptionsResponse.JS client initiates a registration using the received Options response via the WebAuthn API.
Dialog presented to the user by the browser to confirm the credential creation.
The user approves the credential creation.
The WebAuthn API generates the keys and returns an attestation to the JS client.
JS client submits attestation to the backend.
The
ScriptStatein nevisAuth assembles aServerPublicKeyCredentialForRegistrationJSON payload from the form submit and calls the nevisFIDO REST API.Endpoint:
https://<nevisFIDO-host>:<nevisFIDO-port>/nevisfido/fido2/attestation/resultReference: nevisFIDO Reference Guide
nevisFIDO session lookup. (This session is independent of the nevisAuth session)
Incoming request validated according to the WebAuthn specification.
nevisFIDO stores the FIDO2 credential in nevisIDM, such that it is related to the username.
FIDO2 session is updated to reflect the current status.
ServerResponse is returned stating the status of the FIDO2 authentication. At this point the FIDO2 registration is completed.
ScriptStatetransitions took.
Integration
Overview
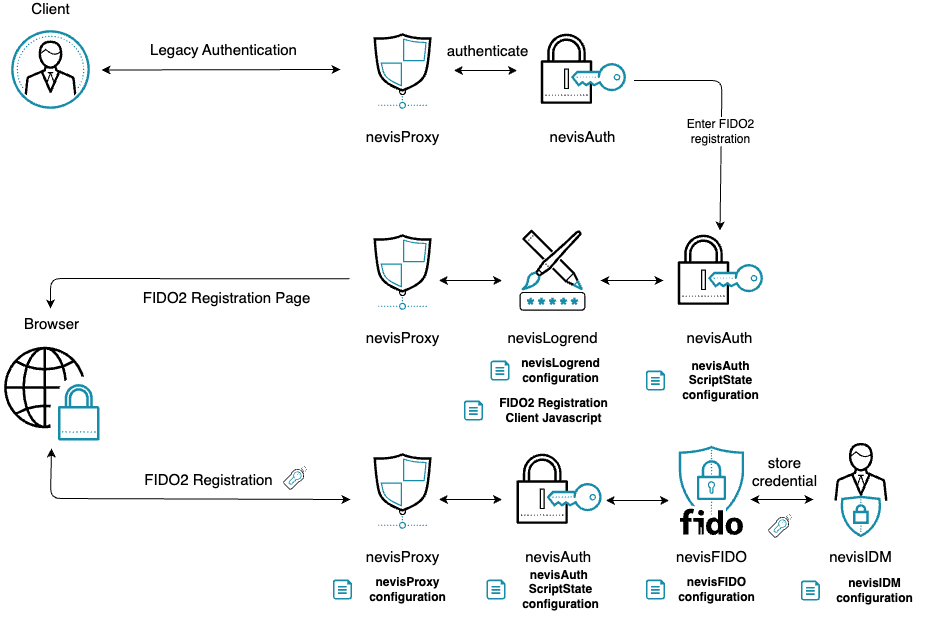
The following diagram illustrates the integrated flow, as well as the main points of configuration.
General Considerations
- A legacy authentication should preceed FIDO2 Registration, which ensures the user is authenticated before it can create new credentials. This means the following AuthStates should be created as part of a
stepupauthentication flow in nevisAuth. - The ScriptState assumes that an
IdmGetPropertiesStateAuthState is executed in the flow before, which maps the userId received from the browser to an extId. - Everytime you copy and create a file, make sure it is readable by
nvauser, and is thus accessible by Nevis components.
Disclaimer
The guide assumes the Nevis components nevisProxy, nevisAuth, nevisLogrend, nevisFIDO and nevisIDM are already installed and setup in some configuration, i.e. that the environment already supports use-cases independent of FIDO2.
Integrate FIDO2 Registration with nevisAuth
Copy & paste the groovy script into your nevisAuth instance folder.
FIDO2 Registration ScriptState
Create the ScriptState in the nevisAuth configuration:
FIDO2 Registration ScriptState configuration
The GUI has an element named
fido2_registration, this will help nevisLogrend to realize the FIDO2 Client Javascript is to be served to the client side.Substitute data from your environment into this configuration block, such as the
fido-hostandfido-portwhich together point to your nevisFIDO instance, and theinstancewhich is the name of the nevisAuth instance.Integrate this AuthState into your authentication flow by making another AuthState or Domain refer to it, then set the
next-state. If no further processing is required after FIDO2 Registration,next-stateshould point to anAuthDoneAuthState.noteMake sure to choose a step-up authentication flow to integrate into, and make sure the
extIdof the user is already loaded into the session. This latter can be ensured with theIdmGetPropertiesStateAuthState for example.
Copy the Javascript files into
/var/opt/nevislogrend/<instance>/data/applications/def/resourcesor into another application inside nevisLogrend.FIDO2 Client Javascript
FIDO2 utily
Base64url encoding library
Configure nevisLogrend
Edit one of the
.vmconfiguration files in your nevisLogrend instance. Prefer aheader.vmor a.vmfile dedicated for script imports.Import scripts into the HTML
Configure nevisProxy.
The FIDO2 calls of the Javascript now must come through nevisAuth, as the ScriptState is designed to dispatch them to nevisFIDO. To make this happen, subsequent requests must reach the ScriptState.
Enable RecheckAuthentication for your IdentityCreationFilter
Restart the instances, FIDO2 Registration should be operational!