Nevis Authentication Cloud
About Nevis Authentication Cloud
The Nevis Authentication Cloud extends your existing Identity Suite with mobile authentication. It is a separate product offered as a fully managed cloud service, providing you with a FIDO-certified solution, without having to operate any additional services in your data center.
Together with the Nevis Identity Suite you can offer a passwordless or multi-factor authentication experience that end-users nowadays expect.
Further resource
If you want to learn more about Nevis Authentication Cloud or are interested in a free trial, see the Nevis homepage.
What about nevisFIDO?
If you are interested in setting up Mobile Authentication in your own data center, see the Configuring Mobile Authentication Use Cases.
Overview
The following diagram shows the basic architecture:
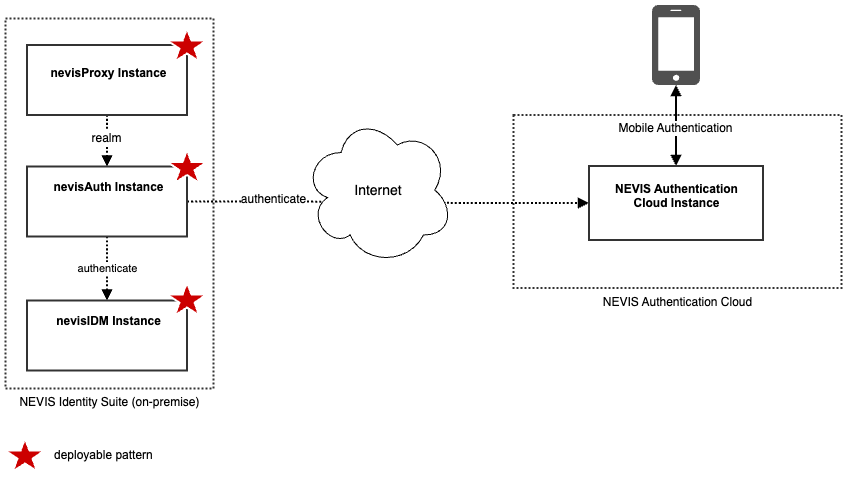
Dependencies
Integrate the Nevis Authentication Cloud with your Nevis Identity Suite requires the following:
- nevisProxy, nevisAuth and nevisIDM on-premise; and
- A fully managed Nevis Authentication Cloud instance.
The amount of base setup you have to do depends on your existing configuration (if any):
- If you are configuring Nevis Authentication Cloud for an existing setup, you already have a project. In this case, you need to adapt your already configured patterns to the following instructions.
- If you are starting from scratch, or with a setup that has only a subset of the required patterns, follow all the matching instructions for the Base Setup before you proceed.
Further resources
If you want to set up Nevis Authentication Cloud from scratch, also consult the following resources:
- Main Concepts of nevisAdmin 4.
- Getting Started, which explains how to configure a web application protected by nevisProxy.
- Alternatively, the following Nevis yoU books are also available (requires registration):
Basic Steps
If you are starting with an empty project, have a look at the [Base Setup] for Nevis Mobile Authentication which covers the same steps with more details. Skip the nevisFIDO setup, as that is the functionality that the Nevis Authentication Cloud will provide for you.
Understanding the Pattern
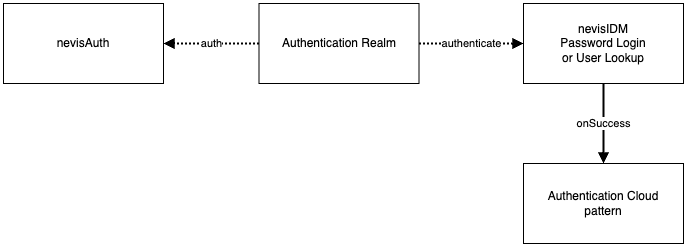
The Nevis Authentication Cloud pattern can take a user from an on-premise nevisIDM and a trigger mobile authentication against the Nevis Authentication Cloud service. The Authentication Cloud pattern has to be added to the authentication flow of your Authentication Realm, after an authentication step for nevisIDM. There are 2 such authentication steps:
- nevisIDM User Lookup: the user has to enter the user name. Use for passwordless authentication.
- nevisIDM Password Login: the user has to enter user name and password. Use for multi-factor authentication.
If a user is successfully authenticated against the on-premise nevisIDM, the Authentication Cloud pattern then checks whether the user has used the Authentication Cloud service for login before. If the user has never used Authentication Cloud for login, the pattern registers the user in the Authentication Cloud service by asking them to scan a QR code with their phone in your branded Access App.
For existing users of the Authentication Cloud, a push notification will be sent to the user's mobile device which prompts a secure authentication with your branded Access App. This secure authentication could be a fingerprint, a Face ID or a PIN. If this is successful, the authentication flow continues. If there are no other logins steps configured, the user is logged in successfully.
The following diagram shows how Authentication Realm, nevisIDM User Lookup or nevisIDM Password Login,and the Nevis Authentication Cloud patterns may be combined.
Getting your API Access Key
Getting the access-key.json file
- Sign in to Authentication Cloud Management Console through the Nevis Orbit portal.
- In the sidebar of your instance, under Integrations, click Nevis Identity Suite.
- Click on Add Nevis Integration.
- Click the nevisAdmin 4 button.
- For Nevis Site Name, enter your company or project name.
- For Nevis SSO URL/Domain, enter the URL of your application, including the protocol http or https.
- Click on Next.
- Click the Download access-key.json file button.
- Click Next, then Done.
Configuring the Authentication Cloud Pattern
Adding the Nevis Authentication Cloud pattern to your existing project
You have to add the Nevis Authentication Cloud pattern to your authentication flow.
- After you logged into your nevisAdmin 4 GUI, open the Configuration tab.
- Select the nevisIDM Password Login or nevisIDM User Lookup pattern.
- Under Basic Settings, click the On Success field.
- In the drop-down, select Add pattern.
- Select Authentication Cloud from the Pattern Categories list.
- Click the Authentication Cloud pattern.
- Click the Add pattern button.
- Save your changes under Basic Settings.
Configure the Authentication Cloud pattern
- Under Basic Settings, click on the New Authentication Cloud pattern.
- Rename it to Authentication Cloud and save it.
- Under Basic Settings, in Access Keys JSON, click the var button.
- In the dialog, click the Set variable button and save your changes.
- Click the Infrastructure tab at the top.
- In your inventory, click under vars: to add a new variable.
- On the Insert secret button, select the drop-down menu.
- Select Import variables. In the dialog, click the Import variables button.
- Highlight the authentication-cloud-access-json: variable.
- Copy it onto the next empty line under vars.
- Place your caret right after the colon in authentication-cloud-access-json:.
- On the Insert secret button, select the drop-down menu. Select Attach files.
- In the dialog, select the access-key.json file you downloaded from the Nevis Authentication Cloud.
- Click the Attach button.
- Save your changes.
You have now successfully connected your Nevis Authentication Cloud to your existing on-premise Nevis Identity Suite installation.