Tenants
Overview
nevisAdmin 4 supports the existence of multiple tenants within a single nevisAdmin 4 application instance.
Each tenant consists of:
- project and inventory data, and
- project and inventory settings, such as permissions and plug-in library dependencies.
The above data is separated for each tenant and cannot be accessed by other tenants.
Tenants are a good option if you have teams or divisions that need to work independently from each other. If this is not relevant for you, simply use nevisAdmin 4 with a single tenant. For this purpose, every nevisAdmin 4 instance comes with a tenant named DEFAULT.
In nevisAdmin 4, the following data and settings are global and not managed per tenant:
- Users and groups.
- SSH and Git key management and other settings in the nevisadmin4.yml configuration file.
- Installed (uploaded) plug-in libraries.
- The master key of the nevisAdmin 4: [Encryption and Storage of Secrets].
Furthermore, it is possible to import projects from one tenant to another via the version control functionality (Git). This means that tenants cannot be used to completely isolate (hide) user/group populations from each other. If you want this, you should set up multiple independent application instances of nevisAdmin 4.
Creating Tenants
It is not possible to create tenants in the GUI. Use the REST API instead. For more information, see Managing Tenants via REST below.
Switching Tenants
Each tenant has its own projects and inventories. How tenants are displayed depends on the setup of your nevisAdmin 4 and the permissions assigned to users or user groups.
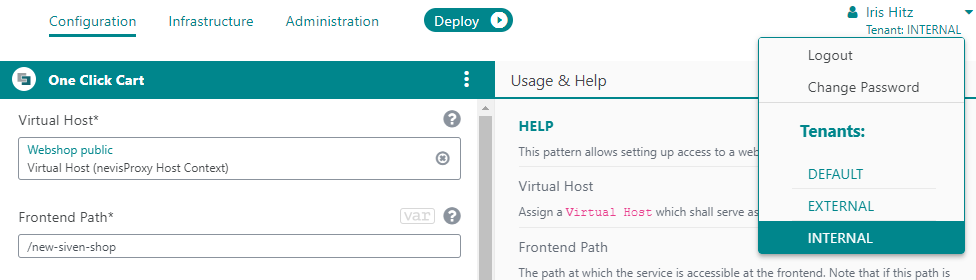
In extensive setups with multiple tenants assigned to one user, this user will have a tenant selection in the User menu*.* The User menu is available in the upper right corner of the application screen (see the next figure). The tenant selection will only include those tenants for which the user has permissions assigned.
By selecting a tenant from the menu, the user can see the projects and inventories belonging to that tenant.
If a single tenant is assigned to the user, the user will see this tenant displayed under his e-mail address in the upper right corner of the application screen (see the next figure). However, the user will not be able to switch to another tenant.
The user will only see those projects and inventories that belong to the single tenant for which the user has been granted permission.

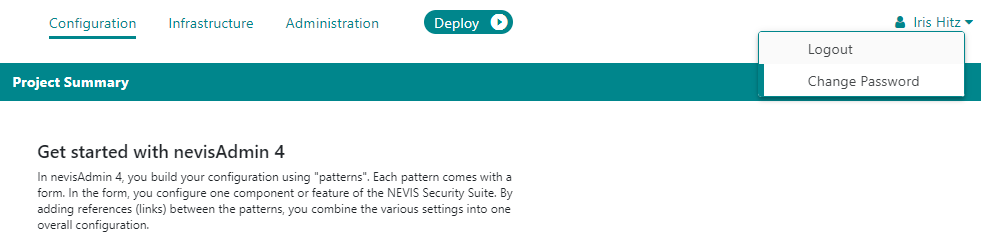
For users who only have the DEFAULT tenant assigned, no additional information will be displayed (see next figure).
The user will only see the projects and inventories of the DEFAULT tenant.
Note that you cannot deploy a project and an inventory from different tenants. The deployment wizard will only accept projects and inventories from the same tenant. See Deployment of the Configuration.
Permissions
It is possible to assign permissions on tenant level. This authorization level lies in between the global and the project/inventory authorization levels. To be able to assign permissions on a tenant, have the Administer tenant permission for that tenant on application level.
nevisAdmin 4 also allows you to assign project and inventory permissions at tenant level. These permissions then apply to all the projects or inventories within that tenant. For example, if you have assigned View project permissions on the DEV tenant, you will be able to view all the projects within the DEV tenant.
Tenants are the natural place to set Create project and Create inventory permissions, allowing you to define who can create project/inventories within each tenant.
- To assign tenant-level permissions, see:
- Managing users and groups via file
- You need no tenant-level permissions to be able to access a single project. It is enough to have the relevant project-level permissions. See also the following sections:
- Editing Project Permissions
- Editing Inventory Permissions
Example
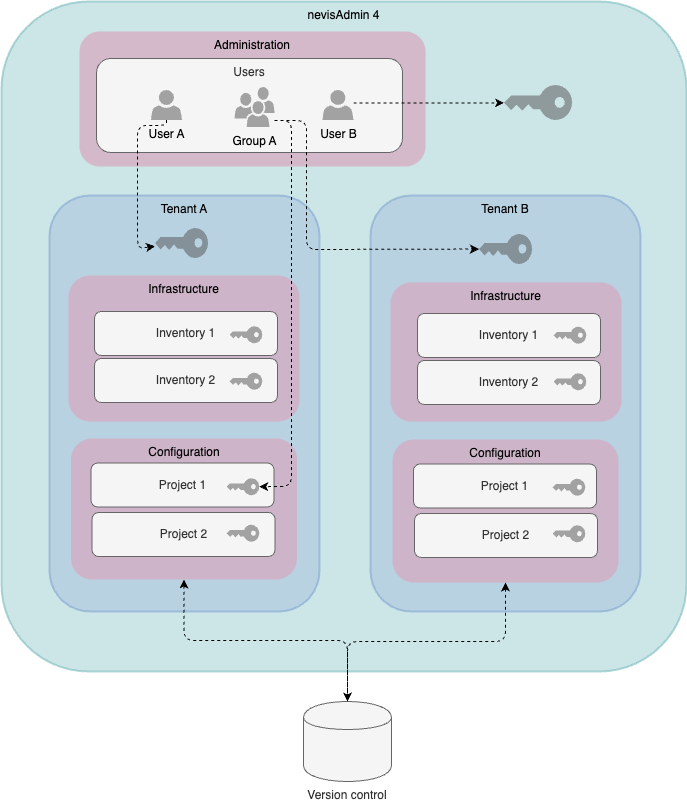
The example below includes one nevisAdmin 4 instance with two tenants, each of them with their own projects and inventories. To simplify the example, we focus on the View project permission only.
- User A: The View project permission is assigned on Tenant A.
- Tenant A → She will be able to see all projects.
- Tenant B → She will not be able to see any project.
- Group A: The View project permission is assigned on Project A-1 and on Tenant B.
- Tenant A → The users in Group A will only be able to see Project A-1.
- Tenant B → The users in Group A will be able to see all projects.
- User B: The View project permission is assigned on application level.
- Tenant A → She will be able to see all projects.
- Tenant B → She will be able to see all projects.
Through the Version control repository, projects in Tenant A can be imported to Tenant B and conversely. (Inventories in Tenant A also can be imported to Tenant B and conversely.)
Managing Tenants via REST
Before executing any of the actions below, you need to execute the following steps to get the authentication token:
Preparation: Login to get authentication token
export NEVISADMIN_URL=http://localhost:9080
export ADMIN_USER=admin
export ADMIN_PASSWORD=admin
# for https, you can add the -k flag to all curl commands to skip certificate verification
export AUTH_RESPONSE=$(curl -v -X POST -H 'Content-Type: application/json' -H 'Accept: application/json' -d "{\"userKey\":\"${ADMIN_USER}\",\"password\":\"${ADMIN_PASSWORD}\"}" "$NEVISADMIN_URL/nevisadmin/api/v1/login?tokenType=bearer")
export TOKEN=$(echo $AUTH_RESPONSE | sed -nE 's/.*"token" : "(.*)" }/\1/p')
Creating a Tenant
The tenantKey can contain uppercase characters only.
- First you need to get the authentication token. See the [above description] on how to proceed.
- Then execute the following steps to create additional tenants within nevisAdmin 4:
export TENANT_KEY=TEST
export DESCRIPTION="Tenant for testing"
export TENANT_DATA="{\"tenantKey\":\"${TENANT_KEY}\",\"description\":\"${DESCRIPTION}\"}"
curl --header "Content-Type: application/json" --header "Authorization: Bearer $TOKEN"  --request POST   --data "$TENANT_DATA" $NEVISADMIN_URL/nevisadmin/api/v1/tenants
Updating a Tenant
- First you need to get the authentication token. See the [above description] on how to proceed.
- Then execute the following steps to update tenants within nevisAdmin 4:
export TENANT_KEY=TEST
export DESCRIPTION="Tenant for testing updated"
export TENANT_DATA="{\"description\":\"${DESCRIPTION}\"}"
curl --header "Content-Type: application/json" --header "Authorization: Bearer $TOKEN"  --request PUT   --data "$TENANT_DATA" $NEVISADMIN_URL/nevisadmin/api/v1/tenants/$TENANT_KEY
Deleting a Tenant
- First you need to get the authentication token. See the [above description] on how to proceed.
- Then execute the following steps to delete tenants within nevisAdmin 4:
export TENANT_KEY=TEST
curl --header "Content-Type: application/json" --header "Authorization: Bearer $TOKEN"  --request DELETE   --data "$TENANT_DATA" $NEVISADMIN_URL/nevisadmin/api/v1/tenants/$TENANT_KEY