Database appliance for nevisIDM
The Nevis database appliance can be used to set up a redundant database for nevisIDM using MariaDB.
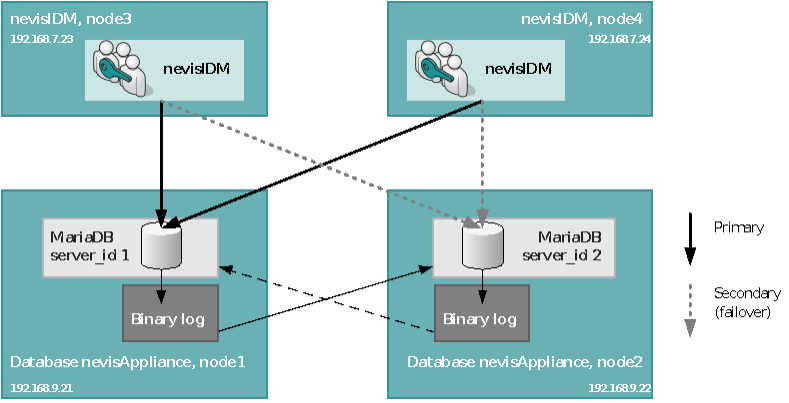
The database setup consists of two databases. Each database runs on a separate server implementing a master-master setup. Replication is done by letting the master server write a binary log of all statements performed on the database (inserts, updates, deletes, etc.), and the slave follows by replaying all those commands. In the scenario shown in the figure above, each server acts as a master and also a slave. This ensures continuity of the service in the event of a failure of the primary database server.
Notes:
- The following guide uses "node1" for the first (primary) and "node2" for the second (secondary) database server and "node3" / "node4" for the servers hosting nevisIDM. Use the full qualified host names of your servers instead.
- Command examples also use the node id ("1", "2", "3" and "4") to indicate on which server a command has to be executed.
- Even if a master-master setup is configured, it is mandatory to operate it in a primary-secondary mode, with both nevisIDM instances connecting to the same server all the time. This is necessary to prevent split brain scenarios.
- If you have to connect node 4 directly to node 2 as a result of long distance issues, use a real database cluster, e.g., Oracle.
Do not share the same database appliance with nevisAuth or nevisProxy session sharing.
Set up and configure the MariaDB database
Edit the file /etc/my.cnf. One server id has to be "1" (primary), the other "2" (secondary). Also adjust the auto_increment_offset parameter of the secondary server to "2".
Ensure that the section for nevisIDM are commented in, especially the autocommit, transaction-isolation and lower_case_table_names parameters.
...
[mariadb]
bind-address = 0.0.0.0
port = 3306
socket = /var/lib/mysql/mysql.sock
skip-external-locking
table_cache = 4

## to use the replication feature, each of the two
## servers involved must have a unique id (either '1' or '2')
## set the id to 1 if not using this feature
# The ID of this master
server-id = 1

# The ID of the replication stream created by this master
# if using the replication feature, the id must match the
# server-id (either 1 or 2)
gtid-domain-id=1
# Enabling binary log
log-bin = /var/lib/mysql/mysql-bin
log-basename = mariadbmaster
binlog_format = MIXED
max_binlog_size = 1000M
expire_logs_days = 1

slave_type_conversions = ALL_NON_LOSSY
log_bin_trust_function_creators = true
## The following settings are described in the nevisIDM
## reference guide and should be enabled before you setup
## the nevisIDM database.
autocommit = 0
transaction-isolation = READ-COMMITTED
lower_case_table_names = 1
character-set-server = utf8mb4
## The following settings are described in the nevisAppliance
## reference guide in the chapter "Database appliance for nevisIDM"
## Do not share the same database appliance with nevisAuth or nevisProxy session sharing.
## To enable consistency and correct order of primary ID in the tables activate the following
## two settings accordingly
## Avoiding collisions of primary IDs for tables where the primary ID is auto-incremented
auto_increment_increment = 2
## if using the replication feature, the offset must match the
## server-id (either 1 or 2)
auto_increment_offset = 1
...
...
[mariadb]
bind-address = 0.0.0.0
port = 3306
socket = /var/lib/mysql/mysql.sock
skip-external-locking
table_cache = 4

## to use the replication feature, each of the two
## servers involved must have a unique id (either '1' or '2')
## set the id to 1 if not using this feature
# The ID of this master
server-id = 2

# The ID of the replication stream created by this master
# if using the replication feature, the id must match the
# server-id (either 1 or 2)
gtid-domain-id=1
# Enabling binary log
log-bin = /var/lib/mysql/mysql-bin
log-basename = mariadbmaster
binlog_format = MIXED
max_binlog_size = 1000M
expire_logs_days = 1

slave_type_conversions = ALL_NON_LOSSY
log_bin_trust_function_creators = true
## The following settings are described in the nevisIDM
## reference guide and should be enabled before you setup
## the nevisIDM database.
autocommit = 0
transaction-isolation = READ-COMMITTED
lower_case_table_names = 1
character-set-server = utf8mb4
## The following settings are described in the nevisAppliance
## reference guide in the chapter "Database appliance for nevisIDM"
## Do not share the same database appliance with nevisAuth or nevisProxy session sharing.
## To enable consistency and correct order of primary ID in the tables activate the following
## two settings accordingly
## Avoiding collisions of primary IDs for tables where the primary ID is auto-incremented
auto_increment_increment = 2
## if using the replication feature, the offset must match the
## server-id (either 1 or 2)
auto_increment_offset = 2
...
Initialize the database
Start the database and set the root password:
1# systemctl enable mariadb.service
1# systemctl start mariadb.service
1# mysqladmin -u root password <admin password>

2# systemctl enable mariadb.service
2# systemctl start mariadb.service
2# mysqladmin -u root password <admin password>
Log in to the database and grant access to the server hosting the nevisIDM instances. To do so, execute the "GRANT ALL PRIVILEGES" command for the host name of your primary nevisIDM server.
Example:
1# mysql -p

1> GRANT ALL PRIVILEGES ON *.* TO 'root'@'node3' IDENTIFIED BY
'password' WITH GRANT OPTION;
1> FLUSH PRIVILEGES;
Set up nevisidmdb
Set up the initial database for nevisIDM according to the nevisIDM reference guide.
After setting up the initial database, grant remote access to the two nevisIDM nodes. Use the same user names and passwords that you defined during the database setup and delete the default users.
1> GRANT CREATE,ALTER,DROP,SELECT,INSERT,DELETE,INDEX,UPDATE,CREATE
VIEW,GRANT OPTION,CREATE ROUTINE,EXECUTE,TRIGGER,ALTER ROUTINE ON nevisidm.* TO
'UIDM01'@'node3' IDENTIFIED BY 'password';
1> GRANT CREATE,ALTER,DROP,SELECT,INSERT,DELETE,INDEX,UPDATE,CREATE
VIEW,GRANT OPTION,CREATE ROUTINE,EXECUTE,TRIGGER,ALTER ROUTINE ON nevisidm.* TO
'UIDM01'@'node4' IDENTIFIED BY 'password';
1> GRANT SELECT, INSERT, DELETE, UPDATE, EXECUTE ON nevisidm.* TO
'UIDM02'@'node3' IDENTIFIED BY 'password';
1> GRANT SELECT, INSERT, DELETE, UPDATE, EXECUTE ON nevisidm.* TO
'UIDM02'@'node4' IDENTIFIED BY 'password';
1> FLUSH PRIVILEGES;
1> SOURCE /root/tools/mysql-clean.sql
Synchronize the databases
The two databases need to be synchronized. The mysqldump command can be used to export the database. For the secondary node to synchronize correctly, you also need to record the current position in the binary log.
Export the databases
Lock the database before dumping it to a file:
1> FLUSH TABLES WITH READ LOCK;
Record the position within the binary log at the moment the database dump has been created. This is necessary to synchronize the second node:
1> SHOW MASTER STATUS;
+------------------+----------+--------------+------------------+
| File | Position | Binlog_Do_DB | Binlog_Ignore_DB |
+------------------+----------+--------------+------------------+
| mysql-bin.000003 | 37372301 | | |
+------------------+----------+--------------+------------------+
1 row in set (0.00 sec)
Export the databases to files using the mysqldump command on node1:
1# mysqldump -u root -p --databases mysql > ~/db_mysql.sql
1# mysqldump -u root -p --databases nevisidm > ~/db_nevisidm.sql
Unlock the database
1> UNLOCK TABLES;
The two database files db_mysql.sql and db_nevisidm.sql have to be transferred now to the secondary node using scp.
Import the databases
The database files have to be imported on the secondary node (node2) now:
2# mysql -u root -p < ~/db_mysql.sql
2# mysql -p --execute='FLUSH PRIVILEGES;'
2# mysql -u root -p < ~/db_nevisidm.sql
Grant permissions
On node1, grant access to node2.
Example:
1> GRANT REPLICATION SLAVE ON *.* TO 'replication'@'node2' IDENTIFIED BY '<admin password>';
1> FLUSH PRIVILEGES;
And on node2, grant access to node1.
Example:
2> GRANT REPLICATION SLAVE ON *.* TO 'replication'@'node1' IDENTIFIED BY '<admin password>';
2> FLUSH PRIVILEGES;
You can now check the communication between node1 and node2.
Example:
1# mysql-ureplication -p -h node2 -P 3306
Start replication, slave database on node2
You can now instruct the database on node2 to replicate the database of node1 by setting the master and starting the slave.
You have to enter the binary log position of the master database (node1) at the moment the database dump has been created.
Example:
2> CHANGE
MASTER TO master_host='node1', master_port=3306, master_user='replication',
master_password='<admin password>', master_log_file='mysql-bin.000003',
master_log_pos=37372301;
2> START SLAVE;
2> SHOW SLAVE STATUS\G
*************************** 1. row ***************************


               Slave_IO_State: Waiting for master to send event
                  Master_Host: node1
                  Master_User: replication
                  Master_Port: 3306
                Connect_Retry: 60
              Master_Log_File: mysql-bin.000003
          Read_Master_Log_Pos: 37372301
               Relay_Log_File: mysql-relay-bin.000002
                Relay_Log_Pos: 960
        Relay_Master_Log_File: mysql-bin.000003
             Slave_IO_Running: Yes
            Slave_SQL_Running: Yes
...
                Last_IO_Errno: 0
                Last_IO_Error:
               Last_SQL_Errno: 0
               Last_SQL_Error:
  Replicate_Ignore_Server_Ids:
             Master_Server_Id: 1
Start replication, slave database on node1
Now, you set up the same configuration the other way round for node1 to be slave of node2. Determine the status of node2 and start the replication on node1.
Example:
2> SHOW MASTER STATUS;
+------------------+----------+--------------+------------------+
| File             | Position | Binlog_Do_DB | Binlog_Ignore_DB |
+------------------+----------+--------------+------------------+
| mysql-bin.000002 | 37888579 |              |                  |
+------------------+----------+--------------+------------------+
Example:
1> CHANGE
MASTER TO master_host='node2', master_port=3306, master_user='replication',
master_password='<admin password>', master_log_file='mysql-bin.000002',
master_log_pos=37888579;
1> START SLAVE;
1> SHOW SLAVE STATUS\G
*************************** 1. row ***************************
               Slave_IO_State: Waiting for master to send event
                  Master_Host: node2
                  Master_User: replication
                  Master_Port: 3306
                Connect_Retry: 60
              Master_Log_File: mysql-bin.000002
          Read_Master_Log_Pos: 37888579
               Relay_Log_File: mysql-relay-bin.000002
                Relay_Log_Pos: 529
        Relay_Master_Log_File: mysql-bin.000002
             Slave_IO_Running: Yes
            Slave_SQL_Running: Yes
...
               Last_IO_Errno: 0
               Last_IO_Error:
              Last_SQL_Errno: 0
              Last_SQL_Error:
 Replicate_Ignore_Server_Ids:
            Master_Server_Id: 2
Configure nevisIDM
The nevisIDM instance is created as documented in the nevisIDM reference guide.
Use the same user names and passwords for which you granted remote access.
The IP addresses of node1 and node2 are used in this example for illustration purposes. You can use these servers' host names instead, of course.:
# nevisidm inst create nevisidm \
 IDMDB_CONNECTION=jdbc:mariadb://node1:3306,node2:3306/nevisidm \
 IDMDB_USERNAME=UIDM02 \
 IDMDB_PASSWORD=password \
 IDM_APPL_URL=https://`hostname`:8989 \
 IDM_SERVER_1_URL=https://`hostname`:8989/nevisidm/services/v1/LoginService \
 IDM_SERVER_DB=mysql \
 RTGROUP=nvbgroup \
 RTOWNER=nvauser \
 SERVER_URL=https://`hostname`:8989 \
 NINJA_CERT=/var/opt/neviskeybox/default/<auth signer>/truststore.jks
After the instance creation, you need to edit the nevisIDM properties (using the nevisidm config idm command). Add the failOverReadOnly=false parameter to the database.connection.url.
Example:
database.connection.url=jdbc:mariadb://node1:3306,node2:3306/nevisidm?failOverReadOnly=false
You can start the nevisIDM instance now.
Upgrading a nevisIDM version
For upgrading nevisIDM and migrating the nevisIDM database, refer to the nevisIDM release notes.
Restore a node
If one of the database server nodes needs to be restored, proceed similar to an initial setup:
- Create the database configuration file and start the instance.
- Set the administration password and grant the necessary privileges.
- Skip the step where you create the initial database using the nevisidmdb command.
- See the chapter Synchronize the databases on how to export the database from the running node and on how to import it to the re-created server.