Mapping
Mappings have two purposes:
- Definition of how an incoming URL must be mapped to a back-end application server. Each mapping defines:
- The URL patterns to be used.
- The back-end application servers that process the HTTP requests for these URLs.
- The way the application servers are selected in terms of load balancing and failover.
- Definition of the mapping's configuration parameters as well as the resources to be applied to the requests for the specified URLs (see also the chapters: Assign Resource panel and Resources).
You can configure one or multiple mappings for an application.
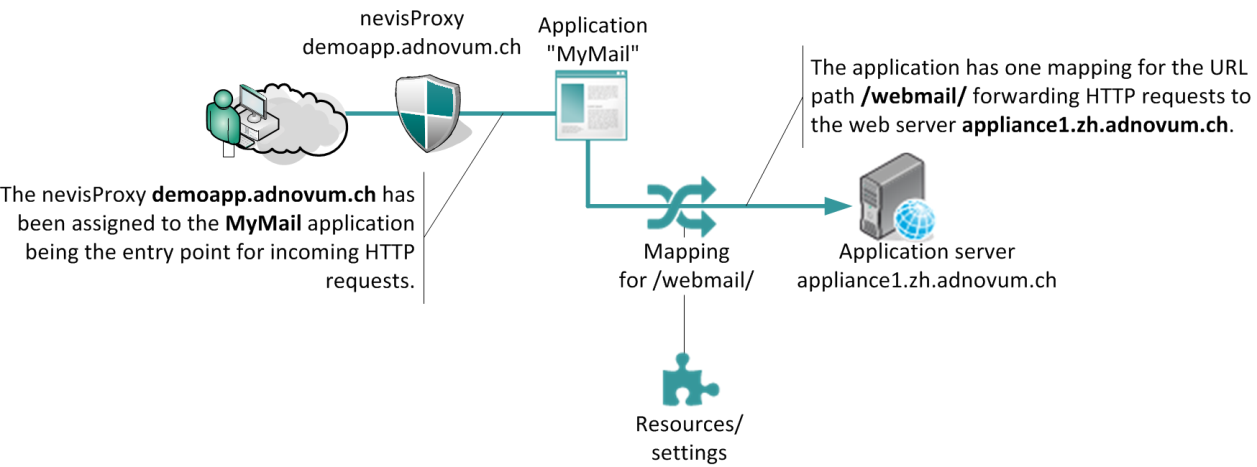
Sample mapping view
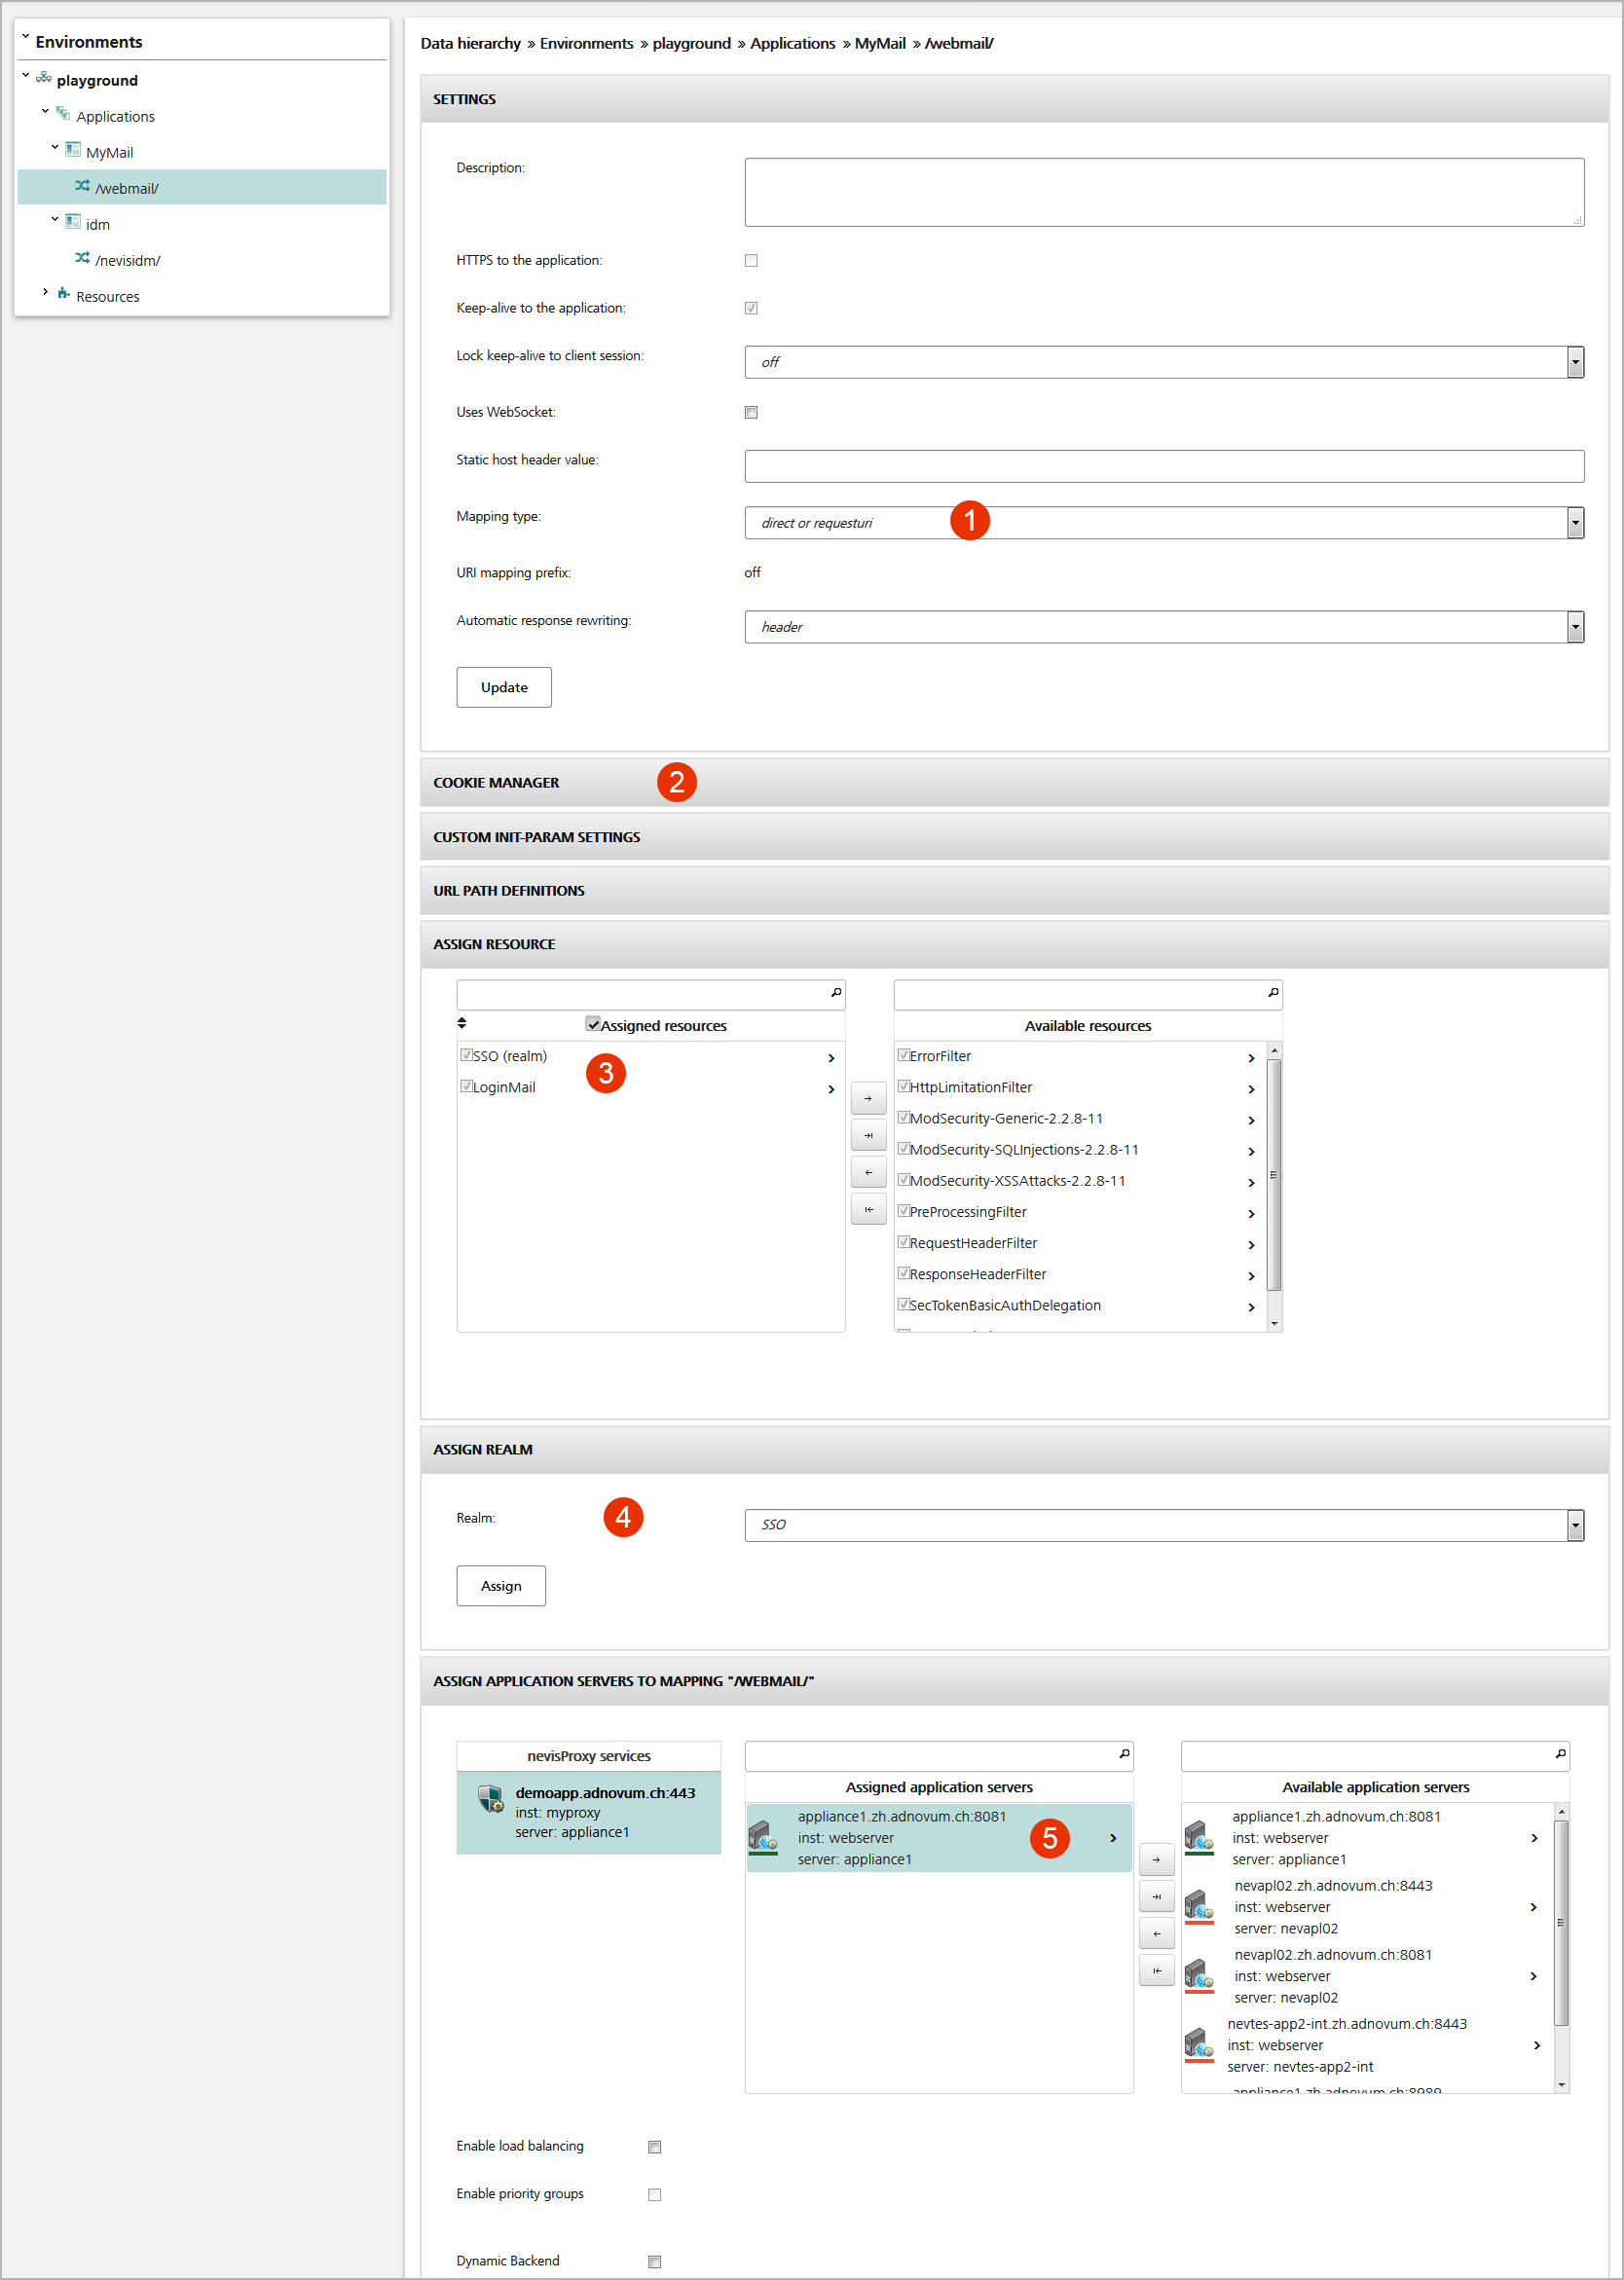
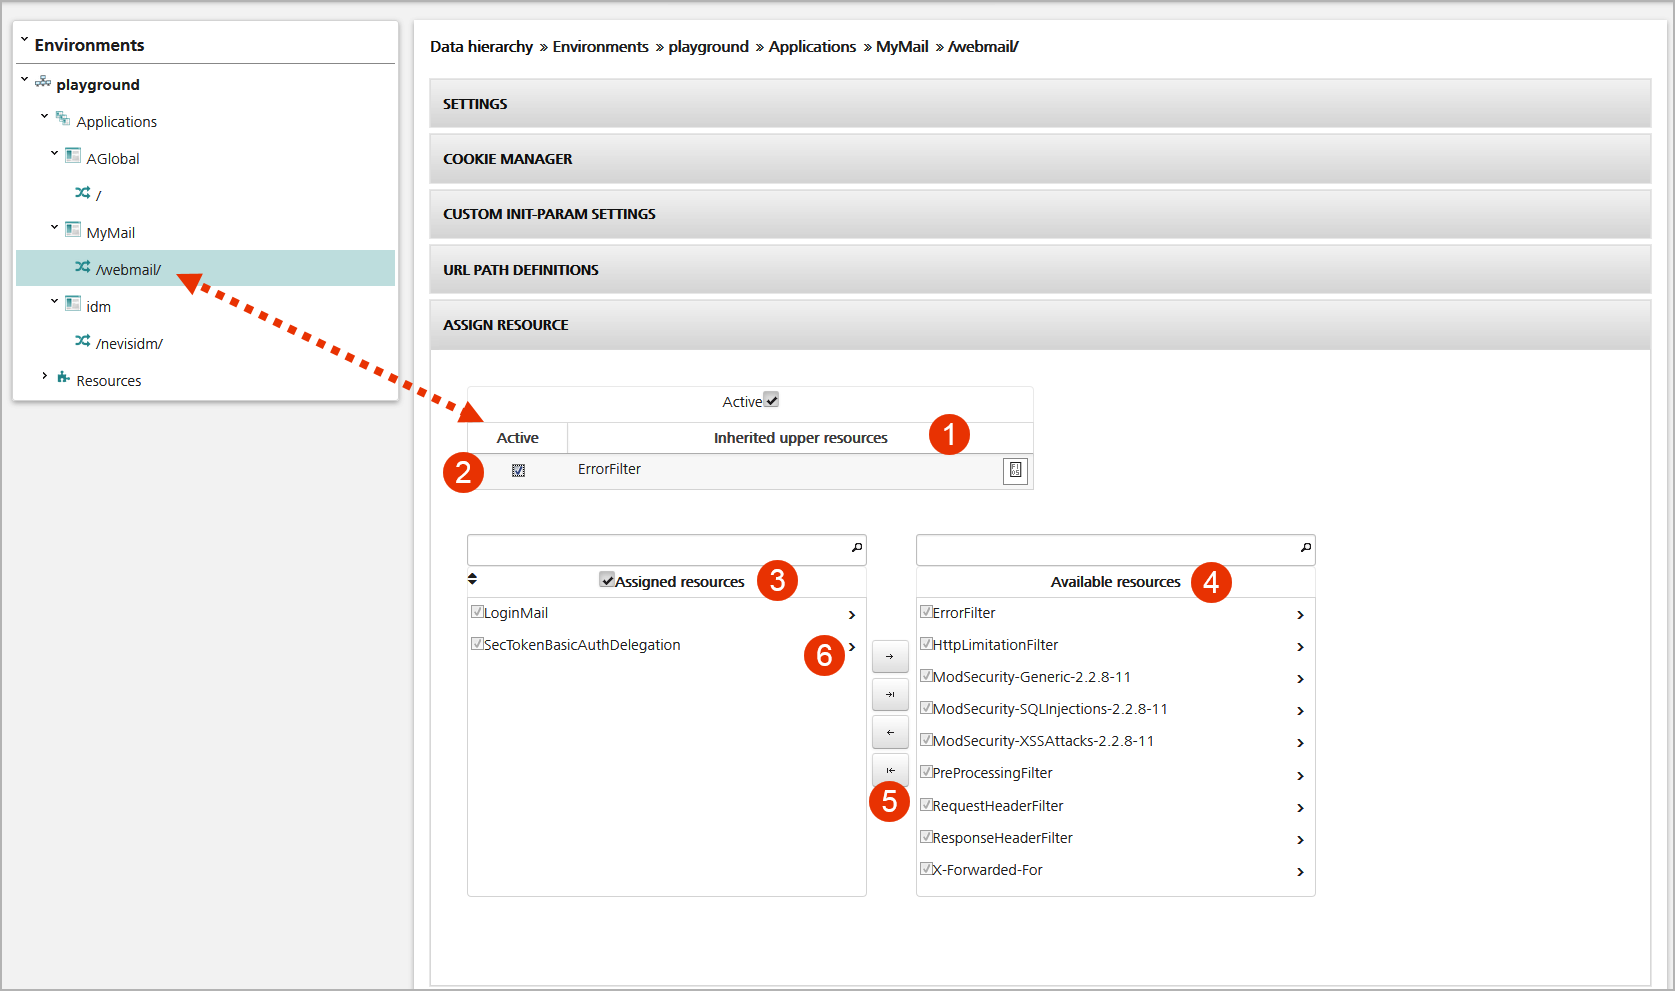
You configure a mapping within the Mapping view (Configuration tab). The figure above shows the Mapping view for the sample mapping /webmail/.
- Set the configuration parameters of the mapping in the Settings panel (no.1 in the figure above).
- The Cookie Manager panel defines the mapping's cookie details (no.2 in the figure).
- The Assign Resource panel lists the resources (or filters) used by the mapping (no.3). These resources implement functions to integrate and secure the application. The system processes them in the order shown in the left hand list.
- To assign a resource to the mapping, drag the resource in question from the Available resources list on the right and drop it into the Assigned resources field on the left. Put the list with resources in the right order.
- Assign the mapping to a realm to enforce user authentication (no.4 in the figure). For more information on realms, see the chapter Realms.
- Specify the server(s) that host(s) the application in the Assign Application Servers to Mapping panel (5). Requests that match the URL path(s) of the mapping are forwarded to these server(s).
For more detailed information on the Mapping view and its panels, see the next subchapters.
nevisAdmin creates an HTTPS Connector Servlet within the configuration file (web.xml) of the nevisProxy service for each mapping that is connected to an application server; one servlet per mapping.
We highly recommend using a dedicated name space for each application and to define the name spaces accordingly, e.g., /nevisportal/, /nevisportal/images/, /nevisportal/scripts/ instead of /nevisportal/, /images/, /scripts/.
Cookie management
Application cookies may be stored within the user's session (and not forwarded to the browser). The definition of which cookies shall be stored can either be made within the Cookie Manager panel of the Mapping view (settings are valid for the assigned back ends only) or by a separate CookieManager filter (to be configured as a resource, see the chapter: Resources).
We suggest storing the cookies within the cookie manager rather than letting them be passed to the client whenever possible.
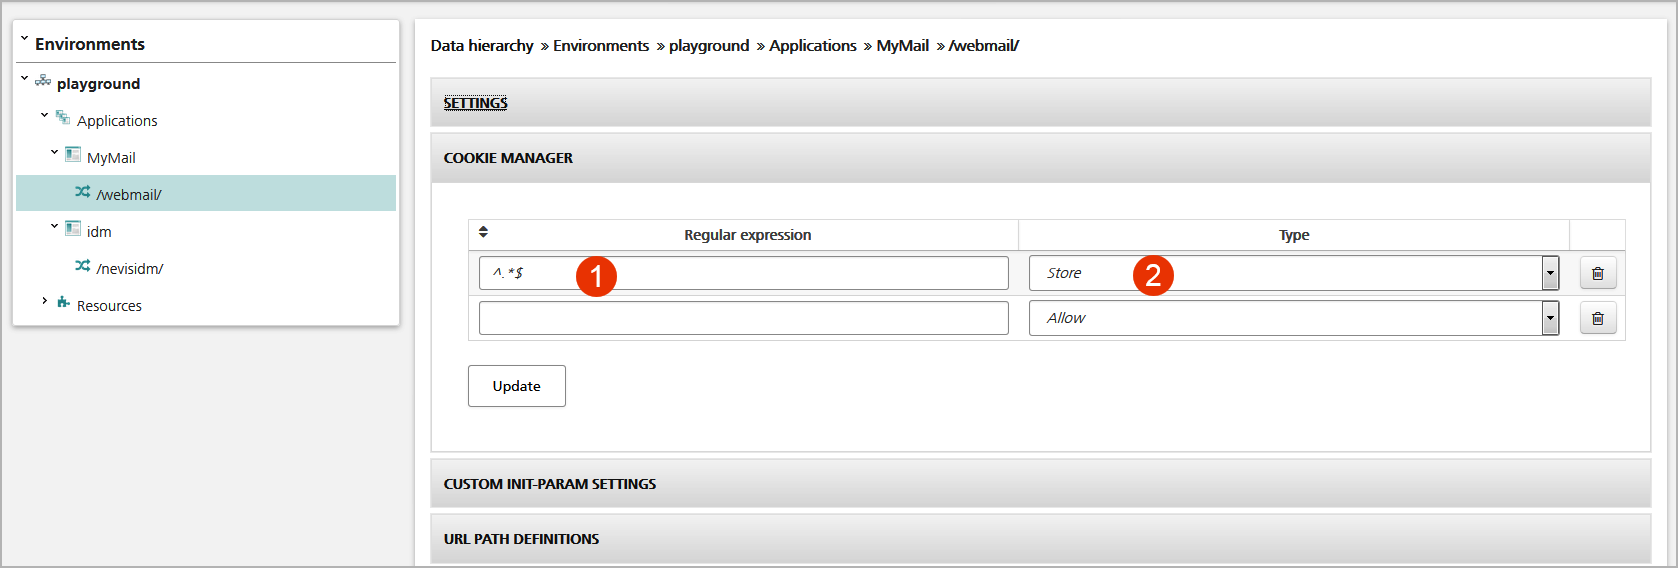
The figure above shows the Cookie Manager panel in the Mapping view. In this panel, you
- Set the regular expression that matches the cookie name (no.1 in the figure).
- Specify the action to be taken with the cookie (e.g., allow, block, retain or store).
Alternatively, a dedicated CookieManager filter (see the chapter Resources) may be configured. This might be necessary if you configure multiple mappings for the same application server and want to share the same cookies within these mappings.
Alternative path definitions
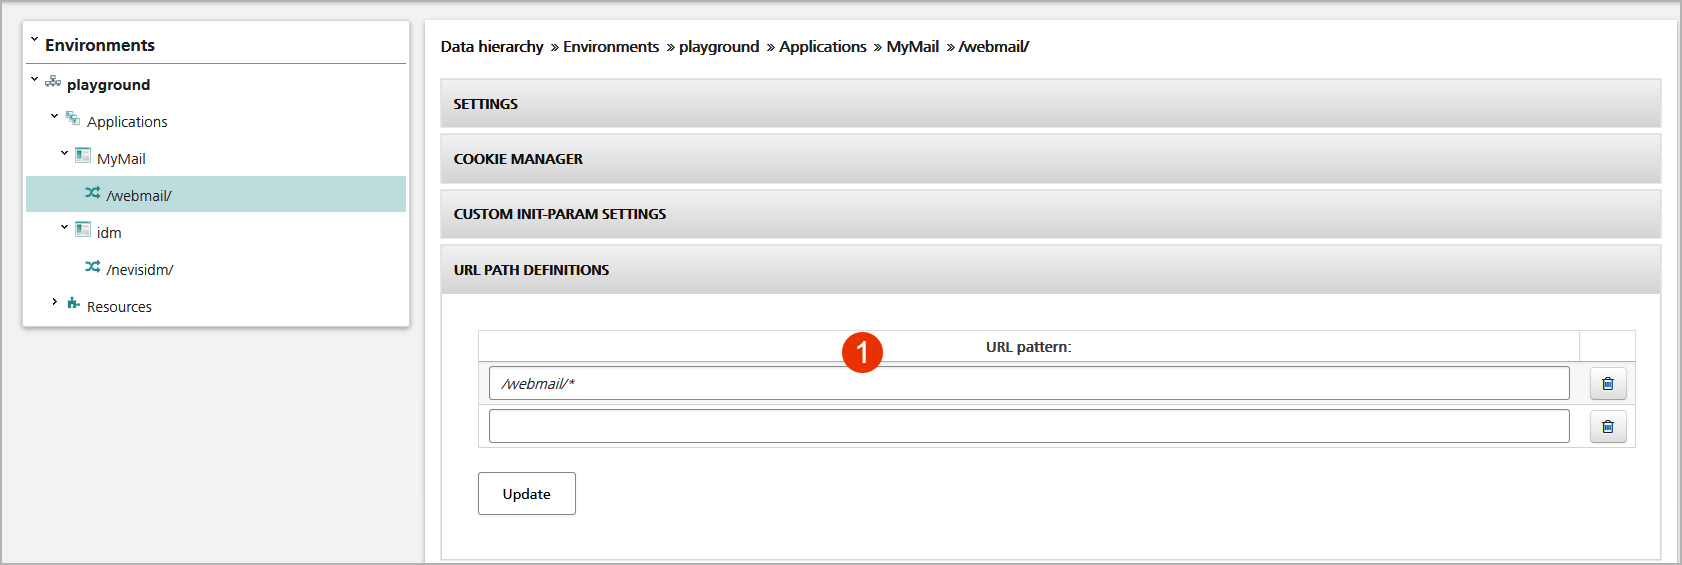
If you want identical settings of a mapping (application server connections, settings, assigned resources, etc.) to be applied to multiple URL patterns, you may configure additional patterns within the mapping. You do this in the URL Path Definitions panel in the Mapping view (no.1 in the figure below).
nevisAdmin supports four types of patterns:
- Path: A string beginning and ending with a
/character is used for path mapping, e.g.,/demobank/. Every request path that matches the path is used in connection with this mapping. This is the default for new mappings. - Handler: A string beginning with a
/character (but not suffixed by/) defines an exact match to the request URL path, e.g.,/demobank/login.do. - Extension: A string with a
.prefix is used as an extension mapping (rarely used), e.g.,.pdf. - For URL patterns matching a path with random ending without a trailing
/, e.g., request URLs like/sap(QWROb3Z1bQo=), the suffix/can be added.
URL path definitions are handled as literal strings in other respects. You usually should avoid path names conflicting with mappings of other applications because the configuration settings may influence each other.
Assign Resource panel
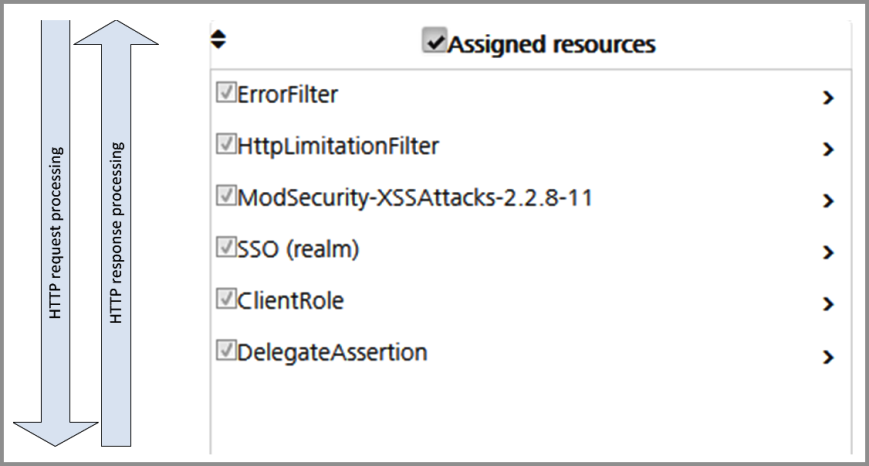
The Assign Resource panel lists resources (or filters) that are used by the mapping. The resources implement functions to integrate and secure the application. The order of the assigned resources defines the sequence of request processing: HTTP requests are processed from top to bottom, HTTP responses from bottom to top, see the figure below.
The resources are usually used in the following order:
- An error filter is used to show a user-friendly error message if a request could not be processed.
- A limitation filter limits the allowed request body size.
- The validation filters deny invalid requests.
- The identity creation filter (created by the realm) enforces user authentication.
- The role filter enforces access control.
- A delegation propagates the user's identity to the application server.
The order of resources within a mapping is applied to all mappings of an application to ensure proper resource object order of inherited resources within sub-mappings (mappings with a more specific but matching URL name space). E.g., if the ErrorFilter is configured to be the first for the mapping /nevisportal/, it will also be on the top of the resource list for the mapping /nevisportal/images/.
The figure below shows the Assign Resource panel for the sample mapping /webmail/. The panel contains the following elements:
- There are upper and lower inherited resources:
- The upper table block shows resources that are inherited from other applications – see no.1 in the figure. This only includes applications appearing before the current application in alphabetical order (not case-sensitive). A resource is inherited from mappings with a path that matches this mapping path (e.g.,
/). Tick the checkbox to de-activate an inherited resource (no.2). The system will add the resource to the mapping'sexcludedresourcesproperty. - There is a similar lower table block, below the Assign Resources field list, which contains inherited resources from applications following the current application in the alphabetical order. This lower block is not visible in the screenshot.
- The upper table block shows resources that are inherited from other applications – see no.1 in the figure. This only includes applications appearing before the current application in alphabetical order (not case-sensitive). A resource is inherited from mappings with a path that matches this mapping path (e.g.,
- The Assigned resources field lists the resources assigned to this mapping (no.3 in the figure).
- To assign a resource, drag the resource from the Available resources field on the right (no.4) to the list of assigned resources on the left.
- Control the execution sequence of the assigned resources by moving them up or down.
- To remove a resource from the Assigned resources list, mark the resource and click the
-->button (no.5). - To view or modify the settings of a resource, click the
>icon (no.6 in the figure).
The Assigned resources field also contains resources inherited from other mappings. These resources cannot be unassigned but can be de-activated.
Deactivate a resource
Sometimes, it is necessary to deactivate a resource inherited by another mapping, e.g., to allow anonymous access to some parts of the web application. You disable an inherited resource by unchecking the relevant checkbox (see no.1 in the figure below).

Enable failover, load balancing or load balancing with priority groups
Use the checkboxes on the bottom of the Mapping view to enable either failover, load balancing or load balancing with priority groups (see the figure below):

Failover means that the system automatically switches to a standby back-end application server upon failure or abnormal termination of the previously active application server. In this case, the previously active server is the primary server. The system uses this server as long as it is available. The standby server is the secondary server, used only as backup.
Load balancing means that the system continuously switches from one back-end application server to a second back-end application server to process requests. Both servers are equally important, there is no primary or secondary server.
Load balancing with priority groups means that there are two groups of servers available, where one group has a higher priority as the other. The servers in the secondary group act as backup: If all servers of the primary group are not available anymore, the system switches to the secondary group. Within the groups, the servers are equal; the system uses them for load balancing.
- To enable the failover feature, leave both checkboxes unchecked:
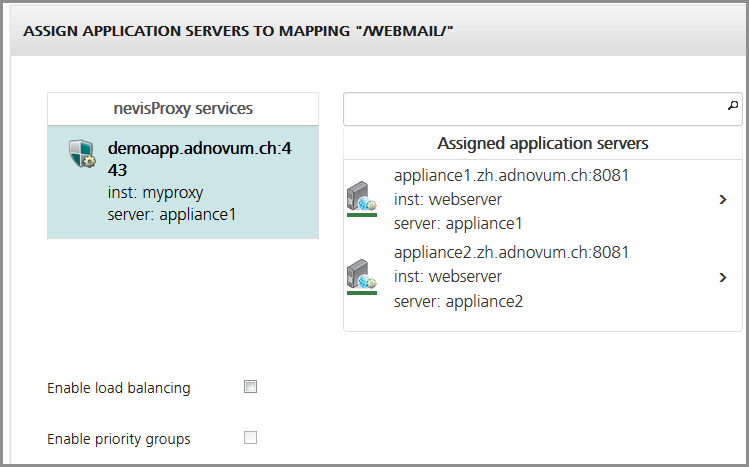
In the figure above, the "appliance1" server on top of the "Assigned application servers" list is the primary server. Only if this server is not available anymore, the system will switch to the "appliance2" server to process requests.
- The system gives the server on top of the list the highest priority. Therefore, place the primary server on top of the list.
- To activate load balancing, tick the "Enable load balancing" checkbox:
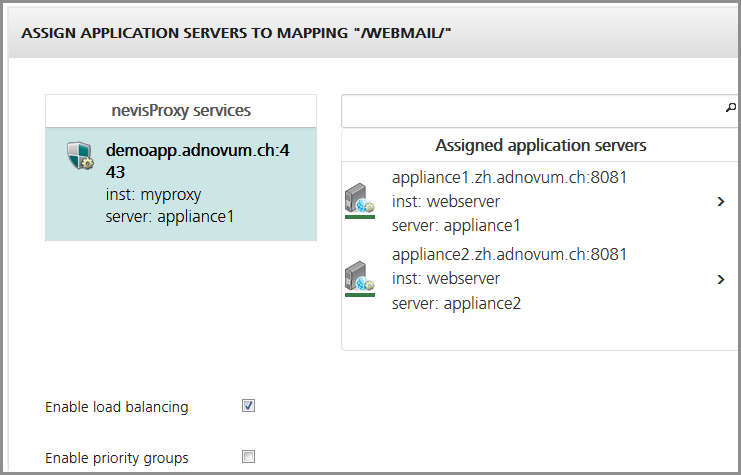
In the figure above, load balancing is in use. Here, the system will alternately use the appliance1 and the appliance2 server for request processing.
- To use load balancing with priority groups, tick both checkboxes "Enable load balancing" and "Enable priority groups":
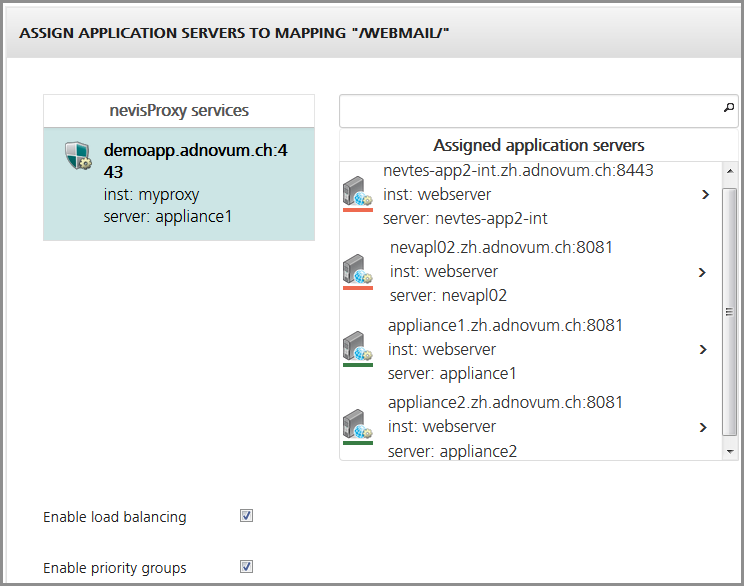
In the figure above, load balancing with priority groups is activated. The system takes the group of servers with the highest priority to process requests. This is the group of servers on top of the "Assigned application servers" list (here the "nevtes-app2-int" server and the "nevapl02" server). The system switches arbitrarily between these two servers to process requests. Only if both servers of the highest priority group are unavailable, the system turns to the group with the second highest priority for request processing (here the servers "appliance1" and "appliance2").
Each group consists of two servers. The system takes the two servers on top of the "Assigned application servers" list to build the group with the highest priority, and so on. Therefore, place the primary servers on top of the list.