Resources
The Resources section within the Configuration navigation pane manages an environment's configuration components. This includes the filter and realm components, which can be applied to mappings.
The resource objects may be re-used for multiple applications or you may configure individual resource objects for dedicated applications:
- Sharing resource objects within different applications has the advantage that you don't need to configure a function multiple times. The "realm" resources (see the chapter Realms) is a good example for a shared resource within all applications of your SSO domain. Sharing resources has the characteristic that changing a resource's parameter affects all applications using that resource. Check the
List of applications using <xy>panel within the Resource view when editing a resource to see which applications might be affected by the change and to decide if this is intended or not. - Individual resources can be used within the mappings of a single or a limited number of applications. You may always make a copy (clone) of a resource to use a new instance of an object with different settings for another application. It is usually a good practice to use the same "prefix" within a resources name if they are used for the same application.
The Key Management section is also listed under Resources. For more information on key management, see the chapter Key management.
Various functions
The Filters section in the navigation pane of the Configuration tab allows you to define and configure functions to apply to mappings within an application (see the figure Sample mapping view).
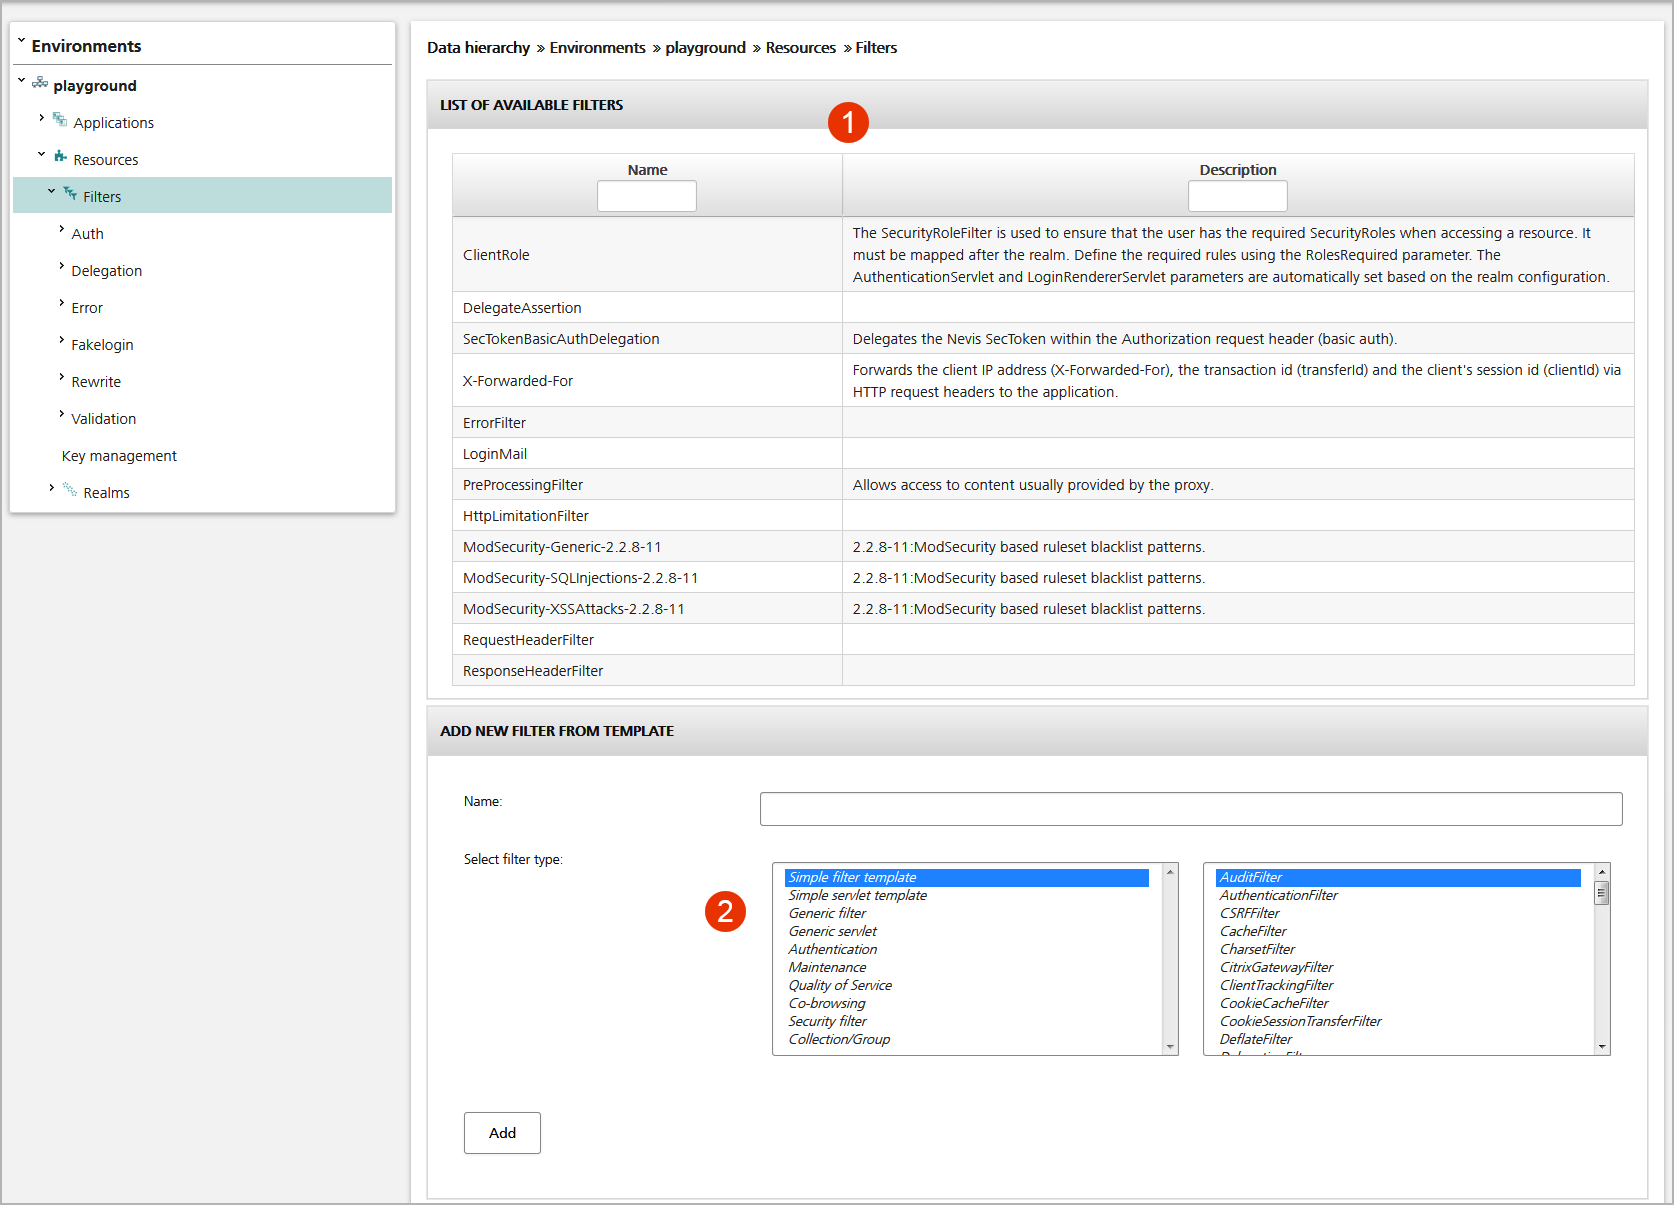
The figure below shows the Filters view:
- The upper part of the view displays the available functions (or filter objects), which you can use to parameterize applications (no.1 in the figure below).
- It is also possible to create a new filter based on the templates listed in the lower part of the view (no.2 in the figure). Proceed as follows:
- First select a filter type from the list on the left (see further below for an explanation of the filter types). Depending on the filter type, you also must select a predefined filter from the list on the right.
- Enter a name for the new filter in the Name field.
- Click Add to create the filter. It will be listed in the List of Available Filters panel in the upper view part. To view or modify the filter settings, click on its name on the left hand side of the upper field.
The available filters are arranged by types.
- Simple template: These are the filters documented in the nevisProxy reference guide. Each filter type allows you to configure its parameters.
- Generic: These resources allow you to configure any filter type. Define the class name within the Type field of the Settings panel and can then configure any parameter you want. This kind of filter may be used if the required nevisProxy filter is not listed within the "simple template" group or if a filter has parameter names which might be specified by the user, e.g., the
org.apache.location.*parameter names of the RewriteFile. - Servlet: This type allows you to configure a servlet within the nevisProxy configuration, e.g., to configure some Apache directives.
- Authentication: This group allows you to configure alternative identity creation filters or security role filters. These filters can only be used together with realms (see the chapter Realms).
- Maintenance: Use this type to create maintenance filters showing a sorry page if an application is not available due to maintenance work.
- Quality of service: Traffic shaping/management filter to use Quality of Service (QoS) features.
- Co-browsing: Filter to configure the unblu co-browsing filter of nevisProxy.
- Security filter: This group provides you some content filters (input validation, error or ICAP filters) to be used within your nevisProxy.
- Collection/Group: This group provides conditional filters (e.g., mapping filter) to be used within your nevisProxy.
Realms
Client authentication is done by creating a realm object. A realm consists of a configuration and the assignment of the involved services. The creation of a realm requires the following steps:
- Create a new realm object. You do this in the overall Realms view of the Configuration tab. You may choose one of the available templates which include some pre-configured AuthStates.
- Configure the AuthStates and GUI elements of the realm. You do this in the Realm view of the new realm.
- Assign the realm to the mapping of the application. You do this in the Mapping view of the mapping involved . This tells nevisProxy to control user access by configuring an IdentityCreationFilter enforcing user authentication.
- Go back to the Realm view and assign the nevisAuth, nevisLogRend, and the authentication back-end server for each nevisProxy service used to access the application. nevisAuth implements the workflow to authenticate users, while the authentication back-end services are used to verify the user's credentials.
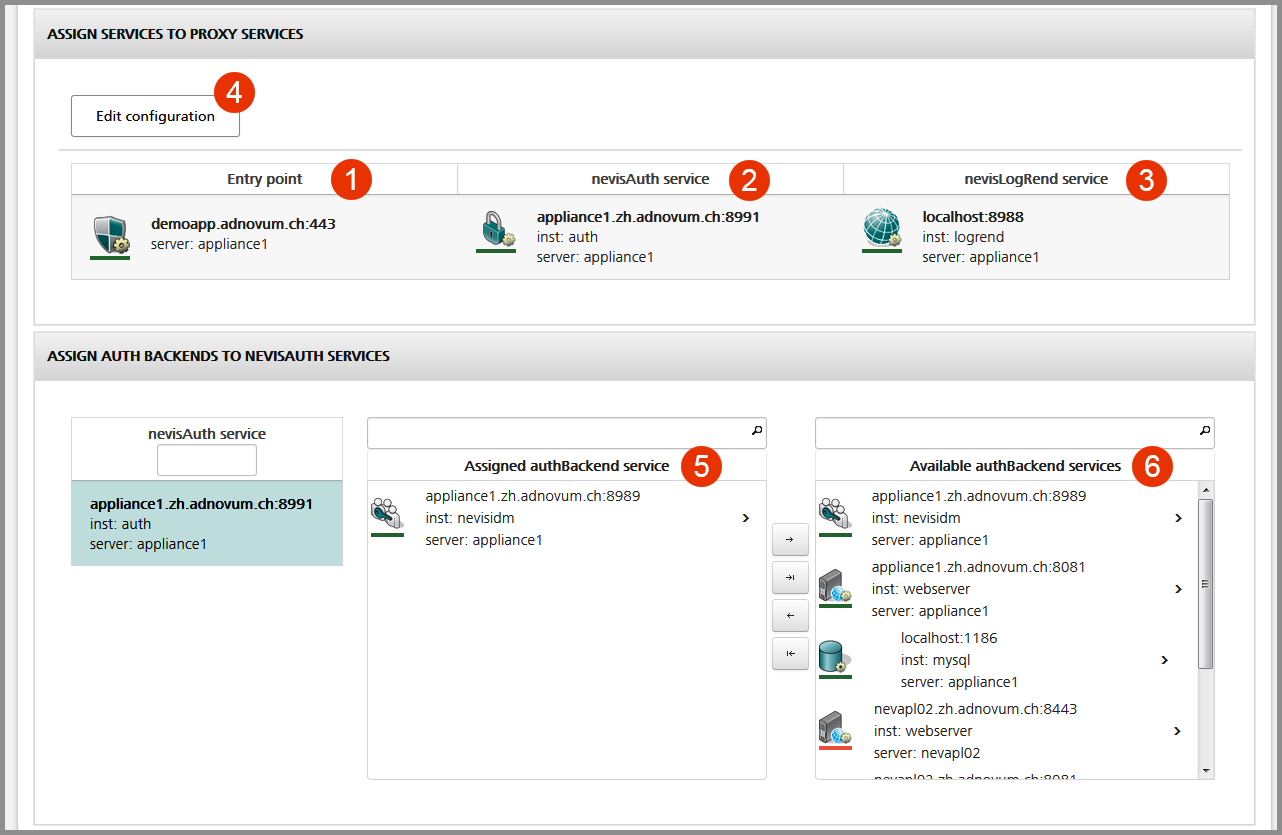
See the figure below:
- No.1 in the figure shows all nevisProxy services that are used by the clients to access the application. Each nevisProxy service communicates with the assigned nevisAuth and (optional) nevisLogrend services.
- No.2 shows the nevisAuth service that is assigned to the nevisProxy service for this realm.
- No.3 shows the nevisLogRend service that is assigned to the nevisProxy service for this realm.
- Click the Edit configuration button if you want to modify the realm's configuration (no.4 in the figure).
- No.5 shows the authentication back-end services that are assigned to the nevisAuth service in the context of this realm, e.g., nevisIDM or an LDAP server. nevisAuth uses these services to validate the user's credentials.
- To assign an authentication back-end service to nevisAuth, drag the service from the list of available authentication back-end services on the right (no.6 in the figure). Then drop the service in the list with assigned services (no.5).
The realm generates the necessary configuration for the involved nevisAuth and nevisProxy services. This includes the following parts:
A new domain is created for the realm within nevisAuth.
All AuthStates are configured within nevisAuth.
An IdentityCreationFilter is created within the nevisProxy configuration and mapped to the application protected by this realm.
noteYou may create alternative IdentityCreationFilter objects in addition (see the "Authentication" filter types within the chapter Various functions, link them to the realm and map them to the application's mappings.
Connectors ("servlets") to the nevisAuth and nevisLogRend services are configured within the nevisProxy service.