Managing Users
Overview
Detailed description about the users, permissions, groups and managing them via REST API are described at Managing Users and Groups via REST.
At this page, it is intended to describe only how to manage the users and permissions via the UI functions.
In nevisAdmin 4 UI, you can manage nevisAdmin4 users and user permissions by using Manage Users functionality.
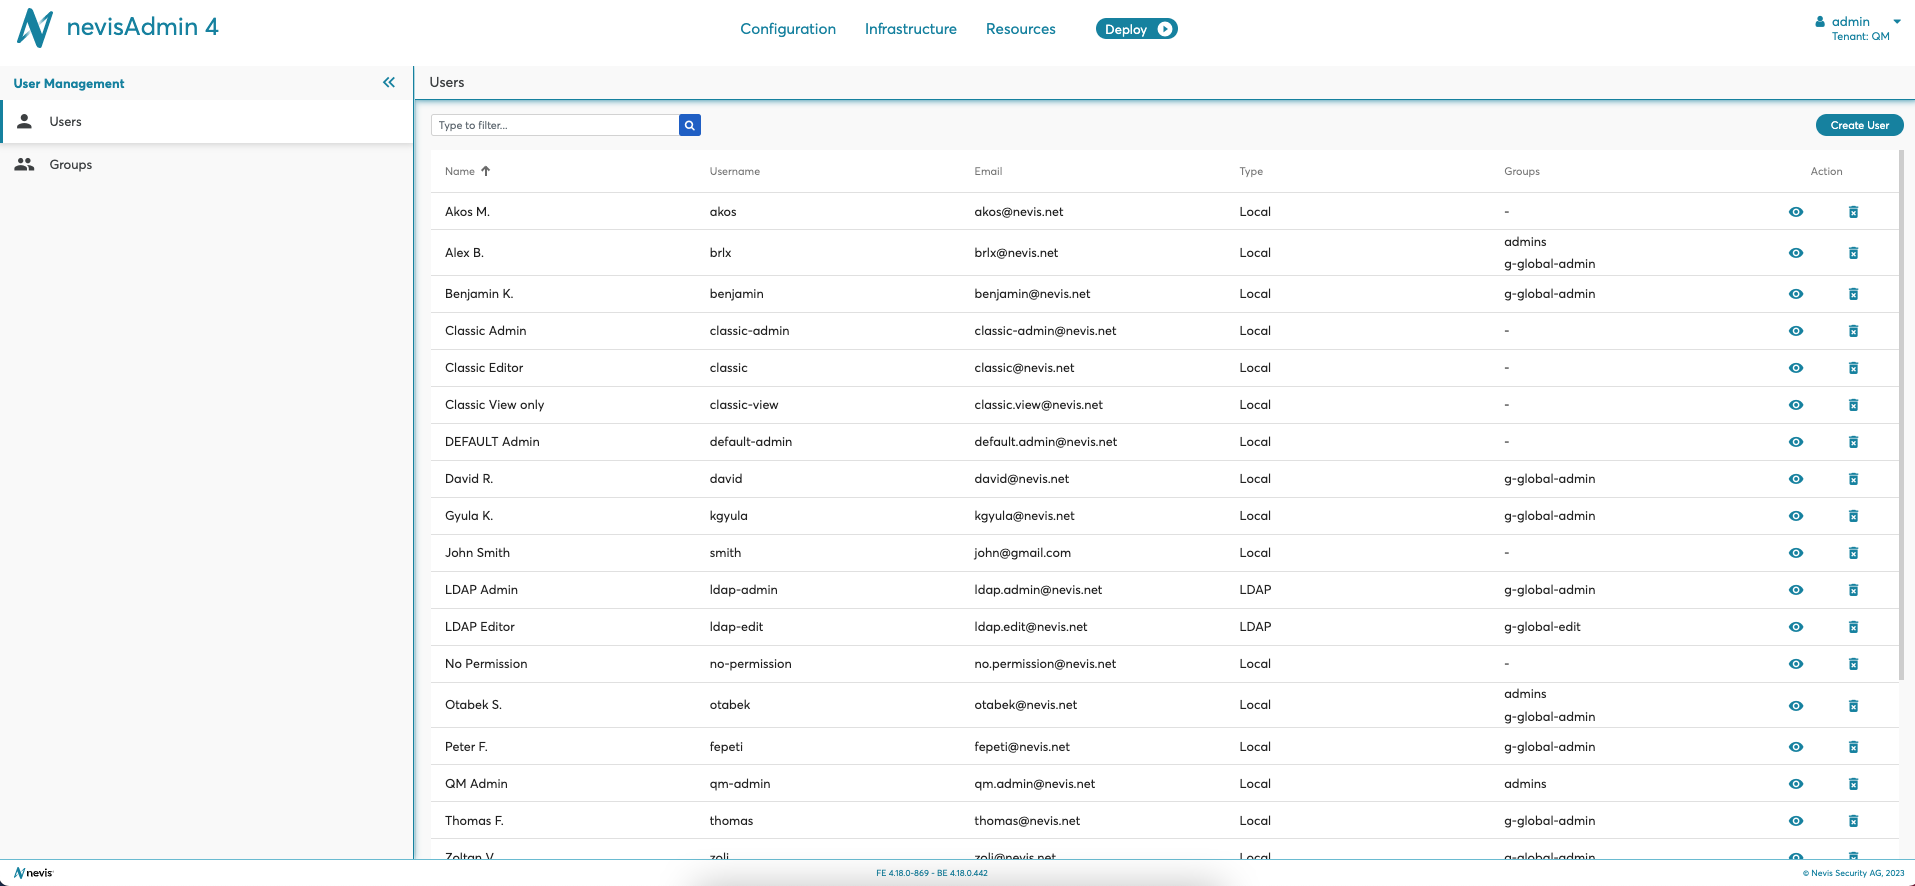
Access the feature from the top right context menu by selecting the Manage Users option. The Users screen is opened afterwards listing the users in a table with the following details:
- Full name
- Username
- Type of user (LDAP, SAML or Local - nevisAdmin4 user)
- Groups which the user belongs to. Detailed description of managing groups are described at Managing Groups.
- Action:
- View icon button to open the user details screen where the user groups and permissions can be managed.
- Delete icon button to delete the user.
The users can be searched by using the Search filter at the top of the screen.
You can create a new user by clicking on Create User button.
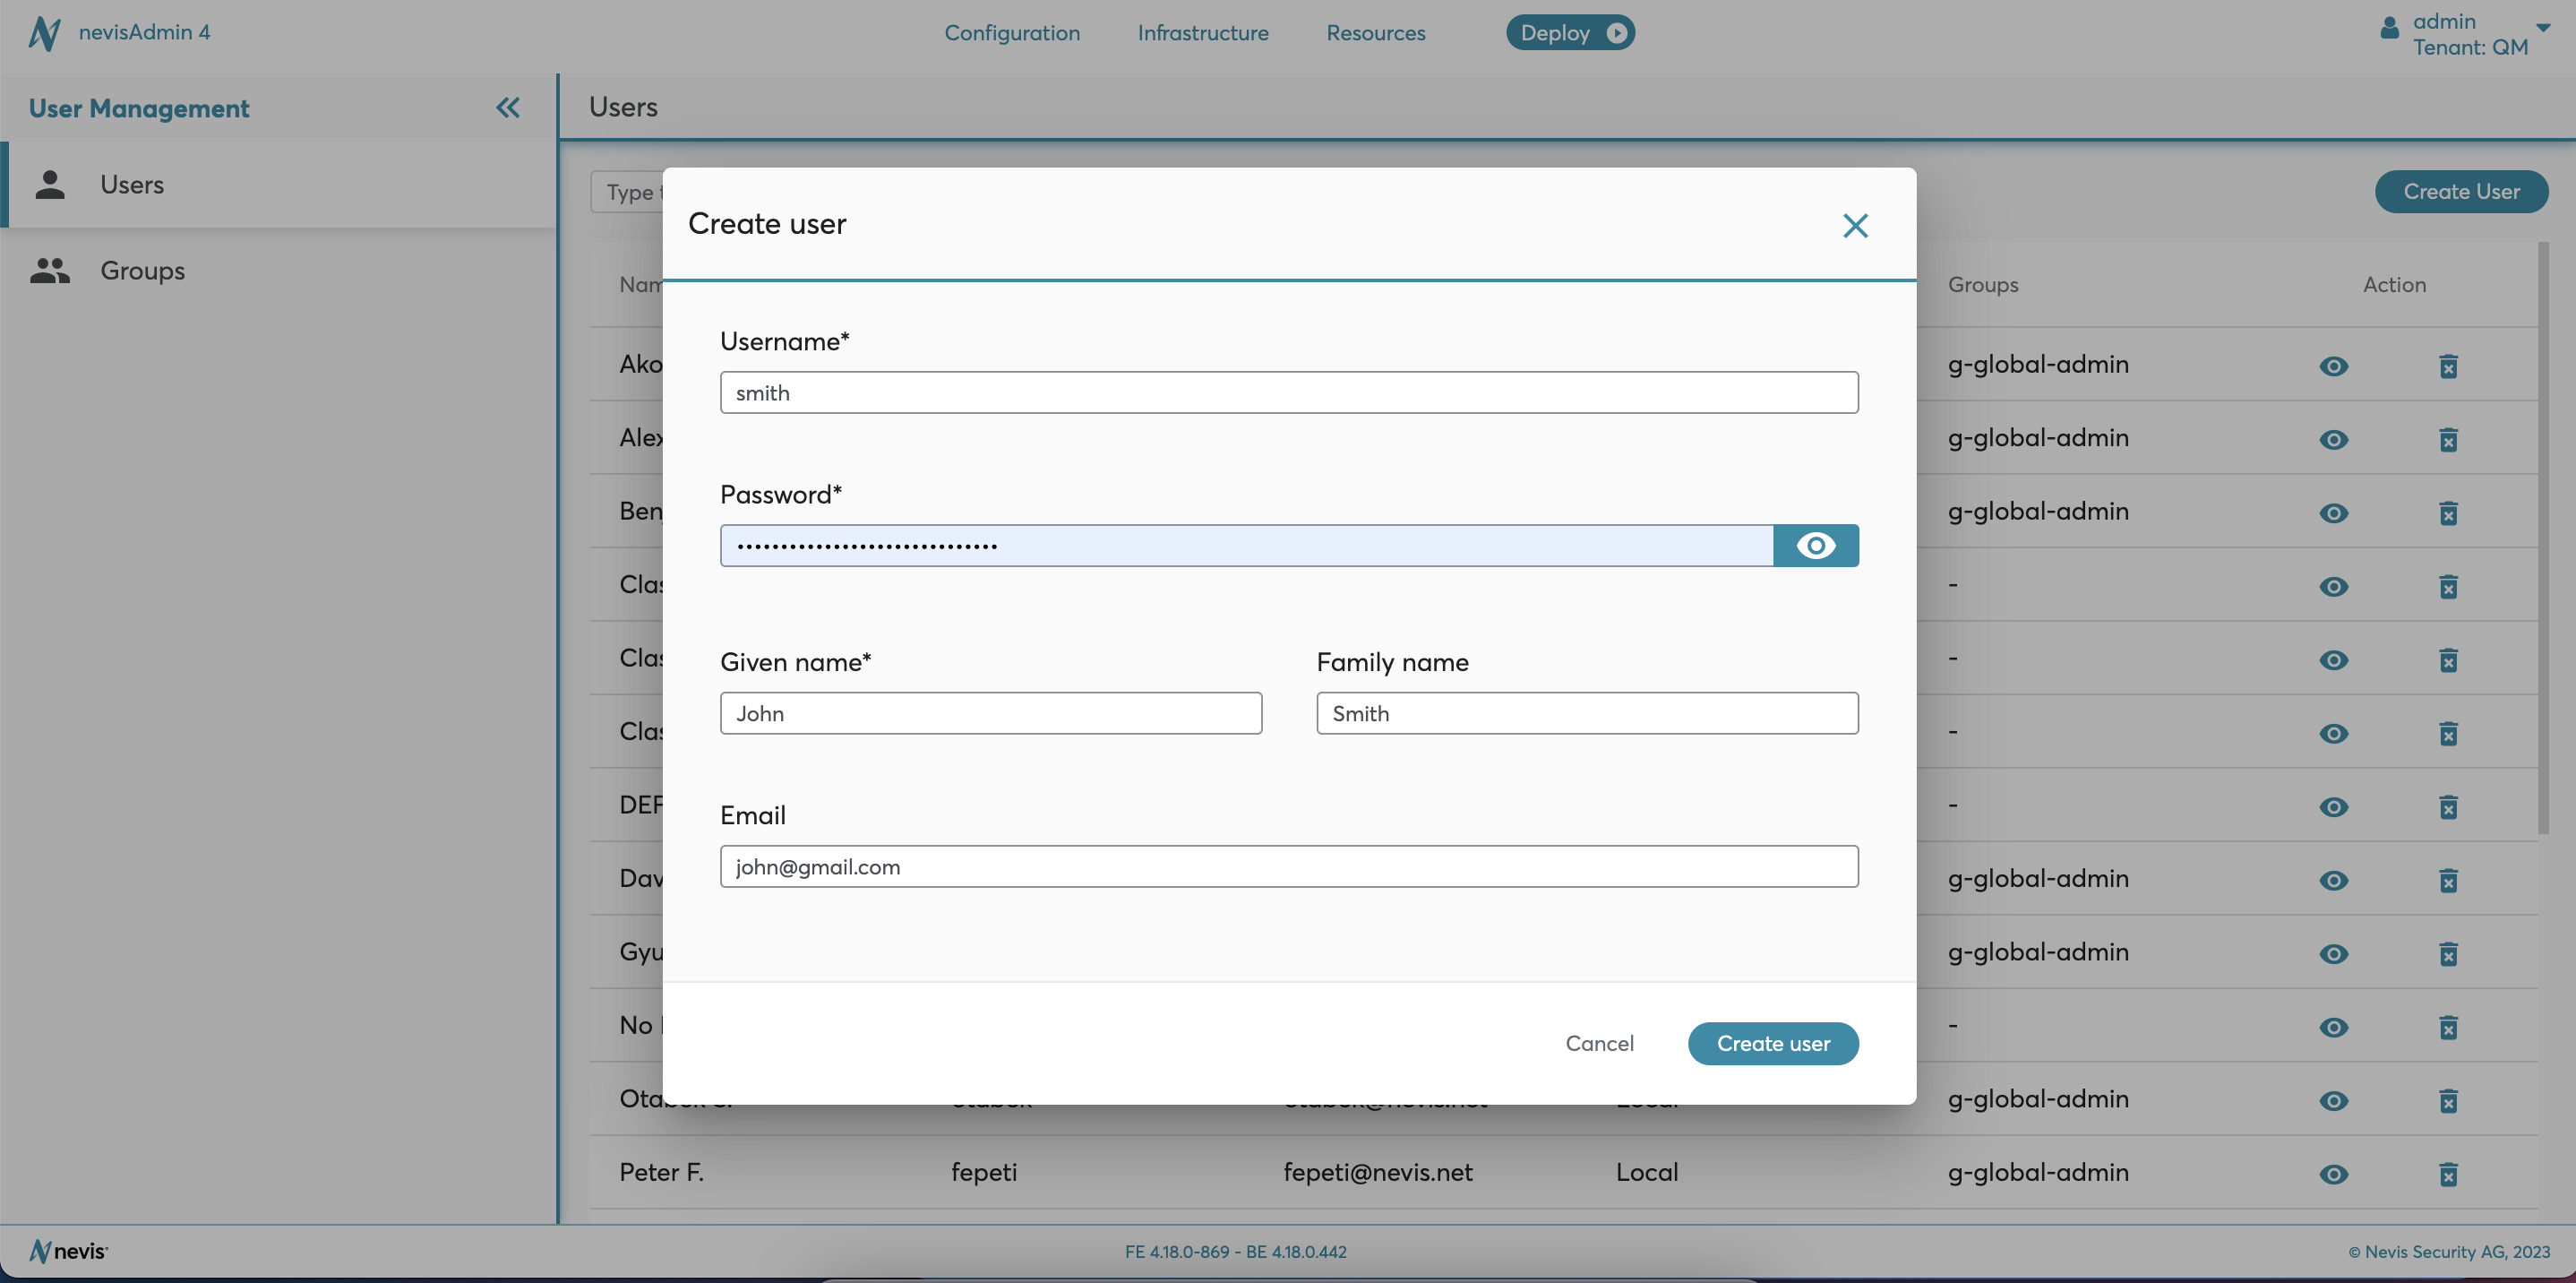
Create user
To create a new user, click on Create User button in the Users screen. The Create user dialog screen pops up with the following input fields:
- Username - username to access nevisAdmin4
- Password - password to access nevisAdmin4
- Given name - given name of the user
- Family name - family name of the user
- Email - email of the user
After providing the inputs and clicking Create user button, a new user is created.
After a user is created, it is not possible to view or reset the password in the UI.
The newly created user has no permission or group is assigned by default. You can assign the permissions and groups in the user details screen, see the details below.
User details
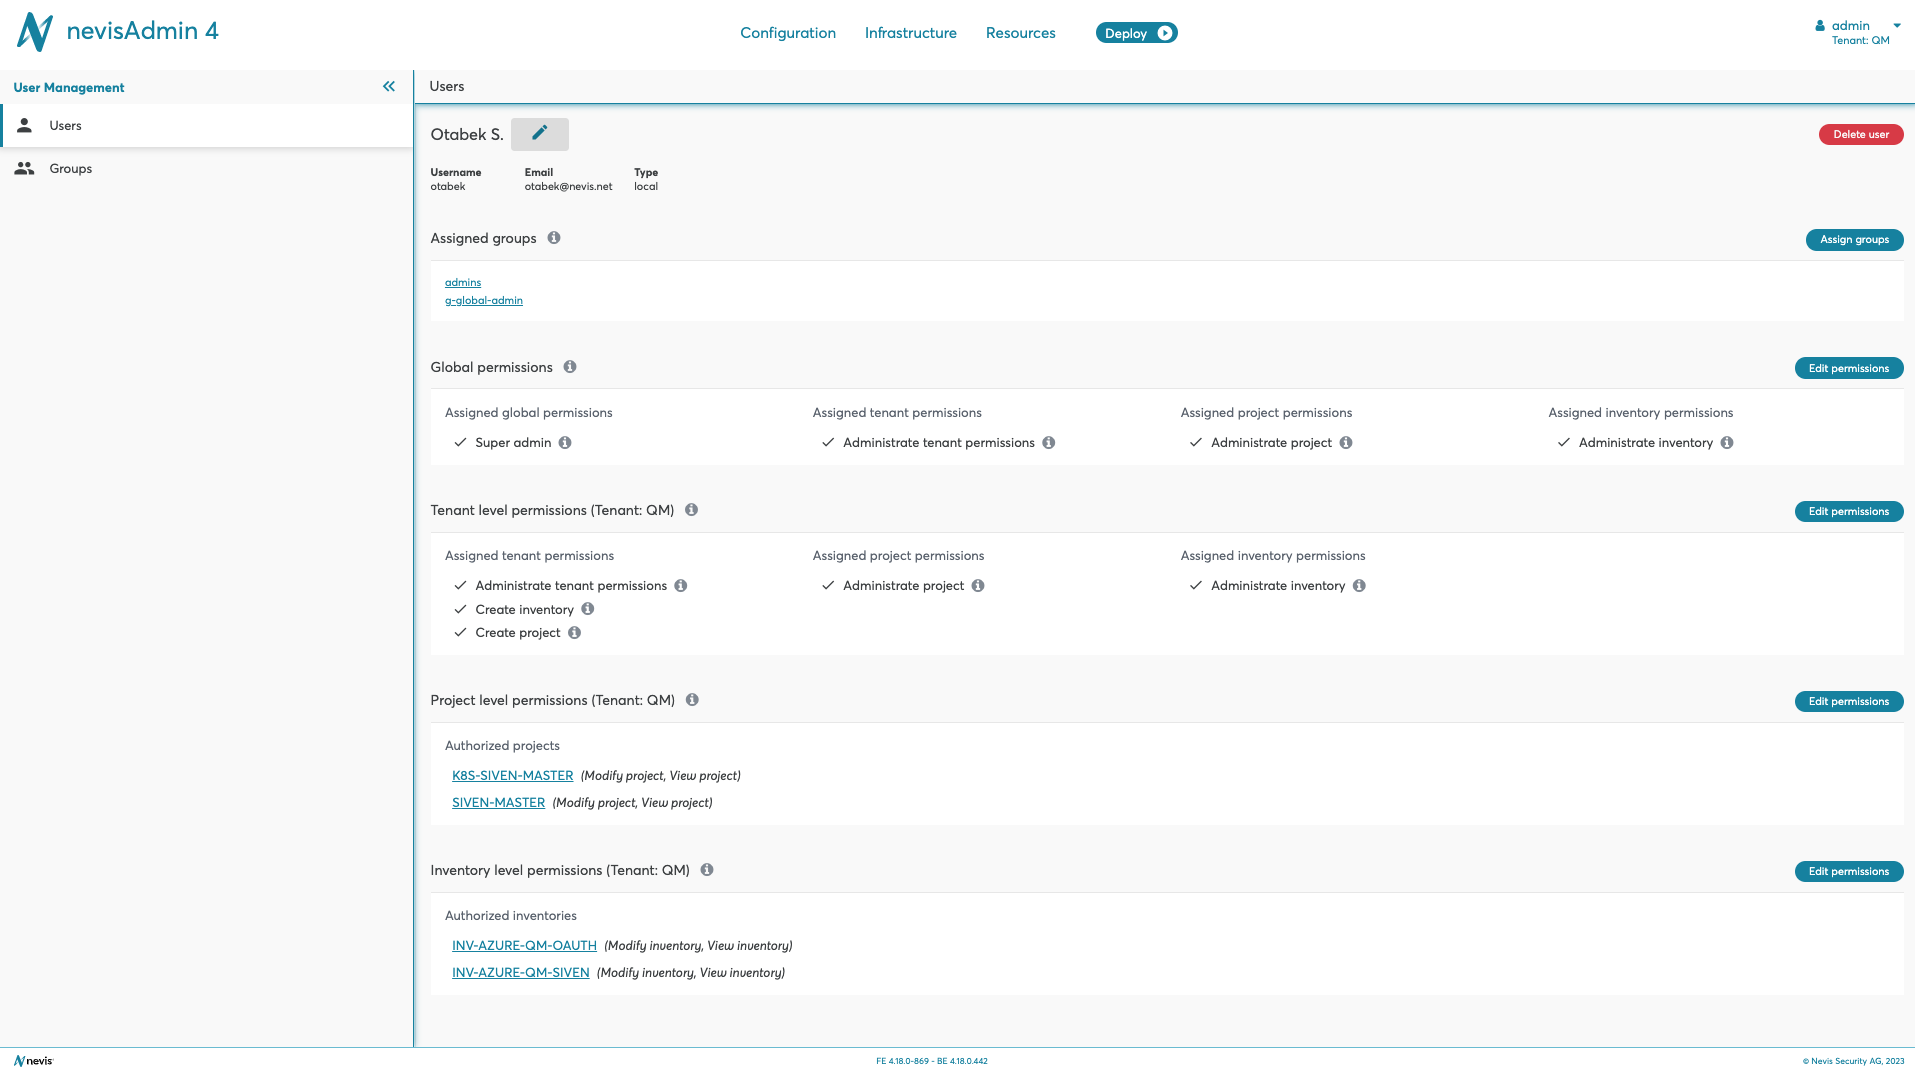
The user details is opened after clicking View icon button in the users table.
The following details and functions are available on the screen:
- User details with the Edit pencil button to edit, see details below.
- Delete user button initiates the deletion of the user.
- Assigned groups - lists the groups assigned to the user, see the details below.
- Permissions are listed by the permission levels that they are set, see the details below for each:
- Global permissions
- Tenant level permissions
- Project level permissions
- Inventory level permissions
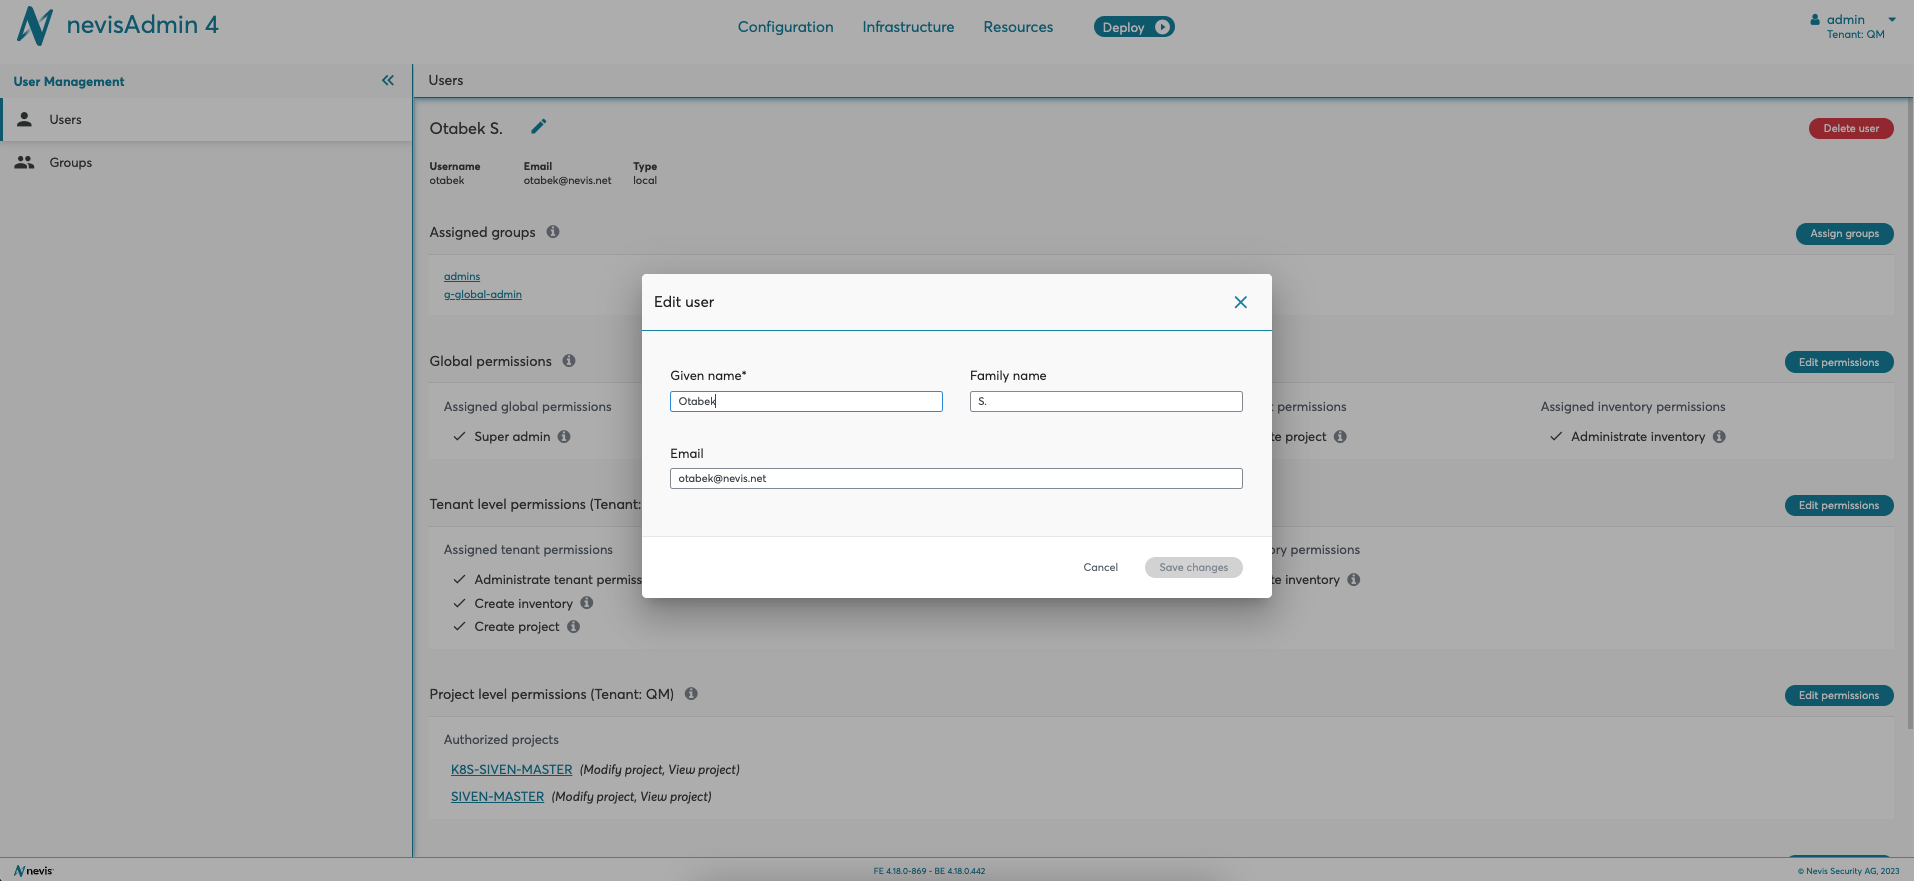
Edit user details
You can edit the following user details by clicking the Edit pencil button in user details screen:
- Given name
- Family name
Delete user
You can delete a user with the Delete user icon button in user list table or Delete user button in user details screen. You have to confirm the warning to delete the user.
User deletion is irreversible action. After the user is deleted, it cannot be undone.
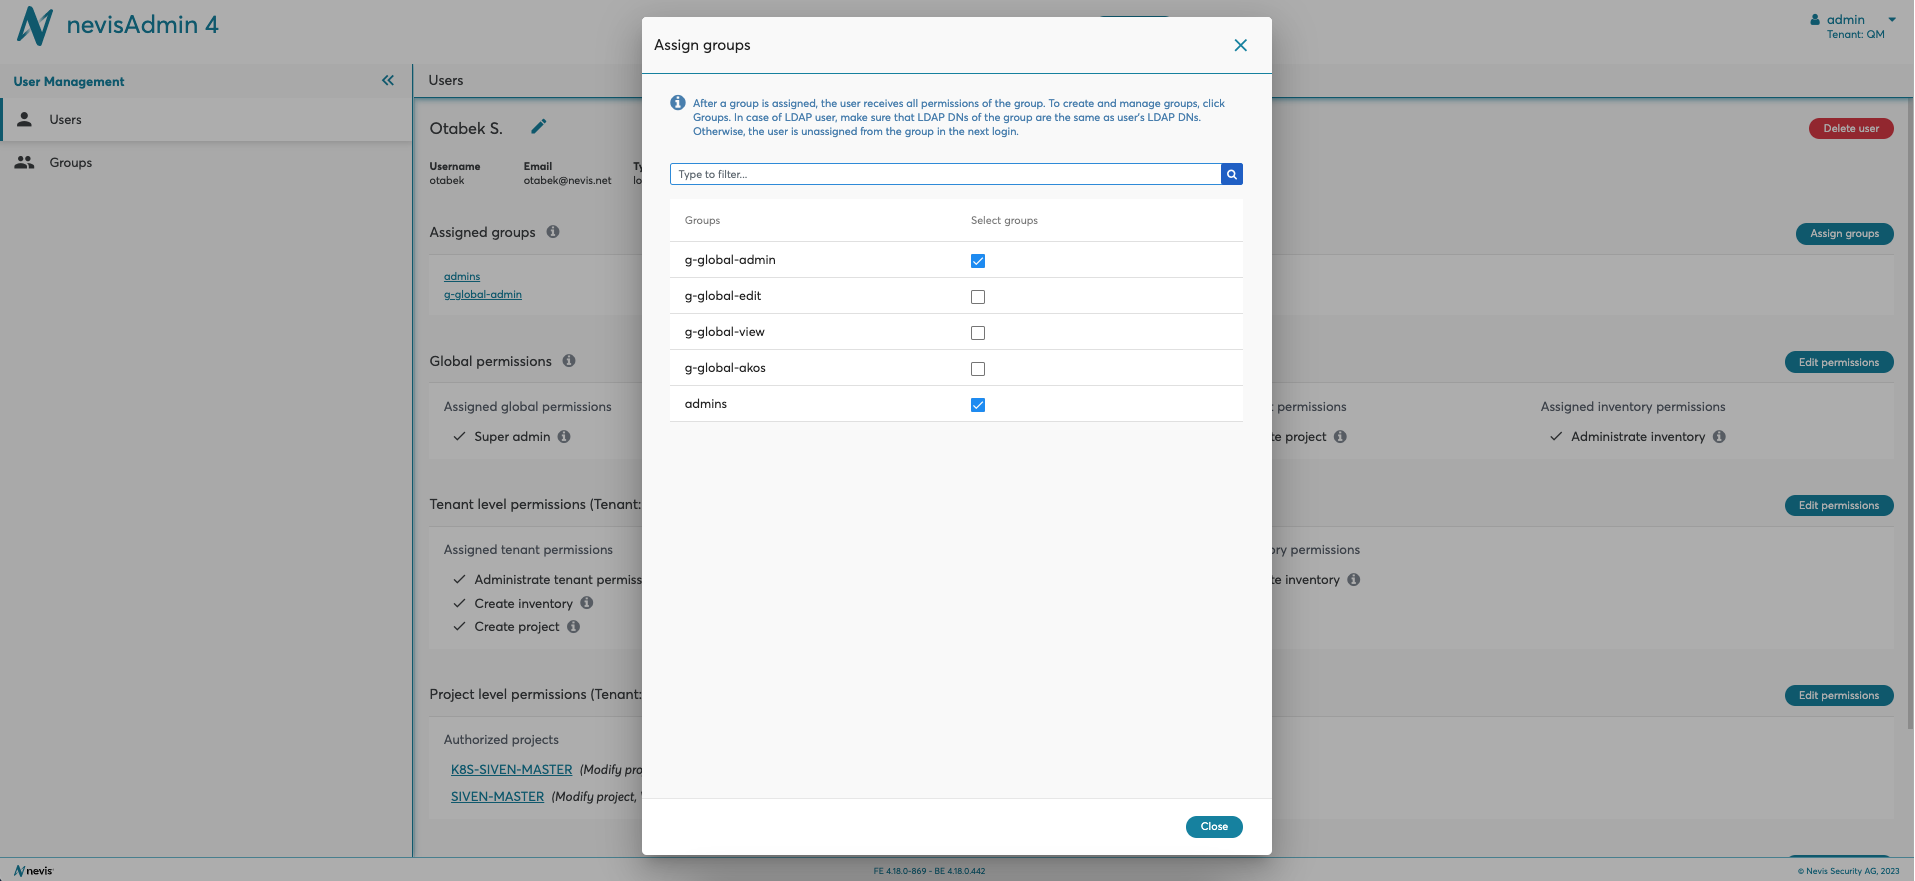
Assign groups
If you want to grant all permissions of a group to the user, you can do it by assigning the group to the user. First, the groups have to be created and then can be assigned to the user.
Group creation and management are described at Managing Groups page.
Perform the following actions to assign groups to the user:
- Click Assign groups button
- Assign groups dialog screen is displayed
- Select the groups you would like to assign
- Close the dialog screen
After the groups are assigned to the user, the user is granted with all the permissions inherited from the assigned groups.
To unassign the groups, simply uncheck the groups in the Assign groups dialog screen.
A user can be a part of multiple groups and you can also set other permissions individually to the user.
Manage permissions/operations
The user permissions can be assigned to the user on a different level. They are displayed as grouped based on these permission level hierarchy on the user details screen.
See the description of the permissions and their levels at Managing Users and Groups via REST
Only assigned permissions are displayed on user details screen. All other unassigned permissions/operations, including the inherited ones, can be found in edit permissions dialog screen.
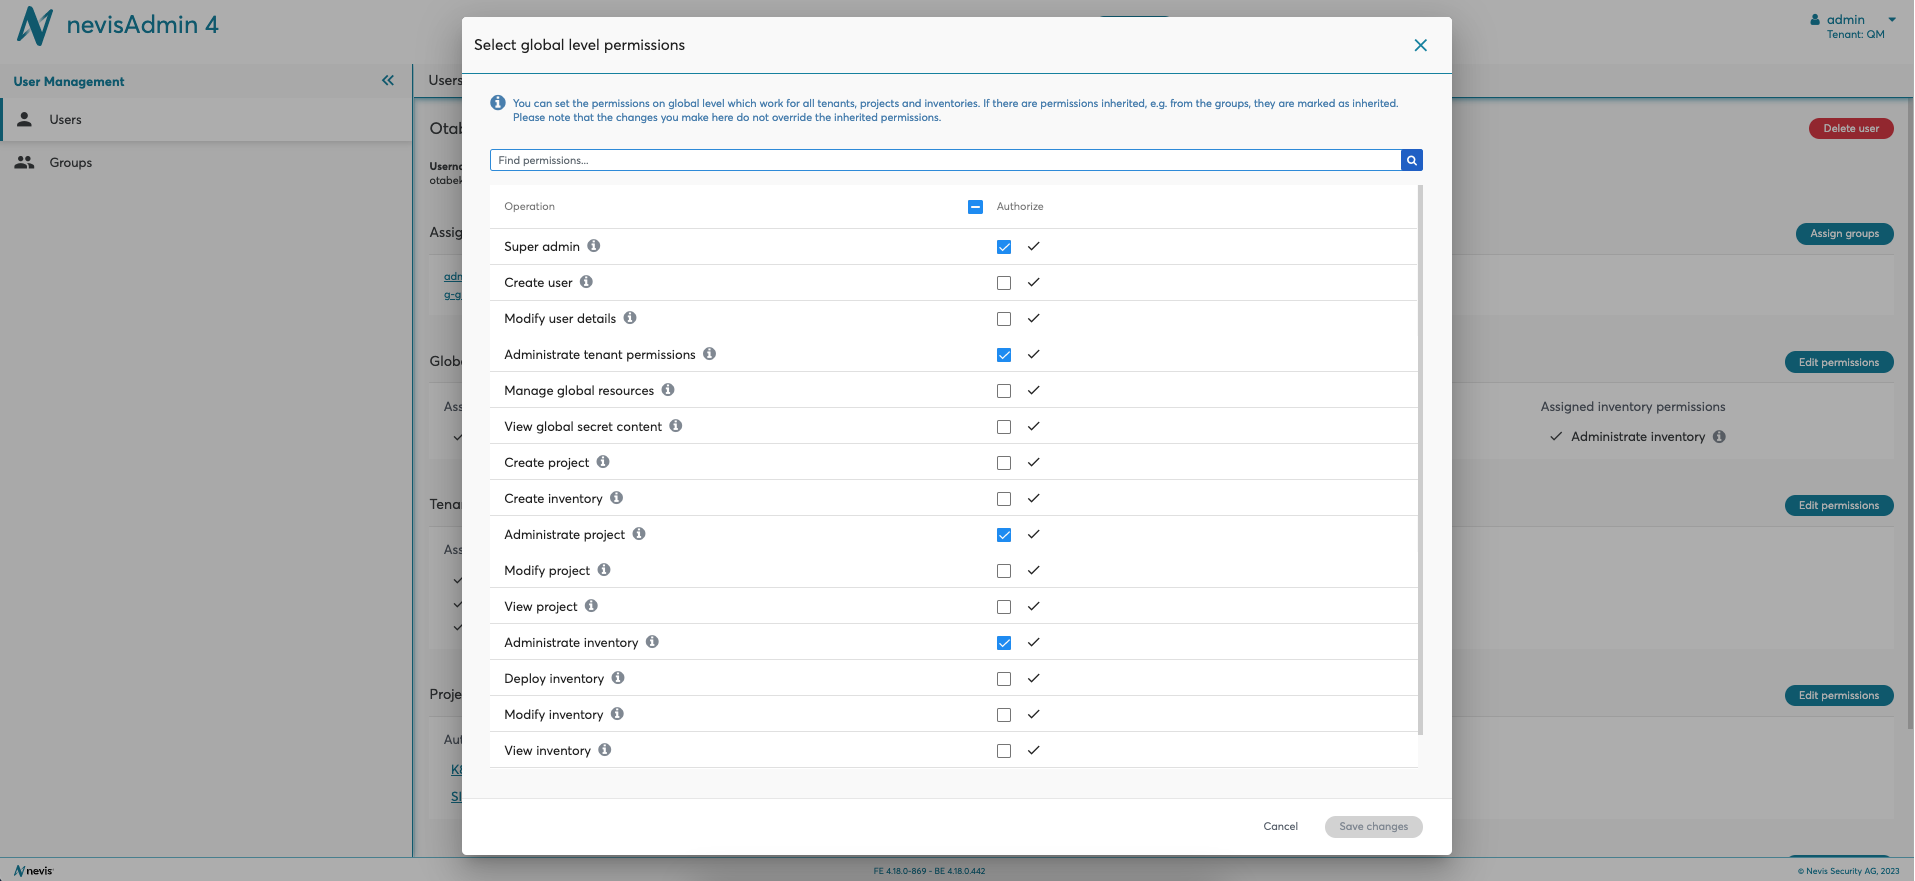
Global level permissions
If you want to grant the user with the permissions on a global level, you do it on this section. Any permission can be set on a global level. This means that the user is granted with the permissions independent from the selected tenant, project and inventory.
Perform the following actions to assign or manage global level permissions:
- Click Edit permissions button in user details screen
- The list of the permissions/operations are given in a table
- if the permissions are inherited from the upper level, for example, from the assigned groups, it is indicated as inherited. Inherited permissions can not be overridden on this screen. To change the inherited permission settings, you have to edit the original settings, in this case the group permissions.
- Check or uncheck to authorize or remove the permissions
- Click Save changes button to save the changes
Assigned permissions are displayed in user details screen.
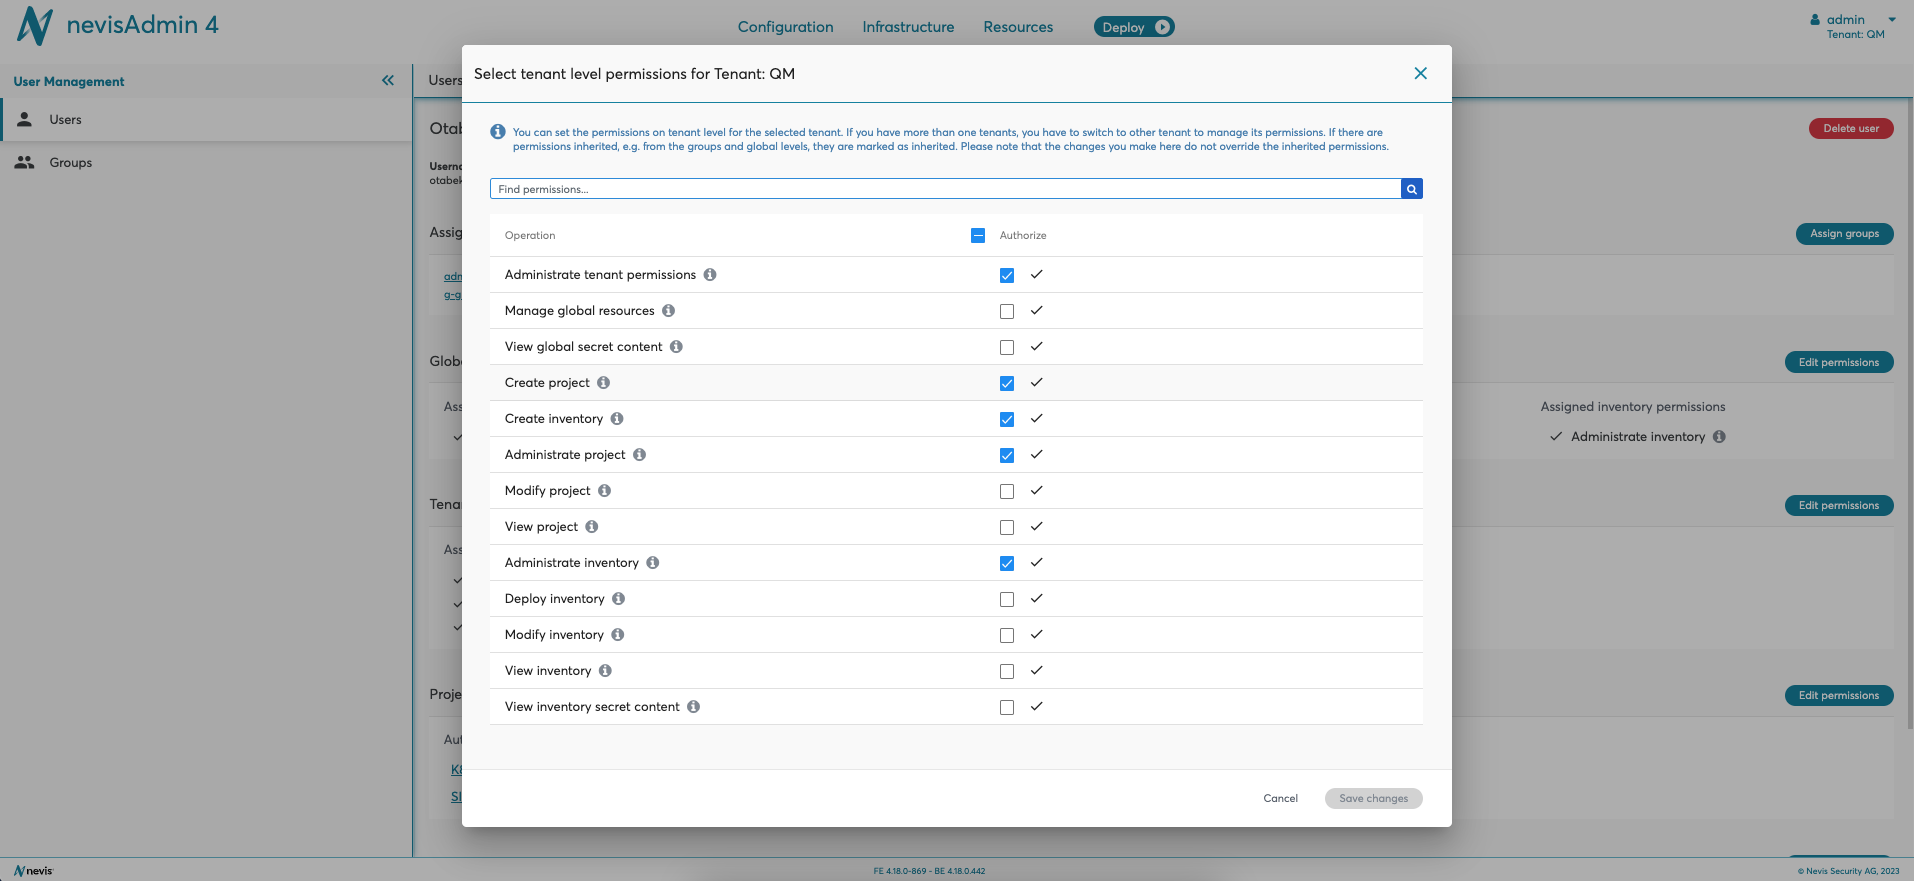
Tenant level permissions
If you want to grant the user with the permissions on a tenant level, you do it on this section. Any permission (except the global operations such as Create user, Modify user details and Super admin) can be set on a tenant level.
Tenant level permissions can be set only on the selected tenant. This means that the user is granted with the permissions only on the selected tenant level for the tenant, project and inventory operations.
If you have more than one tenants and want to set the same permissions on the other tenants, you have to switch the tenant and do the same changes.
To assign or manage tenant level permissions, click Edit permissions button in user details screen and perform the same steps as described in Global level permissions.
Assigned permissions are displayed at Tenant level permissions section in user details screen.
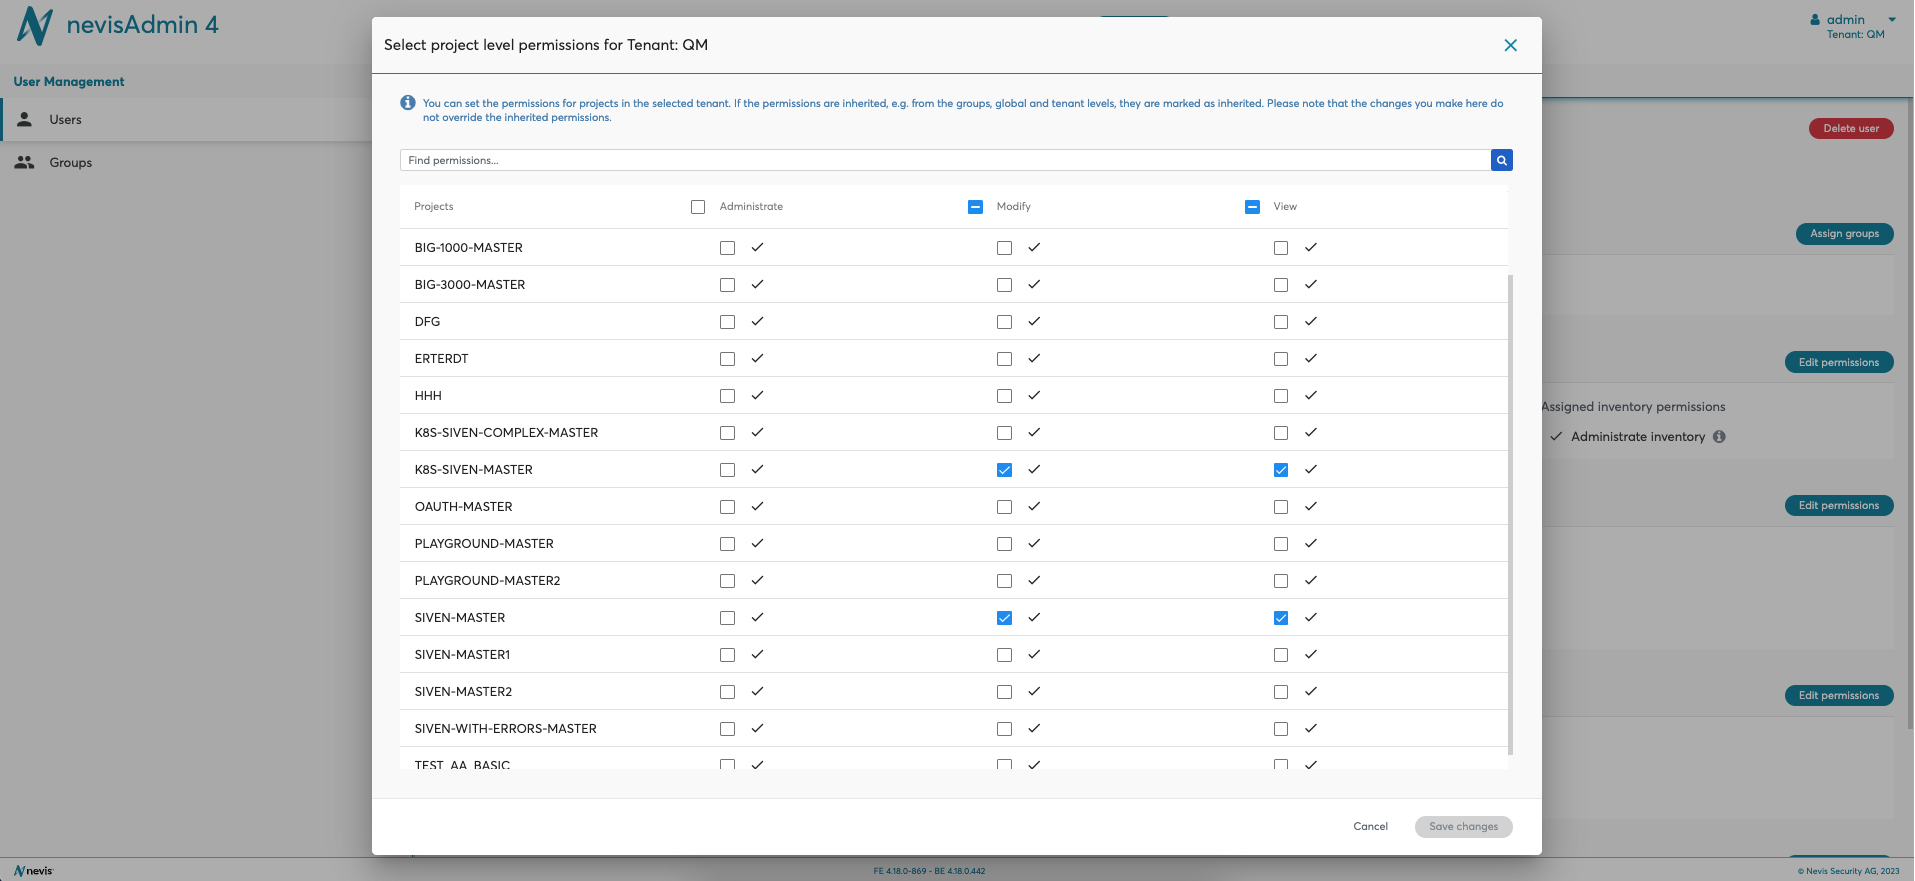
Project level permissions
If you want to grant the user with the permissions only on a project level for the selected tenant, you do it on this section. The same setting can be done in project settings separately for each project. However, in this screen, you can manage the permissions for all authorized projects at the same time.
Perform the following actions to assign or manage project level permissions:
- Click Edit permissions button in user details screen
- The projects are listed in a table
- if the permissions are inherited from the upper level, for example, from the assigned groups, global level or tenant level permissions, it is indicated as inherited. Inherited permissions can not be overridden on this screen. To change the inherited permission settings, you have to edit the original settings, in this case the group, global or tenant level permissions.
- Check or uncheck to authorize or remove the permissions
- Click Save changes button to save the changes.
Authorized projects with assigned permissions are displayed at Project level permissions section of user details screen.
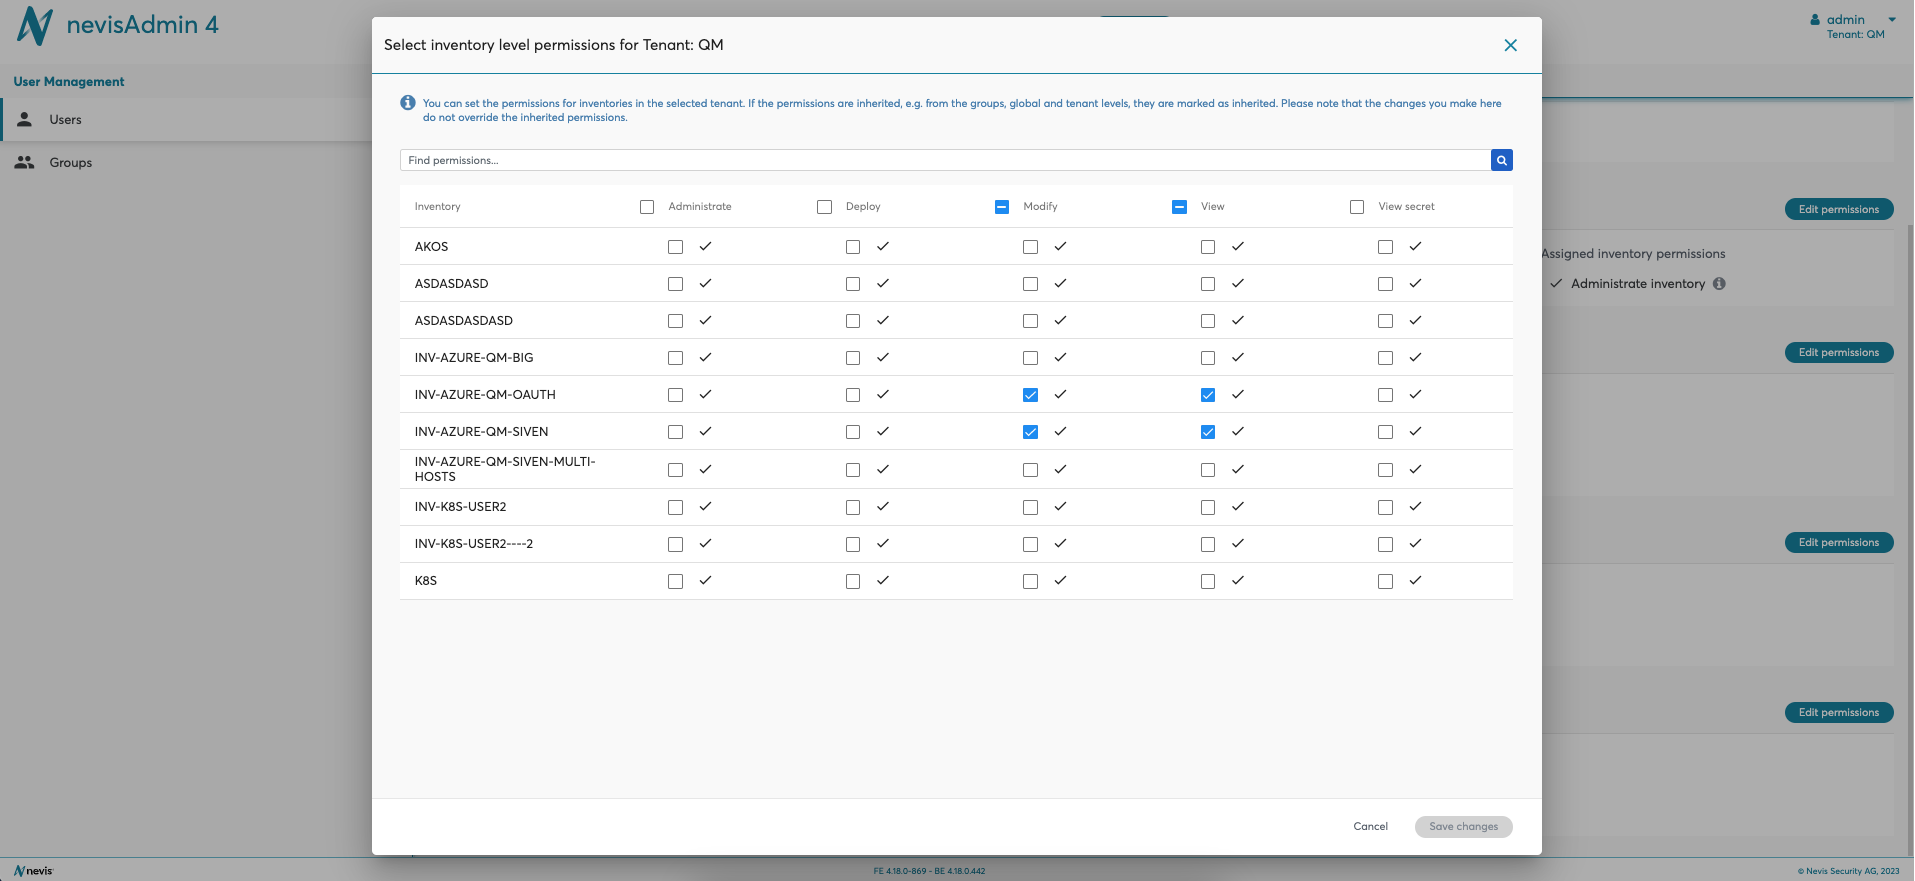
Inventory level permissions
Similar to project level permissions, the inventory level permissions can be set for the selected tenant. The same setting can be done in inventory settings separately for each inventory. However, in this screen, you can manage the permissions for all authorized inventories at the same time.
Assigning and managing the inventory level permissions are similar to Project level permissions.