Secrets and Files
Overview
The Secret & Files functionality supports the creation of global (tenant level) secrets, files and secret files (later mentioned as "secrets" and "files") and the usage of these artifacts in multiple inventories. You can access the functionality from the Resources tab.
The Secret & Files screen allows you to manage all your secrets and files in one central place. You can get a quick overview of what secrets and files you have and where they are used. Together with the used secrets and files you can also find the "unused" or "unlinked" ones and manage them.
- Unused: The status of global secrets and files that are not used in any inventory yet.
- Unlinked: The status of secrets and files that were created on inventory level but removed from the inventory, and that are currently not used in any inventory.
You can perform the following actions from the Secret & Files screen:
- View all your secrets and files used in a single or multiple inventories.
- View and edit the content of your secrets.
- View and replace the content of your files.
- Download your files.
- Delete your secrets and files.
- Create a global secret that can be used in and referenced from your inventory. For further details, see the chapters below.
- Upload a global file that can be used in and referenced from your inventory. For further details, see the chapters below.
The above actions are restricted by permissions. For further details, see the next chapter.
Permissions
The actions related to the secret and files are restricted by permissions. For an overview of these permissions, see the Permissions table in chapter Managing Users and Groups via REST.
Global (Tenant) Secret and Files
The Global Secret & Files feature allows you to use the same secret or file in multiple inventories. An update of your global secret or file will affect all inventories where the given global secret or file is used in. You no longer need to make the changes one by one in each inventory.
To apply your configuration you have to make a deployment as always.
The following sections show how to create and use a global secret and file.
Creating a global secret / file
- Open the Secret & Files screen by selecting the Secret & Files option from the navigation menu in the sidebar of the Resources tab.
- In the Secret & Files screen, the following buttons are available:
- Create global secret: For more details, see the section Create global secret further below.
- Upload global secret file: For more details, see the section Upload global secret file further below.
- Upload global file: For more details, see the section Upload global file further below.
- Define a secret or upload a (secret) file to make it a global secret or file.
- You can now link this global secret or file to your project and reference it from your inventory. See the next section how to proceed.
Using and referencing the created global secret/file
- Create a variable in the pattern property where you want to use the created secret/file.
- Open the relevant inventory file in the Inventory Editor and insert your variable.
- Reference the global secret/file in your variable by performing one of the next two options:
- Copy the ID (that is, Secret ID, Secret resource ID and Resource ID) from the Secret & Files screen and paste it to your variable in the inventory editor.
- Select one of these actions in the Inventory Editor and use the Or select existing secret drop-down in the opened dialog screen to select the global secret/file:
- Insert secret button For more detailed information on inserting a secret, see the chapter Working with Secrets.
- Attach certificate button For more detailed information on attaching a certificate, see the chapter " [Working with Certificates.
- Attach file button For more detailed information on attaching a file, see the chapter Working with Inventory File Attachments.
- Attach secret file button For more detailed information on attaching a secret file, see the chapter Working with Inventory File Attachments.
- Click the Save changes button. The global secret/file is now linked to your variable.
Making a deployment to apply your configuration
The next figure shows how to create and use the global secrets and files in your inventory:
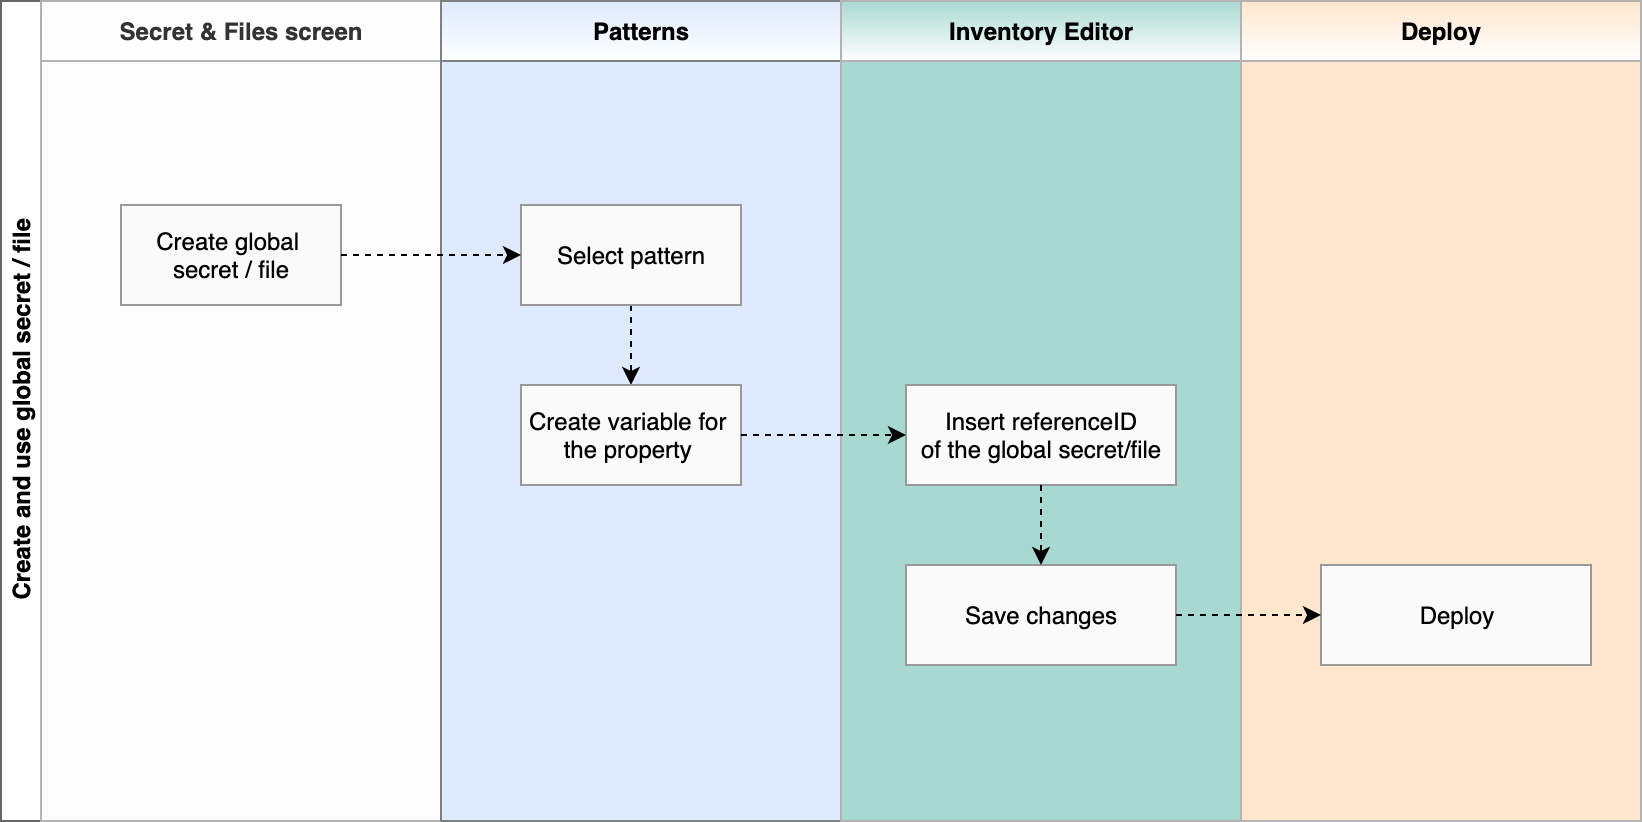
Secret & Files
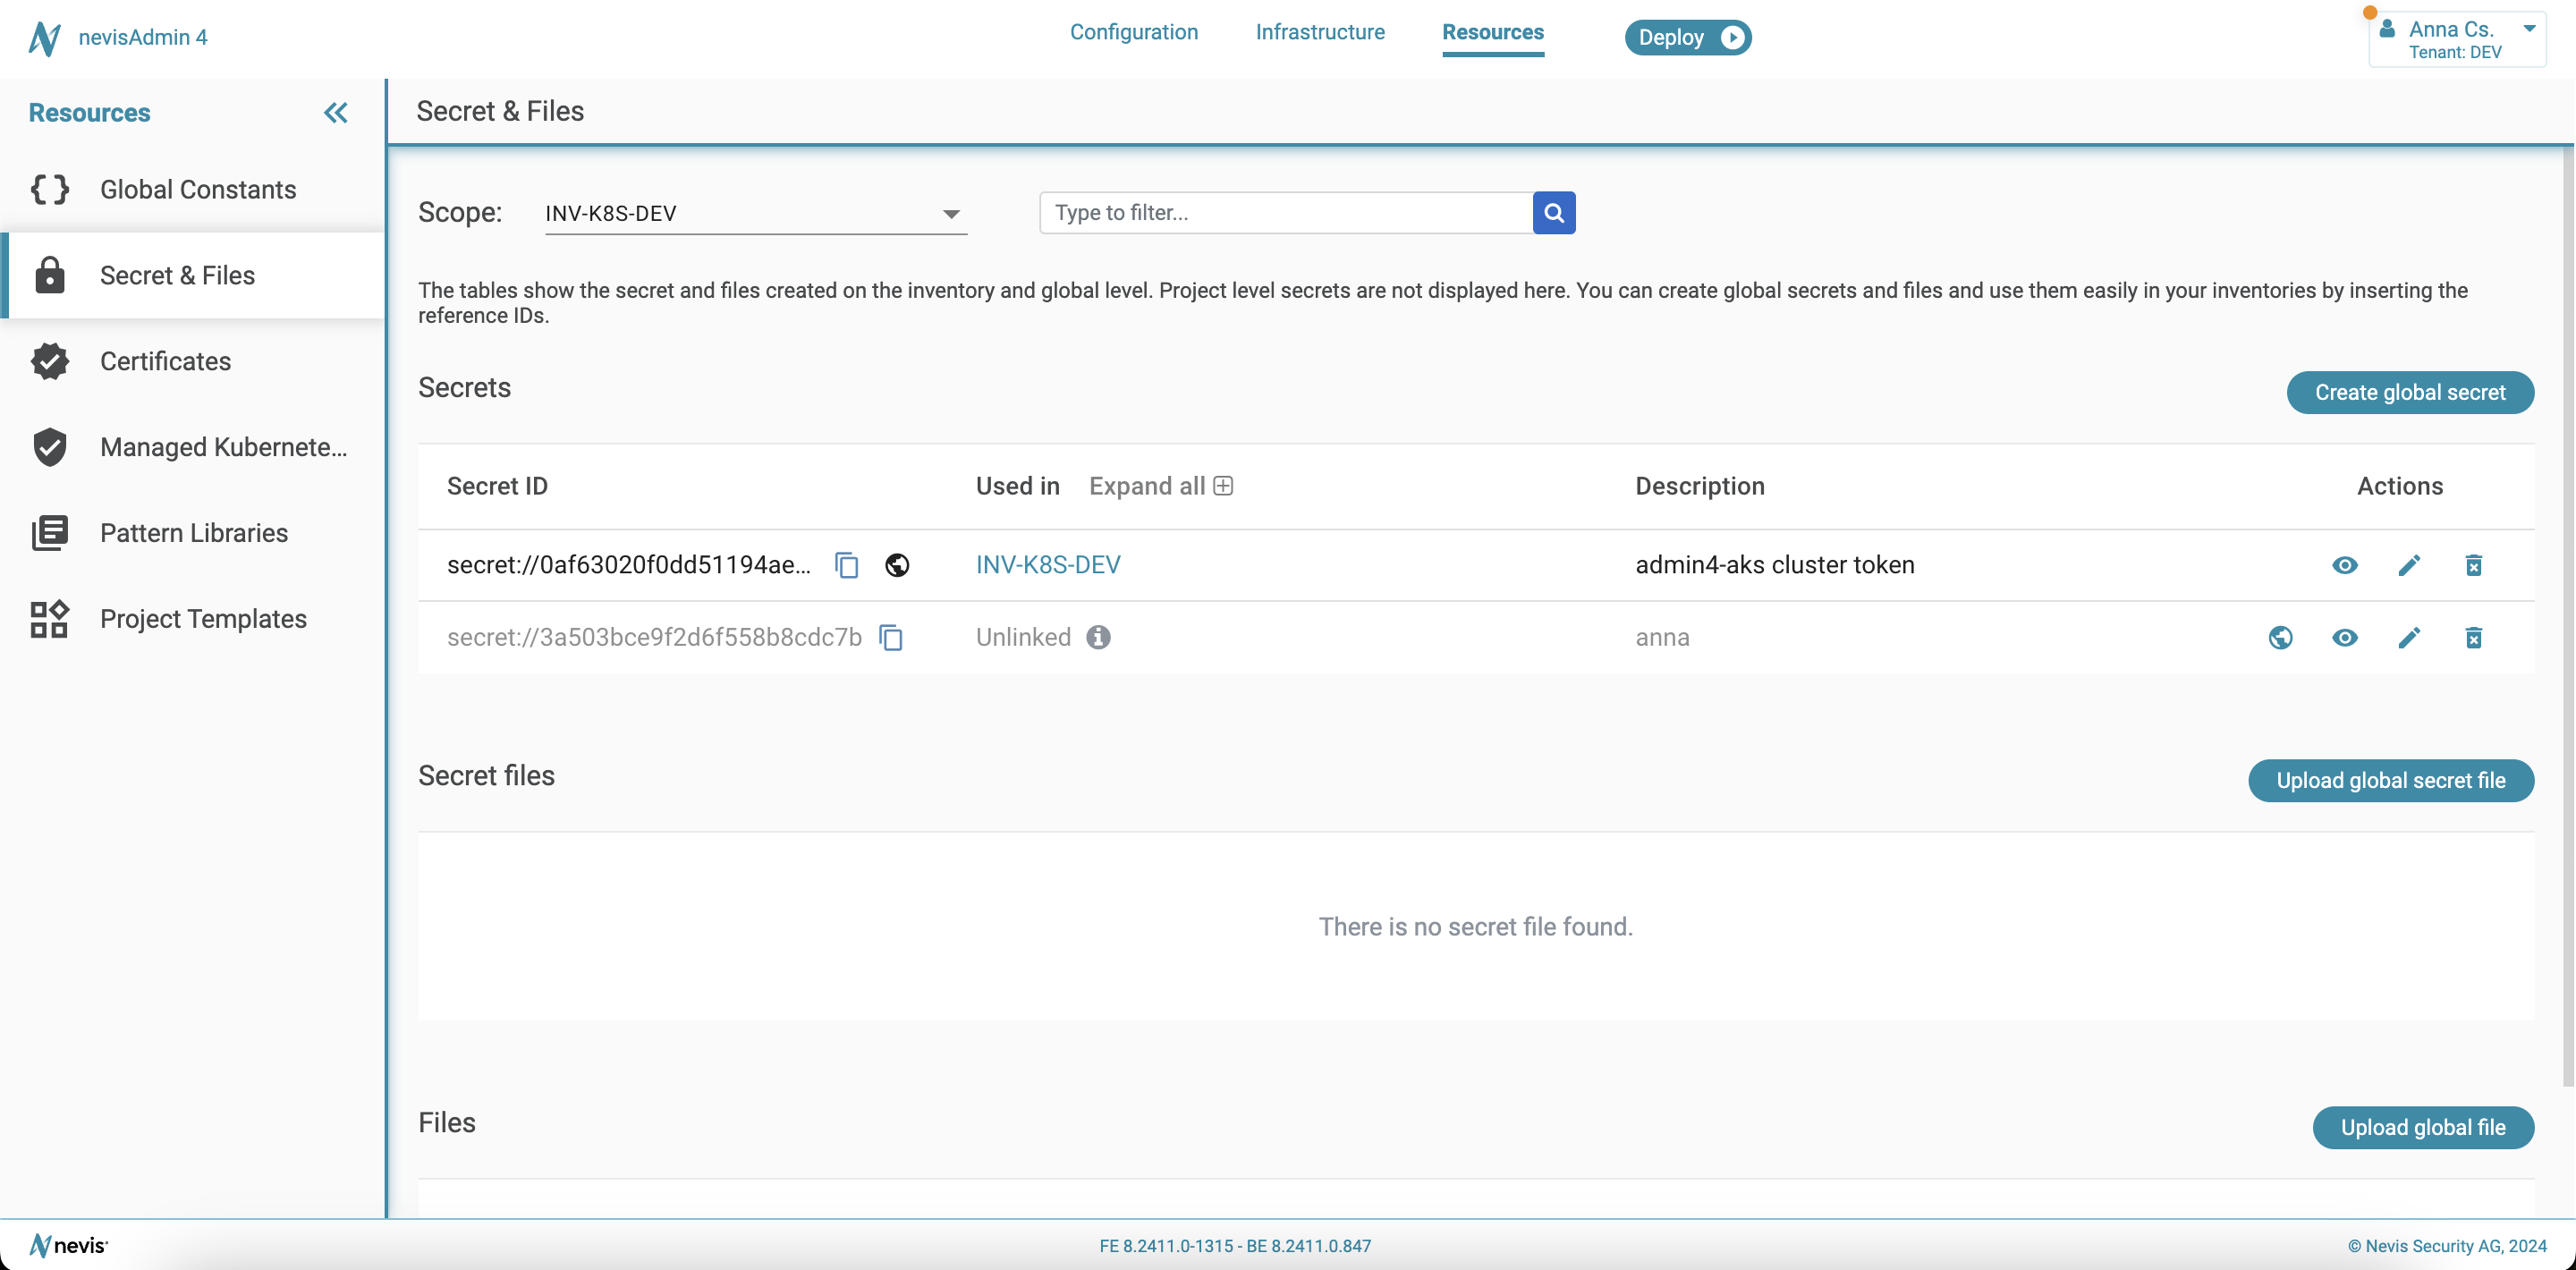
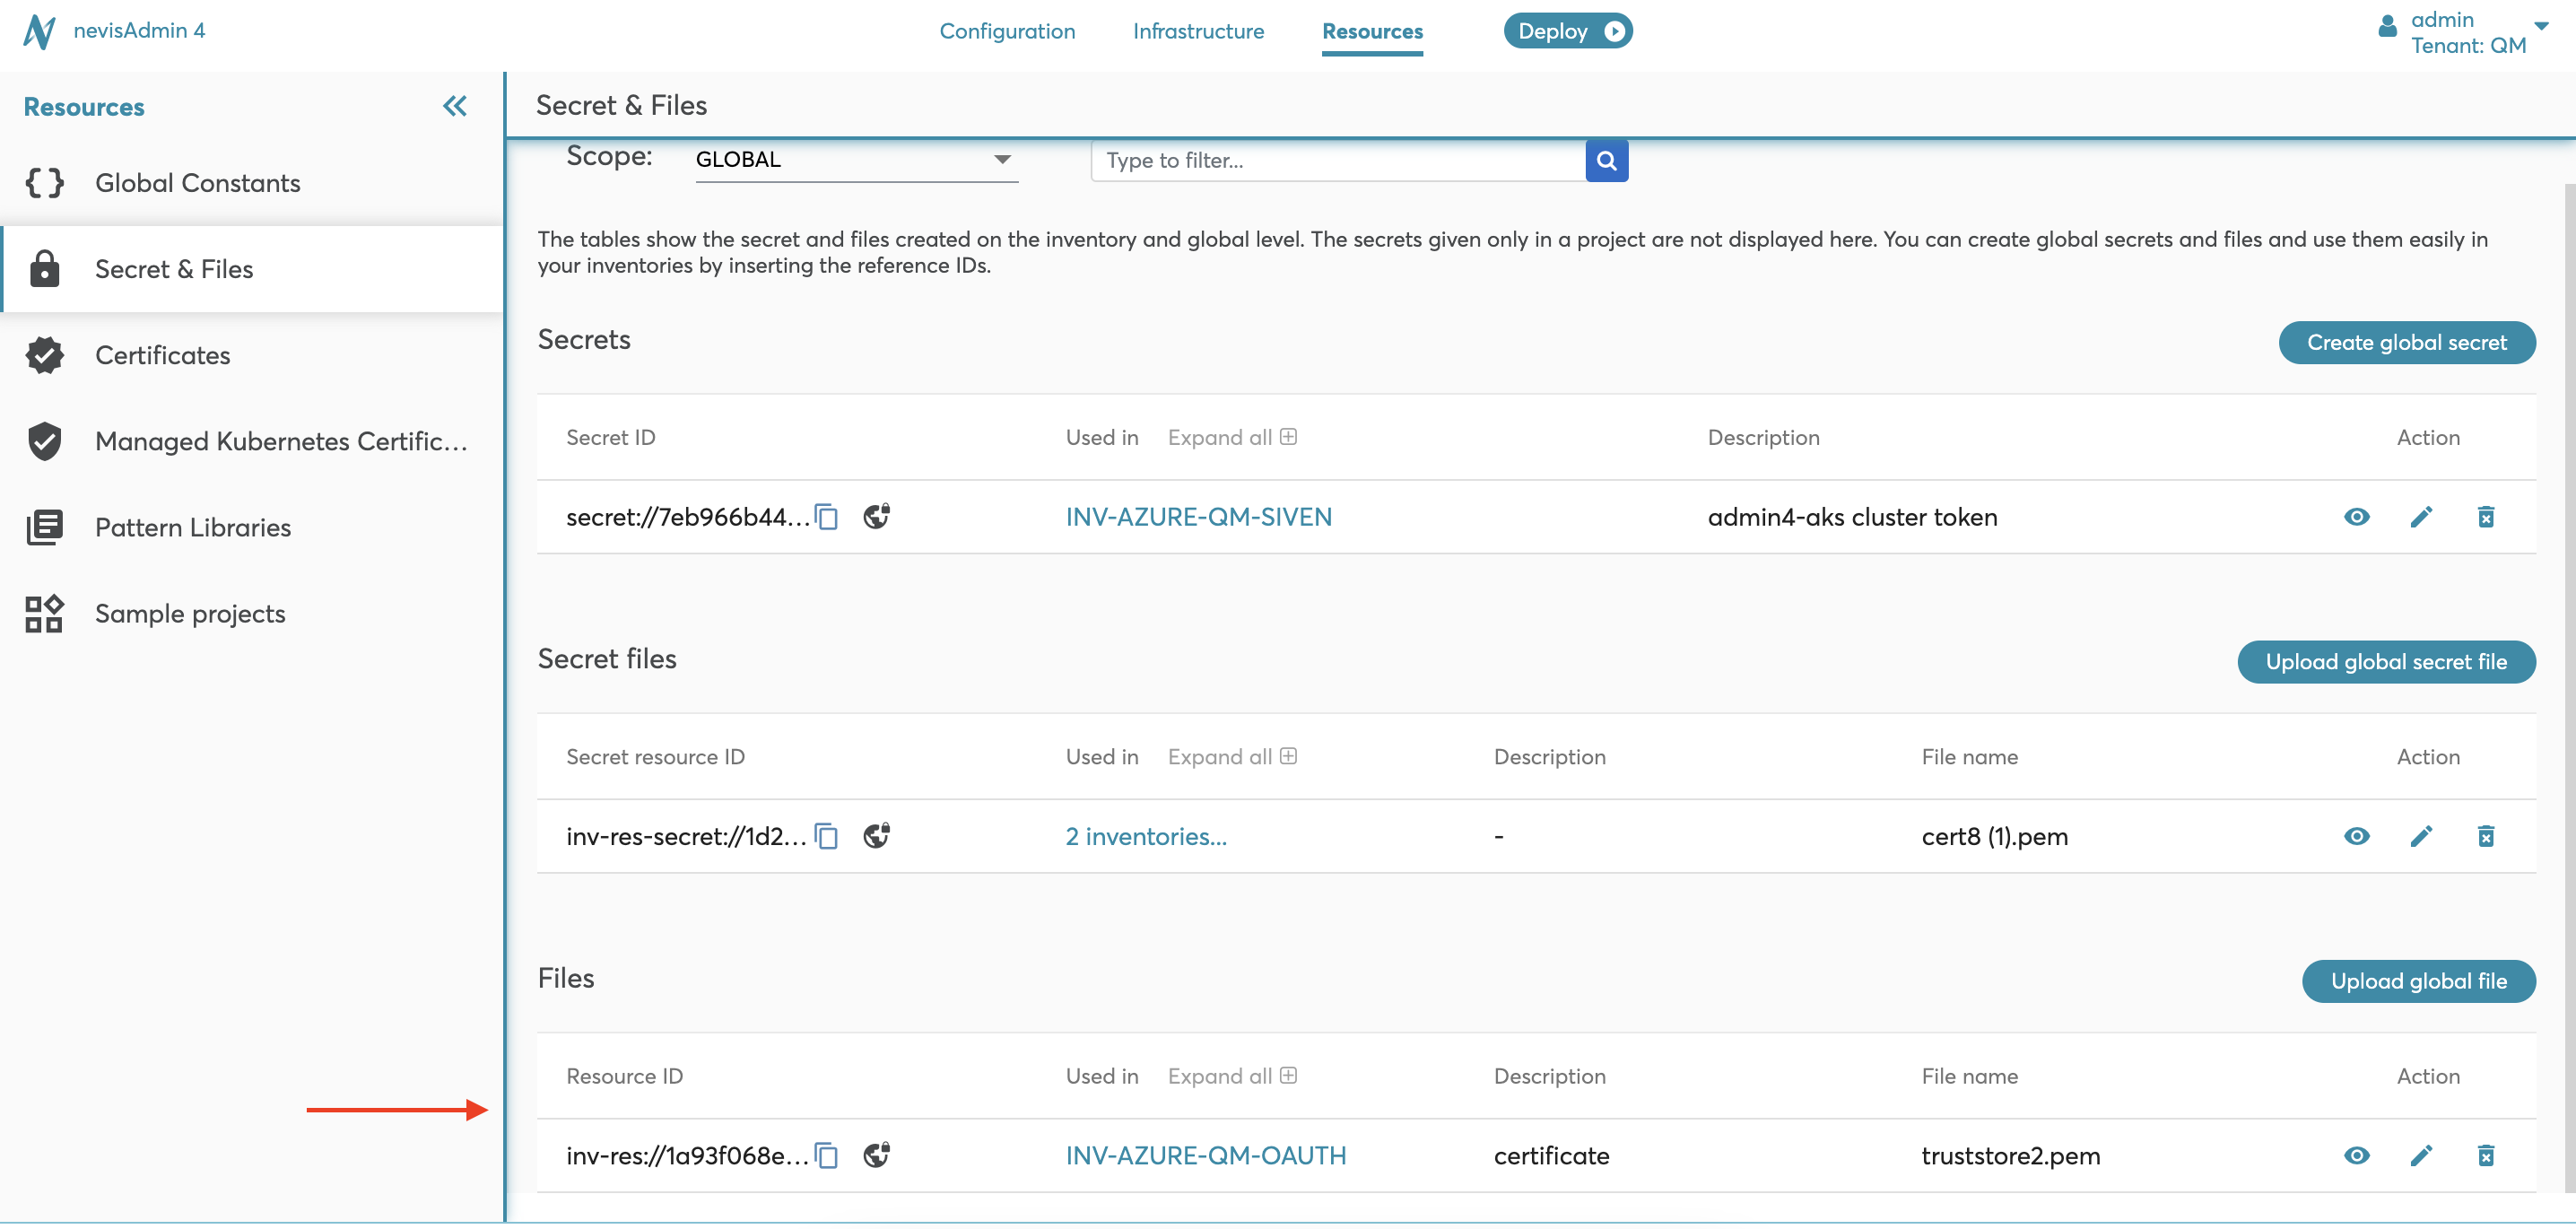
The Secret & Files screen shows the secrets, files and secret files in separate sections. The following filters are available:
- Scope:
- Global: Filters only the global secrets, files and secret files.
- Inventory: Shows all secrets, files and secret files used in the selected inventory.
- Search filter:
- Triggers the search based on ID, inventory name, description and file name.
Secrets
The Secrets section shows the plain text secrets. It consists of the following elements:
- Secret ID:
*ID can be copied by clicking the copy icon. Then paste the ID manually in the inventory.
- ID can be sorted by clicking on the Secret ID column header.
- If the secret is created as a global secret, the global icon indicator is shown.
- Used in:
- Lists the inventories that use the given secret. Note that the Used in column only considers the secrets used under the vars section in your inventories.
- Description:
- Shows the description you defined during the creation of the secret.
- Action:
- View icon: Shows the content of the secret.
- Edit icon: Allows you to edit the content of the secret. Note that you cannot change the reference ID.
- Delete icon: Deletes the secret. Note that a deletion is irreversible and cannot be undone.
- Globe icon: Extend the scope of the secret from inventory level to global level.
- Create global secret button:
- Click on this button to create a global secret.
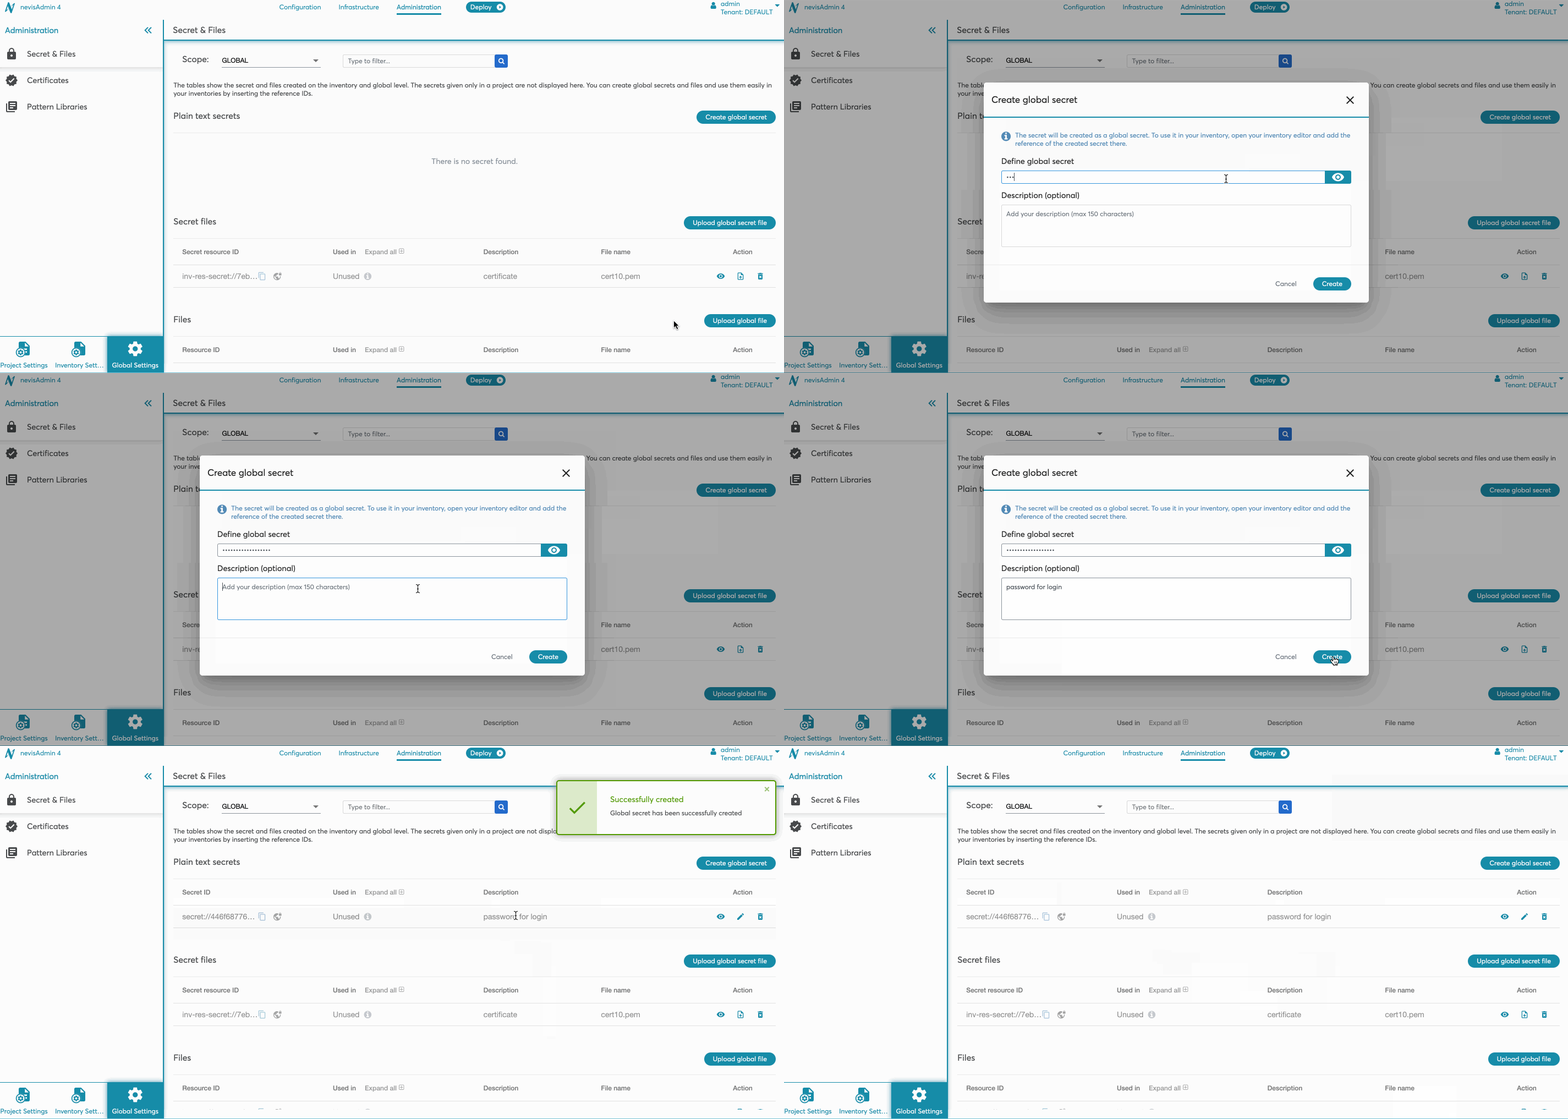
Creating a global secret
If you want to use your secret in multiple inventories, create it as a global secret by clicking the Create global secret button. Once you have created a global secret, you can use it as often as you want in as many inventories as you want. You only need to reference the global secret ID from the respective variable, to link the variable to the global secret. Whenever the content of your global secret is updated, the update is reflected in all places where the global secret is used (referenced).
Note that the Create global secret action is restricted by the MODIFY_TENANT permission. For more details, see the Permissions table in chapter Managing Users and Groups via REST.
Perform the following steps to create a global secret:
- Click the Create global secret button to open the Create global secret dialog screen.
- Define a secret.
- Add a description, if needed. The description will be visible in the Secret & Files screen and also in the Inventory Editor on hovering over the inserted global secret.
- Click the Createbutton.
- The global secret will be created and displayed as "Unused" in the Secrets table.
The following movie shows how to create a global secret:
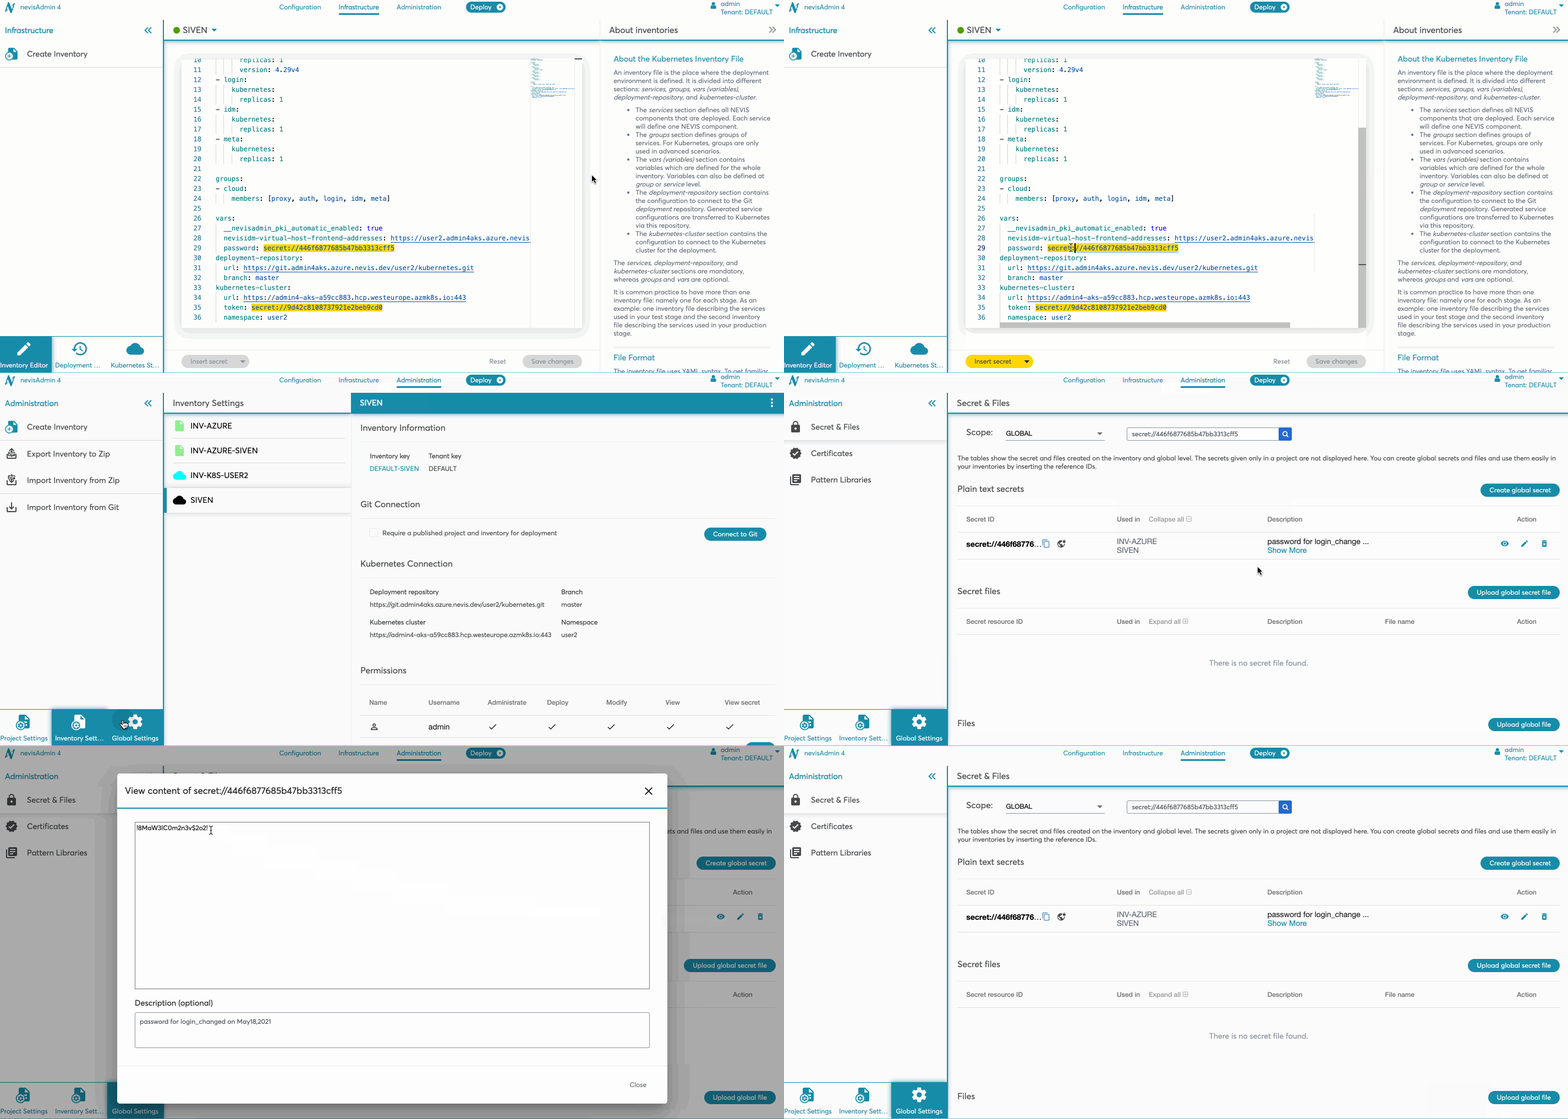
Viewing a secret content
You can view the content of the secret after creation.
Note that view secret content action is restricted by:
- VIEW_SECRET_CONTENT_TENANT - for global secrets.
- VIEW_SECRET_CONTENT_INVENTORY - for inventory level secrets.
For more details, see the Permissions table in chapter Managing Users and Groups via REST.
Perform the following steps to view a secret content:
- Find your secret in the Secrets table.
- In the Action column, click the View content icon.
- The View content dialog screen opens and shows the secret content.
The following movie shows how to view a secret content:
Editing a secret content
You can edit the content of the secret. Note that the reference ID remains the same - only the content will be changed.
The edit content action is restricted by the following permissions:
- MODIFY_TENANT - for global secrets.
- MODIFY_INVENTORY - for inventory level secrets.
For more details, see the Permissions table in chapter Managing Users and Groups via REST.
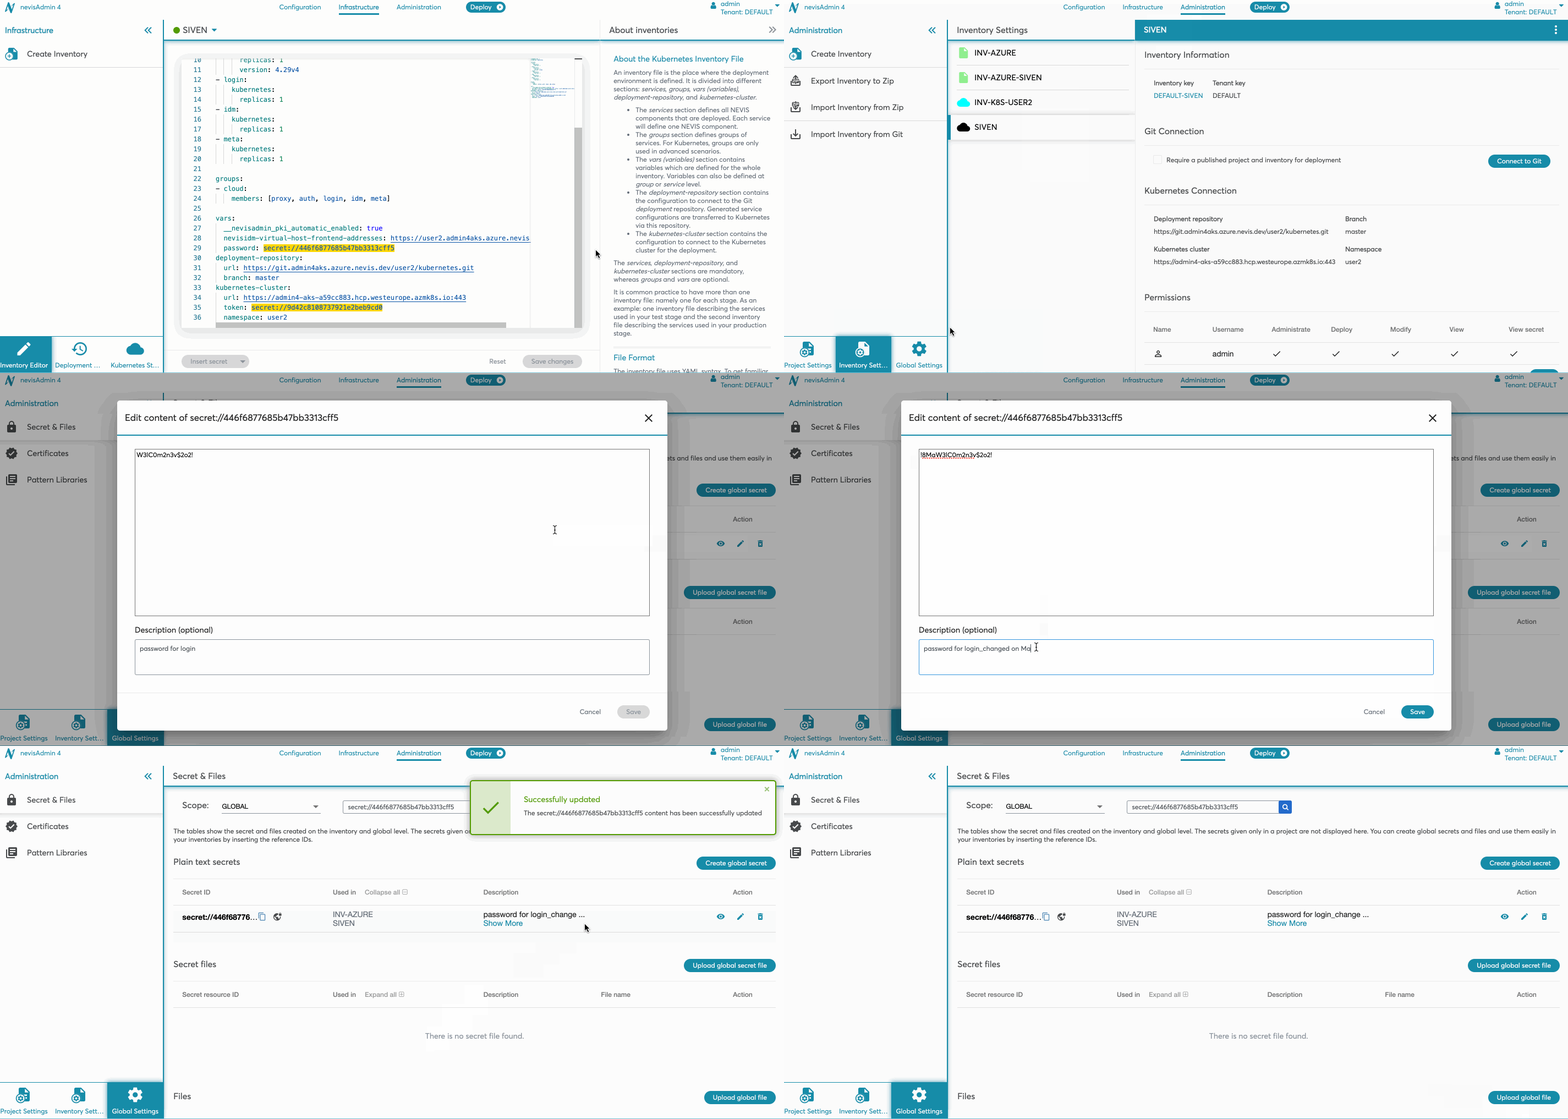
Perform the following steps to edit a secret content:
- Find your secret in the Secrets table.
- Click the Edit content icon in the Action column.
- The Edit content dialog screen is opened.
- Edit the secret content.
- Change the description, if needed. The description will be visible in Secret & Files screen and also in the inventory editor on hovering over the inserted global secret.
- Click the Save button.
- The secret content and description will be updated.
The following movie shows how to edit a secret content:
Deleting a secret
You can delete the secret. Note that this action is irreversible - the secret will be deleted permanently.
The delete secret action is restricted by the following permissions:
- MODIFY_TENANT - for global secrets.
- MODIFY_INVENTORY - for inventory level secrets.
For more details, see the Permissions table in chapter Managing Users and Groups via REST.
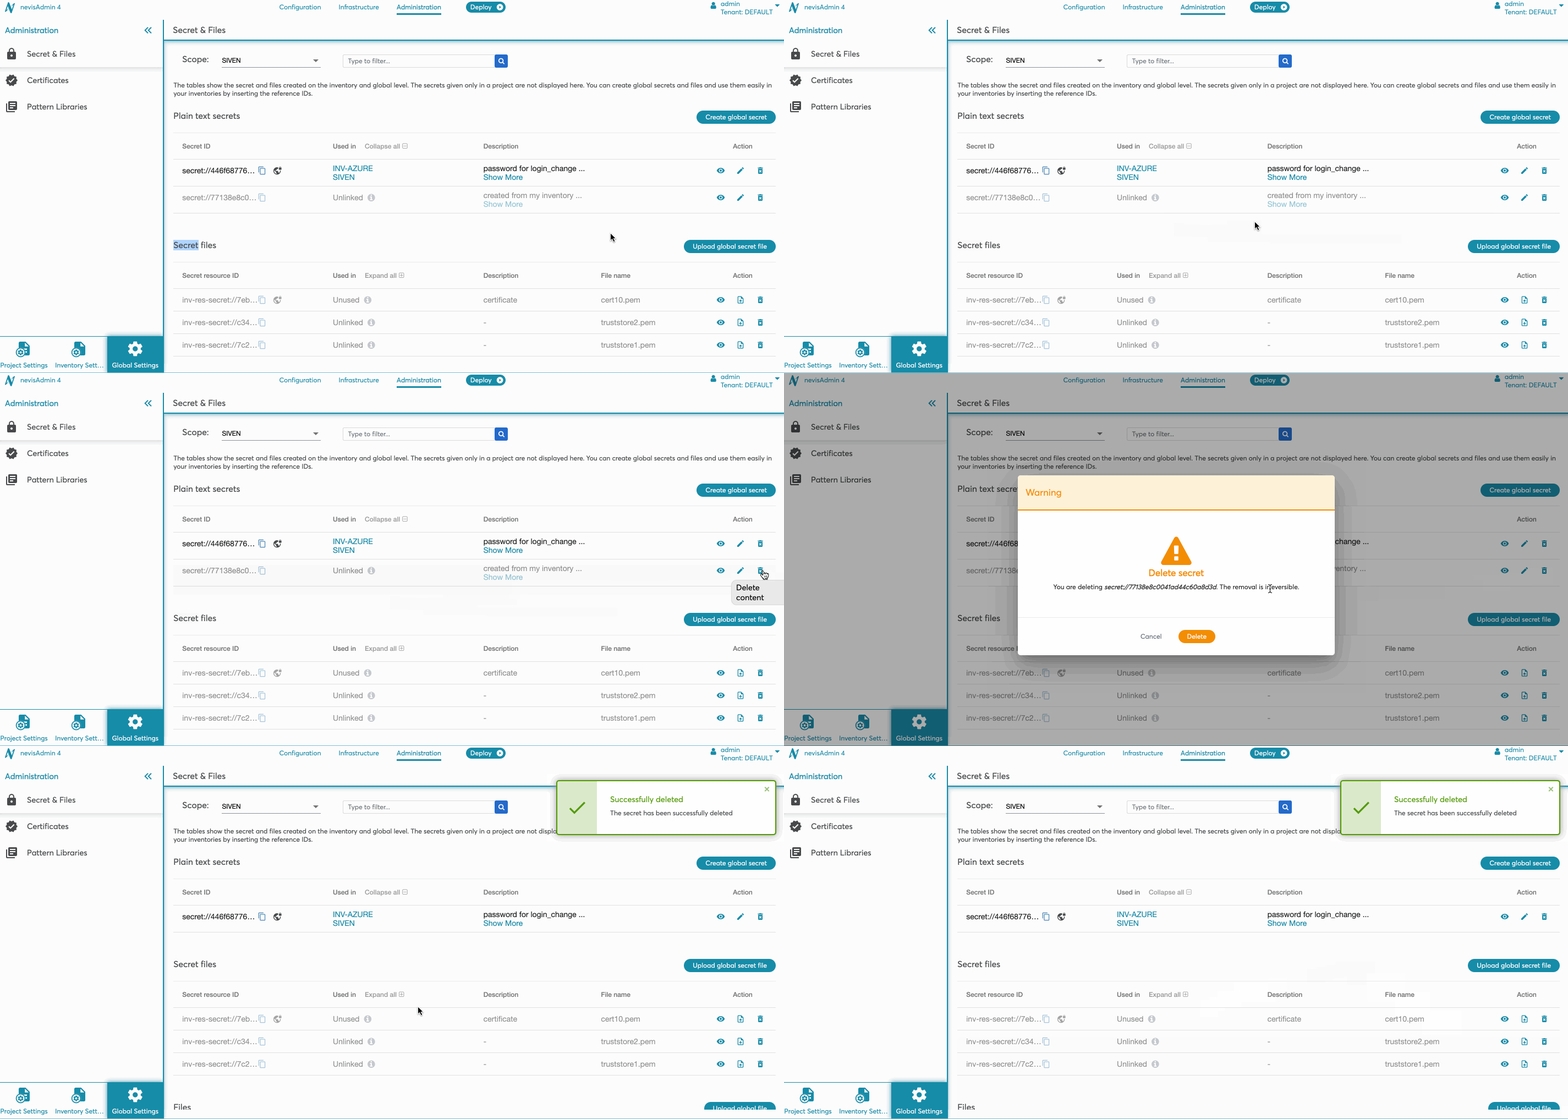
Perform the following steps to delete a secret:
- Find your secret in the Secrets table.
- Click the Delete icon in the Action column.
- The Warning dialog is opened.
- Click the Delete button.
- The secret will be permanently deleted.
Even if the secret is removed from the Secret & Files screen, its reference ID remains in the referring variable in the inventory. It has to be removed manually.
The following movie shows how to delete a secret:
Extend the scope of a secret
You can extend the scope of a secret. Note that this action is irreversible - the secret will be extended permanently.
The extend secret action is restricted by the following permissions:
- MODIFY_TENANT - for global secrets.
- MODIFY_INVENTORY - for inventory level secrets.
For more details, see the Permissions table in chapter Managing Users and Groups via REST.
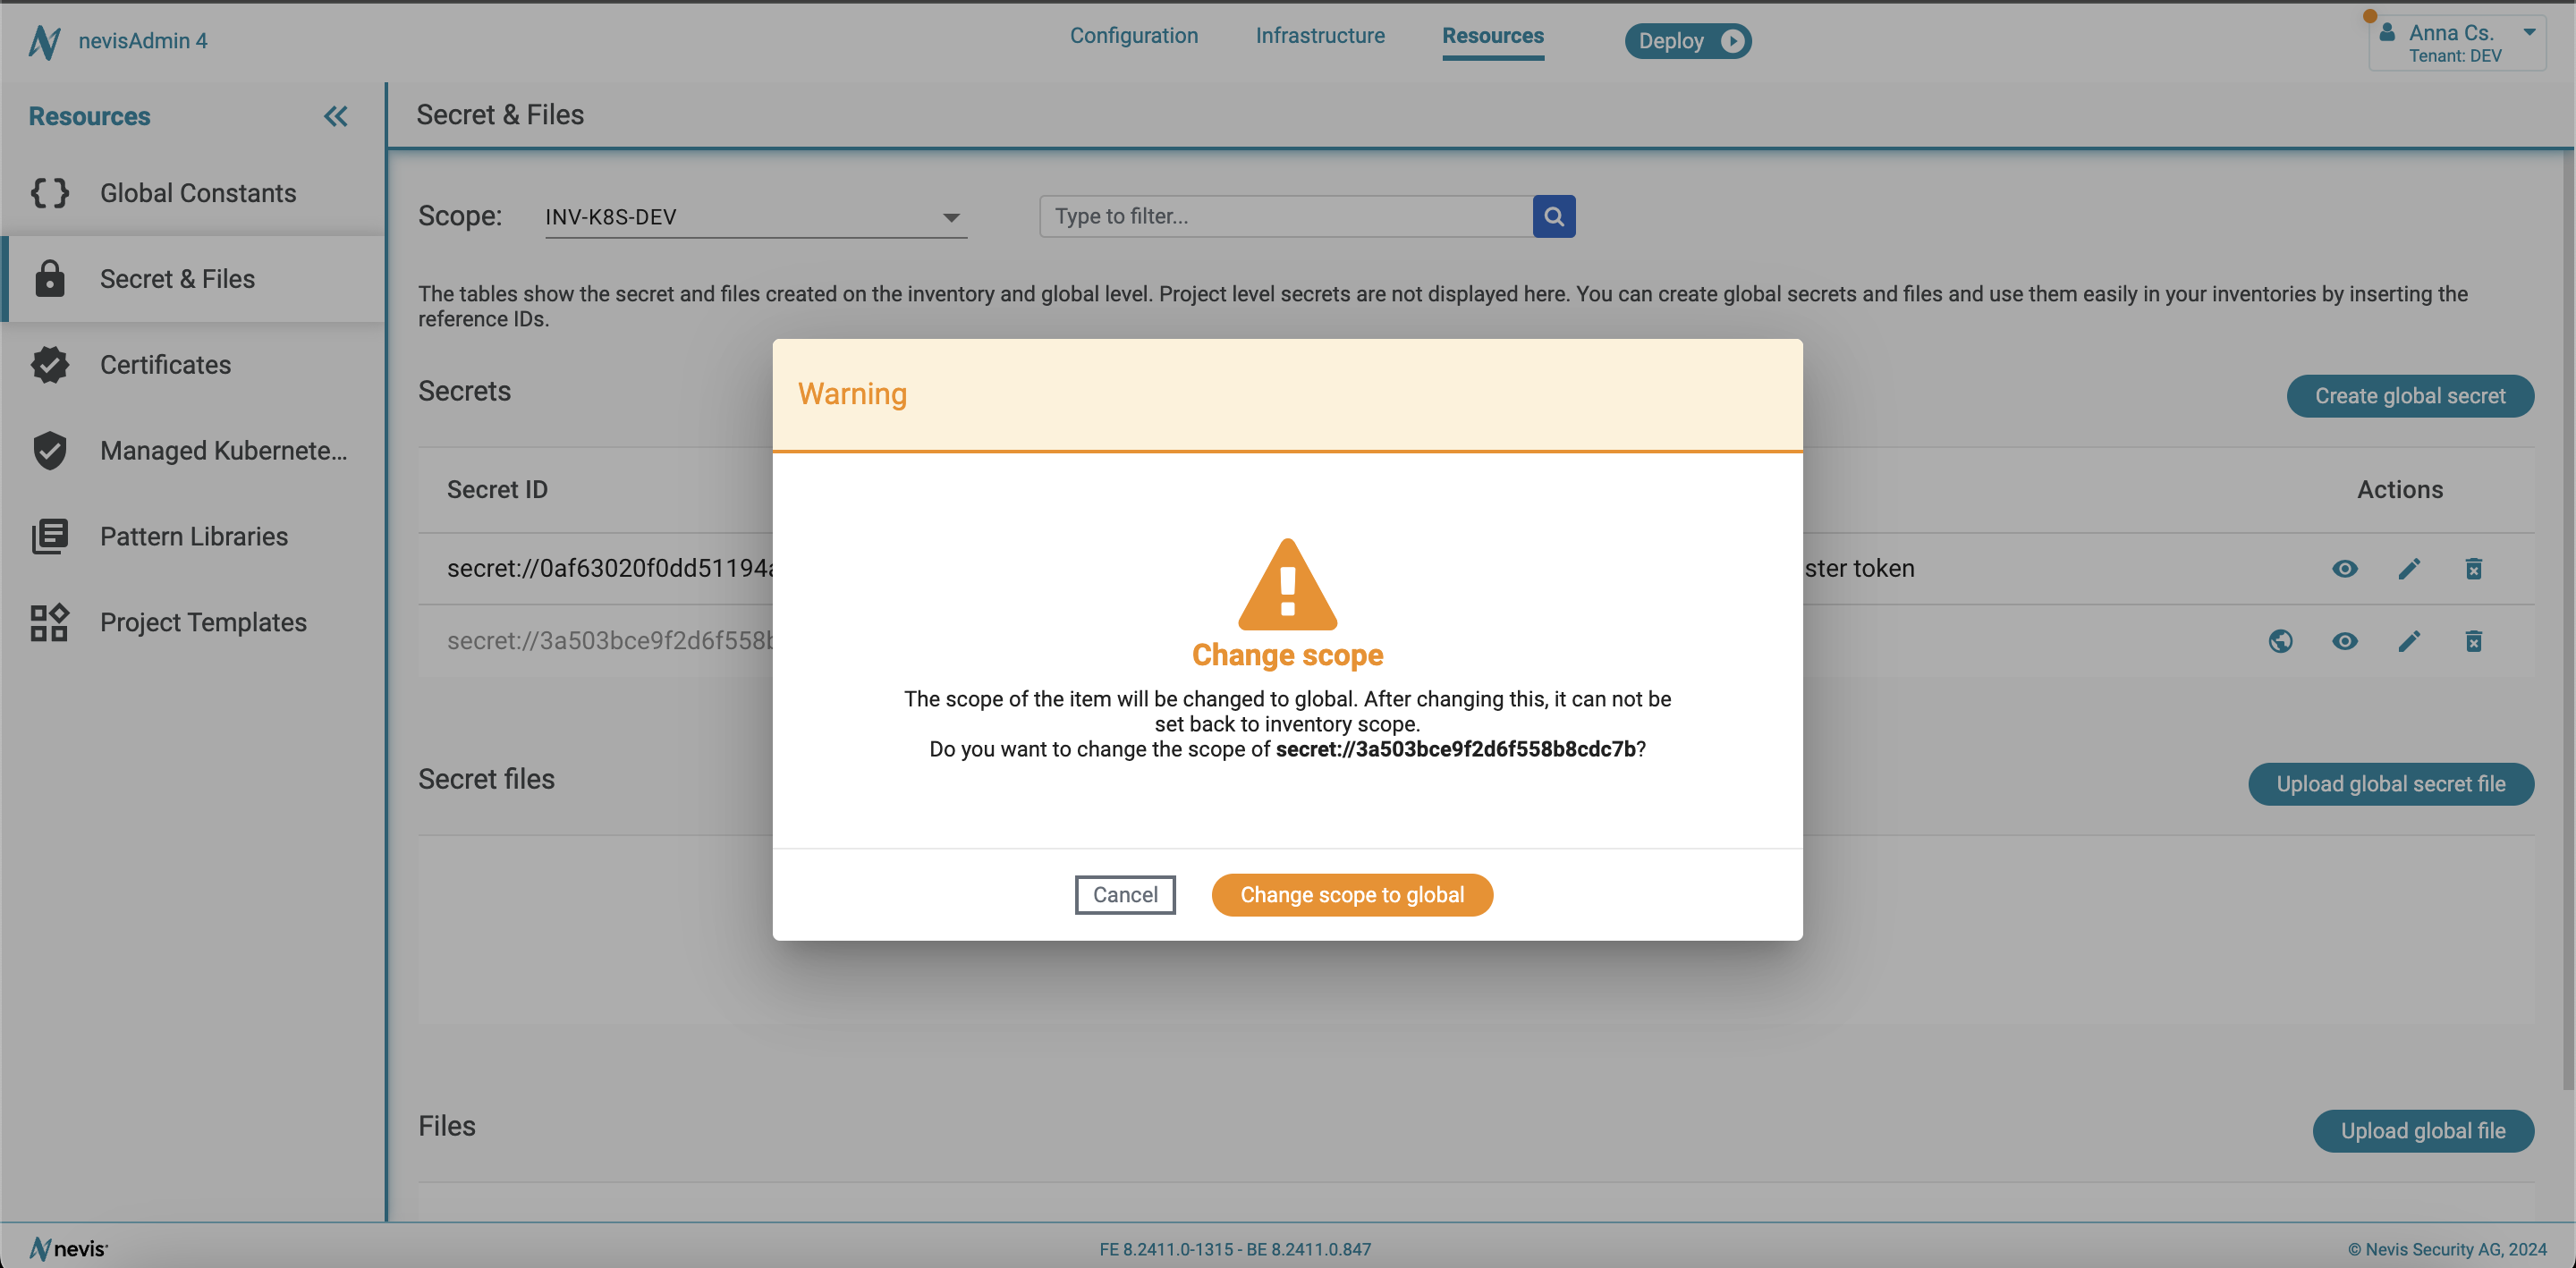
Perform the following steps to change the scope of a secret:
- Find your secret in the Secrets table.
- Click the Extend Scope icon in the Action column.
- The Warning dialog opens.
- Click the Change scope to global button.
- The secret is permanently changed.
The following image shows the change warning dialog:
Secret files
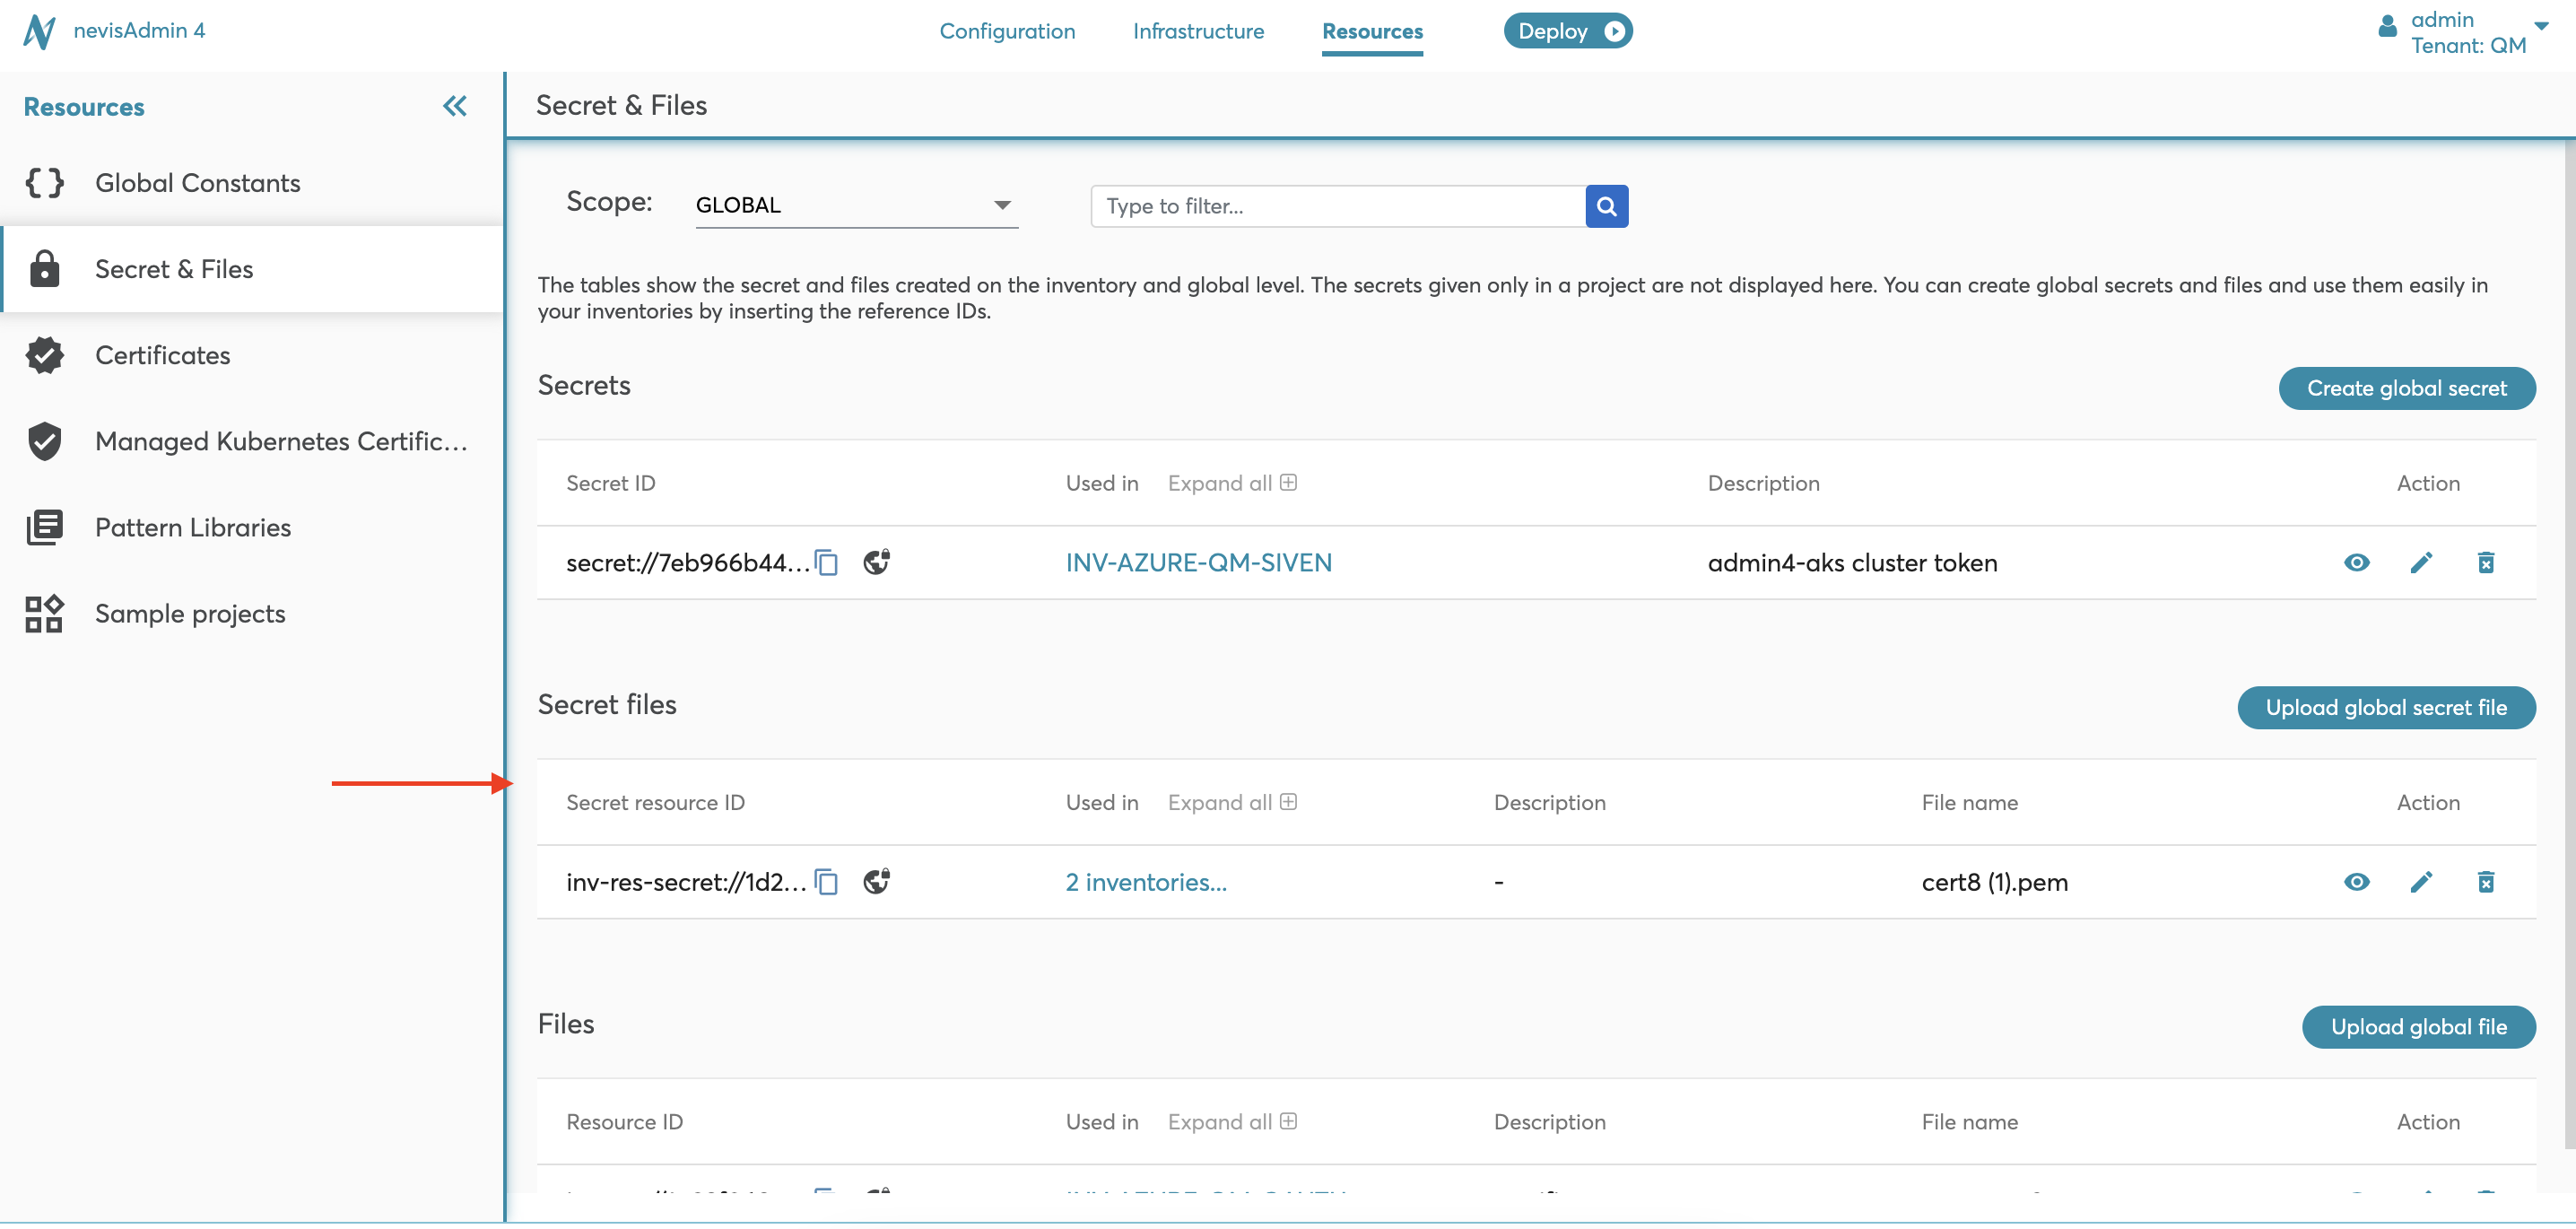
The Secret files section displays the secret files. It contains the following elements:
- Secret resource ID:
- See the description in the Secrets section.
- Used in:
- See the description in the Secrets section.
- Description:
- See the description in the Secrets section.
- File name:
- File name.
- Action:
- View icon: Shows the content of the secret file.
- Replace icon: Enables to replace the content of the secret file and edit the description. Note that you cannot change the reference ID and file name.
- Delete icon: Deletes the secret file. A deletion is irreversible and cannot be undone.
- Globe icon: Extend the scope of the secret file from inventory level to global level.
- Upload global secret file button:
- Click the Upload global secret file button to upload a global secret file.
Uploading a global secret file
If you want to use your secret file in multiple inventories, upload it as a global secret file by clicking the Upload global secret file button. Once you have uploaded a global secret file, you can use it as often as you want in as many inventories as you want. You only need to reference the global secret file's Secret Resource ID from the respective variable, to link the variable to the global secret file. Whenever your global secret file is replaced, this update is reflected in all places where the global secret file is used (referenced).
Note that the Upload global secret file action is restricted by the MODIFY_TENANT permission.
For more details, see the Permissions table in chapter Managing Users and Groups via REST.
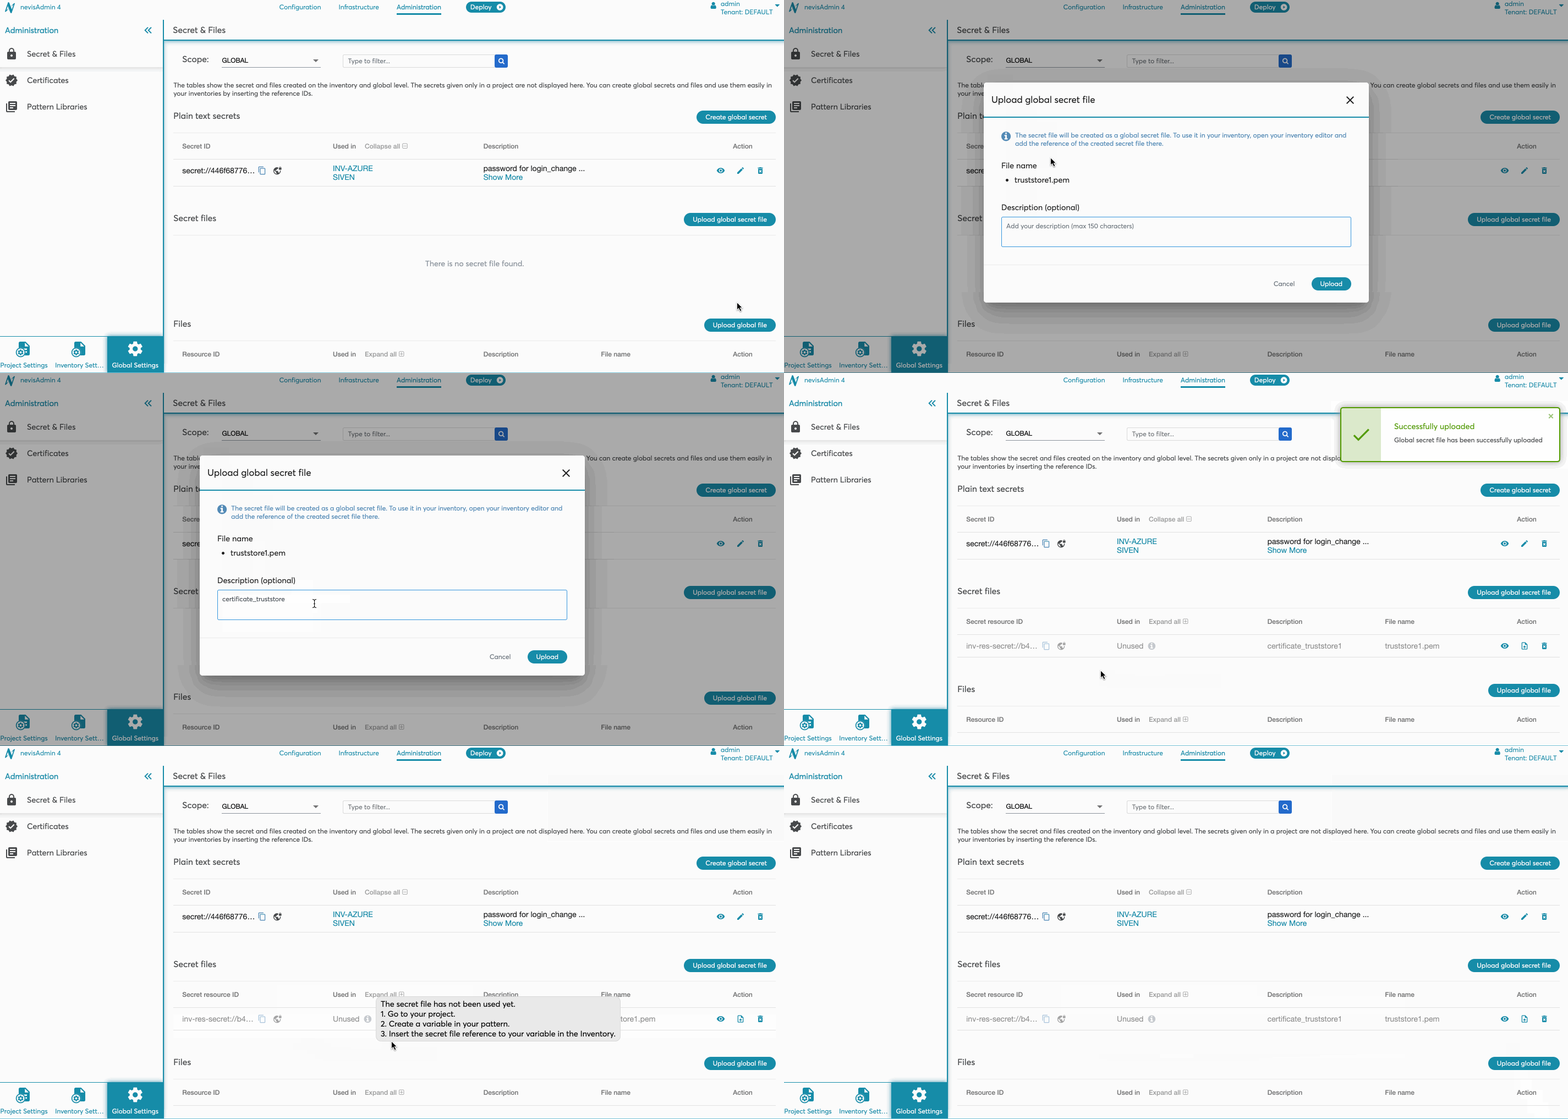
Perform the following steps to create a global secret file:
- Click the Upload global secret file button and select the file you would like to upload.
- The Upload global secret file dialog screen is opened.
- Add a description, if needed. The description will be visible in Secret & Files screen and also in the inventory editor on hovering over the inserted global secret file.
- Click the Upload button.
- A global secret file will be uploaded and displayed as "Unused" in the Secret files section.
Certificate upload
If you would like to upload a certificate, note that the file must be a valid certificate file in PEM format (with .pem extension). All uploaded certificates can be viewed in the Certificatesscreen. More details are described in the chapter Certificates.
The following movie shows how to upload a global secret file:
Viewing and downloading a secret file
You can view the content of the secret file by using the View content action. The Download file function is available in View content dialog screen.
Note that the view secret file content action is restricted by the following permissions:
- VIEW_SECRET_CONTENT_TENANT - for global secret files.
- VIEW_SECRET_CONTENT_INVENTORY - for inventory level secret file.
For more details, see the Permissions table in chapter Managing Users and Groups via REST.
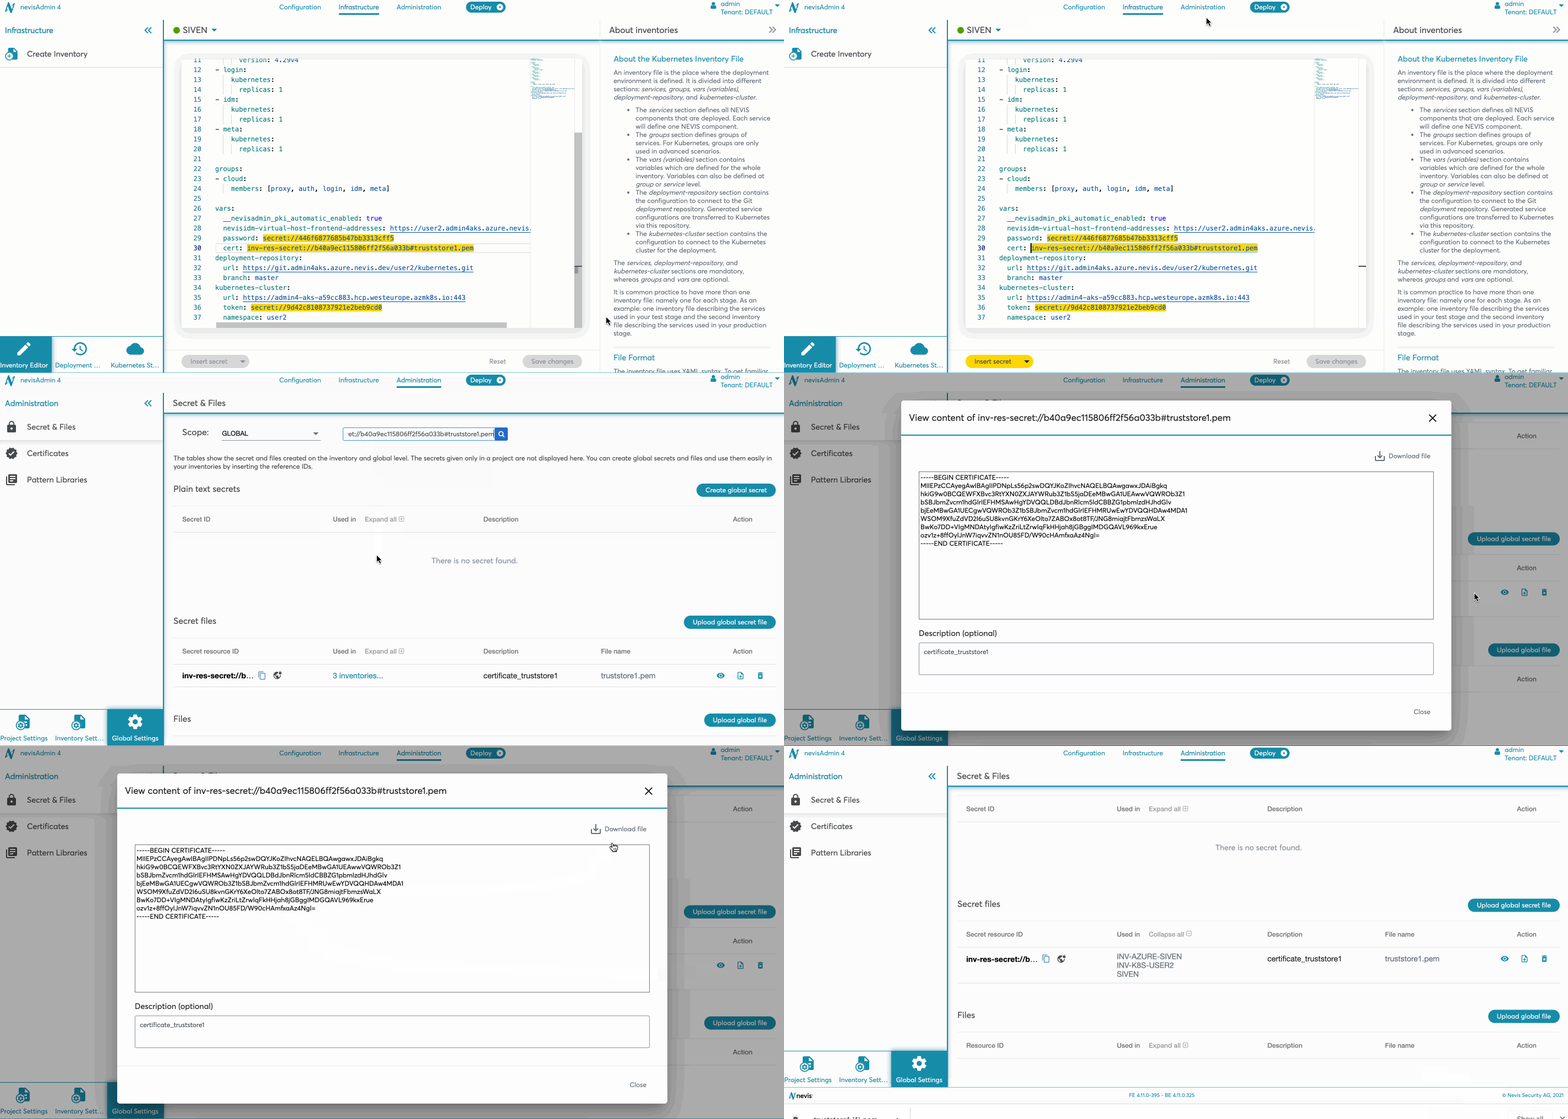
Perform the following steps to view and download a secret file:
- Find your secret file in the Secret files section.
- Click the View content icon in the Action column.
- TheView content dialog screen is opened.
- The file content is displayed on the screen. If the file content cannot be parsed (e.g. the file is image or .zip), it can still be downloaded.
- If you want to download the file, click the Download file button.
The following movie shows how to view and download a secret file:
Replacing the secret file content
You can replace the secret file via the Replace content action.
Content update
Note that after replacing the file, only the content of the file will be updated but the reference ID (inv-res-secret://<id>#fileName>) and file name remain the same. If you upload a file with a new file name, this will not update its reference in the inventory. Therefore, you will see the original file name in the reference content (inv-res-secret://<id>#fileName>) in the inventory.
Note that the replace secret file action is restricted by the following permissions:
- MODIFY_TENANT - for global secret files.
- MODIFY_INVENTORY - for inventory level secret files.
For more details, see the Permissions table in chapter Managing Users and Groups via REST.
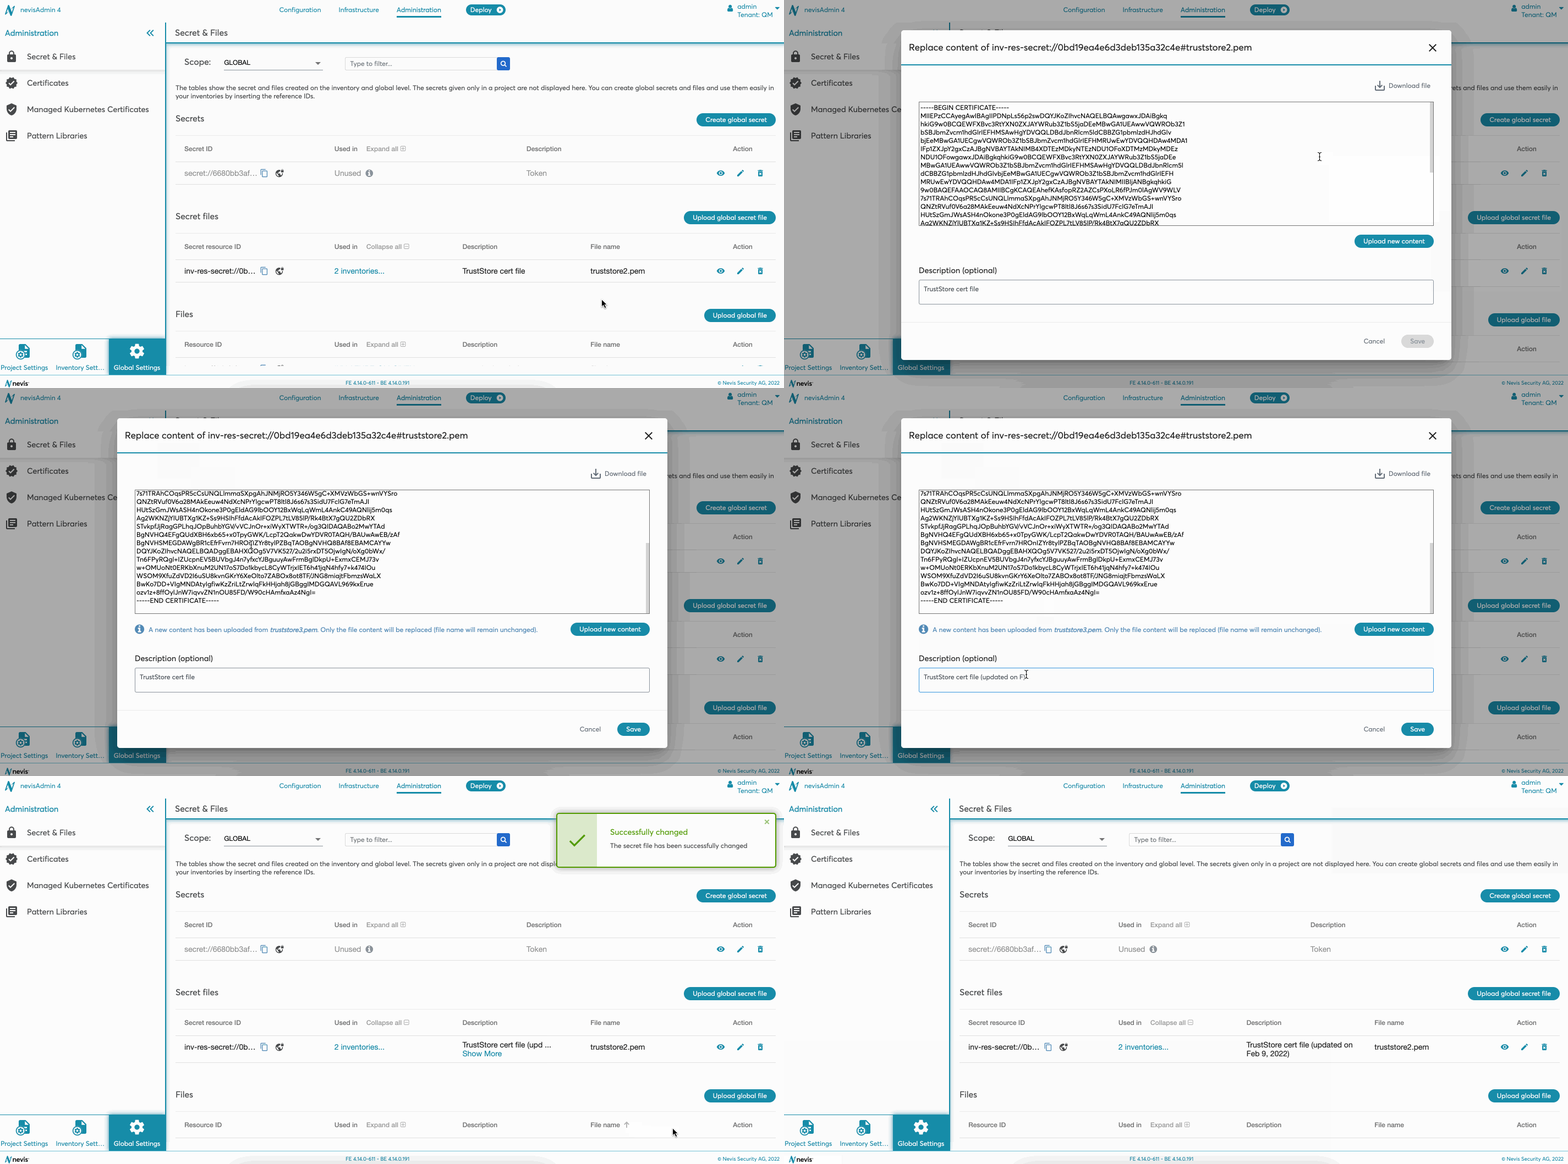
Perform the following steps to replace a secret file content:
- Find your secret file in the Secret files section.
- Click the Replace content icon in the Action column.
- A dialog screen is opened.
- Click Upload new content button and select a new file you would like to upload.
- The newly selected file content is displayed on the screen, if it can be parsed.
- Modify the description, if needed.
- Click the Save button.
- The new file content and description are saved. The file content will be replaced with the selected new file, but the reference ID and file name remain the same.
The following movie shows how to replace a secret file content:
Deleting a secret file
You can delete the secret file. Note that the secret file will be deleted permanently and irreversible.
Note that the delete secret file action is restricted by the following permissions:
- MODIFY_TENANT - for global secret files.
- MODIFY_INVENTORY - for inventory level secret files.
For more details, see the Permissions table in chapter Managing Users and Groups via REST.
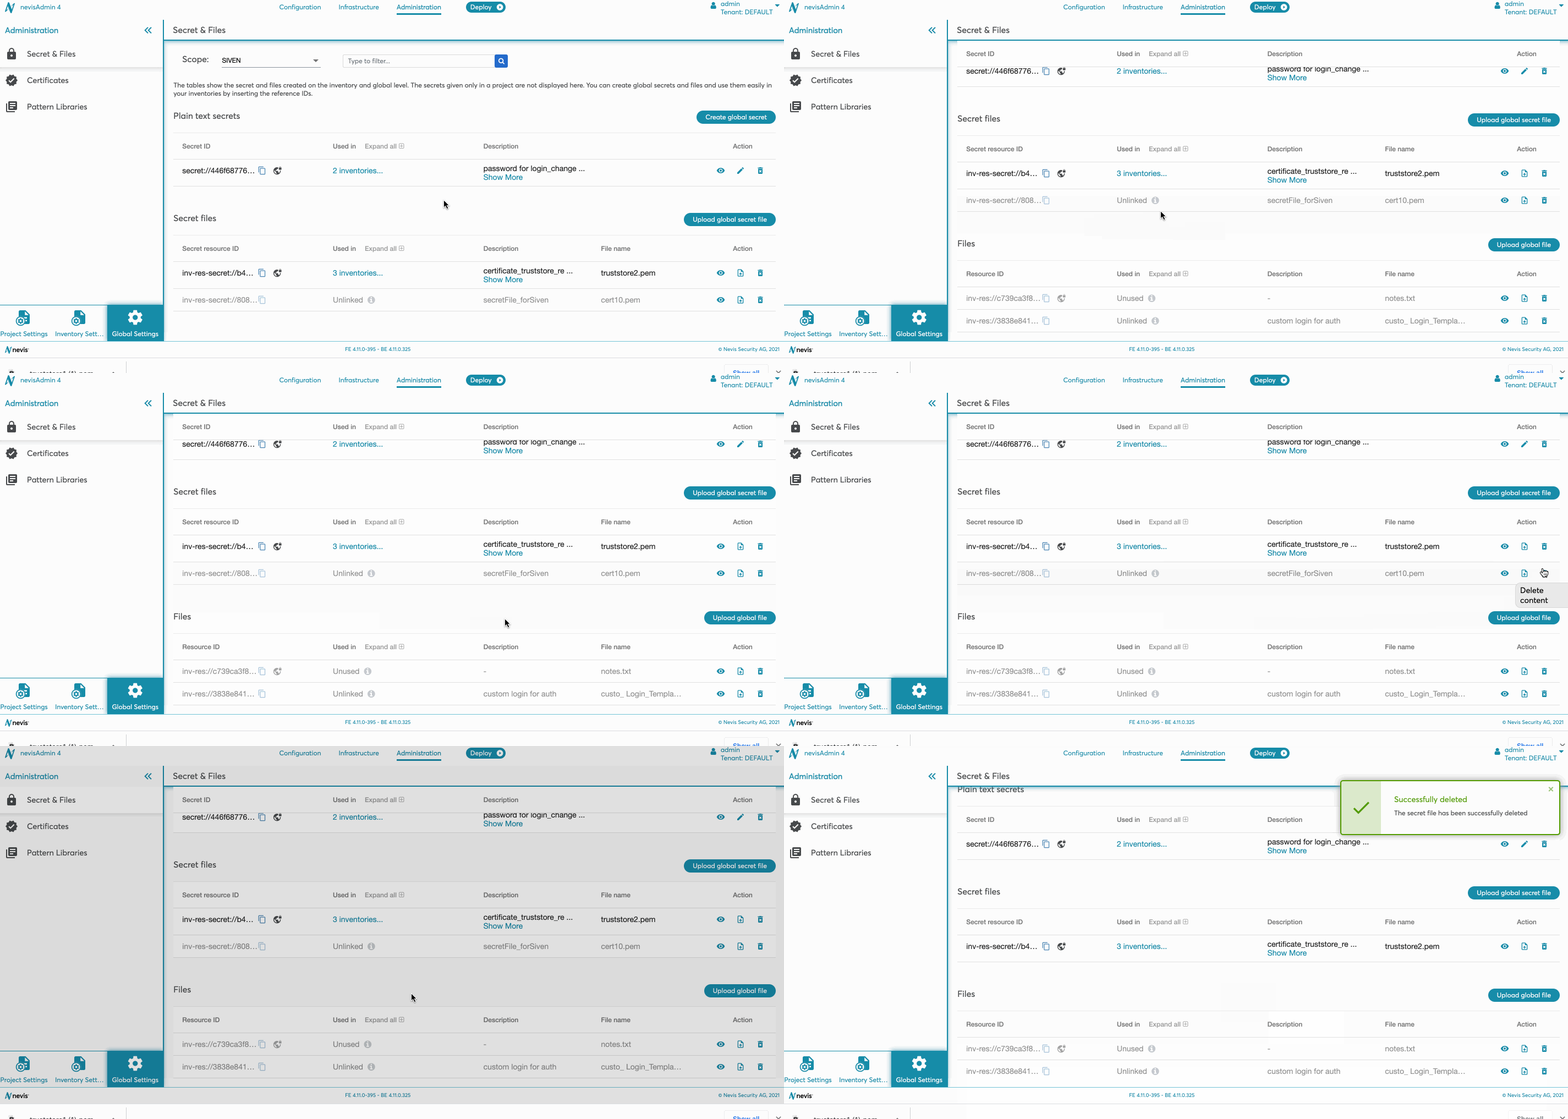
Perform the following steps to delete a secret file:
- Find your secret file in the Secret files section.
- Click the Delete icon in the Action column.
- The Warningdialog is opened.
- Click the Delete button.
- The secret file will be permanently deleted.
Even if the secret file is removed from the Secret & Files screen, its reference ID remains in the referring variable in the inventory. It has to be removed manually.
The following movie shows how to delete a secret file:
Extend the scope of a secret file
You can extend the scope of a secret file. Note that this action is irreversible - the secret file will be extended permanently.
The extend secret file action is restricted by the following permissions:
- MODIFY_TENANT - for global secret files.
- MODIFY_INVENTORY - for inventory level secret files.
For more details, see the Permissions table in chapter Managing Users and Groups via REST.
Perform the following steps to change the scope of a secret file:
- Find your secret file in the Secret files table.
- Click the Extend Scope icon in the Action column.
- The Warning dialog opens.
- Click the Change scope to global button.
- The secret file is permanently changed.
Files
The Files section shows the files. It contains the following elements:
- Resource ID:
- See the description in the Secrets section.
- Used in:
- See the description in the Secrets section.
- Description:
- See the description in the Secrets section.
- File name:
- Shows the name of the uploaded file.
- Action:
- View icon: Shows the content of the file.
- Replace icon: Enables to replace the content of the secret file and edit the description. Note that the reference ID cannot be changed.
- Delete icon: Deletes the file. Note that the deletion is irreversible and cannot be undone.
- Globe icon: Extend the scope of the file from inventory level to global level.
- Upload global file button:
- Click the Upload global file button to upload a global file.
Uploading a global file
See the description in the [Upload global secret file] section.
View and download file
See the description in the [View and download secret file] section.
Note that the required permission to view the file content is different:
- VIEW_INVENTORY
Replace file content
See the description in the [Replace secret file content] section.
Delete file
See the description in the [Delete secret file] section.
Extend the scope of a file
See the description in the [Extend the scope of a secret file] section.