Azure deployment automation
If you want to deploy Nevis onto a Cloud infrastructure, we recommend a Kubernetes-based installation. This installation is based on the Docker containerization and Kubernetes orchestration technologies.
For a general overview of the Nevis-on-Kubernetes deployment solution, check Kubernetes Deployment (Cloud).
In this installation tutorial, you will set up a complete Nevis environment through the Azure portal with minimal configuration. It uses a custom deployment and ARM templates to do this. The created Azure infrastructure matches the one in "Creating Kubernetes cluster on Azure".
For more information about ARM templates and custom deployment see:
- http://docs.microsoft.com/en-us/azure/azure-resource-manager/templates/overview
- http://docs.microsoft.com/en-us/azure/azure-resource-manager/templates/quickstart-create-templates-use-the-portal
Prerequisites
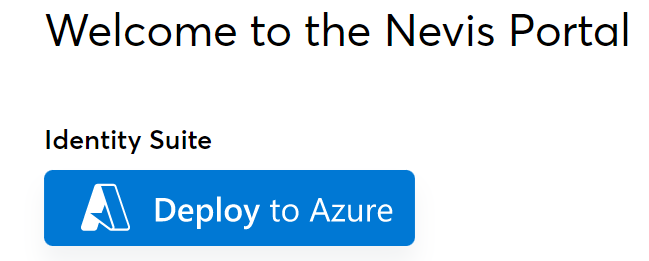
The azure deployment automation is available through the Nevis Portal. To get access, contact your Nevis representative.
The installation process only requires an already existing Azure subscription. No other tools are required.
The following permissions are required for the deployment process:
- User Access Administrator or higher
- Contributor or higher
Steps to Perform
Basic step
The basic step contains the options to be configured for the deployment, these are:
- Subscription: The target subscription.
- Resource group: The target resource group. It has to be a new one, or one that contains no existing resources.
- Region: The target region.
- AKS Node Size: The node size that will be used to create the AKS cluster.
- AKS Node Count: The number of nodes the AKS cluster will have.
- Database Size: The size of the database.
- Domain Name Label: Determines the DNS of the installation. It will be reachable at
<domainNameLabel>.<location>.cloudapp.azure.com/nevisadmin/. The given label has to be globally unique across Azure, which means common labels such as "test', "admin", etc. won't work. It can contain only lowercase letters, numbers, and hyphens. The first character must be a letter. The last character must be a letter or number. The value must be between 3 and 63 characters long. - nevisAdmin4 Password: Password for the nevisAdmin4 instance.
- Grafana Password: Password for the Grafana instance.
Note that if the Region does not provide Standard D4s v3 VMs, then you have to select a different AKS Node Size in the Advanced tab.
Advanced step
The advanced step contains additional optional configuration options.
- DB Server Name: The name of the PostgreSQL server that will be created. Like the domain label, it has to be globally unique across Azure. The name must only contain lowercase letters, numbers, and hyphens. The server name must not start or end in a hyphen. It must be at least 3 characters and at most 63 characters long.
- Container Registry Name: Name of the container registry that will be created. Like the domain label, it has to be globally unique across Azure. The name must contain alpha numeric characters only and must be between 5 and 50 characters long.
- Repository:
- Gitea: By default, Gitea is installed on the AKS cluster that will be used.
- Use Existing Git: With this option, an existing git repository can be used. The public key that has to be added to the repository can be found in the deployment output after it finished.
SAML step
With the SAML step you can configure nevisAdmin4 to use SAML login instead of password based authentication.
- App Federation Metadata Url: App Federation Metadata Url of the Azure Enterprise Application
For more information about how to set up SAML, see SAML Integration.
Create deployment
After configuring the options, click "Review and create", then after a short validation "Create". The deployment takes approximately 20 minutes to complete.
Verifying the deployment
After the deployment is finished, you can login to nevisAdmin4 at <domainNameLabel>.<location>.cloudapp.azure.com/nevisadmin/* with username "admin". The complete url is available at the deployment Outputs:
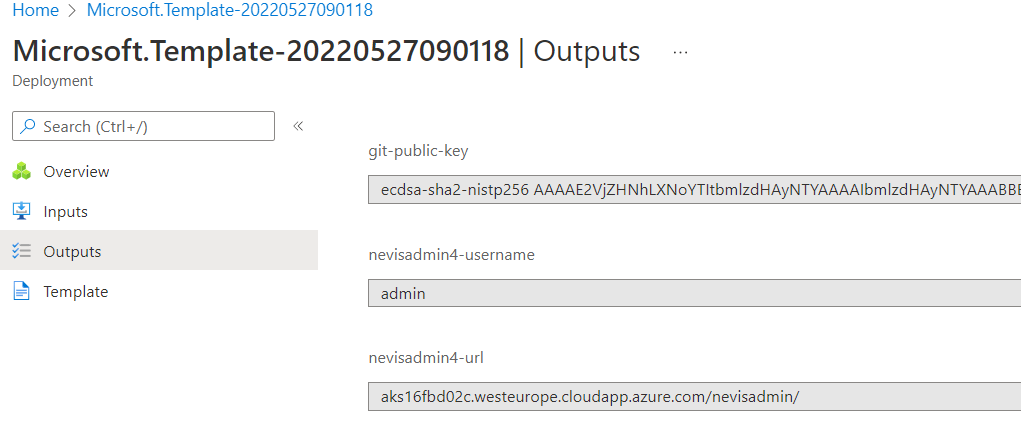
In case you use an already existing git, the public key can also be found here.
Azure resources
The following Azure resources are created during deployment process. All resources are created inside the specified subscription and resource group. The names are taken from an example deployment, and contain generated values, so the exact names are different between deployments.
| Resource | Type | Description |
|---|---|---|
| nevis-installer-identity-3heujinxtc | Microsoft.ManagedIdentity/userAssignedIdentities | A User Assigned Identity that is used by the installation process to connect to the cluster after the Azure resources are created. |
| postgres386a2ee1 | Microsoft.DBforPostgreSQL/flexibleServers | Azure Database for PostgreSQL flexible server, used by the Nevis components. |
| registry84772e1d | Microsoft.ContainerRegistry/registries | Container Registry where the docker images will be stored. |
| d40ca71c-a1a3-50d7-971a-4b3d2fb44fdf | Microsoft.Authorization/roleAssignments | Role assigments for "nevis-installer-identity-3heujinxtc": AcrPush: To be able push the docker images to the container registry.; Key Vault Secret Officer: So it can read the secrets from the Key Vault. ;Azure Kubernetes Service Cluster User Role: To be able to connect to the Kubernetes cluster.; Reader: So it can read the status of the nevis-installer. |
| b1bc6f6d-bc65-50e2-8b9e-8dd6c91d5e97 | Microsoft.Authorization/roleAssignments | |
| 267fcf1c-c586-5a7d-8305-0d3b79312d54 | Microsoft.Authorization/roleAssignments | |
| 267fcf1c-c586-5a7d-8305-0d3b7fds12dd4 | Microsoft.Authorization/roleAssignments | |
| postgresb3530643/894497a0-61a1-5947-8aff-88969bf30af9 | Microsoft.DBforPostgreSQL/flexibleServers/providers/roleAssignments | |
| aks-cluster | Microsoft.ContainerService/managedClusters | Azure Kubernetes Cluster |
| key-vault-3heujinxtc | Microsoft.KeyVault/vaults | Key Vault, that is used to store the automatically generated passwords, and the key material for the GIT connection. |
| nevis-installer-helper | Microsoft.Resources/deploymentScripts | A deployment script, that is used to generate the key material for GIT and store it in the Key Vault. |
| postgres386a2ee1/max_connections | Microsoft.DBforPostgreSQL/flexibleServers/configurations | PostgreSQL server configuration options necessary for the Nevis components. |
| postgres386a2ee1/max_prepared_transactions | Microsoft.DBforPostgreSQL/flexibleServers/configurations | |
| nevis-installer-helper-deployment | Microsoft.Resources/deployments | Helper deployment used to retrieve the egress IP address of the created Kubernetes cluster. It creates no additional resources. |
| 0774d84f-5dda-5607-999c-cca9c833c7f2 | Microsoft.Authorization/roleAssignments | AcrPull assigned to the managed identity of the Kubernetes cluster, so it's able to pull images form the created container registry. |
| nevis-installer | Microsoft.ContainerInstance/containerGroups | A container instance that connects to the Kubernetes cluster and does the installation process, such as deploying nevisAdmin4. |
| postgres386a2ee1/aks-rule | Microsoft.DBforPostgreSQL/flexibleServers/firewallRules | A firewall rule, so only the Kubernetes cluster can connect to the created MariaDB server. It uses the egress IP retrieved by the helper deployment. |
| deployment-status-checker | Microsoft.Resources/deploymentScripts | A deployment script that checks the status of the installation process. |
Creating the Kubernetes cluster will also result in the creation of an additional resource group with the node suffix, which is used for the internal resources of the cluster itself.
Installation process
After all the required Azure resources are created, the installation process begins, and performs the following actions:
- It uploads the necessary docker images to the created container registry.
- It deploys ingress-nginx, which is used to expose the Nevis setup outside the cluster.
- It deploys cert-manager, which is used to create certificates both for internal use, and for creating valid certificates with Let's Encrypt.
- If enabled, it deploys a Gitea installation, the official helm chart is used: http://gitea.com/gitea/helm-chart/.
- It deploys Tempo, Loki, Prometheus and Grafana which is used or monitoring. Grafana is available at
<domainNameLabel>.<location>.cloudapp.azure.com/grafana/ - It deploys nevisOperator, which manages the Kubernetes resources.
- It deploys nevisAdmin4.
Project setup
You can create your project with project templates, for more information see: Project Templates and Simple Sign-up/Sign-in
After deploying the project you can login with username bootstrap and password generated.
Cleanup
All the resources are created inside the selected resource group. Delete the resource group to clear all the created resources.
Troubleshooting
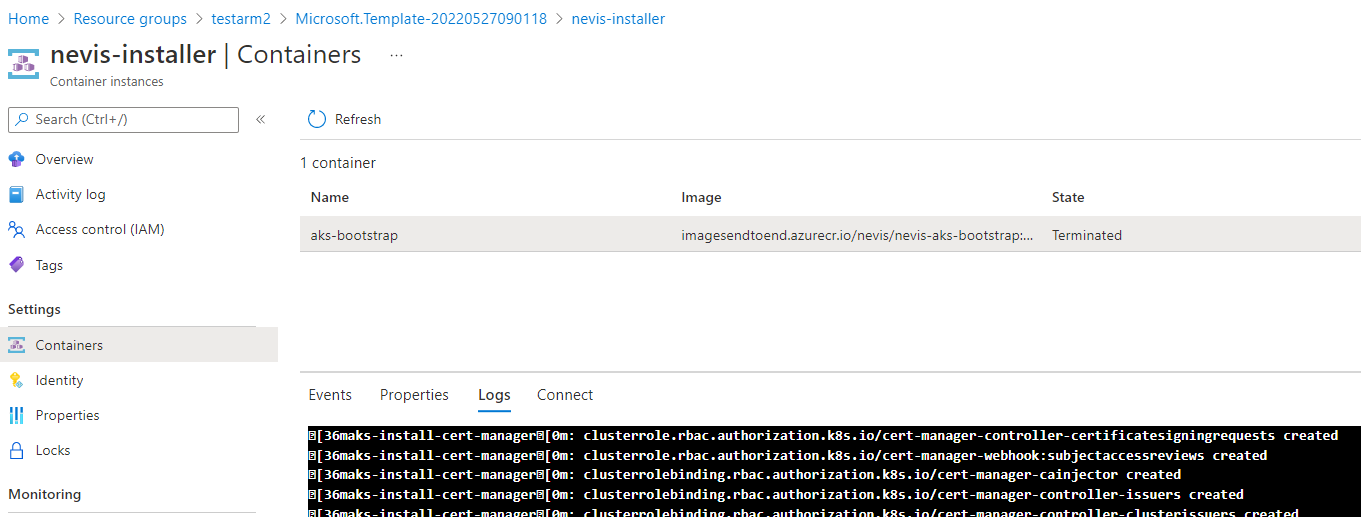
Container logs
In case the installer process fails, the logs of the container can help with the debugging process. The logs can be in the "nevis-installer" resource, under the Containers section.
Deployment input/output
The deployment input contains all options configured before starting the deployment, with the sensitive values hidden. The output contains useful fields, such as where nevisAdmin4 is available.
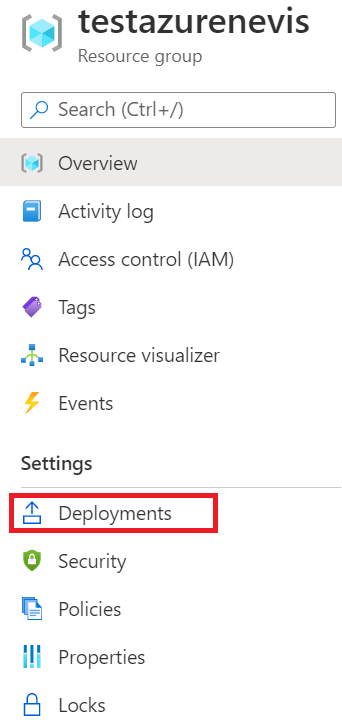
Go to the resource group and click Deployments:
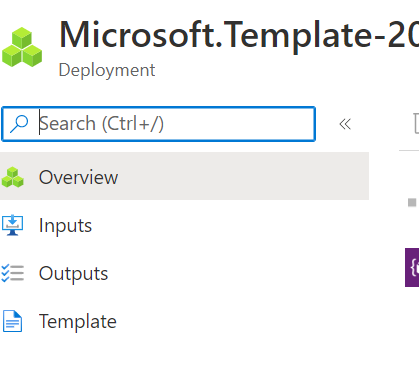
After selecting the deployment, the Output/Input can be seen in the submenu:
Resource not available in this location
The following resource types have to be available in the chosen region:
"Microsoft.ManagedIdentity/userAssignedIdentities",
"Microsoft.Authorization/roleAssignments",
"Microsoft.KeyVault/vaults",
"Microsoft.Resources/deploymentScripts",
"Microsoft.ContainerService/managedClusters",
"Microsoft.ContainerRegistry/registries",
"Microsoft.DBforPostgreSQL/flexibleServers",
"Microsoft.Resources/deployments",
"Microsoft.DBforPostgreSQL/flexibleServers/firewallRules",
"Microsoft.DBforPostgreSQL/flexibleServers/configurations",
"Microsoft.ContainerInstance/containerGroups",
"Microsoft.PowerBI/workspaceCollections"
Specified SKU is not supported in this region. Please choose a different SKU.
In the US regions only ads(Standard_D4ads) machines are available for the PostgreSQL database, while in the EU regions it's s(Standard_D2s_v3) and ds(Standard_D2ds_v3). Select the corresponding database size for the given region.
Passwords
The created Key Vault contains all the generated passwords, such as the root databases password and also the nevisAdmin4 password given during the installation process. The secrets can only be viewed if the Azure user has the explicit permissions to view Key Vault secrets, such as Key Vault Secrets User, Key Vault Secrets Officer or Key Vault Administrator.
Gitea
By default, the deployment comes with a Gitea installation, that uses the official helm template: http://gitea.com/gitea/helm-chart/. It's available at <domainNameLabel>.<location>.cloudapp.azure.com/gitea/
The username and password can be found in the Key Vault.
Adding a public key to the Git repository
During the installation it is possible to use an existing Git repository. If this is selected, the public key from the Deployment output has to be added to the repository, so nevisAdmin4 is able to use it. It is recommended to add the public key directly to the repository as a deploy key, and not to the Git account itself. As an example, you can do this on GitHub the following way.
Changing existing configuration
Open Azure cloud shell and set the following environment variable:
export RESOURCE_GROUP_NAME=
Connect to the cluster:
az aks get-credentials --resource-group $RESOURCE_GROUP_NAME --name aks-cluster --overwrite-existing
Add helm repo, get the username and password by selecting a docker image on the Nevis portal
helm repo add nevis 'https://dl.cloudsmith.io/basic/nevissecurity/rolling/helm/charts/' \
--username <username> \
--password <password>
helm repo update
Get current configuration values:
helm get values nevisadmin4 -n nevisadmin4 > values.yaml
Change the values.yaml then apply the new configuration, helm list -n nevisadmin4 can be used to get the current version of the helm chart:
helm upgrade nevisadmin4 nevis/nevisadmin4 -n nevisadmin4 -f values.yaml \
--version <current-version>
Upgrade
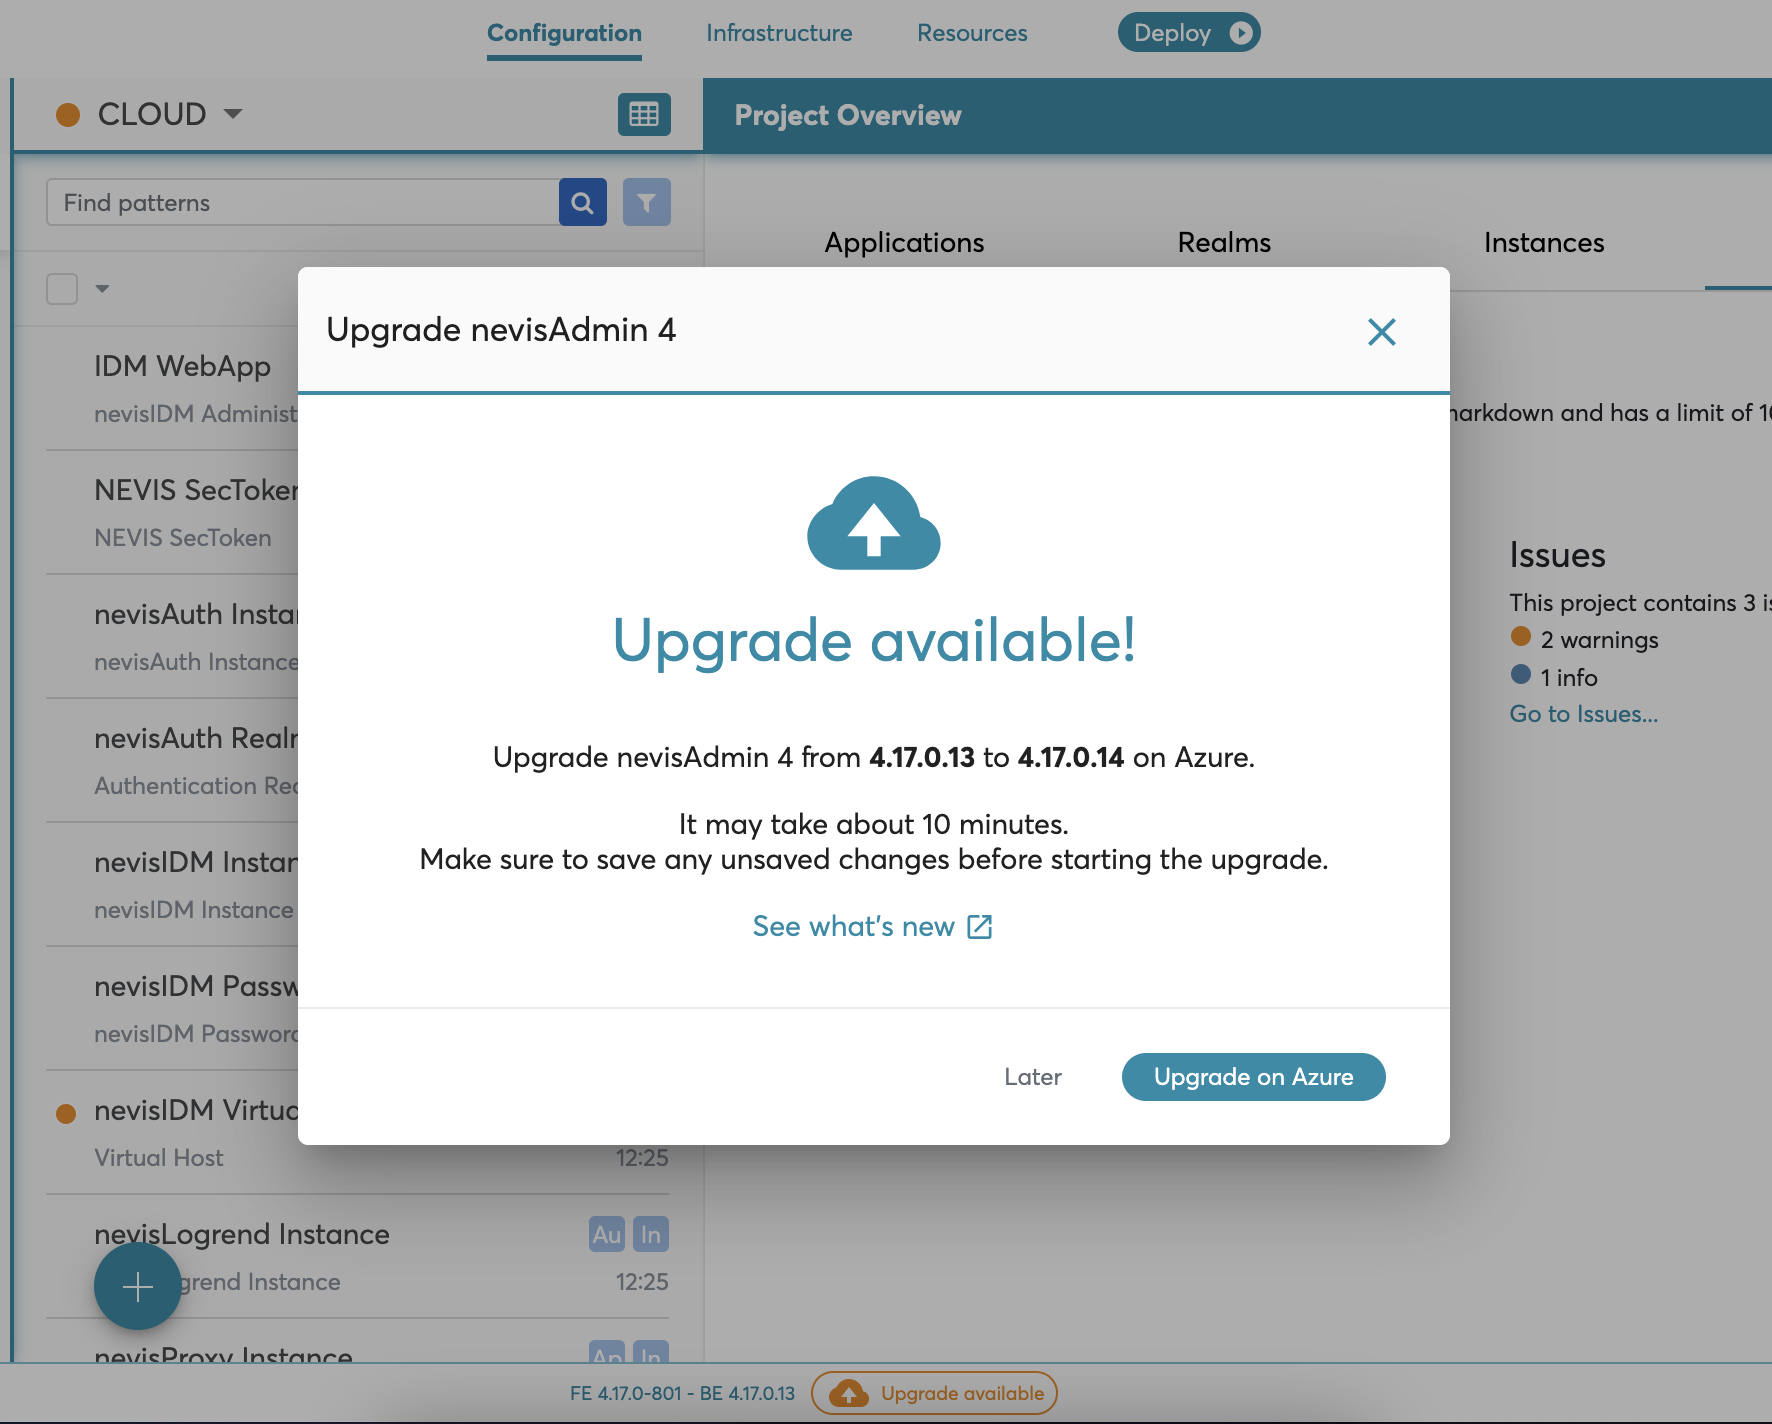
You can upgrade installations deployed after the November 2022 release automatically through an Azure deployment similarly to the initial deployment. For older installations, see: Kubernetes Upgrade.
Once the newer version of the installation is available, the system suggests the upgrade after logging in nevisAdmin 4. The upgrade indicator is also displayed at the bottom of the application UI. When you initiate the upgrade from nevisAdmin 4, you are navigated to Azure portal where you need to fill up the necessary information on Azure ARM template.
The upgrade does not affect the deployed environments. After upgrade, you need to upgrade project libraries and deploy the updated projects. For this, we recommend to use the secondary deployment.