Creating an Inventory
The Create Inventory Function
You create an inventory with the Create Inventoryfunction. This function is available:
- in the Infrastructure Welcome screen, and
- in the sidebar Actions menu of the Infrastructure tab.
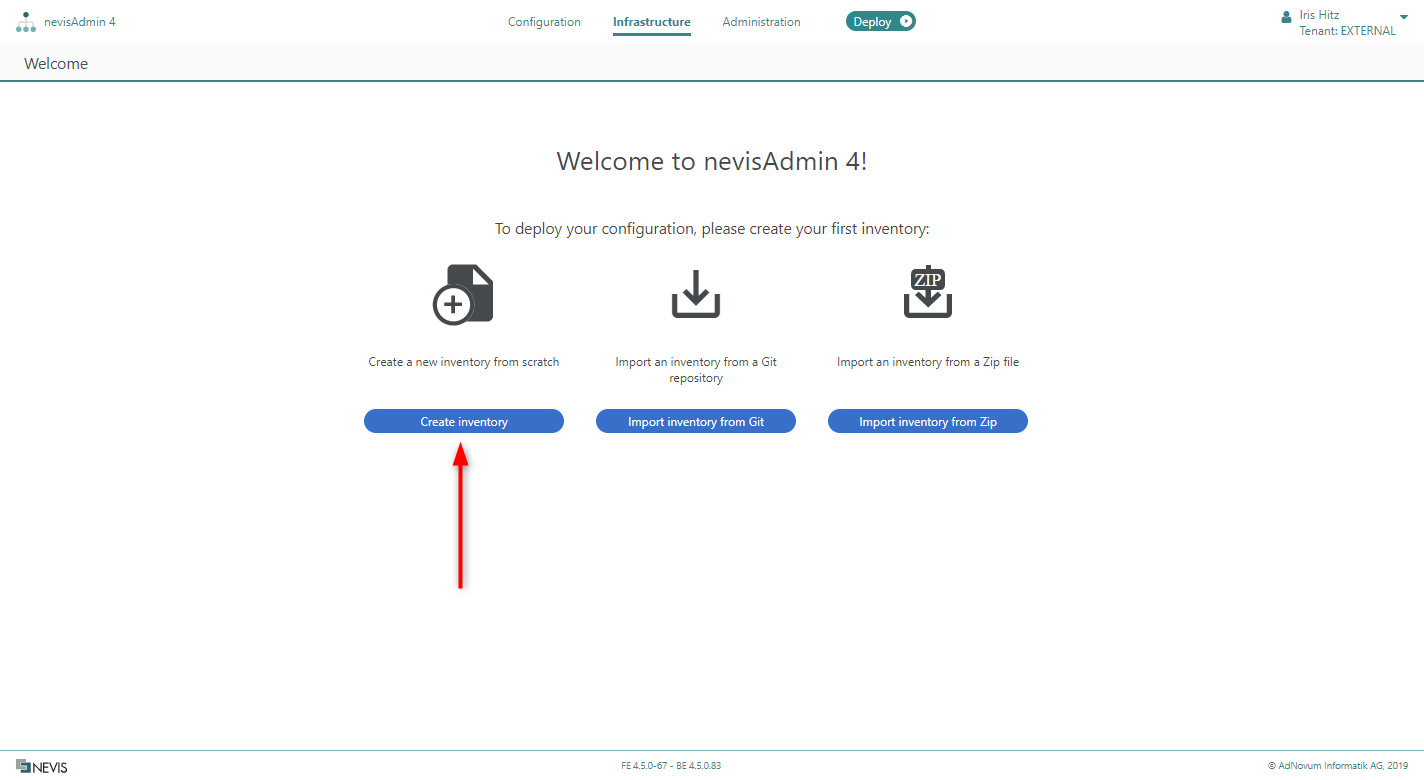
Creating an Inventory from Welcome Screen
The Infrastructure Welcome screen appears:
- when nevisAdmin4 does not contain any inventories yet, or
- when you do not have the permission to view any of the existing inventories.
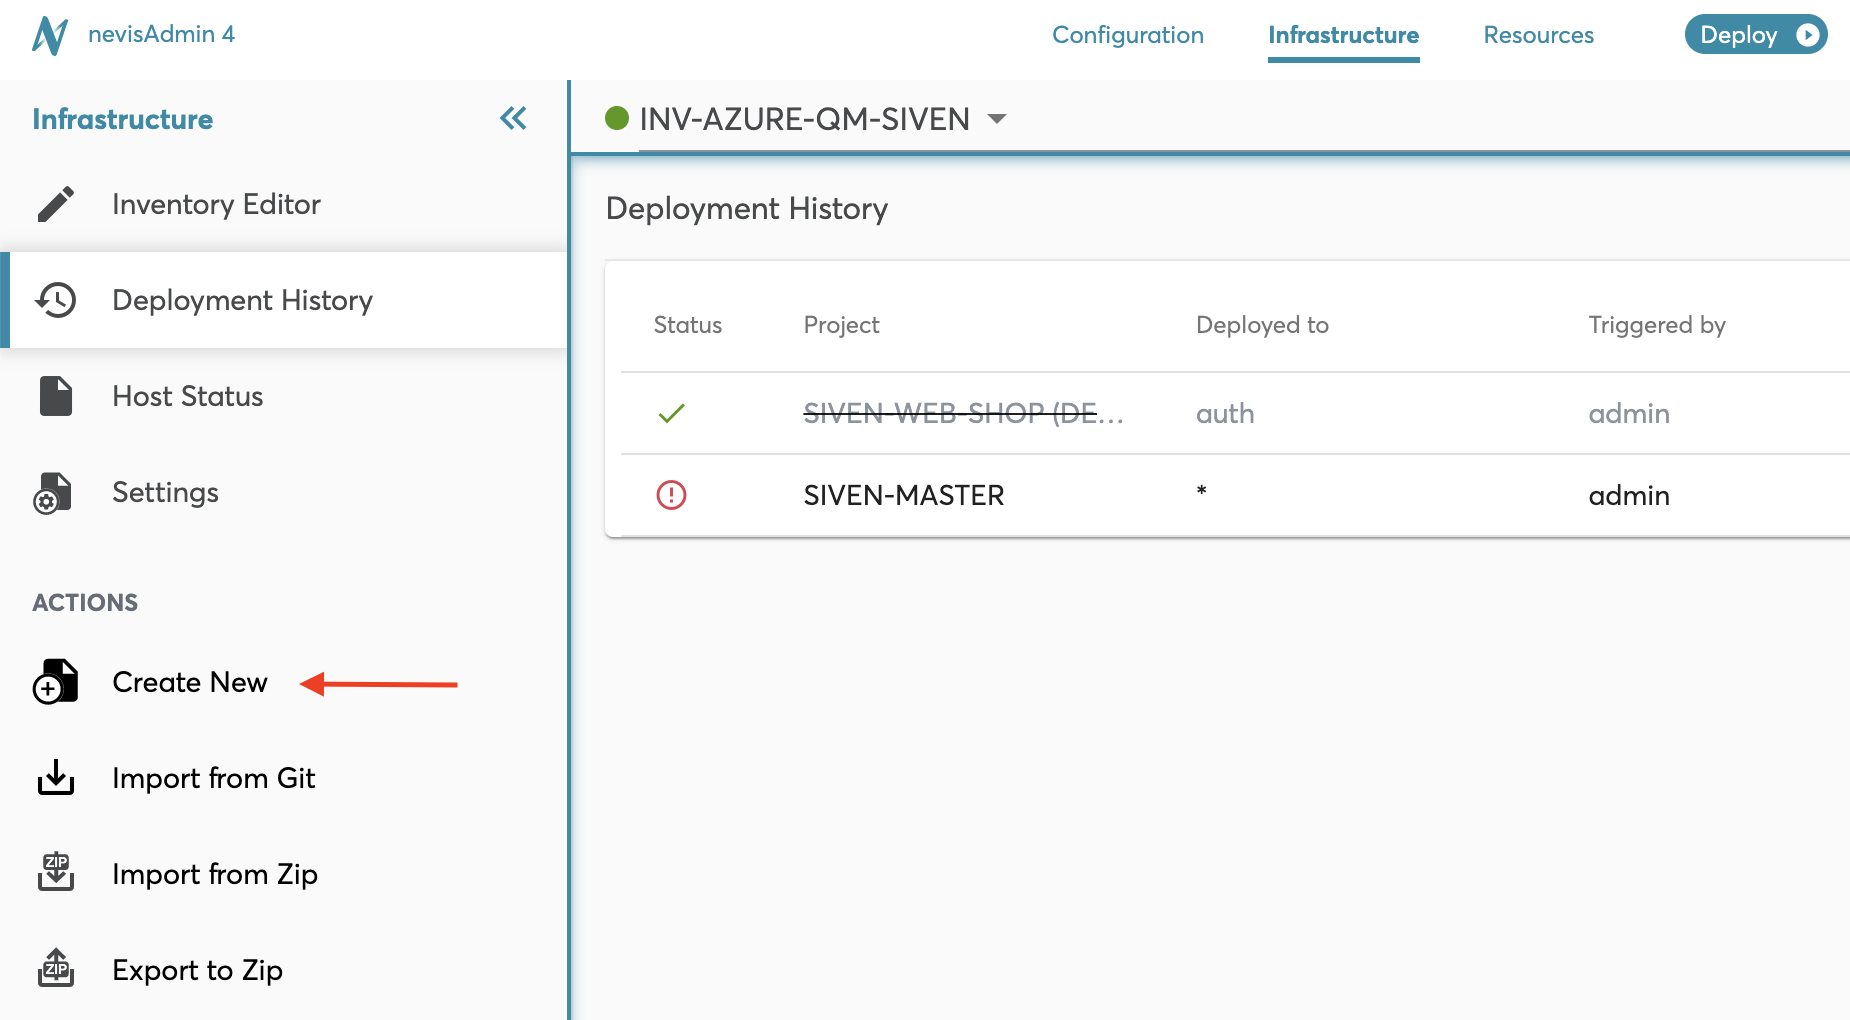
Creating an Inventory from the Infrastructure Screens
The Create New inventory function is also part of the Action menu in the Infrastructure tab (see the next figure).
The Action menu of the Infrastructure tab is only available when an inventory already exists.
Accessing Inventories
Click the Infrastructure tab to access existing inventories. The Infrastructure screen allows you to create new and modify existing inventories.
Creating an Inventory
You have several options to create an inventory. You can create:
- an unversioned inventory,
- an versioned inventory that is connected to a Git-based version control system, or
- an inventory for deployment to Kubernetes.
The next sections describe these options.
Creating an Unversioned Inventory
You create an inventory by selecting the Create New action from the Action menu in the sidebar of the Infrastructure screen. This will open the Create Inventory dialog:
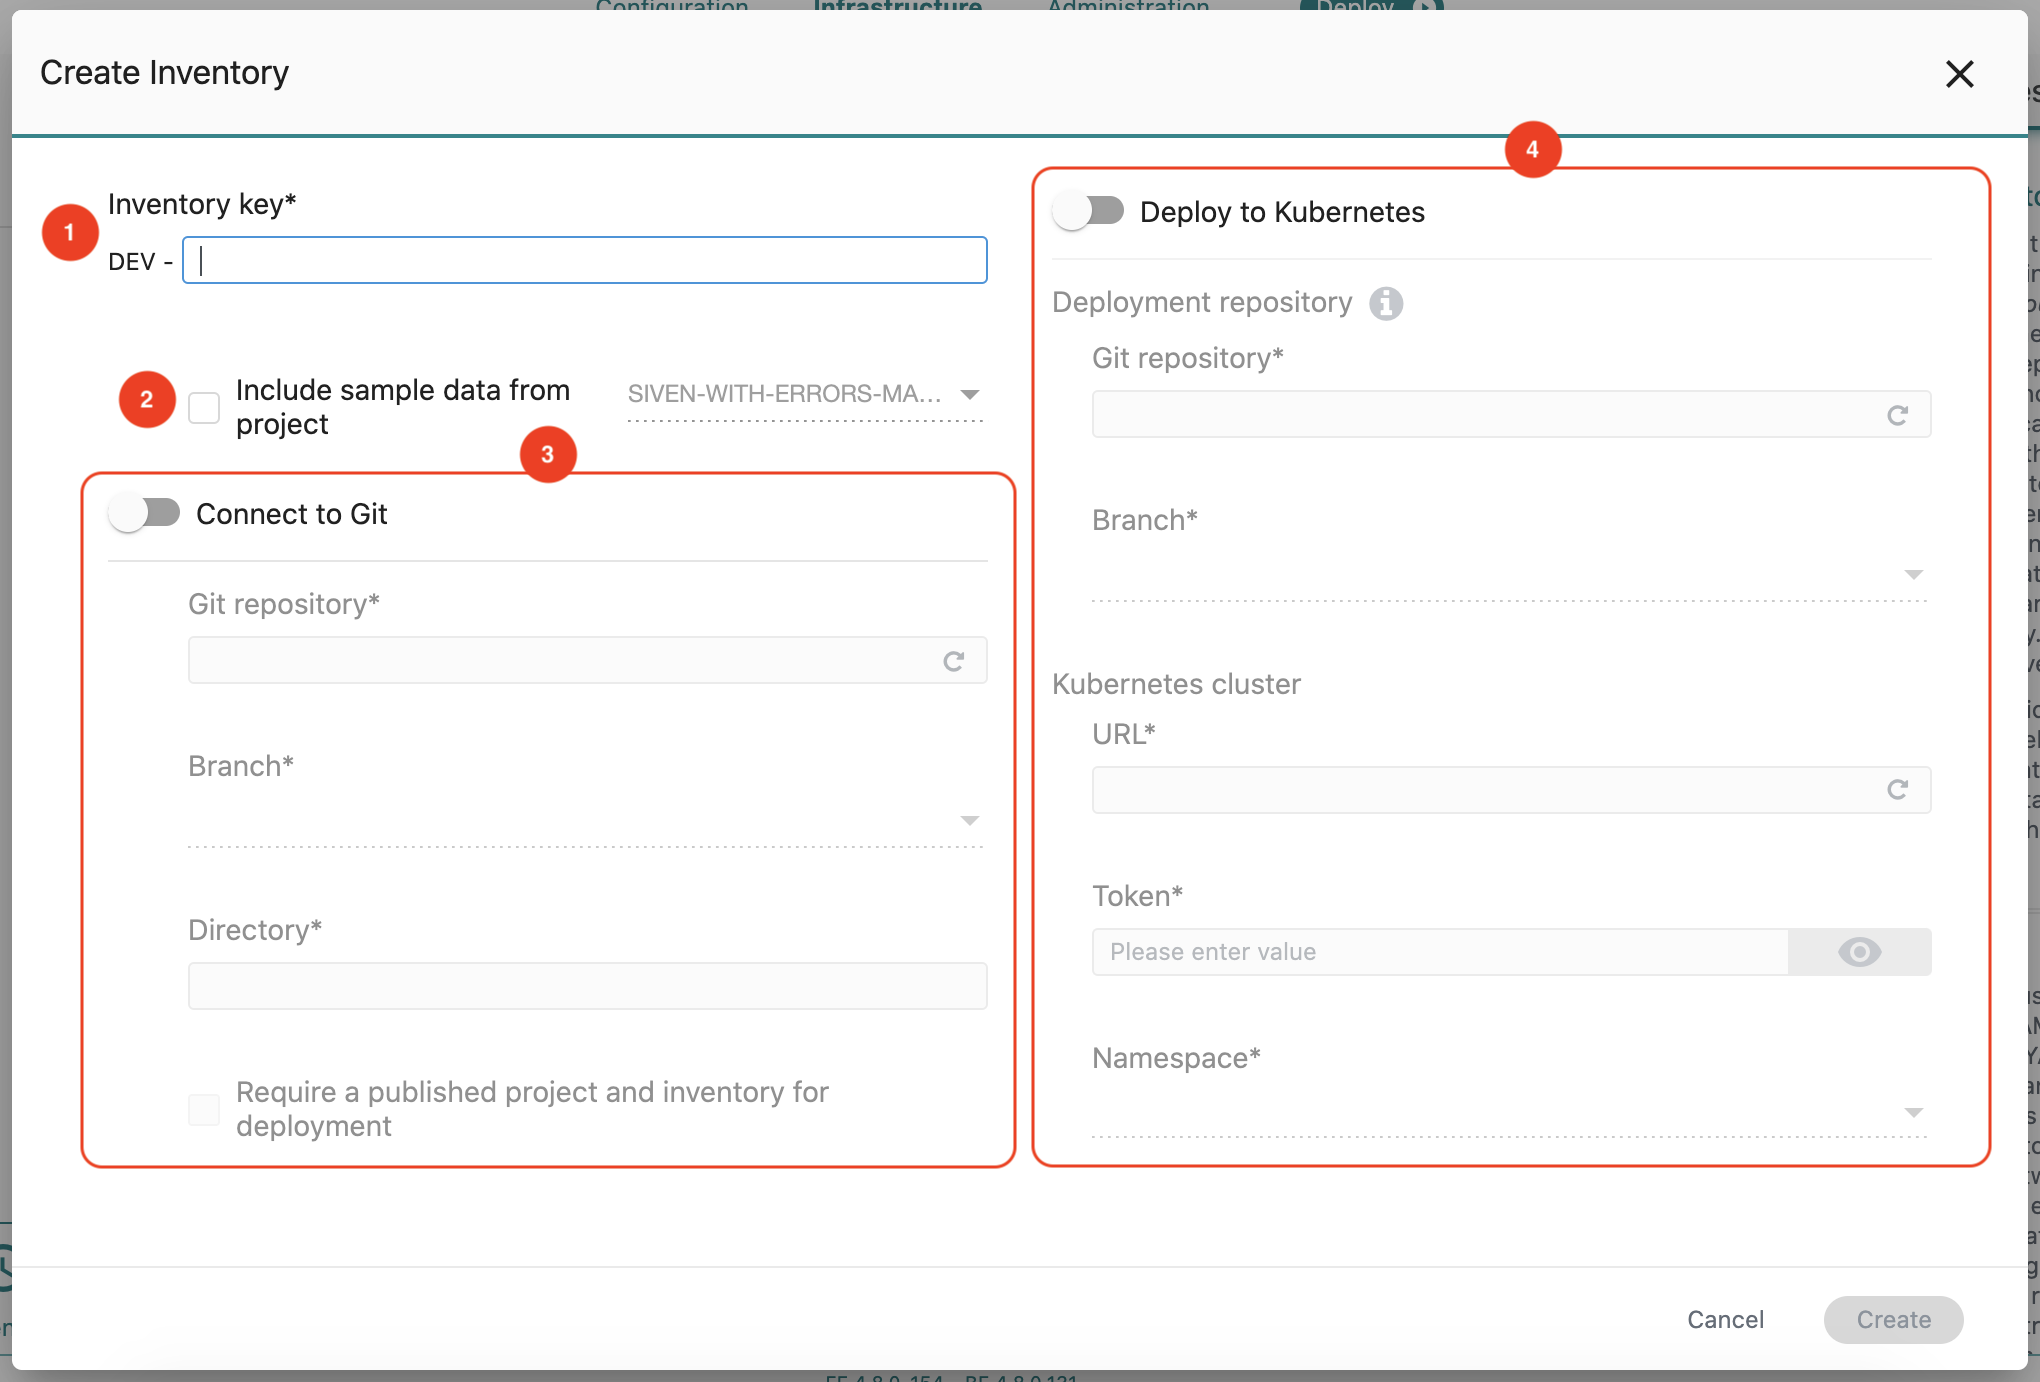
The following fields in the Create Inventory dialog are of relevance when you create a new inventory:
- The Inventory key (no. 1 in previous figure) Define the key for the new inventory in this field. Note that the key must be unique. The inventory key always starts with the relevant tenant. In the previous figure, this is "EXTERNAL-". For more information about tenants, see Tenants.
- To start working from a valid inventory file, enable the checkbox Include sample data (no. 2) and choose a project to get the data from.
- TheConnect to Git toggle (no. 3 in previous figure) Enable the toggle if you want version control. In case of an unversioned inventory, leave this toggle disabled.
- TheDeploy to Kubernetestoggle (no. 4 in previous figure) Enable the toggle if you want your inventory to deploy to a Kubernetes cluster. In case of an unversioned inventory, leave this toggle disabled.
Creating an Inventory with a Connection to Git
See also Git Setup and Best Practices and Connecting Inventories to Git.
You can only create an inventory that is connected to Git if the selected repository/path folder in Git is empty. If this is not the case, then:
- import the existing inventory instead, or
- manually empty the target folder with Git tools, or
- change the path, branch or repository such that they point to an empty folder.
The Create Inventory Dialog - Versioned Inventory
You specify the details of your versioned inventory in the Create Inventory dialog (see next figure). This dialog appears after you selected the Create New action from the Action menu in the sidebar of the Infrastructure screen.
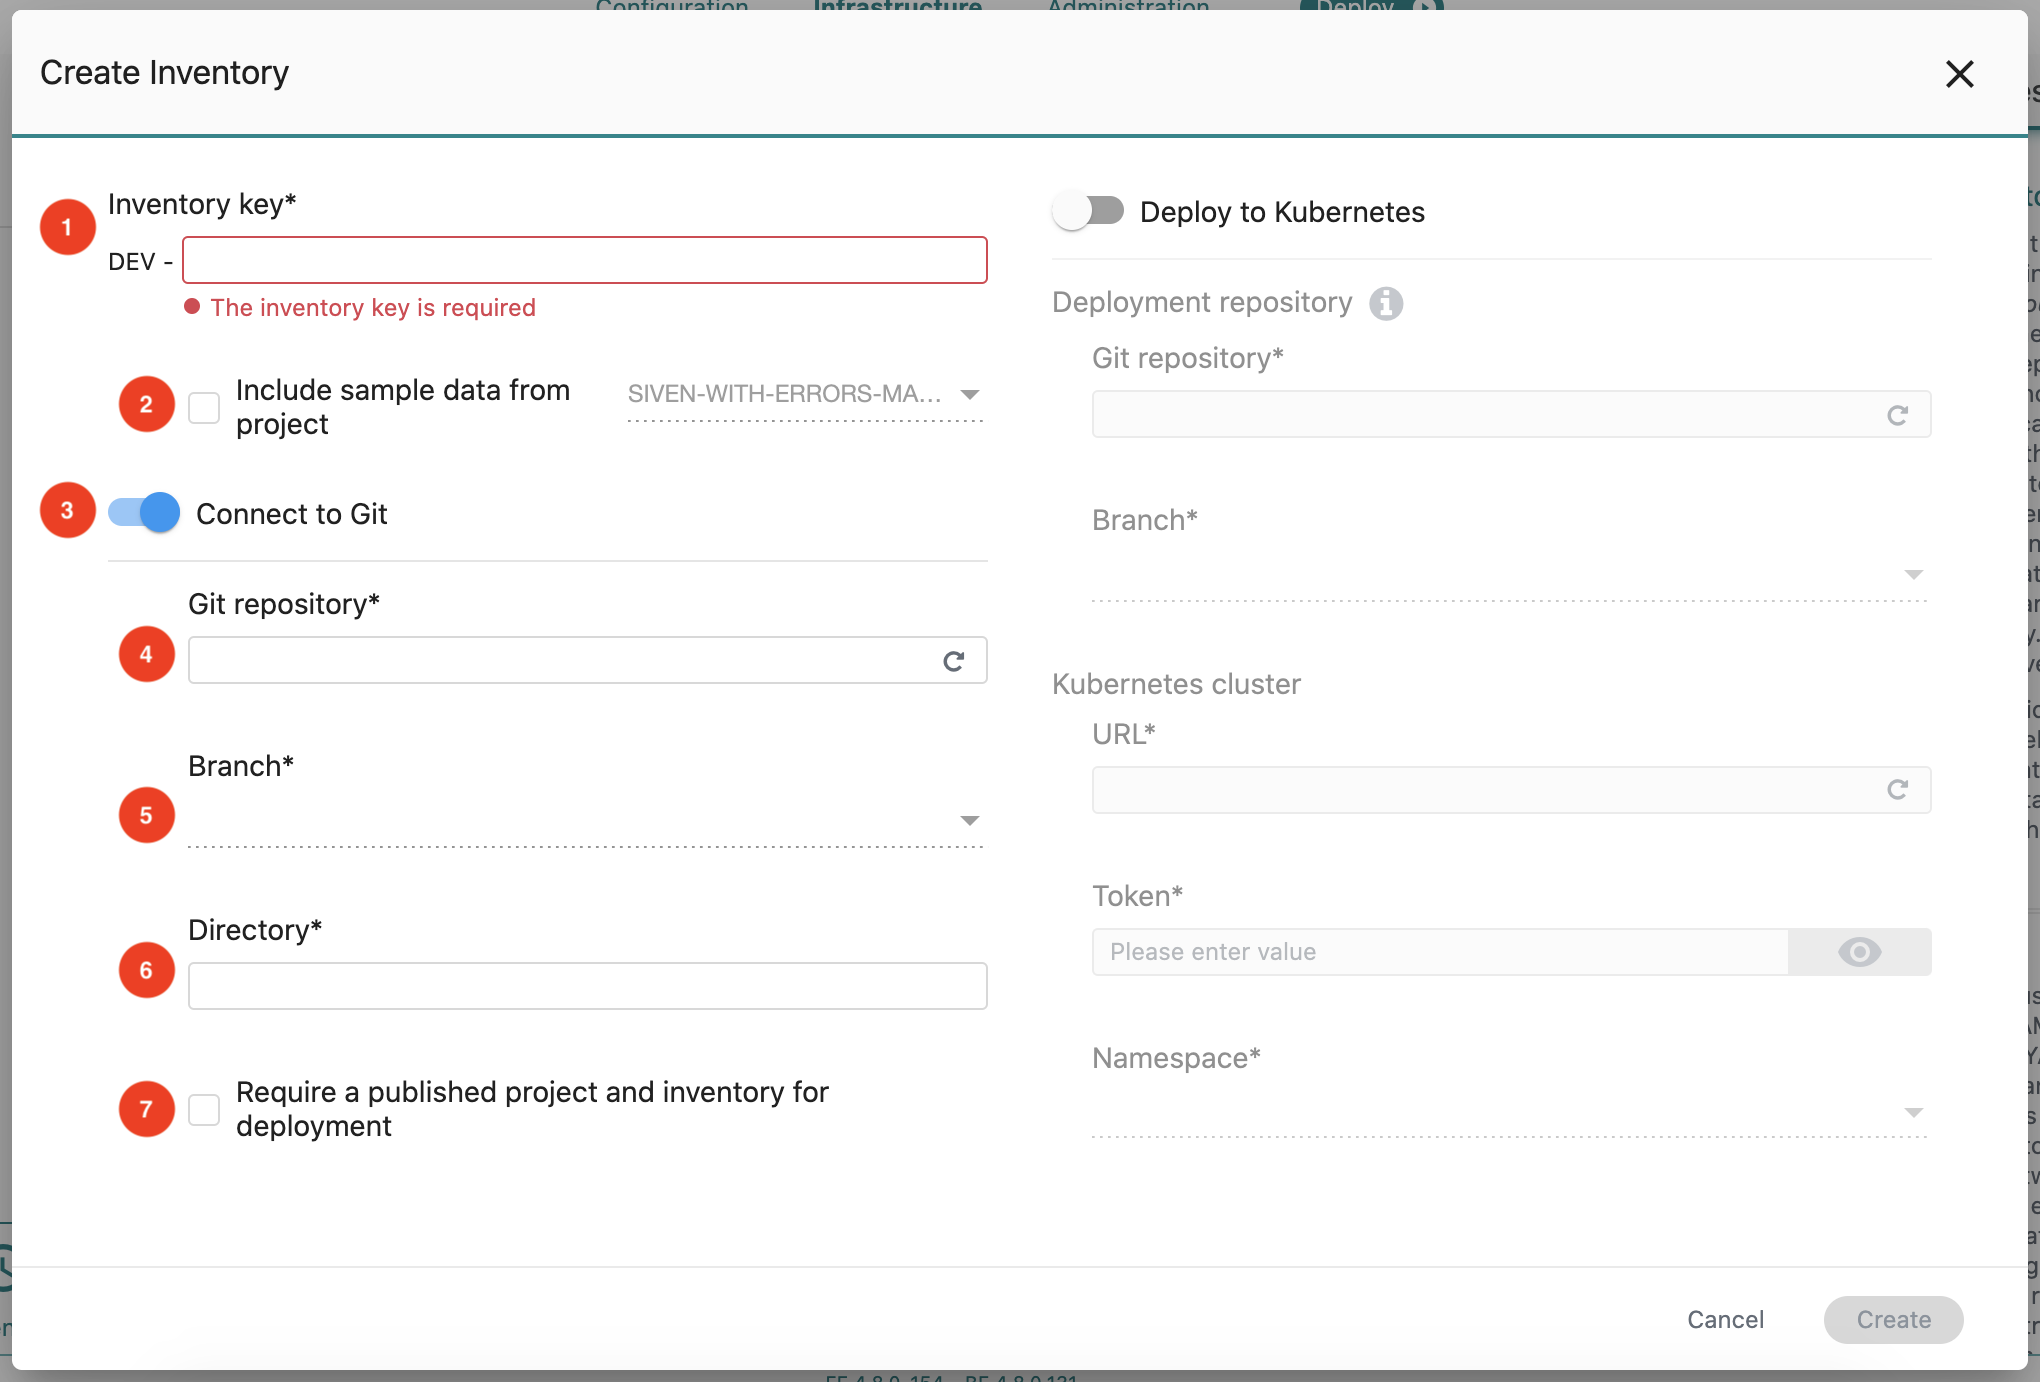
The following fields in the Create Inventorydialog are of relevance when you create an inventory with version control:
- The Inventory key field (no. 1) Define the key for the new inventory in this field. Note that the inventory key must be unique. The inventory key always starts with the selected tenant. In the previous figure, this is "INTRANET-". For more information about tenants, see Tenants. This field is mandatory.
- To start working from a valid inventory file, enable the checkbox Include sample data (no. 2) and choose a project to get the data from.
- Enable theConnect to Git toggle (no. 3 in previous figure) to enable version control.
- The Git repository field (no. 4 in the figure) Enter the Git URL of the inventory in this field. The scanning is done automatically once the focus is blurred to get immediate feedback on whether the repository exists. This field is mandatory.
- The Branch drop-down menu (no. 5) The Branch drop-down menu lists the available branches from the Git repository. By default, the master branch is selected. If this is not appropriate for your inventory, select the correct branch. This field is mandatory.
- The Directoryfield (no. 6) In this field, you specify the name of the directory in the repository in which you want to store the inventory files. This field is mandatory.
- If you tick the checkbox Require a published project and inventory for deployment (no. 7), you can only deploy if the selected project and this inventory are published. See more on this feature here: Restricting Deployment to Published Projects Only.
Creating an Inventory to Deploy to Kubernetes
The Create Inventory Dialog - Kubernetes Inventory
You specify the details of your Kubernetes-ready inventory in the Create Inventorydialog (see next figure). This dialog appears after you selected the Create New action from the Action menu in the sidebar of the Infrastructure screen.
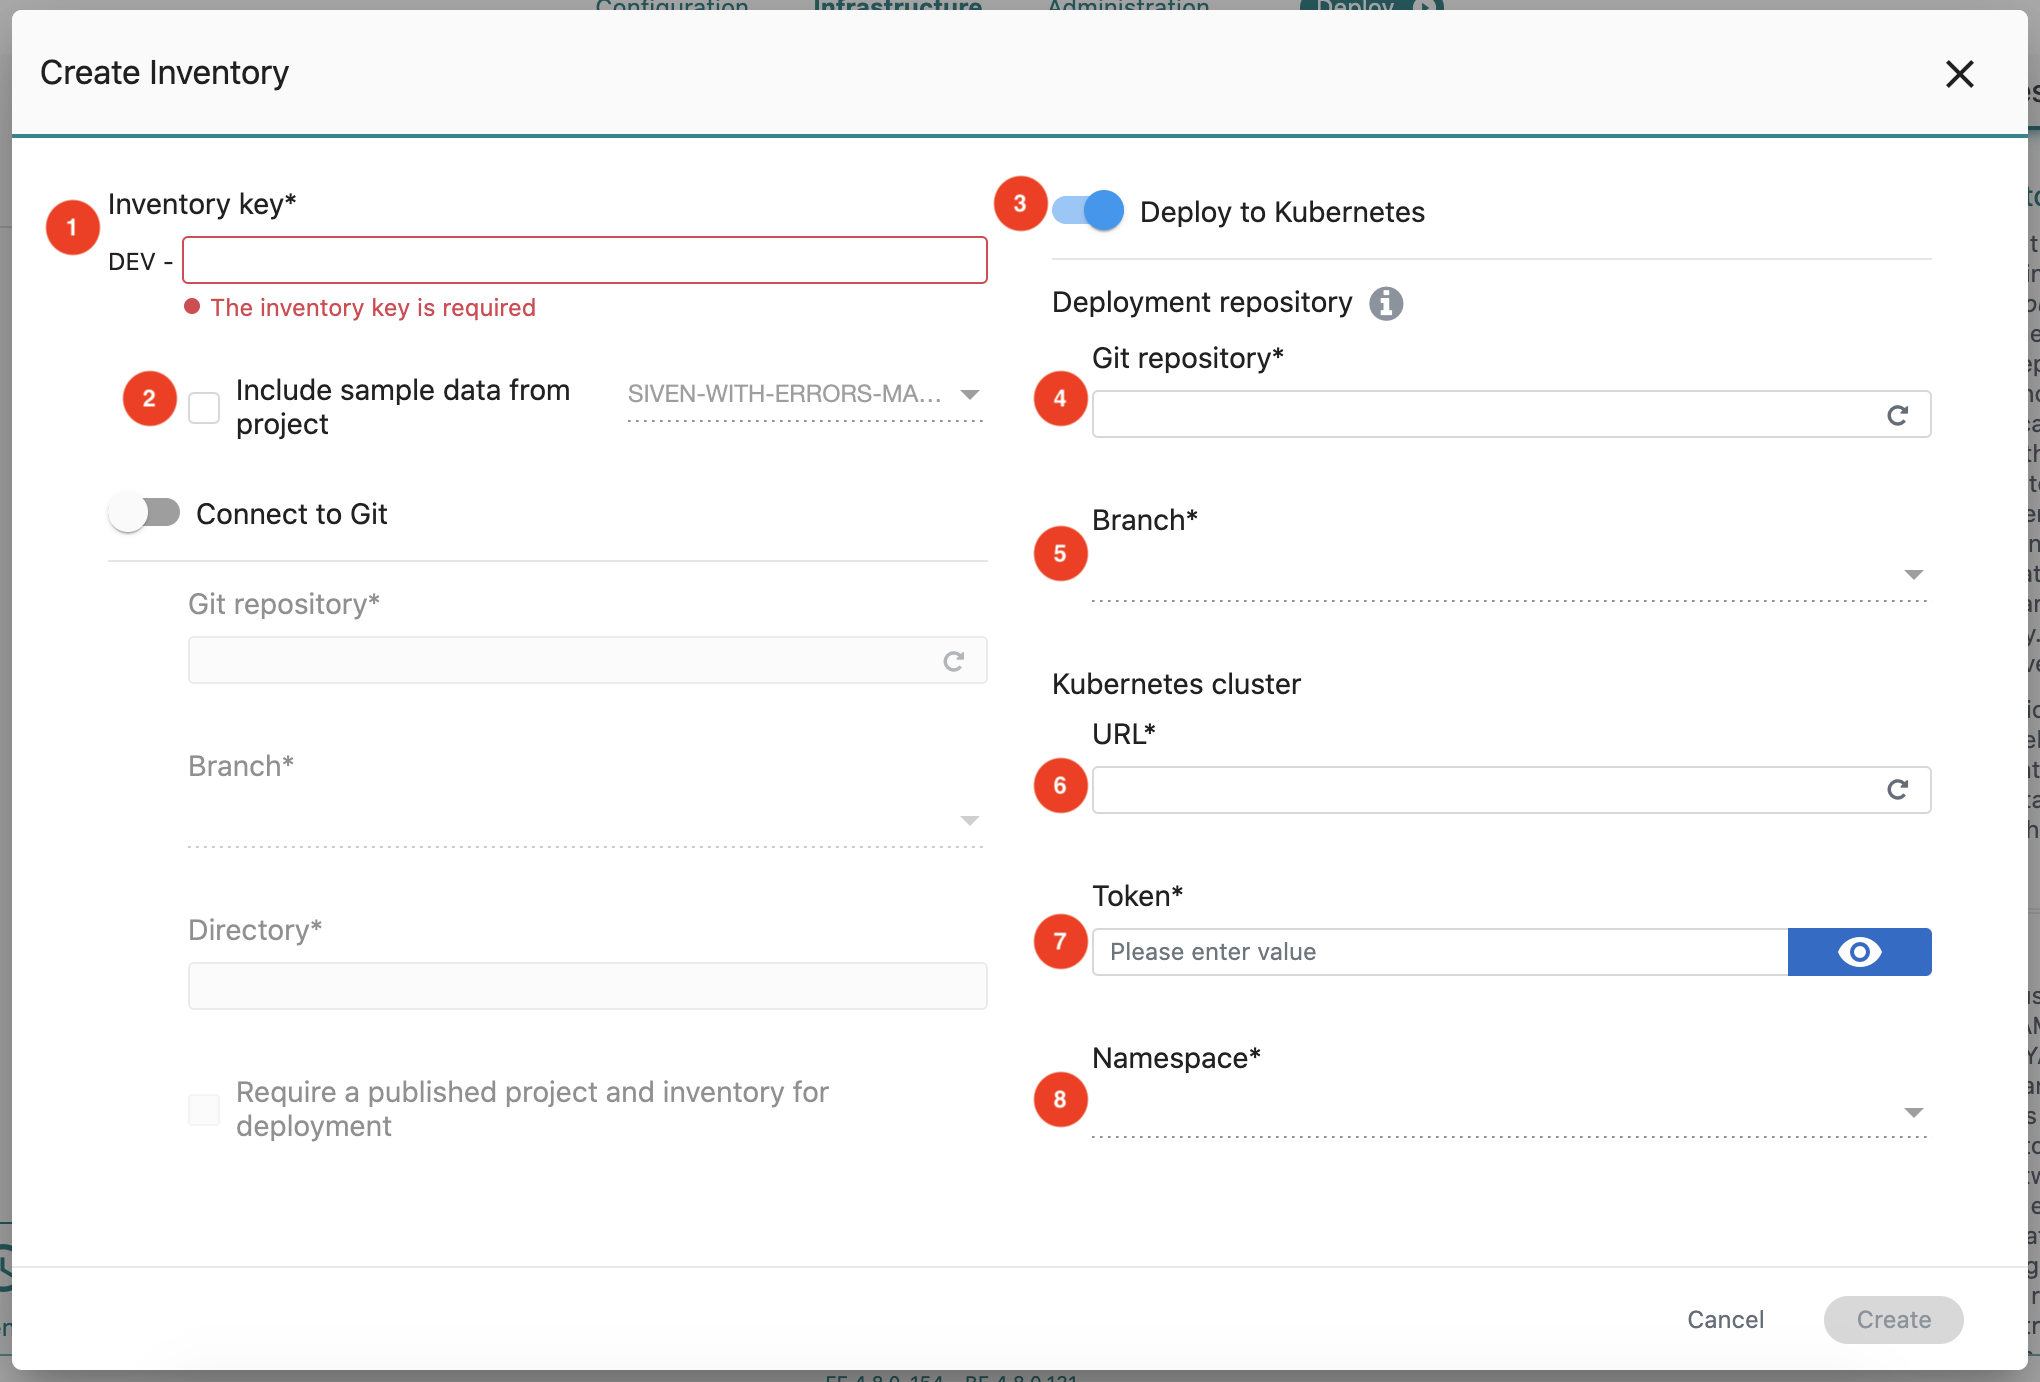
The following fields in the Create Inventorydialog are of relevance when you create an inventory for deployment to Kubernetes:
- The Inventory key field (no. 1) Define the key for the new inventory in this field. Note that the inventory key must be unique. The inventory key always starts with the selected tenant. In the previous figure, this is "EXTERNAL-". For more information about tenants, see Tenants. This field is mandatory.
- To start working from a valid inventory file, enable the checkbox Include sample data (no. 2) and choose a project to get the data from.
- Enable the Deploy to Kubernetes toggle (no. 3 in previous figure) to be able to deploy your inventory to a Kubernetes cluster.
- Deployment repository section:
- The Git repository field (no. 4 in the figure) Enter the Git URL of the deployment repository in this field. The scanning is done automatically once the focus is blurred to get immediate feedback on whether the repository exists. This field is mandatory.
- The Branch drop-down menu (no.5) lists the available branches in the Git repository. By default, the master branch is selected. If this is not appropriate for your inventory, select the correct branch. This field is mandatory.
- Kubernetes cluster section:
- The URL field (no. 6) Enter the URL of the Kubernetes cluster in this field. The URL is scanned automatically after the Token is inserted and the focus is blurred. This field is mandatory.
- The Token field (no. 7) Enter the token required to access the Kubernetes cluster in this field. This field is mandatory.
- The namespace drop-down menu (no. 8) Select one of the available namespaces from the Kubernetes cluster that you want to use. This field is mandatory.
Further Steps
After clicking Create to create the new inventory, the inventory file opens. You specify your new inventory in this file. For instructions on how to proceed, see Working with Inventory Files.