Automate with the REST API
Learn how you can use the REST API to automate various tasks such as user registration or transaction authentication.
To see all available REST API endpoints, see the REST API reference.
Prerequisites
Before you start experimenting with the API, make sure you have successfully completed the following tasks.
If so, you now have the following:
- Access Key
- The Muvonda Access App installed and configured
- Access to the Authentication Cloud management console
You also need a bash prompt in a terminal. Linux, MacOS, or on Windows, Git bash, or Powershell bash work fine.
Prepare your environment
Prepare a few local variables in your shell so that the following scenarios can be run conveniently.
Copy the REST API Endpoint
- To copy the REST API endpoint for your Auth Cloud Instance, click Overview from the menu.
- Under your instance name, click the copy icon for Your REST API endpoint.
- In your shell, type the following. We expect to see that Python 3 is installed.
python --version
- Assign your Access Key to a shell variable.
export ACCESS_KEY=eyJhbGciOiJIUzUxMiJ9.eyJiLCJpc3Mi...rfeAsv2dc3DO8zQGvC0g
- Assign your REST API endpoint to a shell variable. Make sure you include the trailing slash.
export APIBASE=https://sandbox-int-6c1fcf.mauth.nevis.cloud/
Register your mobile app authenticator
- To register your authenticator, send your Access Key and
usernameto the API with the following command. Replace theusernamewith your email.
curl -XPOST \
  -H "Authorization: Bearer $ACCESS_KEY" \
  -H 'Content-Type: application/json' \
  -d '{"username":"[email protected]"}' \
  ${APIBASE}api/v1/users/enroll | python -m json.tool
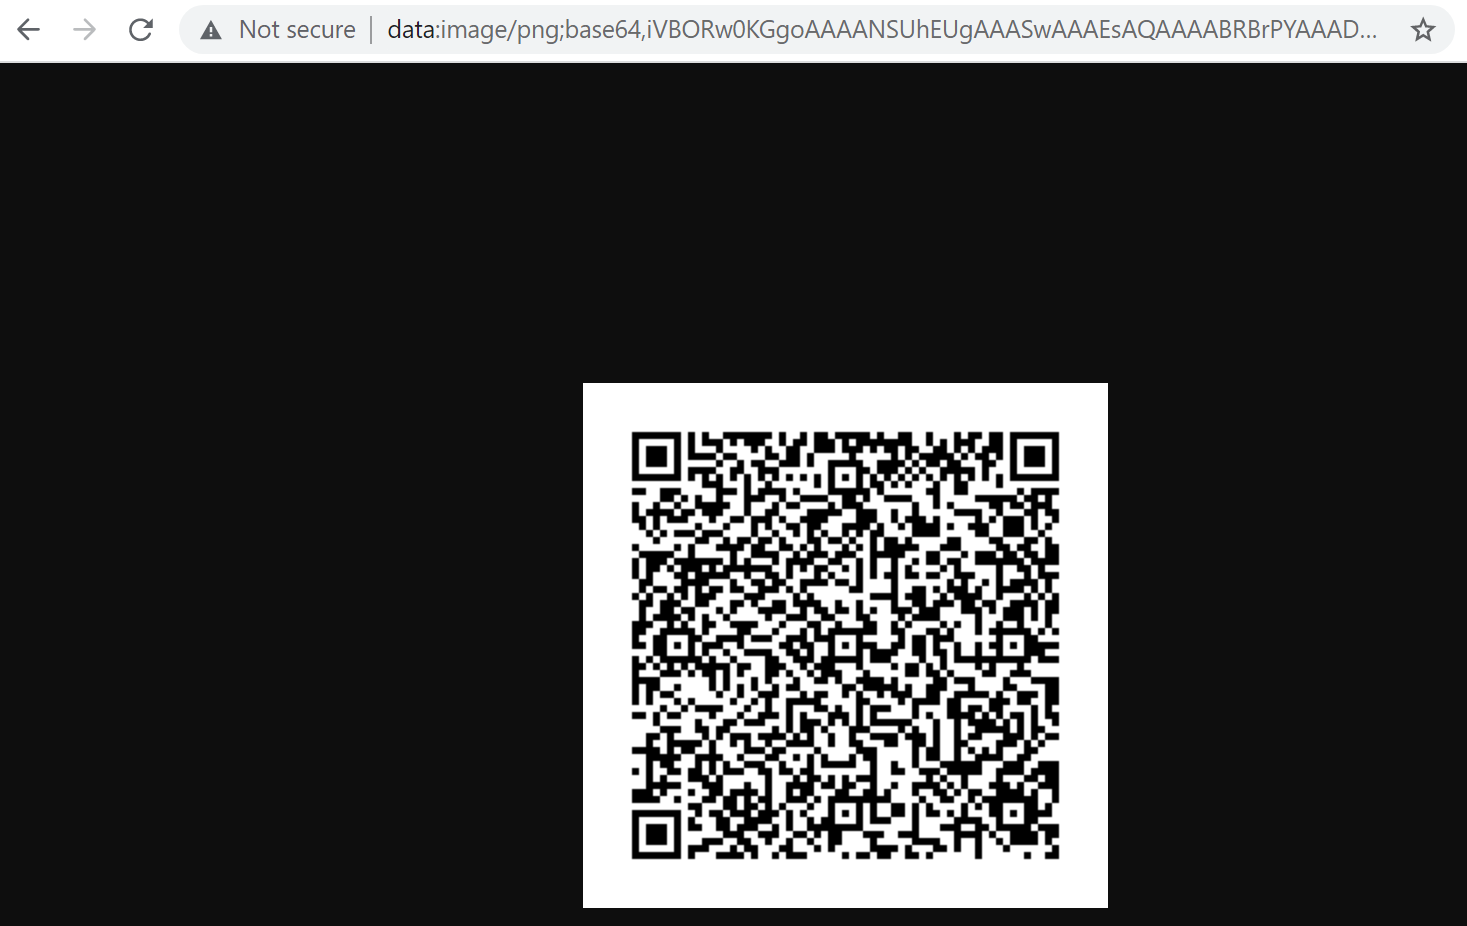
The response contains a Base64-encoded QR code that can be read by the Access App on your mobile phone.
{
    "userId": "11ff2eb5-7def-4e8f-9eb2-e82bdfbf2b4d",
    "username": "[email protected]",
    "status": "new",
    "createdAt": "2020-06-30T08:47:59.168663Z",
    "authenticators": [],
    "enrollment": {
        "transactionId": "56bd1216-d971-436e-a599-bd02a31c44f0",
        "statusToken": "eyJhbGciOiJIUzUxMiJ9.eyJhdWQiOiJzdGF0dXMiLCJpc3MiOiJodHRwczovL3NhbmRib3gtaW50LTZjMWZjZi5tYXV0aC5uZXZpcy5jbG91ZC8iLCJpYXQiOjE1OTM1MDY4NzksImp0aSI6IjU2YmQxMjE2LWQ5NzEtNDM2ZS1hNTk5LWJkMDJhMzFjNDRmMCIsInN1YiI6IjExZmYyZWI1LTdkZWYtNGU4Zi05ZWIyLWU4MmJkZmJmMmI0ZCJ9.iCiBKB59ObaDV7QCNGF6avdh-2rO6njX0eSq5Ky0FOaN1tqSMXyjae27BtVmd3AgvG8zFxQ12vs8D3suCjJGLg",
        "qrCode": {
            "type": "image/png",
            "size": 300,
            "dataUri": "data:image/png;base64,iVBORw0KGgoAAAANSUhEUgAAASwAAAEsAQAAAABRBrPYAAADo0lEQVR4Xu3XbZLVIBCFYXbA/nfJDrCfw9VkUk7pH+0pvZQ3Ic2L1d8wY//OWOMp+el4Y4/xxh7jjT3Gv4KtMUZN6jnnWjOvufZae1jqxepfTfxmLSxrxa9RX1ntxCyV1juqB5xlUVlgyxfAANNvF73rWQYQfwFsE9Vq+VUelGDGrnYMKSElYn2Vc6ccGD4eGfLXMSXzyXhW1ifjj2EZ0XdGUsaIfuUp9Y0+TEbuhLrcyqAJh5FelrZgQ5WsvItcp3JUTbndlkaM9ukzHKuASrjsrDqa6rsRS8kex1KbATNHxyS/ubcDIzo1HMcKfsjpmLtVfQ+m/UX10tiL/vXbSYpOLFHXlKcEcOAGe+0GdGJba9akp0xMtyaK9GZCA6YTuwPkHqBucqBZWkS9mAAvGeAuldxMEzQHdmLl3+8Hroj74OGhDcrTVsx0an9Urkl6oOy02WjEnBqnSasYpiht9qTUm7Gdhrf0mLQYheJX5FVZLVgSUrkshmSfHSpG++nEKtLbN3eiwsS7EvV2fDRgW6mME3oVfQonObr0n2ZsuzQJtDJep+Ew62PVN2A6SzqN0skkVnD1I/QtGHdaqQW/WtV/UtrN2HTBk5bglUtxTrWZv4VaMVeVxauuopmg6K4hAvqwKB6dc96mYhixY9DNvQ2YJqgFWk64TabKYVr+ozZMsAXZtW4k3EmEI34RfZgoU5Zfhb5E0nGqZzb2YYk6rc8Jl6KuHJCbnq3YojRdpwbDsRaFviTzcm8LJgu3jjwJcqDFGrnwIrqwaDuULkvUsy/v6j6XCT3Y1Js5dqd69R1XZbbJiVZMHqqT9BbHiHmJ4nOPRix6gtKqq7tohcpGgl4mtGDOMVYMDecQJdF8XExbsSgcV0ZnuwhCx4JGbL96y6BzNslRW1TQzb0NmMqN+lSWAsKffnNOkU4sJpRsyceXkAH1U0G9mHcQBy9Hh6qP02g6sZVwp8U427j0XKKEPv7tw7ZKznmrV599BMW4TPViqRS1wQIZUJ2HHVL03i07sKNpvDqcGpnIVGb1YjJS1PkTZwP8wFeG9GD1rbe8piE16or+aMaMl+4iHwtkp3JORjRiIq9sZnr10v3GaYy16SqZHowFHnw5RX5F5vNuQgtG1andUF64E3qZ6Shuxzwkpg0lJV85dz+a0IPVZPCtv35mGOVcrx/Hbg+G5Mmab+WbnIRlQy82IJM3V3Jgnpo50OXeDuzX4409xht7jDf2GP8R9g3b8qzbIiNhswAAAABJRU5ErkJggg"
        },
        "appLinkUri": "https://sandbox-int-6c1fcf-app.mauth.nevis.cloud/open?dispatchTokenResponse=eyJubWFfZGF0YSI6eyJ0b2tlbiI6IjY5YTEwYWQ4LTc2ZjQtNDU1NC05OTkyLTE0YWNiYmE4YzBiYiIsInJlZGVlbV91cmwiOiJodHRwczovL3NhbmRib3gtaW50LTZjMWZjZi5tYXV0aC5uZXZpcy5jbG91ZC9fYXBwL3Rva2VuL3JlZGVlbS9yZWdpc3RyYXRpb24ifSwibm1hX2RhdGFfY29udGVudF90eXBlIjoiYXBwbGljYXRpb24vanNvbiIsIm5tYV9kYXRhX3ZlcnNpb24iOiIxIn0"
    }
}
- Copy the contents of the
dataUriwithout the double quotes, and paste it in your browser to display the QR code used by the Access App.
username for productionIn a production site, the username needs to be unique and permanent. For this reason, email addresses are not to be used as they can change during the user lifecycle. Ideally, a sufficiently memorable unique username is used, accompanied by the current user email address.
Register with your Access App
- On your mobile phone, open the Muvonda Access App.
- Tap the Read QR Code button.
- Scan the QR code of the
dataUriyou displayed in your browser in Step 2 above. - Select a biometric method such as fingerprint or facial recognition.
- On the Registration Successful page, tap Close.
Test whether your registration was successful
You can look up your user with the following command:
curl -H "Authorization: Bearer $ACCESS_KEY" \
    ${APIBASE}api/v1/users?username=[email protected] \
    | python -m json.tool
The response contains the user records including the user userId, whether the account is active or not, and also the date of creation and the last update.
{
    "userId": "11ff2eb5-7def-4e8f-9eb2-e82bdfbf2b4d",
    "username": "[email protected]",
    "status": "active",
    "createdAt": "2020-06-30T08:34:54Z",
    "authenticators": [
        {
            "authenticatorId": "95ebe358-79b4-46d1-848a-117511503151",
            "name": "your iPhone",
            "type": "ios",
            "enrolledAt": "2020-06-30T09:22:29Z",
            "updatedAt": "2020-06-30T09:22:29Z"
        }
    ]
}
Lookup by userId
Each user is assigned a unique, fixed user userId that can also be used for lookups. This never changes, unlike other user generated fields.
The username can be any arbitrary string, such as an email, a hashed value or a Microsoft Azure UUID, while the user userId is permanent and uniform.
- Copy your
userIdfrom the response above. - Replace the last element in the URL below with your
userId, and run a search with the following:
curl -H "Authorization: Bearer $ACCESS_KEY" \
    ${APIBASE}api/v1/users/<ADD-YOUR-userId-HERE>  \
    | python -m json.tool