Window location hash in URI
Some applications use a fragment, within the request URI. When bookmarking such an URI, the fragment might get lost because neither nevisProxy nor nevisAuth are aware of the URI's fragment since this data is never sent to them by default.
If you like to let the browser keep the fragment during the login process, enhance the login page to forward this information to nevisAuth. nevisAuth may then store this information and send it to nevisProxy for the final redirect to the initially called URI.
You may use the configuration template "ELK" to configure this use case. For more information, see the chapter: ELK.
The necessary tasks are:
Add a new parameter to the GUI descriptor of the relevant login page. You'll find this page in the navigation pane of the Configuration tab:
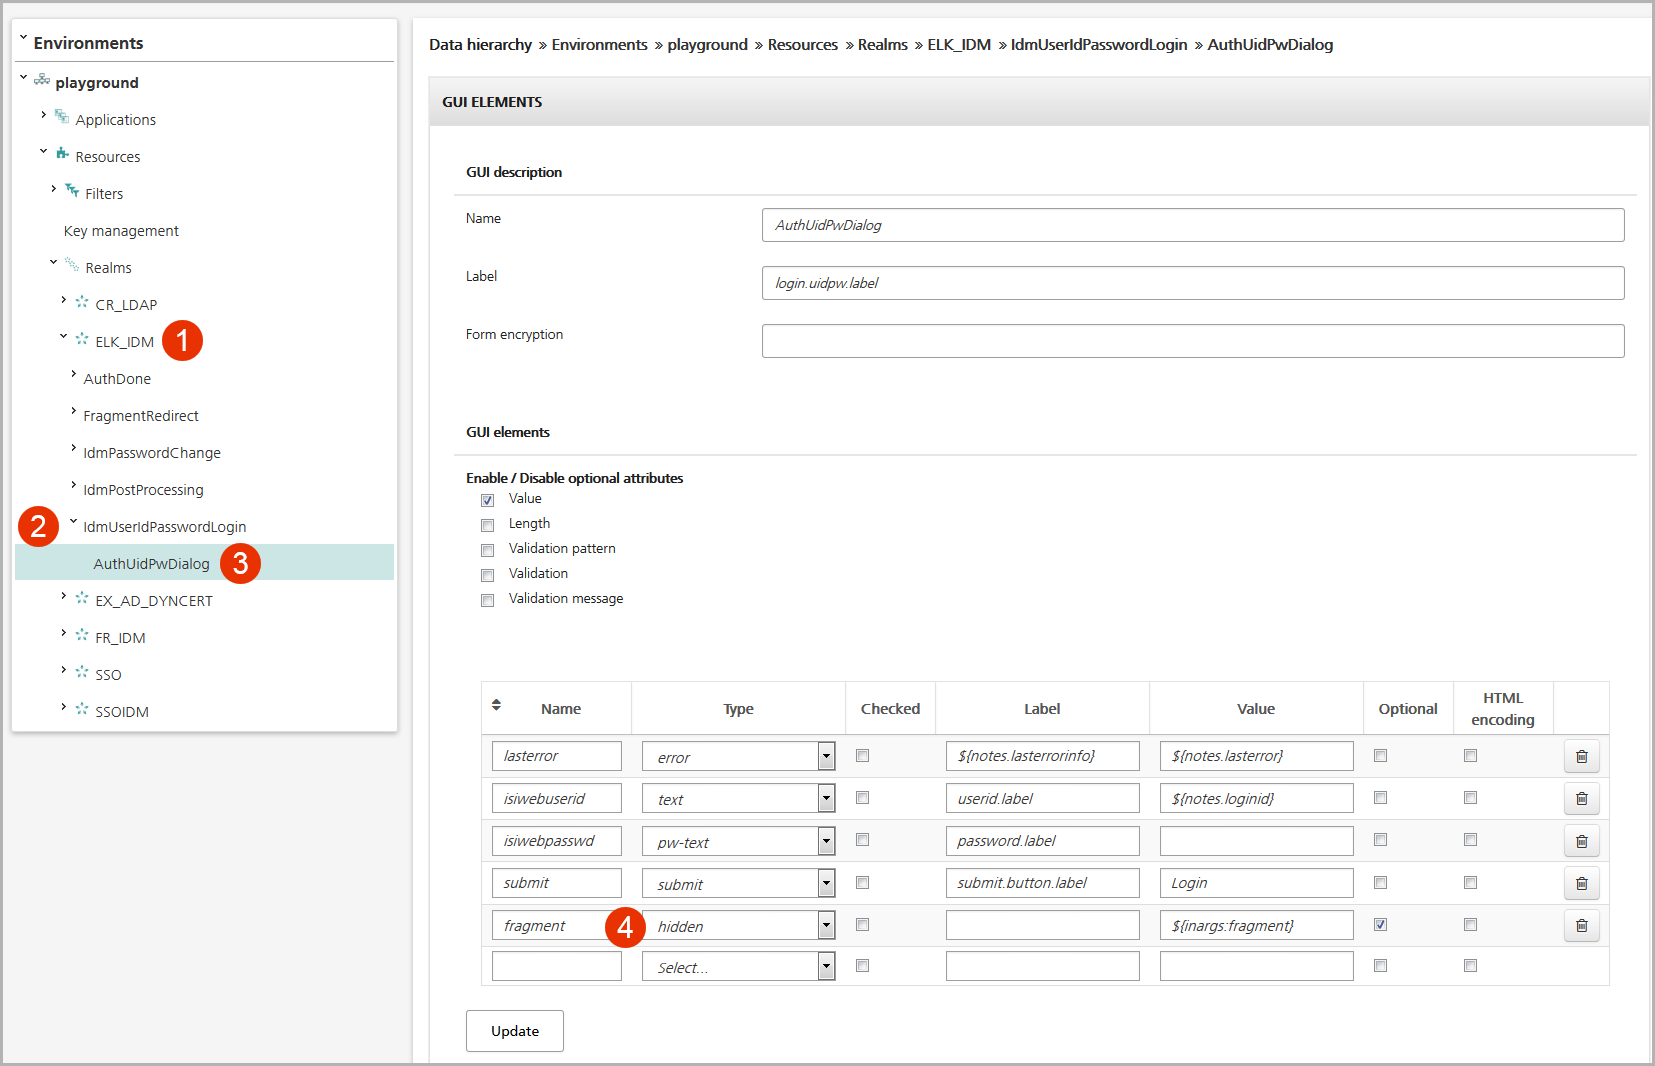
- In the navigation pane, navigate to the realm that corresponds with the authentication domain of the relevant application. In the example, this is the ELK_IDM realm (no.1 in the figure below).
- Within the realm, go to the authstate in question (an authstate defines how to process the authentication requests within the authentication workflow). In the example, this is the IdmUserIdPasswordLogin authstate (no.2).
- Then click on the relevant GUI descriptor to open the descriptor view with the GUI elements on the left. In the example, this is the AuthUidPwDialog GUI descriptor (no.3).
- Add a new GUI element to the GUI elements list. In the example, the new element is called "fragment" (no.4). It is an optional, hidden element with the value
${inargs:fragment}.
Allow this parameter to be posted by nevisProxy to nevisAuth, e.g., by the following validation pattern (depends on the data stored within the fragment):
^(#\[0-9a-zA-Z_/.-\]\{0,50\})?$.You specify this setting in the view of the relevant realm (see the figure below):
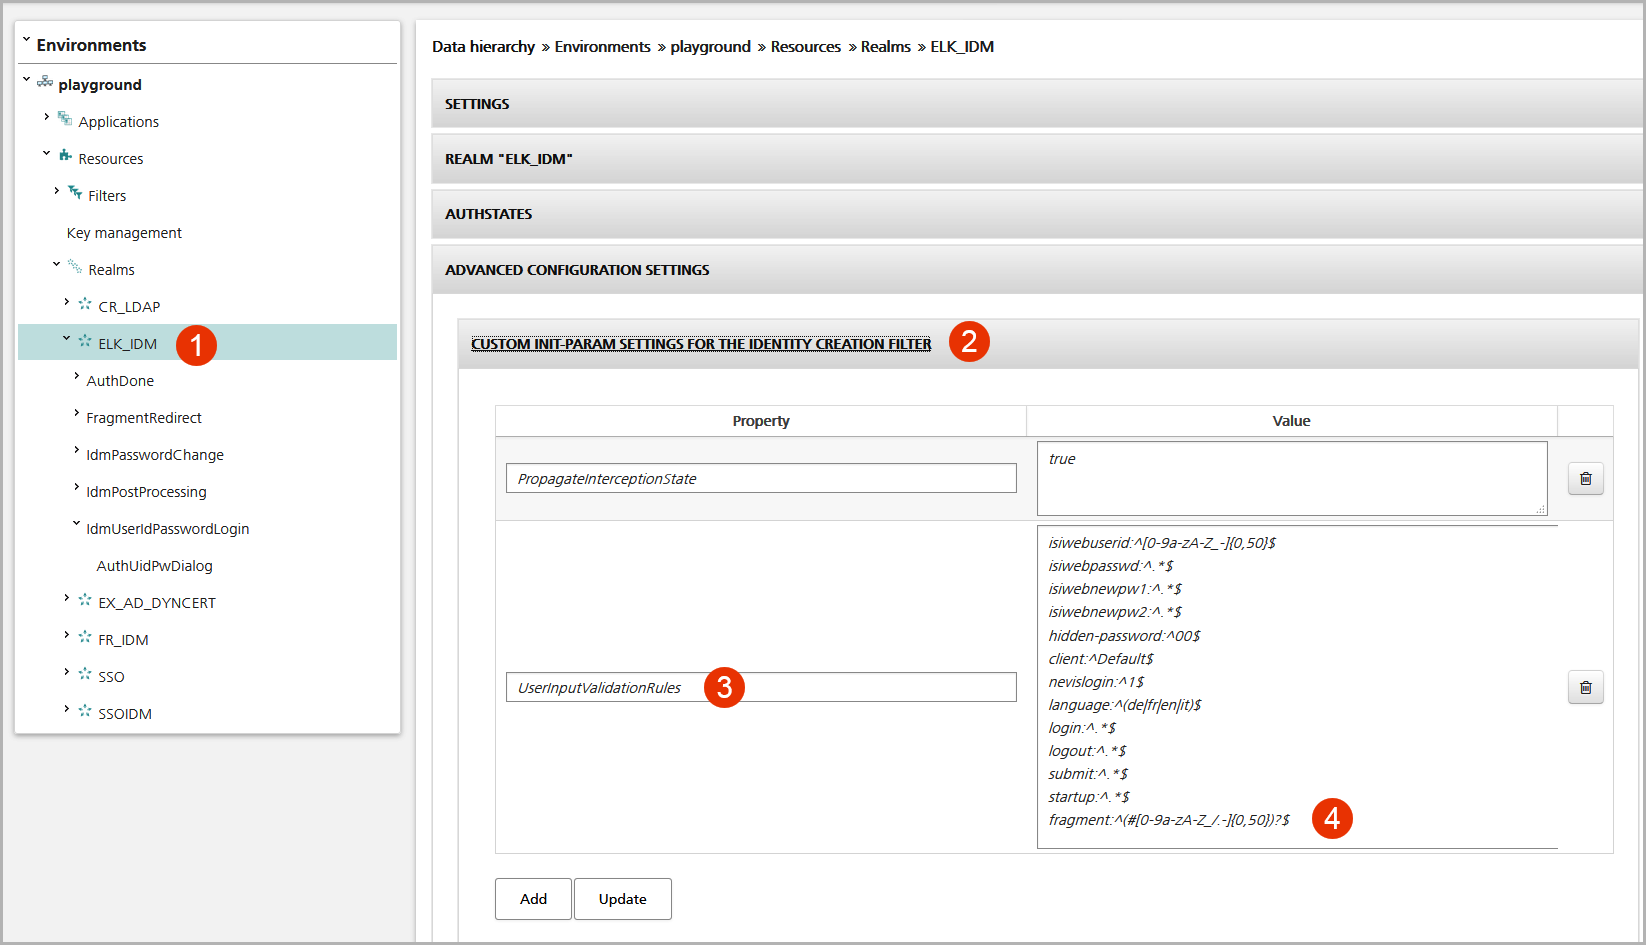
- Open the realm view by clicking on the relevant realm in the navigation pane of the Configuration tab. In the example below, this is the ELK_IDM realm (no.1 in the figure).
- In the realm view, open the Custom Init-Param Settings for the Identity Creation Filter subpanel of the Advanced Configuration Settings panel (no.2).
- In the Property column, enter the property UserInputValidationRules (if it is not defined yet) – no.3 in the figure.
- In the Value column on the right, enter the name of the new GUI element, followed by the validation pattern:
_<element-name>:<pattern>_(in the example, this is_fragment: ^(#\[0-9a-zA-Z_/.-\]\{0,50\})?$, see no.4 in the figure below).
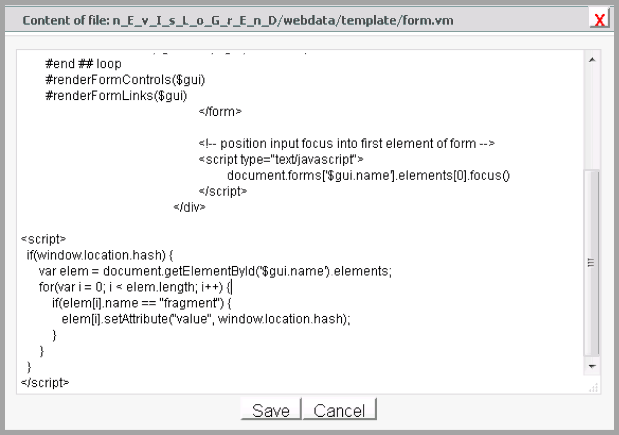
Modify your login page. A small JavaScript shall read the fragment and set it within the HTML from posted to nevisAuth.
<script>
 if(window.location.hash) {
 var elem = document.getElementById('$gui.name').elements;
 for(var i = 0; i < elem.length; i++) {
 if(elem[i].name == "fragment") {
    elem[i].setAttribute("value", window.location.hash);
 }
 }
 }
</script>
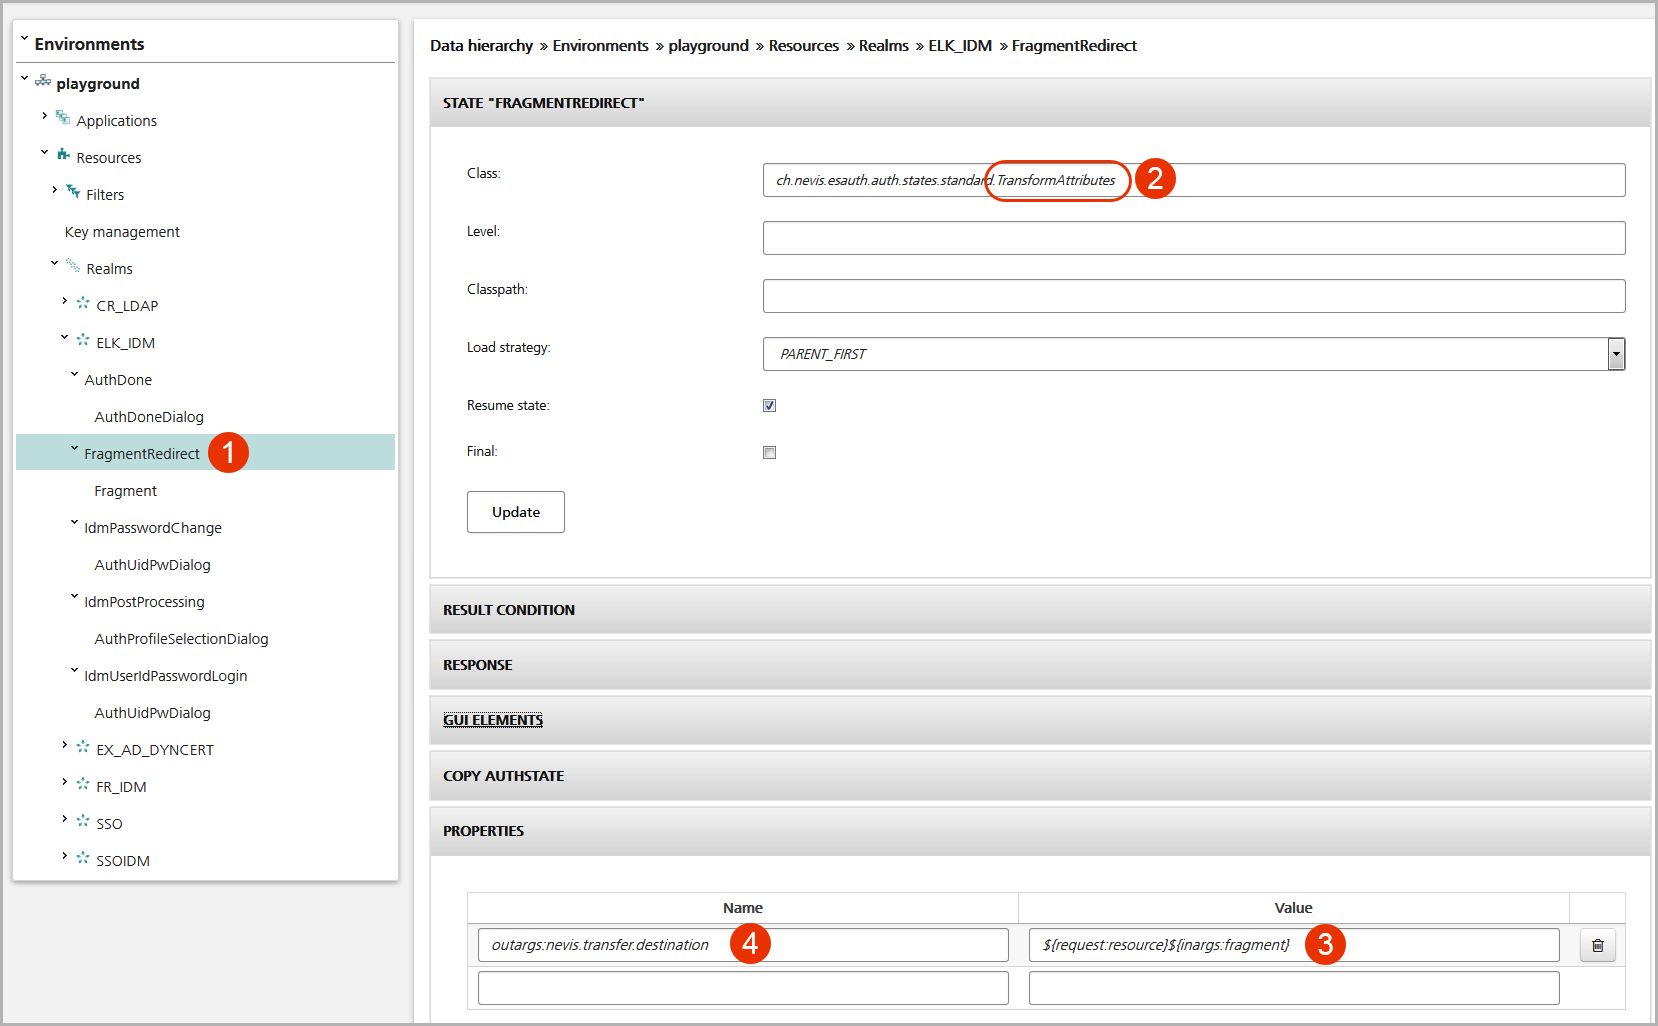
Modify the redirect URI. For this, use a TransformAttributes authstate (in our example, we use the TransformAttributes authstate "FragmentRedirect", see no.1 and no.2 in the figure Overwites nevis.transfer.destination.
Proceed as follows:
- In the navigation panel of the Configuration tab, navigate to the realm in question. In the example, this is the ELK_IDM realm.
- Open the view of the relevant TransformAttributes authstate by clicking on the authstate entry. In the example, this is the FragmentRedirect entry, see no.1).
- In the Properties panel, add the value
${request:resource}${inargs:fragment}for the parameteroutargs:nevis.transfer.destination(no.3 and no.4, respectively).