Working with Inventory File Attachments
Before you can add a file attachment to an inventory, you need to define the corresponding variable in the project configuration. This is explained in Working with Variables.
There are several ways to attach a file / secret file ("file") to an inventory:
- By directly attaching it in the inventory. In this case, an inventory level file will be created, which can be used only within the given inventory.
- By using an existing file. An existing file can be either a global file uploaded in the Secret & Files screen, or an inventory level file that was already used in the given inventory.
- Using a global file: Global files can be used in multiple inventories. To use a global file, you first need to upload it, via the buttons Upload global secret file or Upload global file in the Secret & Files screen. To open this screen, go to the sidebar of the Administration tab, and select Secret & Files from the Global Settings menu. For more information, see the chapter Secrets & Files.
- Using an existing inventory level file: To attach an existing inventory level file, use the functions Attach file or Attach secret file. Even if you removed the attachment from the inventory before, you can re-use it until it is permanently removed from the Secret & Files screen. For more details, see the chapter Secret & Files.
Note that attachments are added as secrets and cannot be modified from the inventory once they are added. However, they can be viewed, downloaded and replaced from the Secret & Files screen.
- If you need to modify an existing attachment, go to the Secret & Files screen and use the Replace content action.
- Uploaded files are encrypted and stored in the database. They will not be published to Git or exported to Zip.
- Classic deployment:
- The file will be copied, via SSH, to the target machine, where it is saved in unencrypted form.
- Users who have the permission to deploy the inventory file with the secret attachment can see the attachment as an unencrypted file inside the Deployment Wizard.
- Kubernetes deployment:
- If all of the following conditions are met, the secret file is not be exposed anywhere; it is not visible in Git or in the generated configuration file in Deployment Wizard:
- Secrets are used in secret fields AND
- Secrets are uploaded via the Attach secret file or Upload global secret file function AND
- The uploaded file size is smaller than 1MB.
- The secret file will not be encrypted if the file size exceeds 1MB or it is uploaded through the regular Attach file or Upload global file function. As a result, the file will be visible in unencrypted form in the Git deployment repository and generated configuration file in the Deployment Wizard. See more information about the Kubernetes file size limitation at chapter "Limitations and known issues".
- If all of the following conditions are met, the secret file is not be exposed anywhere; it is not visible in Git or in the generated configuration file in Deployment Wizard:
Adding an Attachment
Attaching a File Directly to an Inventory
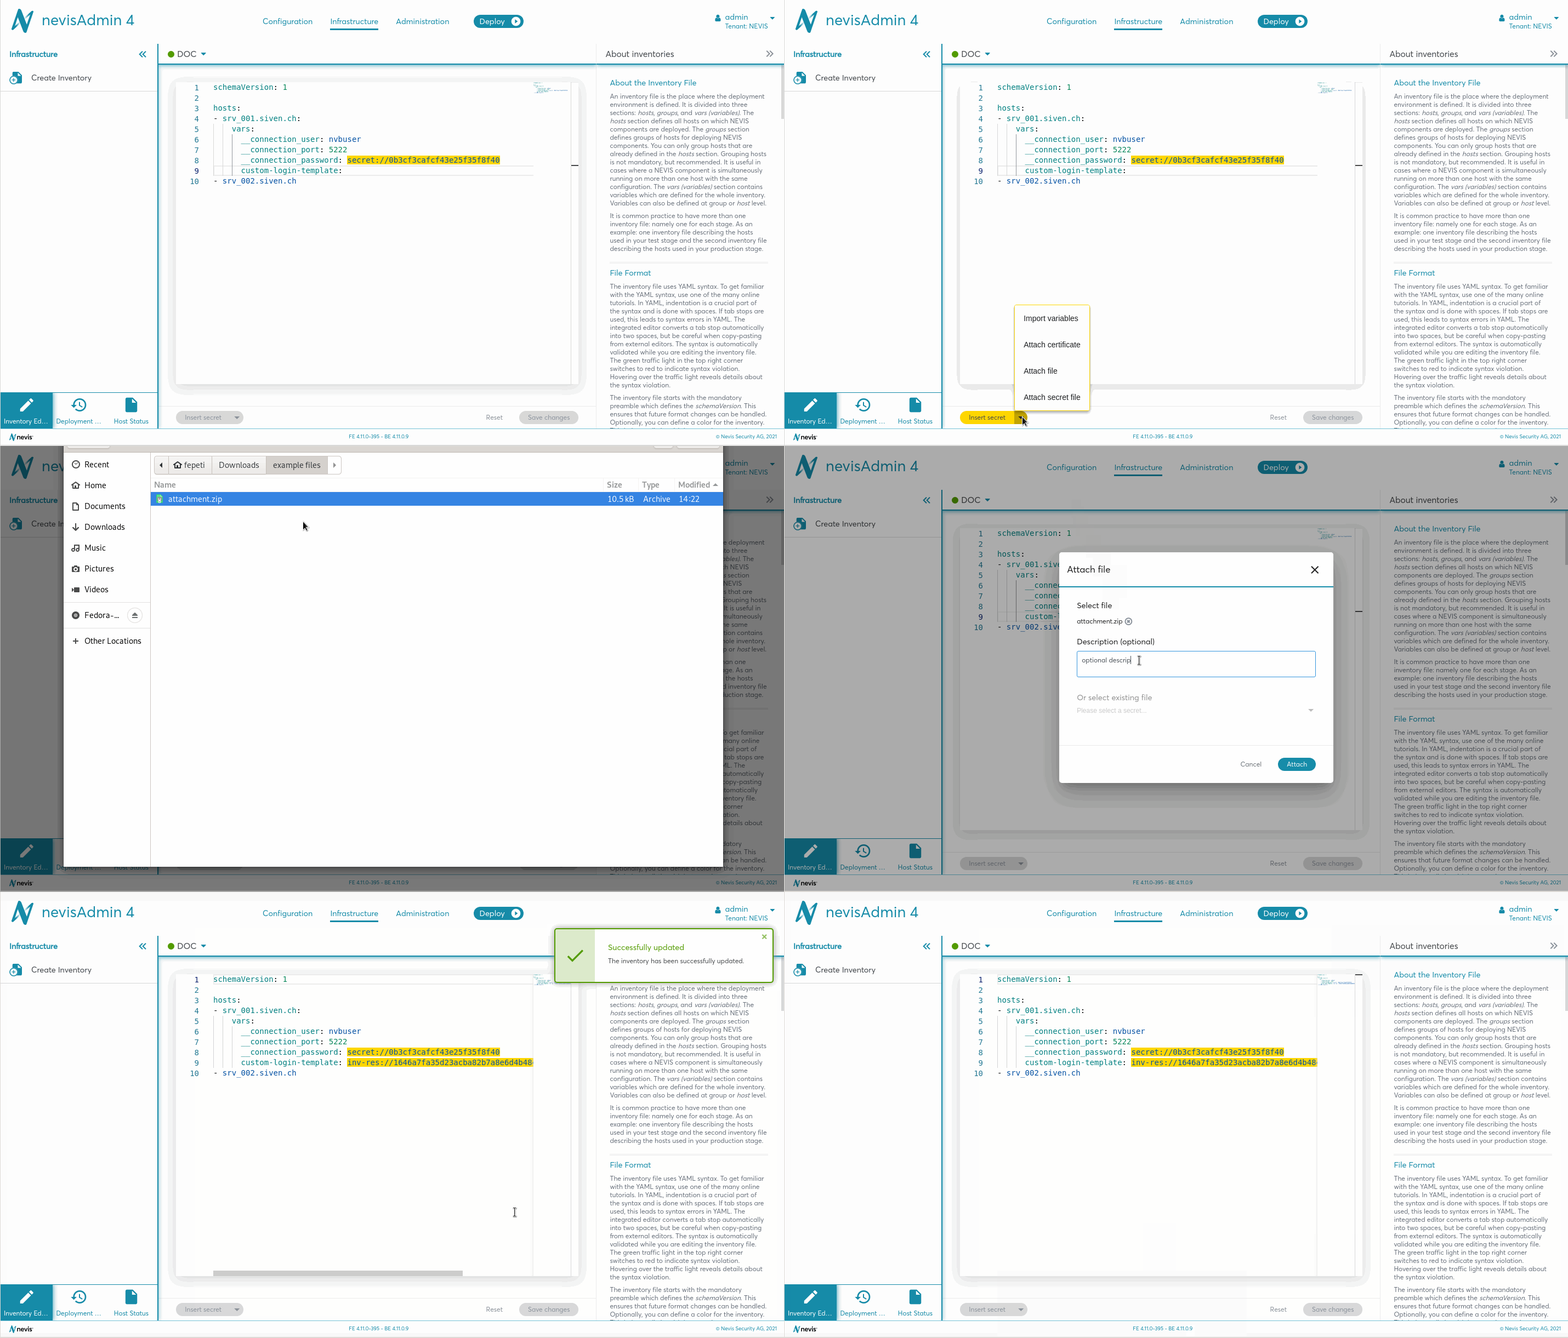
To add a file attachment directly to an inventory, perform the next steps:
- Open the inventory file to which you want to add the attachment.
- Enter the variable name in the respective vars block.
- Place you cursor right after the relevant variable name.
- Click the triangle arrow icon on the Insert secret button in the lower left corner of the inventory file.
- Select Attach file from the drop-down menu.
- The Attach file dialog opens.
- Click Select file and select the file you want to add to the inventory.
- Add a description, if needed. The description will be visible in the Secret & Files screen and in the Inventory Editor when hovering over the inserted file.
- Click Attachto add the selected attachment.
- Click Save changes in the lower right corner of the inventory file.
The following movie demonstrates the steps you need to perform. As an example, a file is inserted for the custom-login-template variable.
Using an existing global file
There are several ways to use an existing global file. Both are explained below:
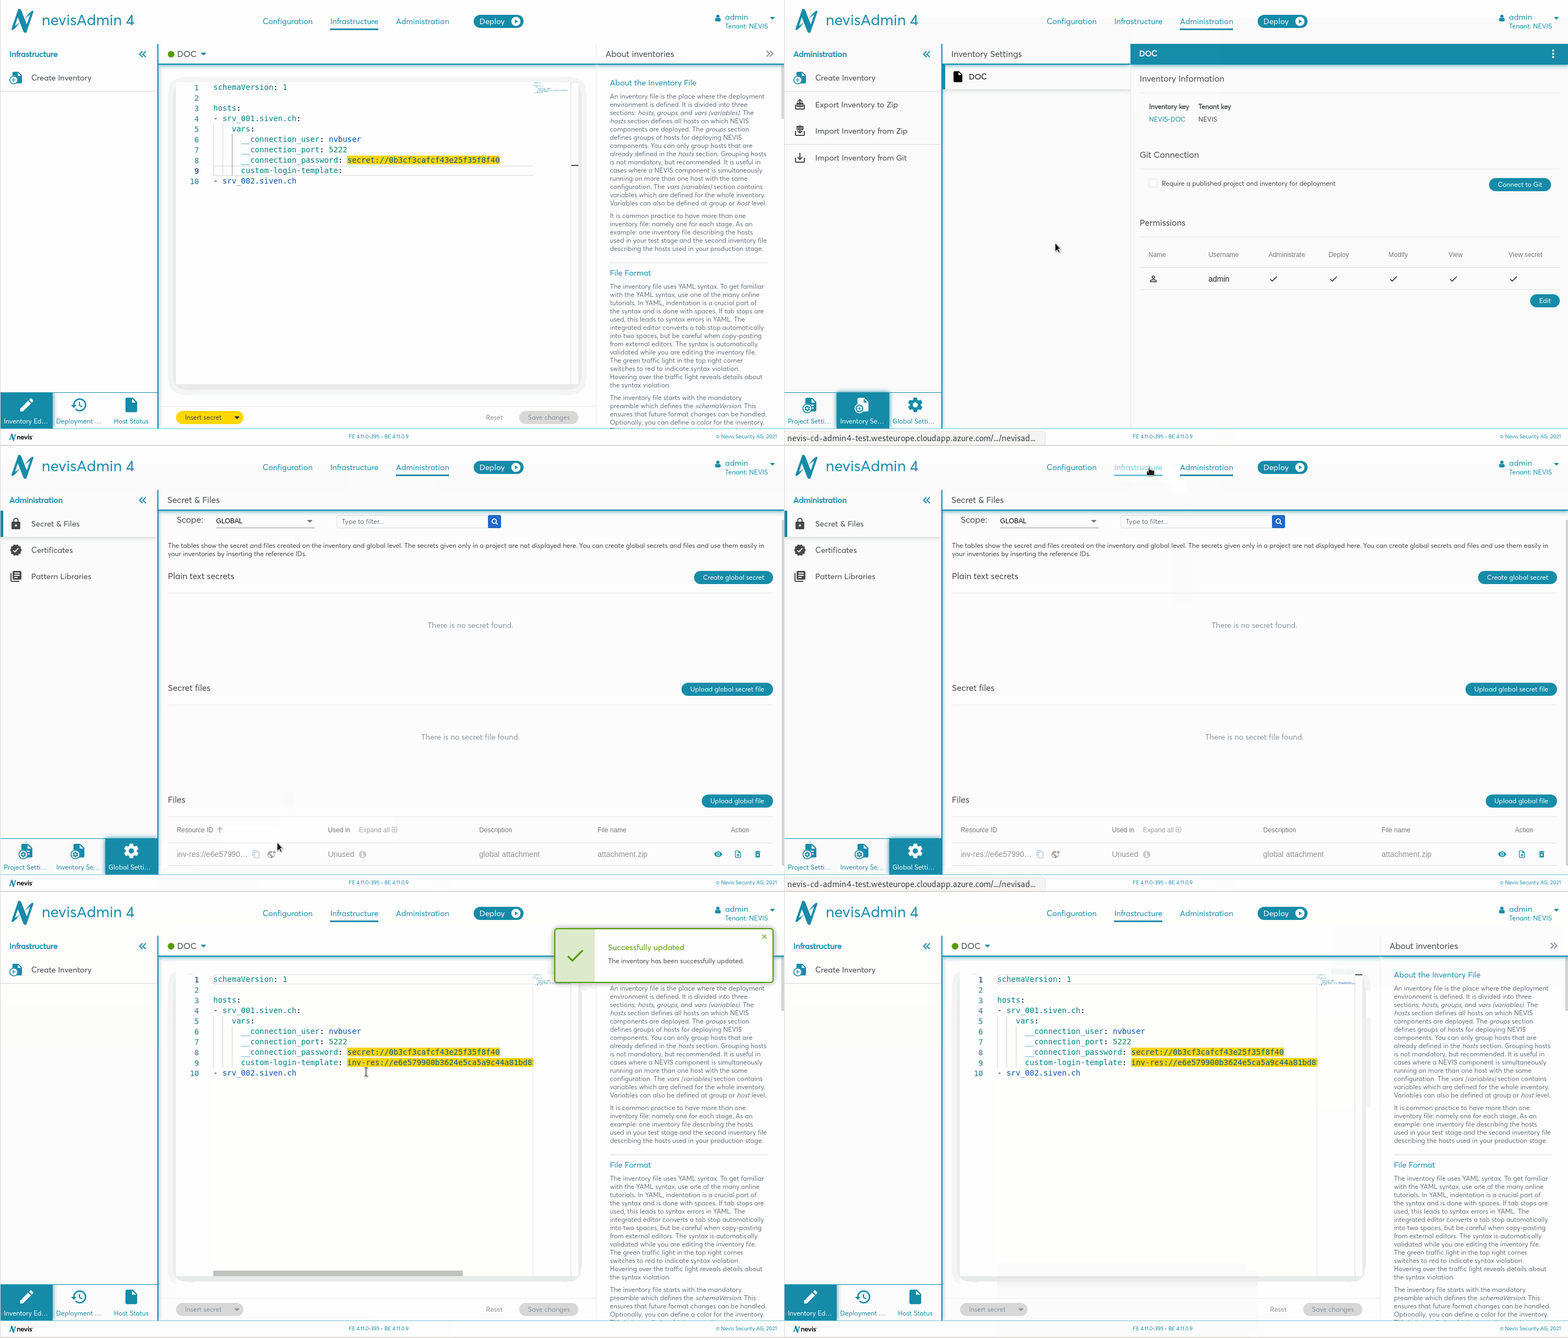
By manually copy-pasting the reference ID into the inventory. For this, perform the following steps:
- Visit the Secret & Files screen and find your file there.
- Copy the reference ID (secret resource ID / resource ID).
- Click inside the inventory file in the Inventory Editor.
- Paste the reference ID to the variable as a value (to custom-login-template. in our example).
- Click on Save changes in the lower right corner of the inventory file.
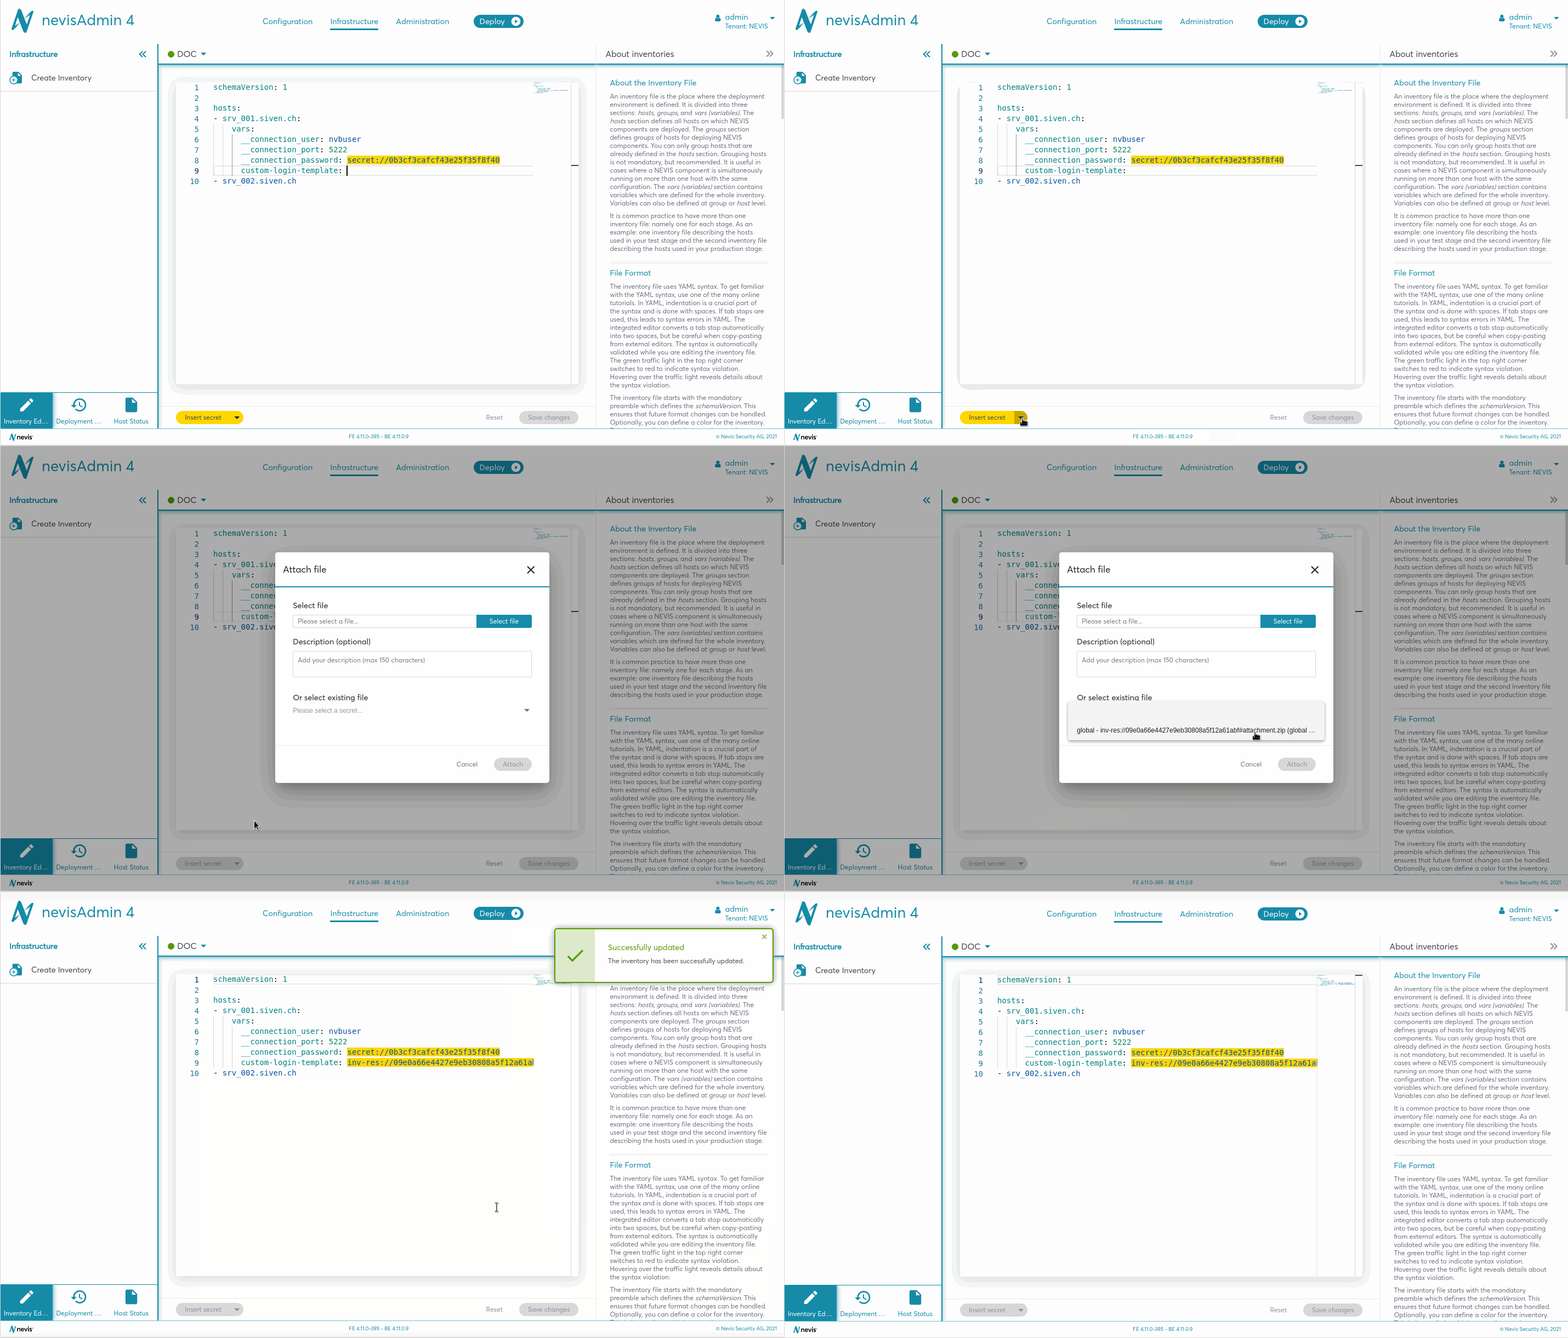
By selecting the global file from the list. For this, perform the following steps:
- Click inside the inventory file in the Inventory Editor.
- Put you cursor right after the variable name inside a vars block, for example after custom-login-template**.
- Click on the triangle arrow icon on the Insert secret button. Select Attach file from the drop-down menu.
- The Attach filedialog opens.
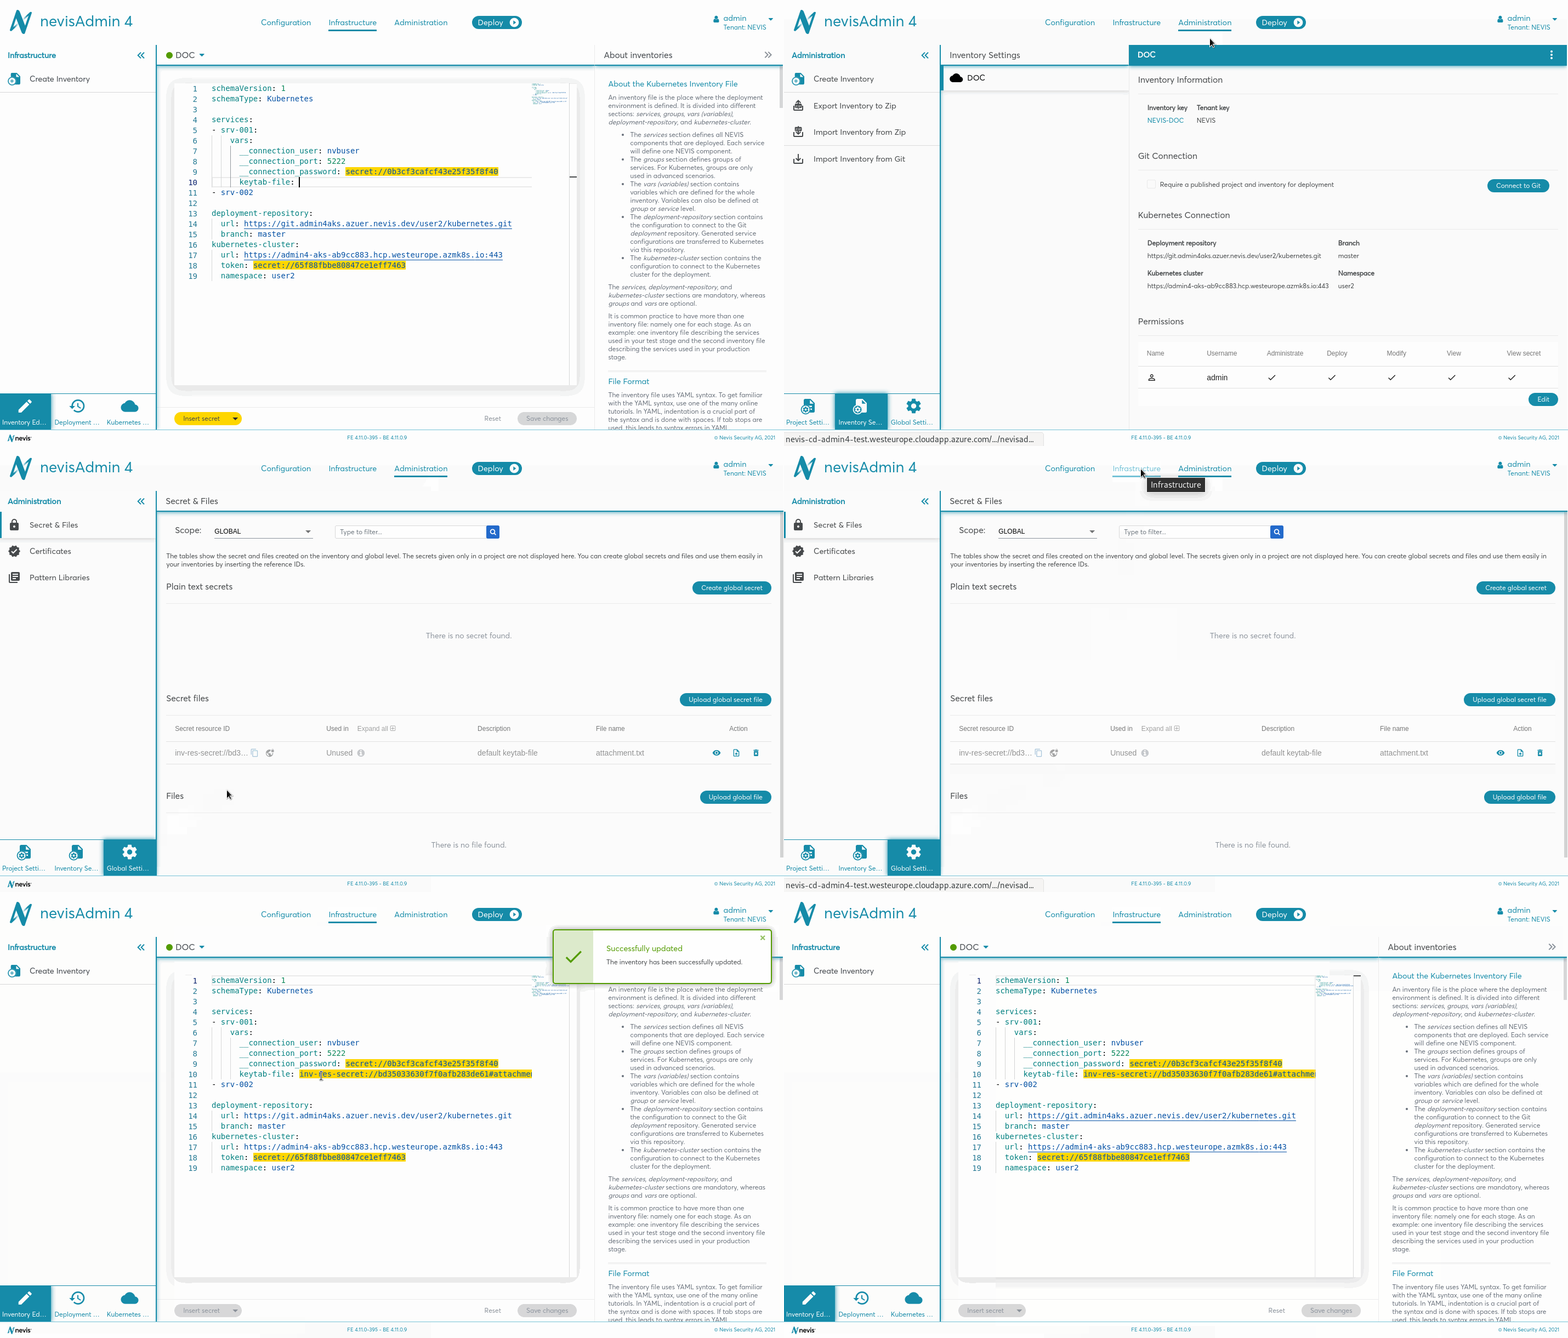
- Select the global file from the drop-down. Note that you can re-use a file that is removed from the inventory, as long as it is not removed from the Secret & Files screen.
- Click Attachto add the file to the inventory.
- Click on Save changes in the lower right corner of the inventory file.
The following movies demonstrate the steps you need to perform. As an example, a file is inserted for the custom-login-template variable.
Selecting an existing inventory level file
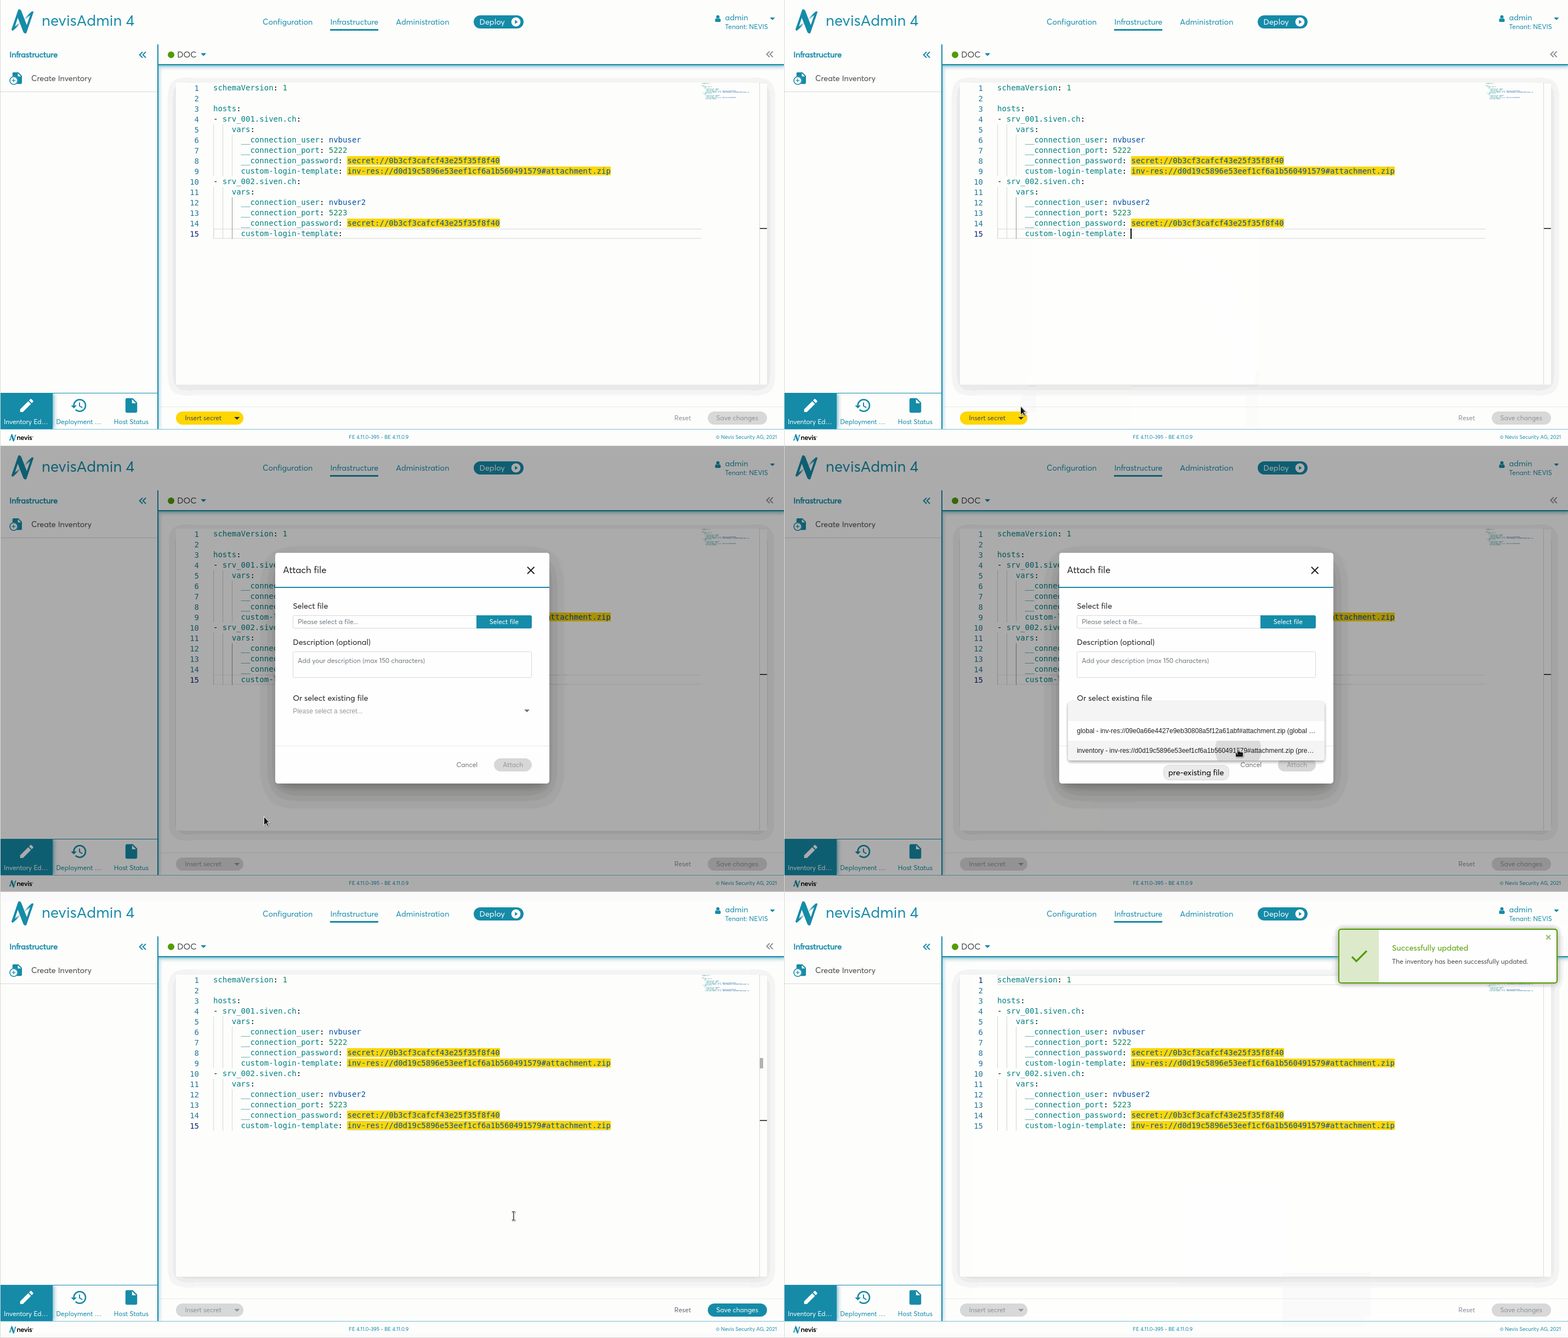
To select an existing inventory level file, perform the following steps:
- Click inside the inventory file in the Inventory Editor.
- Put you cursor right after the variable name inside a vars block, for example after custom-login-template**.
- Click on the triangle arrow icon on the Insert secret button. Select Attach file from the drop-down menu.
- The Attach filedialog opens.
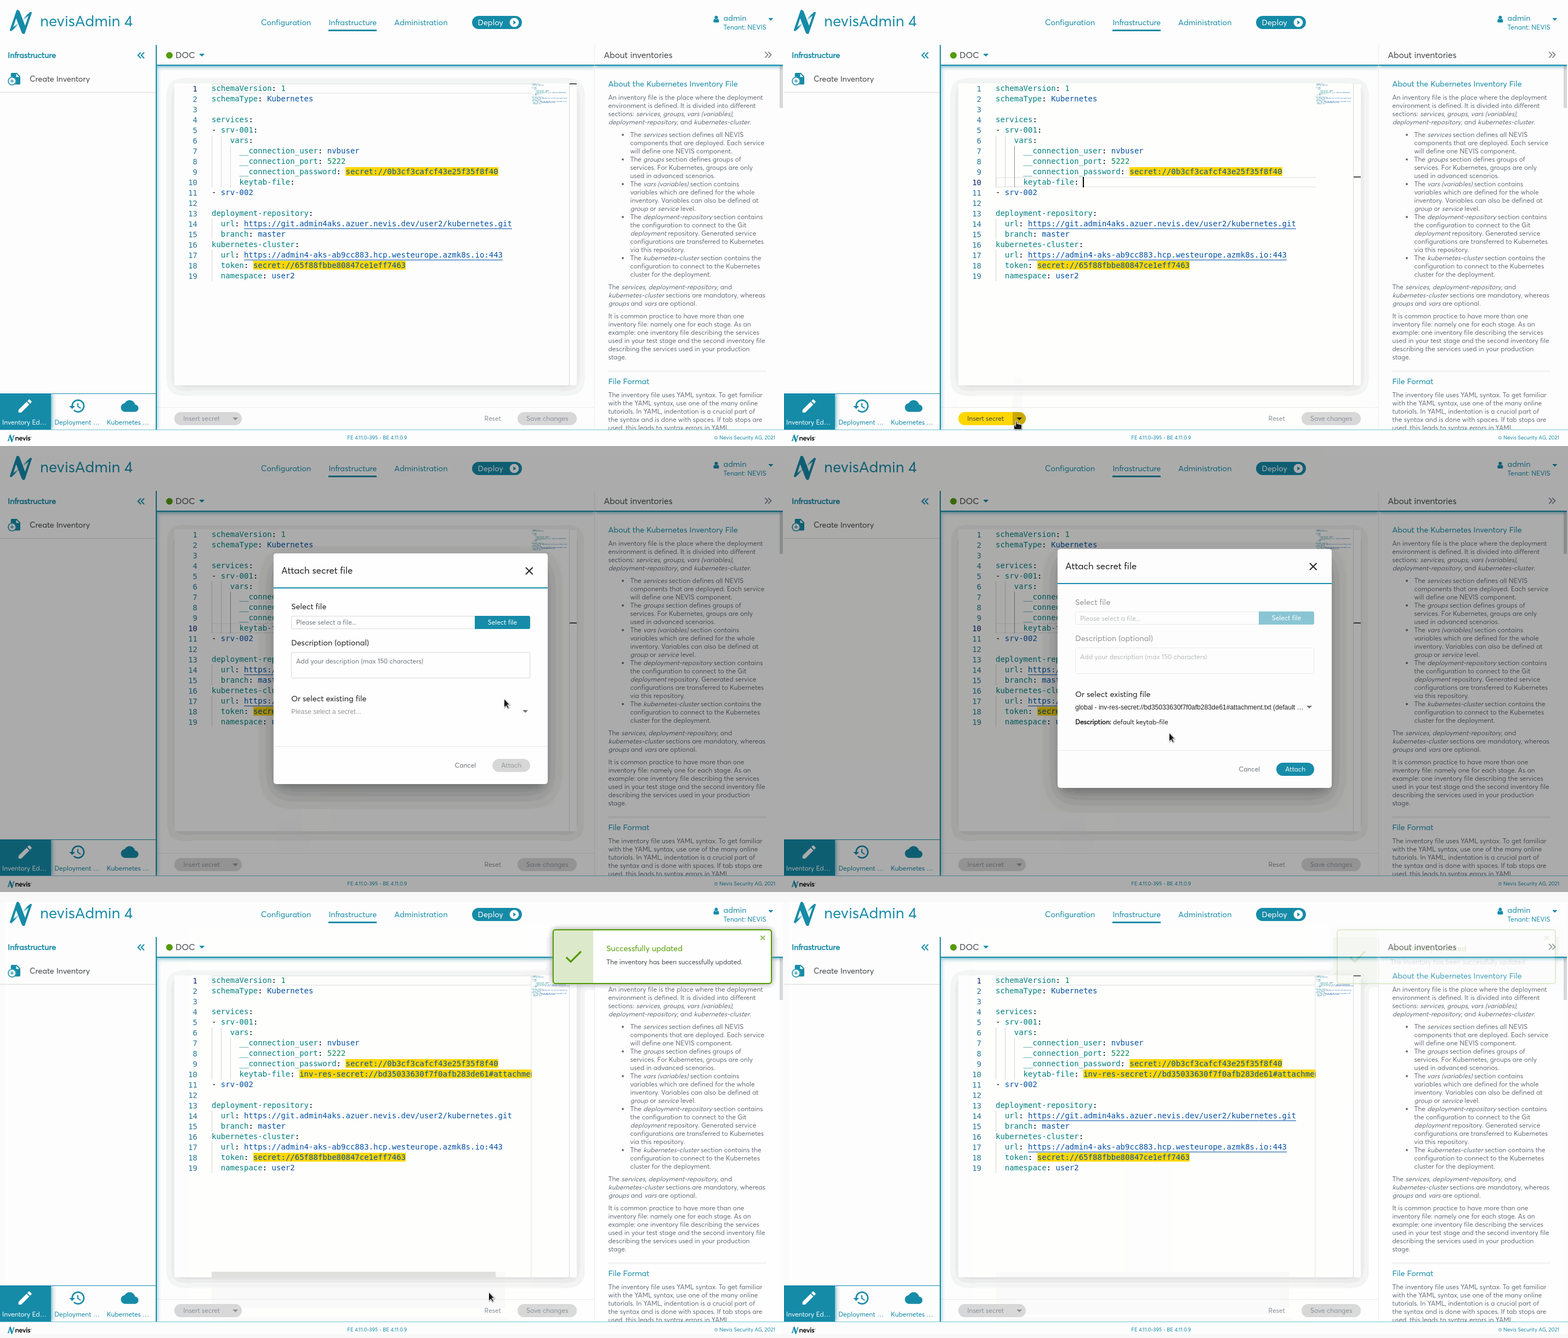
- Select the file from the dropdown. Note that you can re-use a file that is removed from the inventory, as long as it is not removed from the Secret & Files screen.
- Click Attachto add the file to the inventory.
- Click on Save changes in the lower right corner of the inventory file.
The following movie demonstrates the steps you need to perform. As an example, a file is inserted for the custom-login-template variable.
Scope of Files
Files are only resolvable in the inventory they were created in. Copying a file referenceID from one inventory to another will not make the file's value available in the other inventory. Similarly, branching an inventory manually in your Git system and importing it will result in an inventory with unresolvable files.
It is possible to extend the scope of a file from inventory to global level. On the Secret & Files page under the Resources tab, you extend the inventory level items with the Extend scope action button. It is applicable only for items that are not global scoped yet. The scope of the item will be changed to global. After the change, it can not be set back to inventory scope.
Attach Secret Files
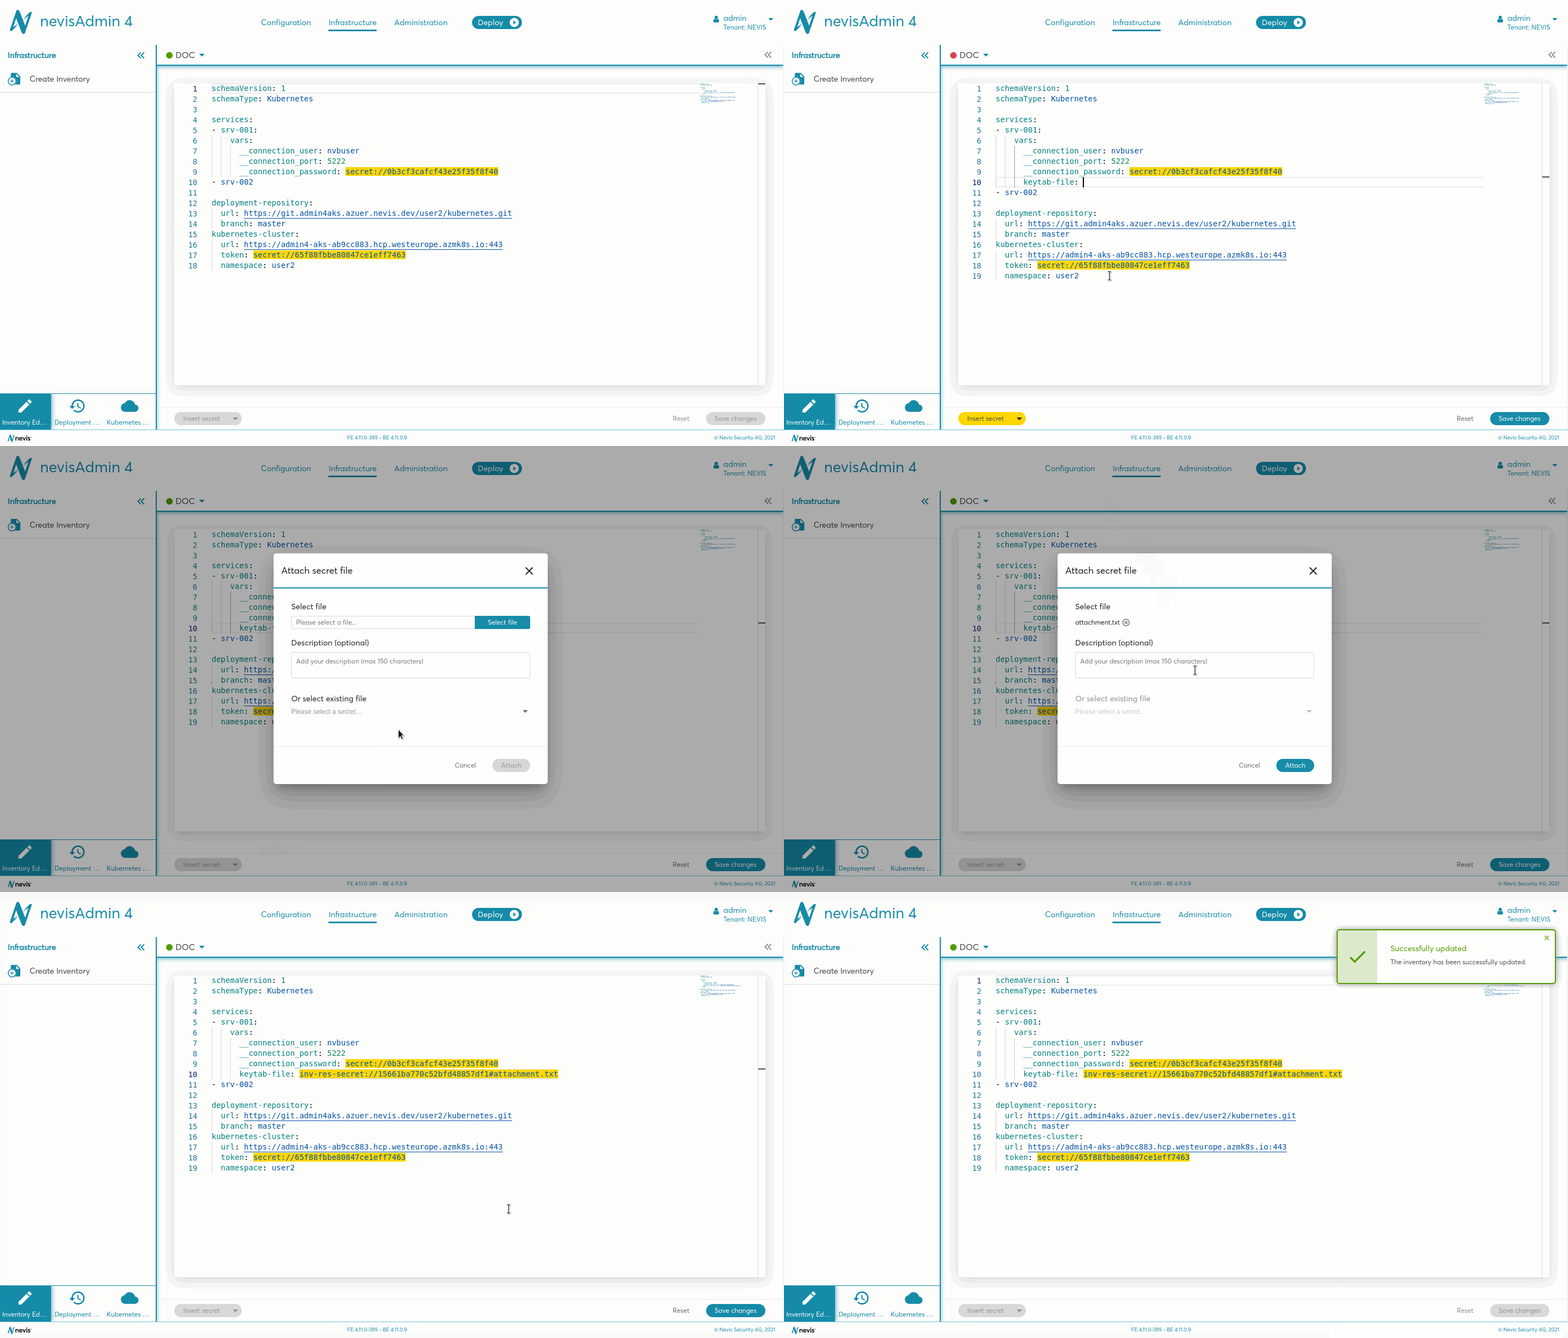
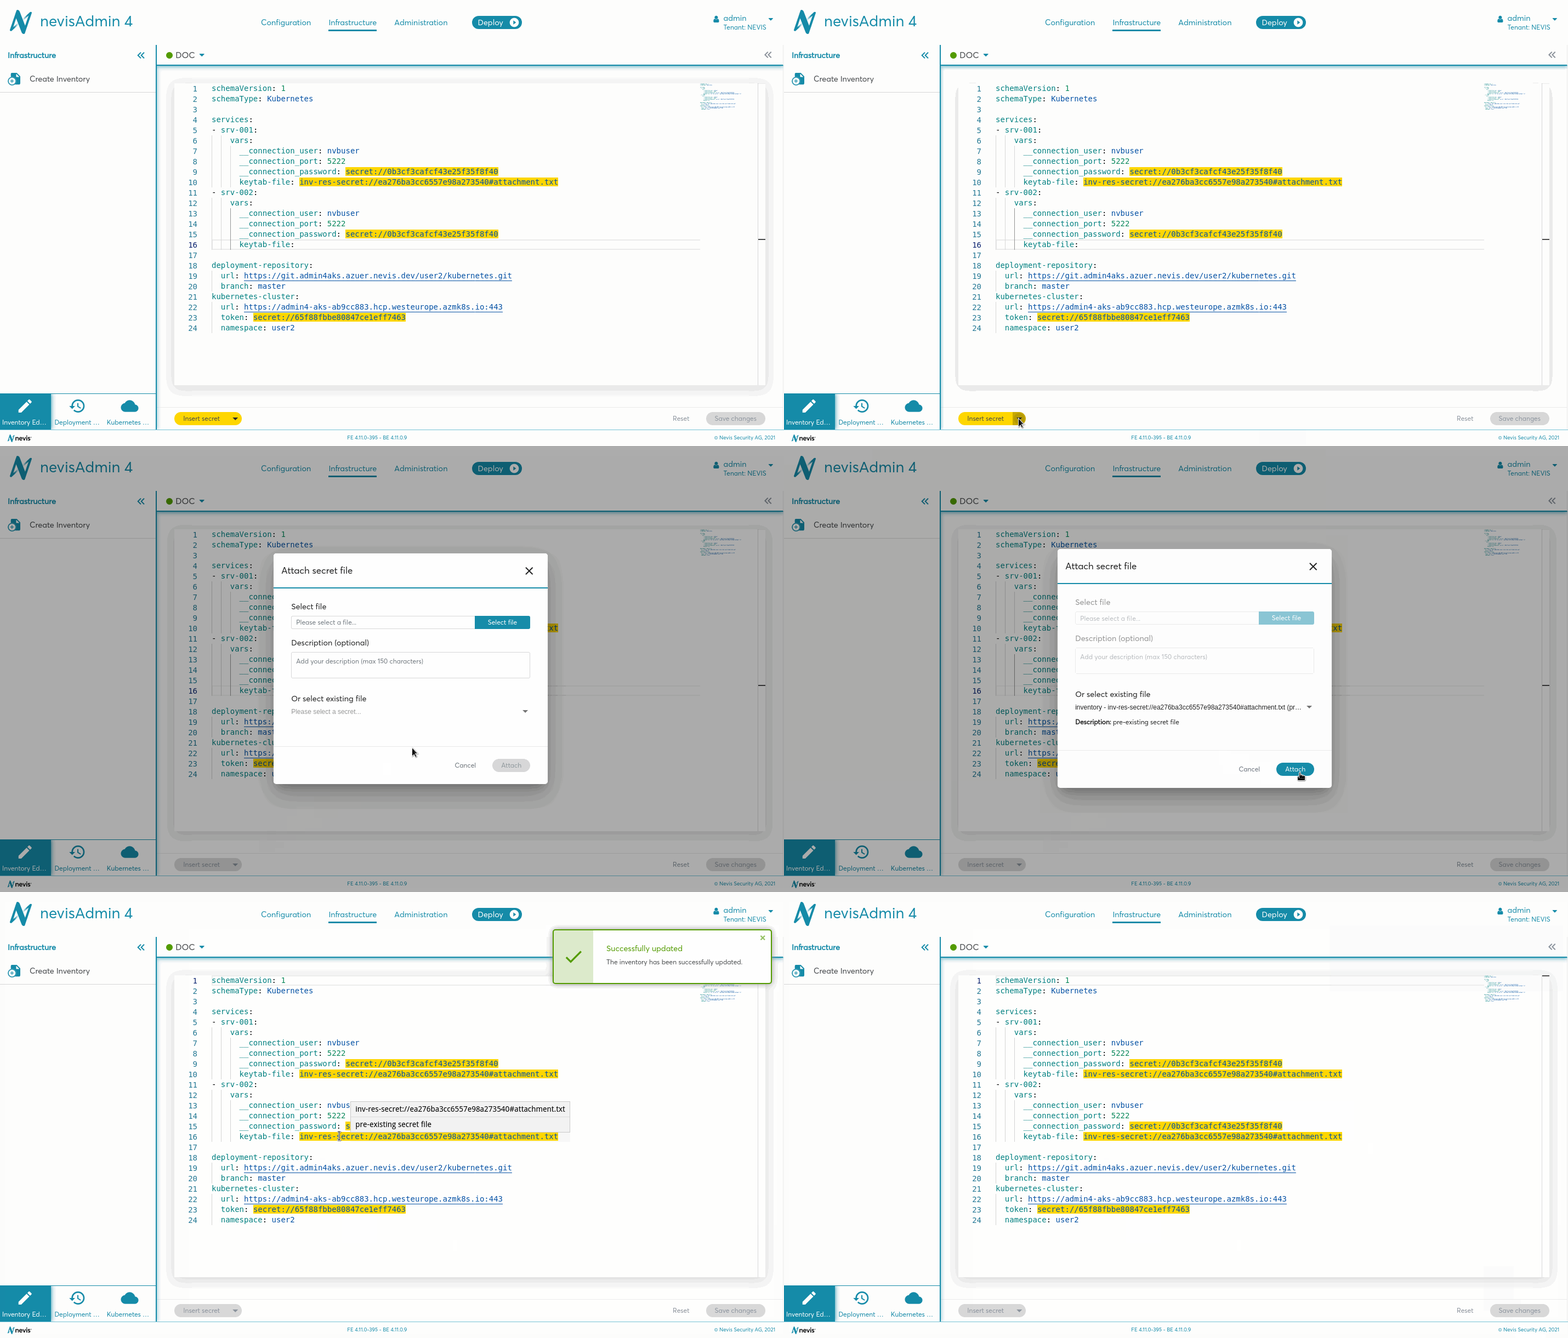
If you want to attach a secret file, perform the same steps as the ones required to attach a file, except that now you have to select the function Attach secret file (instead of Attach file) from the drop-down menu. To upload a global secret file, you use the function Upload global secret file in the screen Secret & Files. For more information, see chapter Secret & Files.
In order for the file to be secure not to be exposed in Git or a configuration file, the secret has to be used in a secret field and the file size has to be smaller than 1MB. For more information about the secret fields, see chapter Special Input Field Type: Secret fields.
The following movie demonstrates the steps you need to perform. As an example, a file is inserted for the keytab-file variable.
Deleting an Attachment
If you no longer need to use a specific attachment, simply delete the reference to the attachment in the inventory file.
Attachments that are removed from an inventory file can still be selected and reused. If you want to delete a file permanently, open the Secret & Files screen and use the Deleteaction. For more information, see chapter Secret & Files.
Attach Kubernetes Secret Files
Secrets defined directly in Kubernetes, using the kubectl create secret command, can be referenced in inventories. To do so, use the format k8s-secret-file://<Kubernetes secret key>:<keymap key>/, where <Kubernetes secret key> is the name given to the Kubernetes secret, and <keymap key> is the key of the individual secret file stored in the Kubernetes secret. Do not forget to include the trailing / character at the end of the reference.
It is currently supported only for the secrets used in the secret fields (secret properties), see more on secret fields at chapter Special Input Field Type: Secret fields.
Secrets referenced this way will be searched for and replaced during deployment, but they will not be exposed during the deployment preview, or upon publishing to Git.
The creation of the Kubernetes secrets can also be automated by using Vault Secrets Operator, this way the secrets will be managed by HashiCorp Vault.

Removing a Kubernetes Secret
Removing a Kubernetes secret reference from the inventory will not delete the secret from the cluster. This has to be done manually using the kubectl delete secret command.
How Secrets Work
If you want to understand how secrets work in more detail, see:Encryption and Storage of Secrets