Working with Patterns
Patterns are the building blocks of a nevisAdmin 4 project. After adding patterns to your project, you can "personalize" your patterns by editing their fields on the Patterns screen.
The Patterns screen with the Pattern input fields appears automatically when you add a pattern by clicking on the Add pattern button.
Patterns Screen Overview
The following figure shows the Patterns screen, displaying the fields of the selected pattern in the middle part of the screen. By editing the fields, you define the settings of the pattern.

These are important screen parts:
- The Patterns List ("A" in the previous figure): The Patterns List on the left side of the screen contains all patterns within a project.
- The Pattern Editor ("B" in the figure): You can edit the fields of the selected pattern in the Pattern Editor in the middle of the screen. For more information on editing pattern fields, see Editing Pattern Fields.
- The Usage & Help part on the right side of the screen ("C" in the figure): Some patterns are referenced and used by other patterns. The Usage section contains this kind of information. The Help section provides necessary information about the pattern in general and about each pattern field in detail.
- Project name (no. 1 in the figure): The name of the project whose patterns are listed in the Patterns List.
- Pattern name (no. 2): The pattern name refers to the name of the pattern instance, that is, this specific, personalized pattern containing your settings.
When you add a pattern instance to your project, it is called
New <pattern type name>by default. For example: "New Web Application", "New Hosting Service" or "New nevisProxy Instance". It is possible to change this default name. For more information, see Renaming a Pattern chapter. - Pattern type (no. 3): This name refers to the pattern type on which the pattern is based, for example "Web Application", "Hosting Service" or "nevisProxy Instance".
- Pattern category (no. 4): Refers to the category of this pattern. Patterns are classified into categories to help users find/filter related patterns or pattern types. For more information about filtering patterns by categories, see Navigating Patterns.
- Save and Reset buttons (no. 5): Action buttons to save or reset pattern modifications.
Renaming a Pattern
New patterns automatically get a dummy name based on their pattern type. However, it is recommended that you rename your patterns. The Rename function is immediately active after a pattern is added. It is also possible to rename a pattern later on.
The next movie shows how to rename a pattern:
Renaming instance patterns
You use instance patterns to add instances of Nevis products such as nevisProxy, nevisAuth and nevisIDM in designated directories on the target host. These instance directories are named after the corresponding instance pattern. The directory is created during the first deployment.
Follow the next steps to rename an instance pattern that is already deployed:
- Rename the pattern in the GUI.
- Rename (move) the instance directory and associated systemd files on the deployment host.
- Deploy.
If you omit step 2, then the behavior during deployment is as follows:
- Pattern < release 4.7.x: If the old instance is still up, deployment will fail because the ports are in use.
- Pattern >= release 4.7.x: The old instance is shut down during deployment.
For example, execute the following commands to move a nevisAuth instance:
systemctl stop nevisauth@<old-name>
systemctl disable nevisauth@<old-name>
mv /var/opt/nevisauth/<old-name> /var/opt/nevisauth/<new-name>
mv /etc/systemd/system/nevisauth@<old-name>.service /etc/systemd/system/nevisauth@<new-name>.service
<new-name> is the new sanitized pattern name and <old-name> is the old sanitized name. Sanitized means that spaces and other special characters are replaced by underscore.
Removing a Pattern
For removing patterns see the Removing Patterns chapter.
Standard, Custom and Experimental Patterns
The nevisAdmin 4 patterns are either standard, customized, or still in the experimental phase. This distinction is visual in the header of the Pattern editor pane:

- Standard patterns are part of the Nevis Standard Pattern Library. They have been tested for Nevis compatibility.
- Custom patterns are patterns that were not developed by the nevisAdmin team. They have not been tested by Nevis.
- An experimental pattern is not yet part of the standard library. It may change considerably before it is standardized.
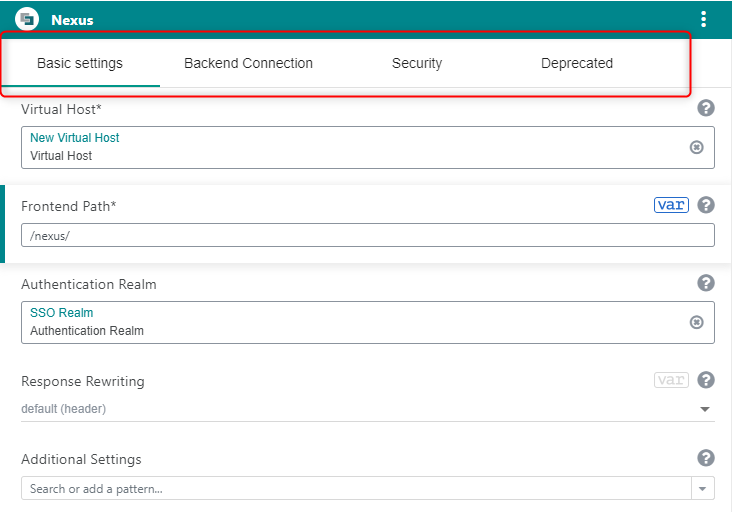
Pattern Categories
The properties of a pattern are grouped in categories.
Each property belongs to exactly one category and is shown only in the corresponding category tab. The Help section always shows the whole list of properties, no matter the selected category.