Integrating HubSpot
You can integrate your existing HubSpot instance with Identity Cloud to provide authentication for your customers to your content. In addition, you can synchronize account information and permissions between Identity Cloud users and your HubSpot contacts.
Prerequisites
You need a CMS Hub Enterprise, Service Hub Professional, or Service Hub Enterprise account to integrate HubSpot with Identity Cloud.
You need a HubSpot-hosted domain with content such as HubSpot blogs, landing pages, website pages, or knowledge base articles.
For more information, see Set up single sign-on (SSO) to access private content.
Single sign-on (SSO) for private content
Set up SSO
To set up SSO with Identity Cloud for a HubSpot-hosted domain, perform the following steps:
- In the Identity Cloud management console, go to Integrations.
- In the list of available integrations find HubSpot and click + Install.
- Click Continue.
- In a separate tab, log in to your HubSpot account and click the settings icon on the top right of the main navigation bar.
- In the left sidebar menu, navigate to Tools > Website > Private Content.
- At the top of the page, click the Choose a domain to edit dropdown menu and select a domain.
- In the Single sign-on (SSO) section, click Set up SSO.
- In the right panel Single sign-on (SSO) settings, click the Security token format dropdown menu and select SAML.
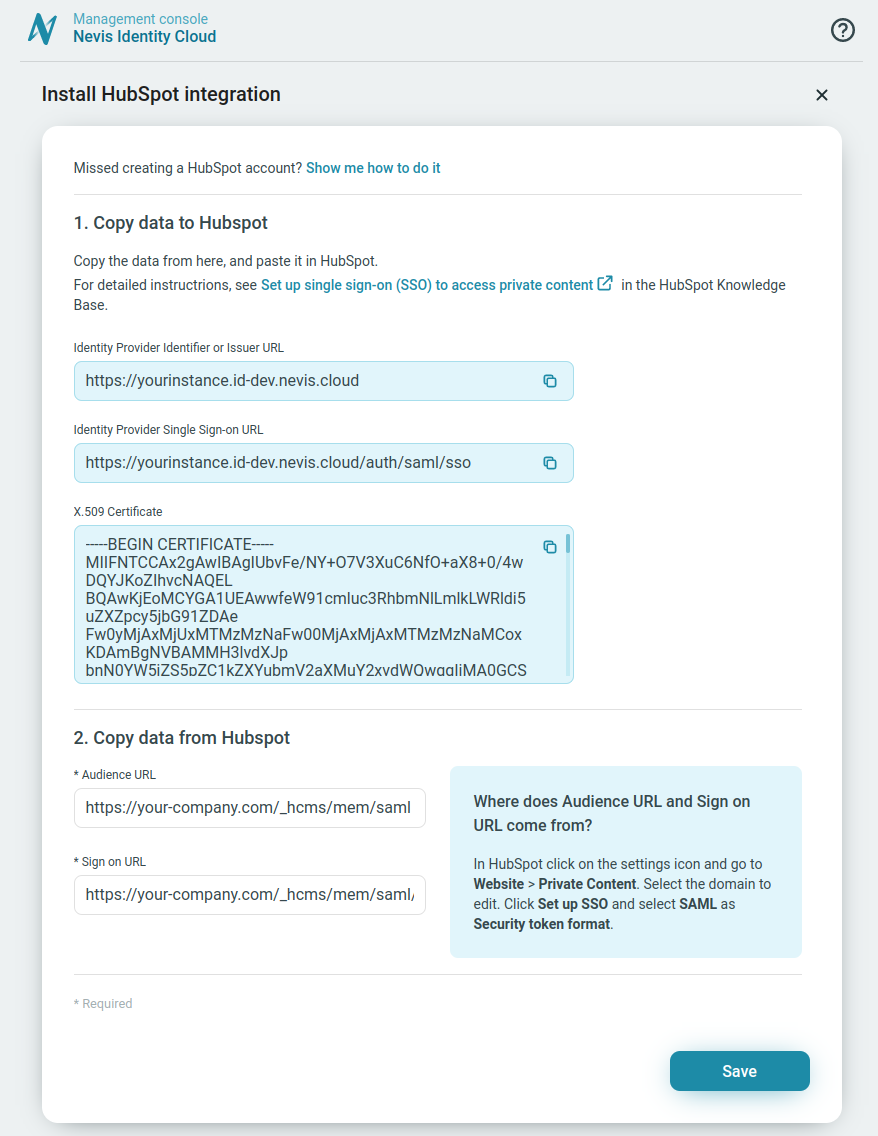
- In the right panel Single sign-on (SSO) settings, copy the Audience URL and Sign on URL and paste it in Identity Cloud into the corresponding fields.
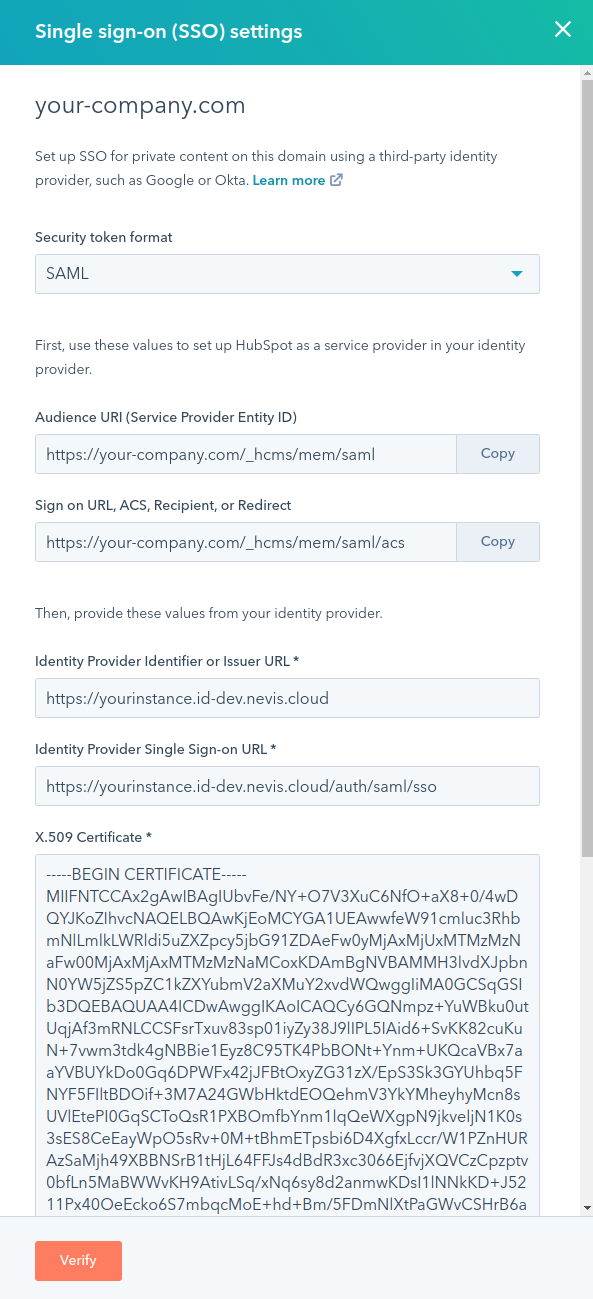
- In Identity Cloud, copy the Identity Provider Identifier or Issuer URL, Identity Provider Single Sign-on URL, and X.509 Certificate and paste it in the HubSpot Single sign-on (SSO) settings panel into the corresponding fields.
- In Identity Cloud, click Save and wait until your changes are published.
- In the HubSpot Single sign-on (SSO) settings panel, click Verify.
- Register a new test user, or use any existing test user to log in and complete the verification.
Require SSO for private content
To configure your private content to require SSO, perform the following steps in your HubSpot account:
- Navigate to your content: HubSpot blogs, landing pages, website pages, or knowledge base articles.
- Navigate to the Settings.
- Under Control audience access, choose either Private - Single sign-on required or Private - Single sign-on required with list filtering.
- Click Save.
For more information, see Set up single sign-on (SSO) to access private content.
Contact synchronization
Configure the HubSpot integration to synchronize your Identity Cloud users with your HubSpot instance such that your HubSpot contacts are always up-to-date. The synchronization is triggered upon signup and login of your users to Identity Cloud.
The following is synchronized between Identity Cloud and your HubSpot instance if you enable Contact synchronization:
When a user signs up for Identity Cloud,
- a HubSpot contact is created, if one does not already exist, with the user email address.
- the HubSpot contacts lifecycle stage is initialized with a predefined value. You can configure the initial value with the Lifecycle stage property initial value option.
When a user signs up or logs in to Identity Cloud,
- the First name and the Last name of the user in Identity Cloud are synchronized to the HubSpot contact if not yet set.
- the first name and the last name of the HubSpot contact are synchronized to the Identity Cloud user if not yet set.
To configure contact synchronization, you need to create a HubSpot access token and set up contact synchronization.
Create access token
Create an access token as a prerequisite to set up contact data synchronization:
- Log in to your HubSpot account and click the settings icon on the top right of the main navigation bar.
- In the left sidebar menu, navigate to Account Setup > Integrations > Private Apps.
- Click Create a private app.
- On the Basic info tab, enter your app name. Optionally, you can add a Logo and a Description.
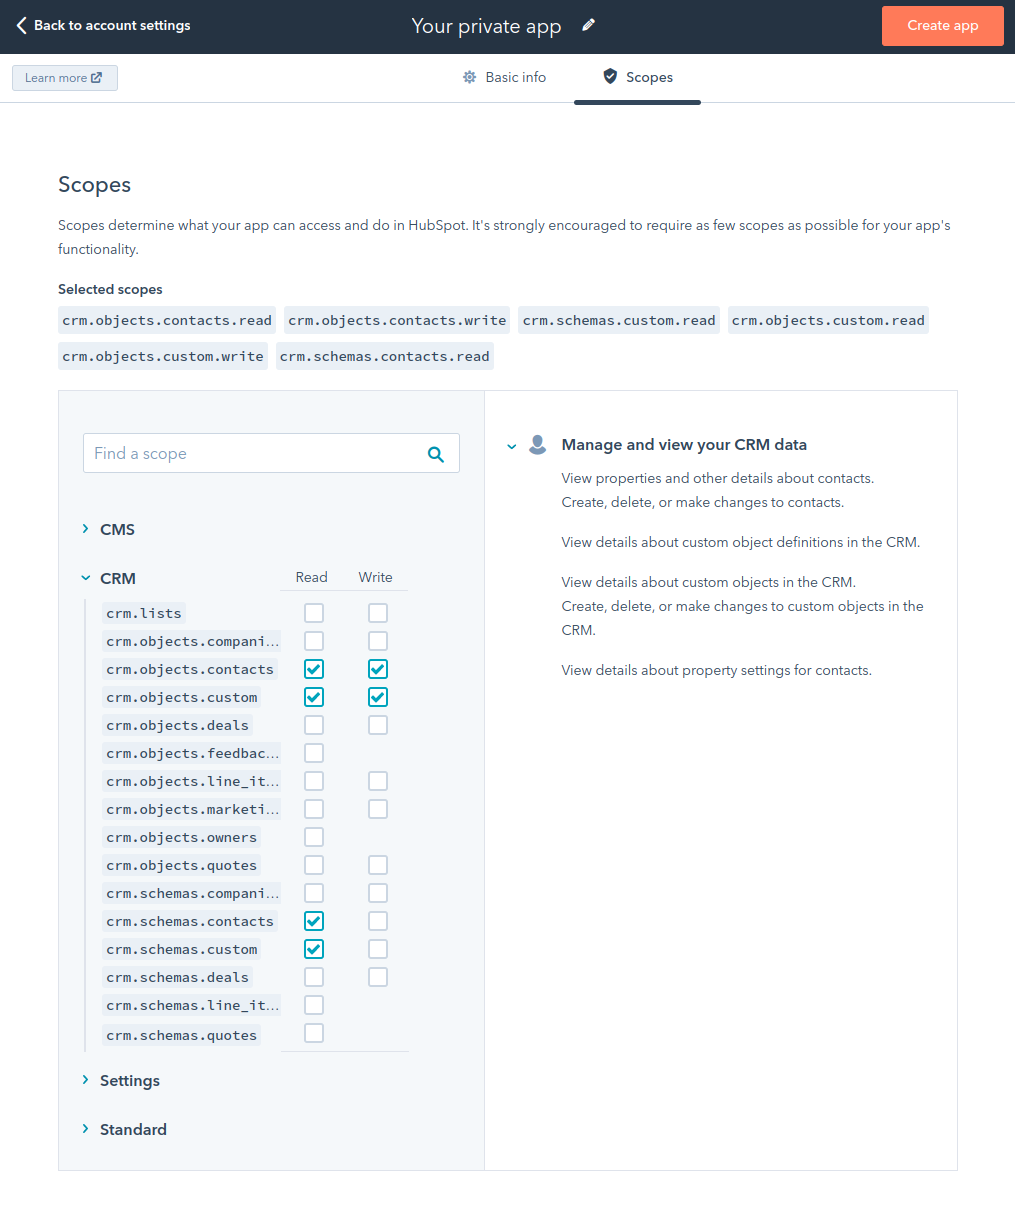
- Click the Scopes tab.
- Under CRM select the checkboxes for the following scopes
crm.objects.contacts: Read and Writecrm.objects.custom: Read and Writecrm.schemas.contacts: Readcrm.schemas.custom: Read
- Click Create app in the top right.
- In the dialog, read the information about your access token, and then click Continue creating.
- In the dialog, click Show token and then Copy to add the access token to your clipboard for later use.
For more information, see Private Apps.
Set up contact synchronization
To set up contact synchronization, perform the following steps:
- In the Identity Cloud management console, go to Integrations.
- In the list of installed integrations click the HubSpot tile.
- Click the tab Contact synchronization.
- Enable Contact synchronization.
- Get your HubSpot access token.
- In your HubSpot account, click on the settings icon on the top right of the main navigation bar.
- In the left sidebar menu, navigate to Account Setup > Private Apps.
- Find your private app in the list, and click View access token, then click Copy to add the access token to your clipboard.
- In Identity Cloud, paste your HubSpot Access token in the corresponding field.
- Optionally, select the Lifecycle stage property initial value.
- Click Save.

Synchronize contact permissions
You can configure the HubSpot integration to synchronize HubSpot-related permissions of Identity Cloud users to a predefined HubSpot contact property such that you can create active contact lists.
You can configure one or more permissions for the HubSpot integration in Identity Cloud. The permissions of the HubSpot integration work conceptually the same as permissions of applications, see the permission concept
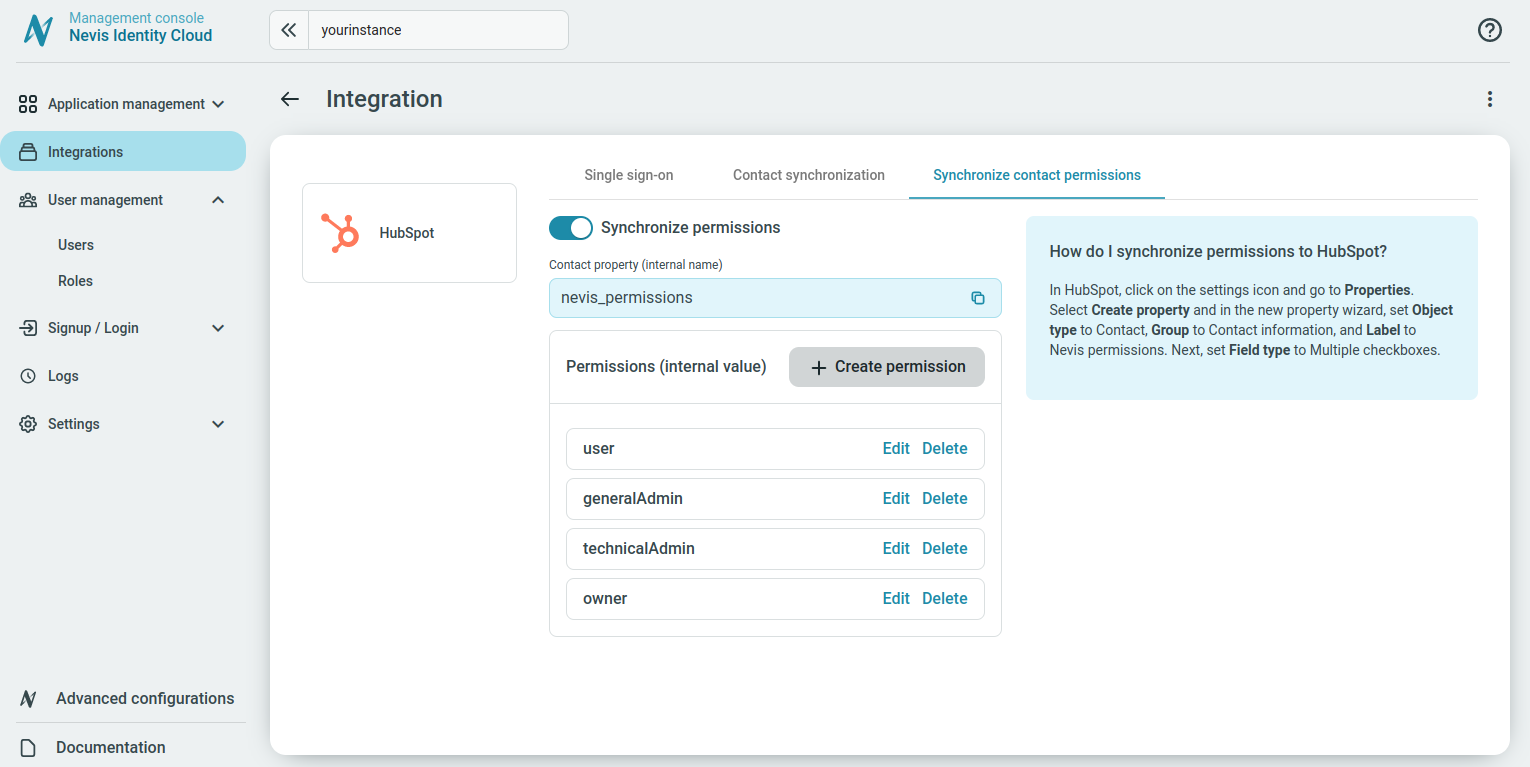
When a user logs in to Identity Cloud, all HubSpot permissions that are assigned to the user over roles are synchronized to the predefined HubSpot contact property with the name nevis_permissions. Based on this contact property, you can create active HubSpot contact lists in a dynamic way. For more information, see Create and use lists.
The name of a permission of the HubSpot integration defined in Identity Cloud needs to match the Internal value of the option added to the multiple checkbox contact property nevis_permissions in your HubSpot instance.
To configure contact permissions synchronization, set up contact permissions and create the HubSpot contact permission property.
Set up contact permissions
To enable contact permission synchronization, do the following:
- In the Identity Cloud management console, go to Integrations.
- In the list of installed integrations click the HubSpot tile.
- Click the tab Synchronize contact permissions.
- Enable Synchronize permissions.
Create the HubSpot contact permission property nevis_permissions in your HubSpot instance for the contact permission synchronization to work.
You can configure HubSpot permissions in the same way as application permissions.
To create a permission for HubSpot, do the following:
- Click Create permission.
- Provide a valid Name and optionally provide a Description to identify the permission. The name can contain alphanumeric characters and underscore only. The length of the Name is at most 30 characters.
- Click Create.
To edit a permission of HubSpot:
- Select a permission and click Edit.
- In the dialog, adapt the Name and the Description.
- Click Save.
To delete a permission of HubSpot, do the following:
- Select a permission and click Delete.
- In the dialog, confirm that you want to delete the permission.
- Click Delete permission.
Create HubSpot contact permission property
Create a multiple checkbox property with the name nevis_permissions where the Identity Cloud permissions of the HubSpot integration are synchronized to:
- Log in to your HubSpot account, and click the settings icon on the top right of the main navigation bar.
- In the left sidebar menu, navigate to Data Management > Properties.
- Click the Select an object dropdown menu, and select Contact properties.
- Click Create property.
- In the right panel, Create a new property,
- Click the Object type dropdown menu and select Contact.
- Click the Group dropdown menu and select Contact information.
- In the Label field, enter
nevis_permissions.
- Click Next.
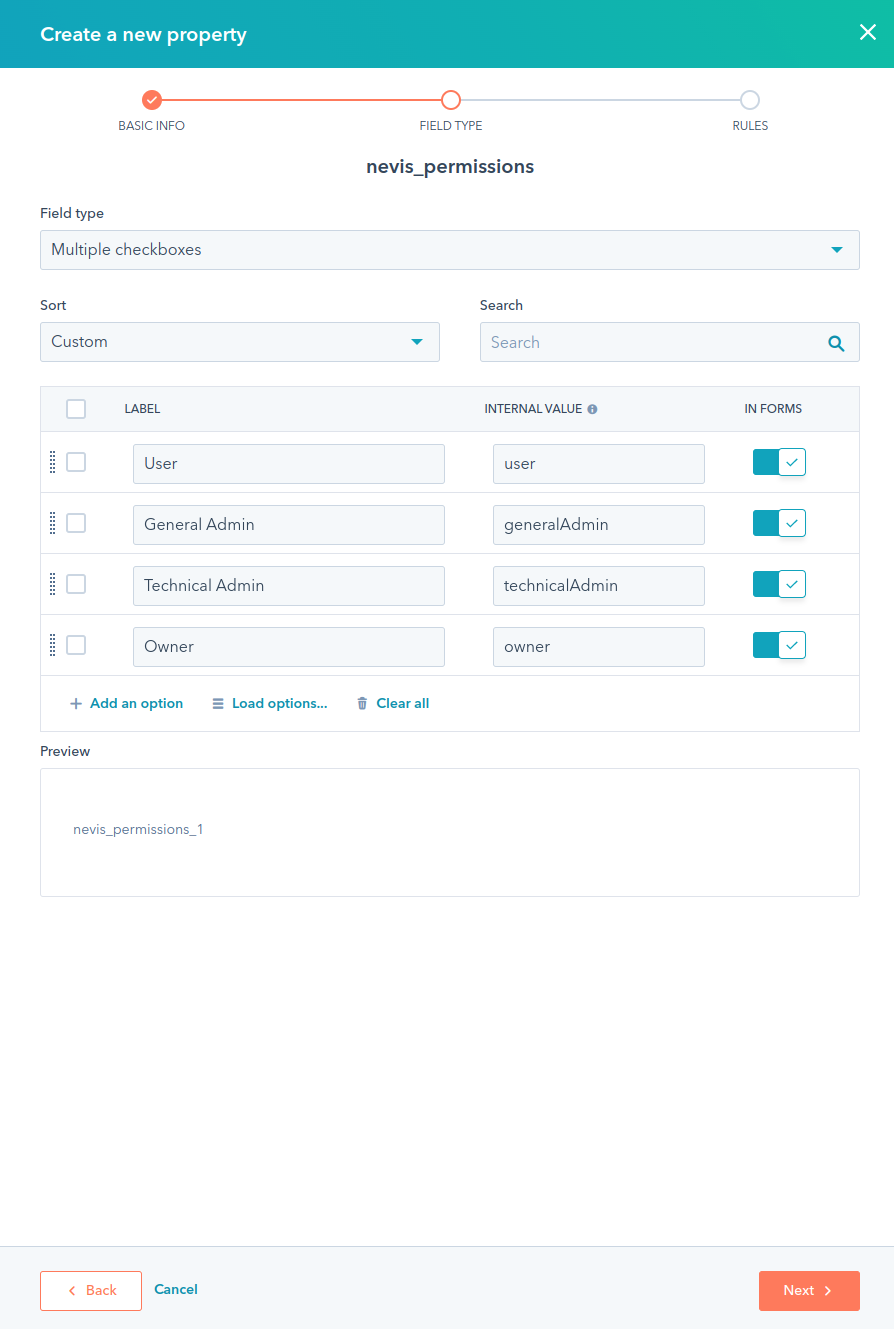
- Click the Field type dropdown menu and select Multiple checkboxes.
- Add one or more options and provide for each a label and internal value. The internal value must exactly match the permission name configured for the HubSpot integration in Identity Cloud.
- Click Next, and then click Create.
For more information, see Create and edit properties.