Single-factor signup
Supported single-factor signup methods
Identity Cloud supports the following single-factor sign-up methods:
- Self-service signup methods
- Invite-initiated signup
Single-factor self-service signup methods
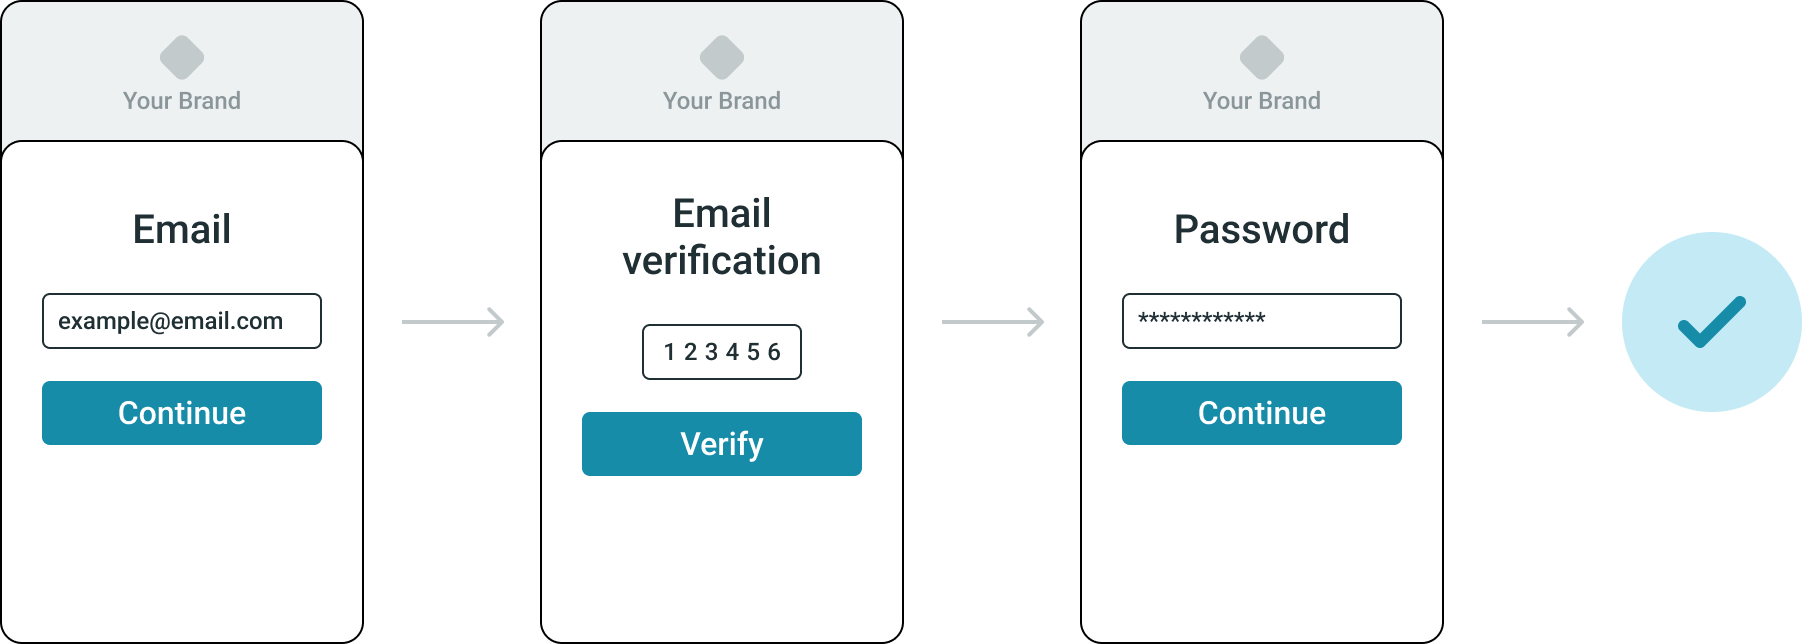
Signup with email
Signing up with an email and password is the default authentication method for user signup. This method is always active and cannot be disabled with single-factor authentication. For more information, see Password.
To sign up with an email:
- On the Login page, click Create account.
- Enter the preferred email address.
- Click Continue.
- Enter the verification code you received through email.
- Click Verify.
- If the verification code is correct, the Set password page opens.
- If the verification code is incorrect, you can enter it again, or you can get a new one by clicking get a new code.
- Enter a password.
- Click Continue.
- If the password does not meet the criteria, an error message is shown with details of the criteria to be met.
- If the password meets the criteria, the account is created, and the user is automatically logged into the application.
Signup with social accounts
Signup and login with social accounts can be treated as one flow. If the user does not yet have an account with Identity Cloud, the new user account is created after successful authentication with a social identity provider and successful email verification.
The difference between signup and login with social accounts is, that in the case of signup, a new user is created in the system. In the case of login, the user already exists.
If the user account with Identity Cloud already exists with an email and password, or with another social identity provider, registering a new social identity provider with matching email for login links it to the already existing user account in Identity Cloud after successful email verification.
To sign up with a social identity provider:
- On the Login page, select the icon with the logo of the social identity provider of choice. The login page of the social identity provider loads.
- Go through the authentication flow of that social identity provider.
- Enter the verification code you received through email.
- Click Verify.
During signup with social identity providers, the user may be prompted to allow Identity Cloud to use their information from the social identity provider. Denying access to the information terminates the signup flow.
After successful verification, the user account with the social identity provider is created and the user is logged into their account with your application.
Specifics of authentication steps and supported account types may vary by social identity provider. For example, only business Microsoft accounts may be used to signup and login through Identity Cloud.
Invite-initiated signup
Sign up with invitation
The administrator can invite users directly from the Management console using user invitations. An invitation link is sent to the user's email address. They can register an account using the link. For more information, see Invite users.
To sign up with an invitation:
- Locate the invitation email in the mailbox and click the link URL in it
- The Set your password for page opens with a prefilled email. Enter a password and click Continue.
- If the password does not meet the criteria, an error message is shown with details of the criteria to be met.
- If the password meets the criteria, the Terms and conditions page opens.
- Click Continue to accept the terms and conditions.
Afer completing sign up the user is automatically logged in and redirected to the Default return URL.